Page 213 of 572

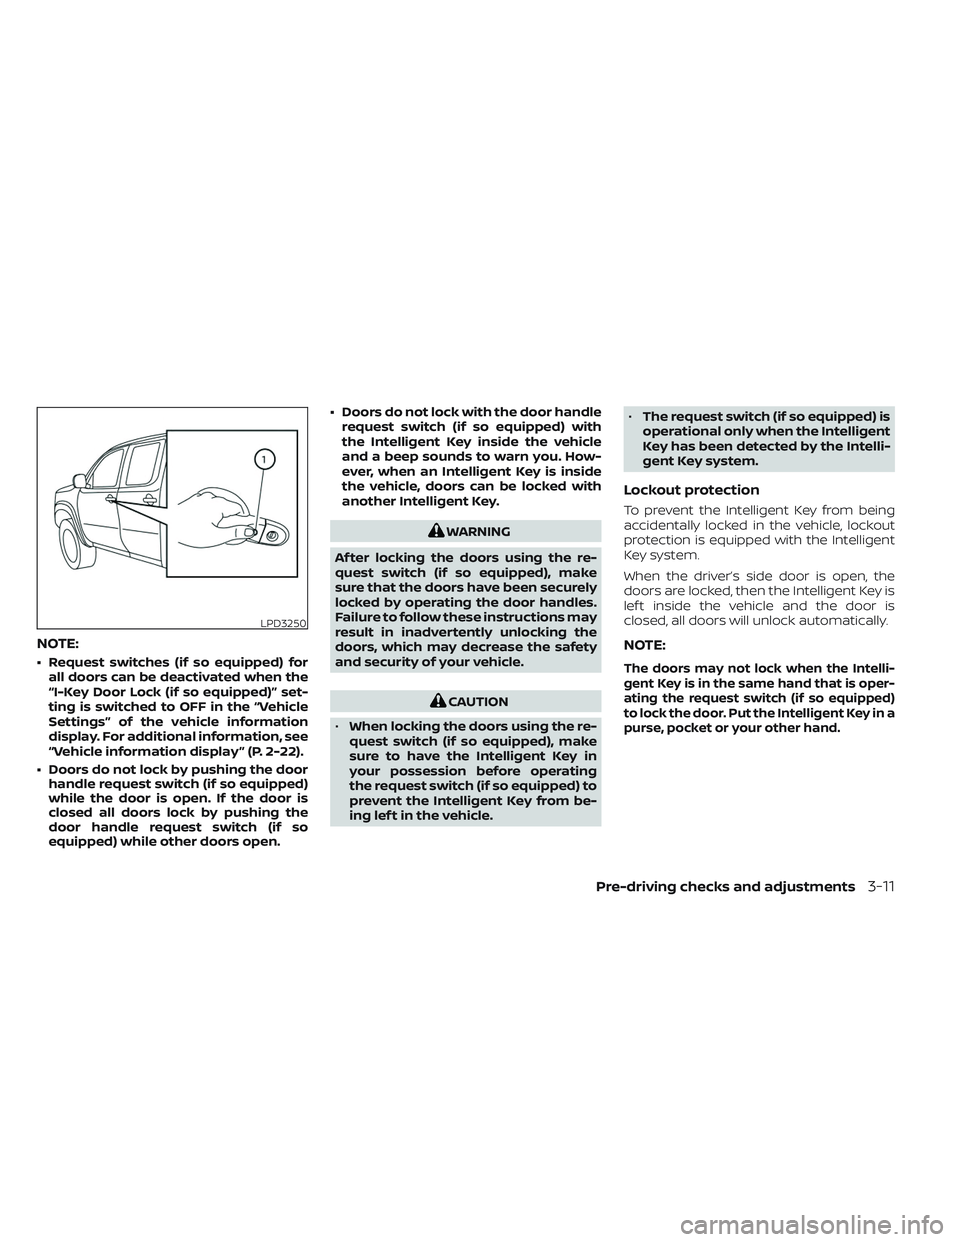
NOTE:
• Request switches (if so equipped) forall doors can be deactivated when the
“I-Key Door Lock (if so equipped)” set-
ting is switched to OFF in the “Vehicle
Settings” of the vehicle information
display. For additional information, see
“Vehicle information display ” (P. 2-22).
• Doors do not lock by pushing the door handle request switch (if so equipped)
while the door is open. If the door is
closed all doors lock by pushing the
door handle request switch (if so
equipped) while other doors open. • Doors do not lock with the door handle
request switch (if so equipped) with
the Intelligent Key inside the vehicle
and a beep sounds to warn you. How-
ever, when an Intelligent Key is inside
the vehicle, doors can be locked with
another Intelligent Key.
WARNING
Af ter locking the doors using the re-
quest switch (if so equipped), make
sure that the doors have been securely
locked by operating the door handles.
Failure to follow these instructions may
result in inadvertently unlocking the
doors, which may decrease the safety
and security of your vehicle.
CAUTION
• When locking the doors using the re-
quest switch (if so equipped), make
sure to have the Intelligent Key in
your possession before operating
the request switch (if so equipped) to
prevent the Intelligent Key from be-
ing lef t in the vehicle. •
The request switch (if so equipped) is
operational only when the Intelligent
Key has been detected by the Intelli-
gent Key system.
Lockout protection
To prevent the Intelligent Key from being
accidentally locked in the vehicle, lockout
protection is equipped with the Intelligent
Key system.
When the driver’s side door is open, the
doors are locked, then the Intelligent Key is
lef t inside the vehicle and the door is
closed, all doors will unlock automatically.
NOTE:
The doors may not lock when the Intelli-
gent Key is in the same hand that is oper-
ating the request switch (if so equipped)
to lock the door. Put the Intelligent Key in a
purse, pocket or your other hand.
LPD3250
Pre-driving checks and adjustments3-11
Page 215 of 572

If a door handle is pulled while unlocking
the doors, that door may not be unlocked.
Returning the door handle to its original
position will unlock the door. If the door
does not unlock af ter returning the door
handle, push the door handle request
switch (if so equipped) to unlock the door.
All doors will be locked automatically un-
less one of the following operations is per-
formed within one minute af ter pushing
the request switch (if so equipped).
• Opening any door.
• Pushing the ignition switch.
Using the interior lights
The interior lights illuminate for a period of
time when a door is unlocked and the inte-
rior light switch is in the DOOR position.
The lights can be turned off without waiting
by performing one of the following
operations:
• Placing the ignition switch in the ONposition.
• Locking the doors with the Intelligent Key.
• Switching the interior lights switch to the OFF position.
For additional information, see “Interior
lights” (P. 2-78).
HOW TO USE THE REMOTE
KEYLESS ENTRY FUNCTION
The remote keyless entry function can op-
erate all door locks using the remote key-
less function of the Intelligent Key. The re-
mote keyless function can operate at a
distance of 16 f t (5 m) away from the ve-
hicle. The operating distance depends
upon the conditions around the vehicle.
The remote keyless entry function will not
function under the following conditions:
• When the Intelligent Key is not within the operational range.
• When the doors are open or not closed securely.
• When the Intelligent Key battery is discharged.
CAUTION
When locking the doors using the Intel-
ligent Key, be sure not to leave the key
in the vehicle.
Pre-driving checks and adjustments3-13
Page 216 of 572
Type A (if so equipped)
1.(lock) button
2.
(unlock) button
3.
(panic) button
Type B (if so equipped)
1.(remote engine start) button
2.
(lock) button
3.
(unlock) button
4.
(panic) button
Locking doors
1. Place the ignition switch in the LOCK position.
2. Close all doors.
3. Press the
button on the Intelligent
Key.
4. The hazard indicator lights flash twice and the horn beeps once.
5. All doors will be locked.
WARNING
Af ter locking the doors using the Intel-
ligent Key, be sure that the doors have
been securely locked by operating the
door handles. Failure to follow these in-
structions may result in inadvertently
unlocking the doors, which may de-
crease the safety and security of your
vehicle.
Unlocking doors
1. Press thebutton on the Intelligent
Key to unlock door(s).
2. The hazard warning lights flash once.
LPD3600LPD3602
3-14Pre-driving checks and adjustments
Page 222 of 572

• The vehicle is shif ted out of P (Park)position.
• The alarm sounds due to illegal entry into the vehicle.
• The ignition switch is pushed without an Intelligent Key in the vehicle.
• The ignition switch is pushed with an In- telligent Key in the vehicle but the brake
pedal is not depressed.
CONDITIONS THE REMOTE ENGINE
START WILL NOT WORK
The Remote Engine Start will not operate if
any of the following conditions are present:
• The ignition switch is placed in the ONposition.
• The hood is not securely closed.
• The hazard warning lights are on.
• The engine is still running. The engine must be completely stopped. Wait at
least 6 seconds if the engine goes from
running to off. This is not applicable when
extending engine run time.
• The
button is not pressed and held
for at least 2 seconds.
• The
button is not pressed and held
within 5 seconds of pressing the lock but-
ton. • The brake is pressed.
• The doors are not closed and locked.
• The Key System Error Light remains solid
in the vehicle information display.
• The alarm sounds due to illegal entry into the vehicle.
• Two Remote Engine Starts, or a single Remote Engine Start with an extension,
have already been used.
• The vehicle is not in P (Park) position.
• There is a detected registered key already inside of the vehicle.
The Remote Engine Start Mode (if so
equipped) may display a warning or indica-
tor in the vehicle information display. For
additional information, see “Vehicle infor-
mation display” (P. 2-22). 1. Pull the hood lock release handle
O1lo-
cated below the driver's side instrument
panel. The hood will spring up slightly.
2. Push the lever
O2at the front of the
hood to the side as illustrated with your
fingertips and raise the hood.
When closing the hood, lower it slowly and
make sure it locks into place.
LPD3276
HOOD
3-20Pre-driving checks and adjustments
Page 229 of 572

TAILGATE
Opening the tailgate
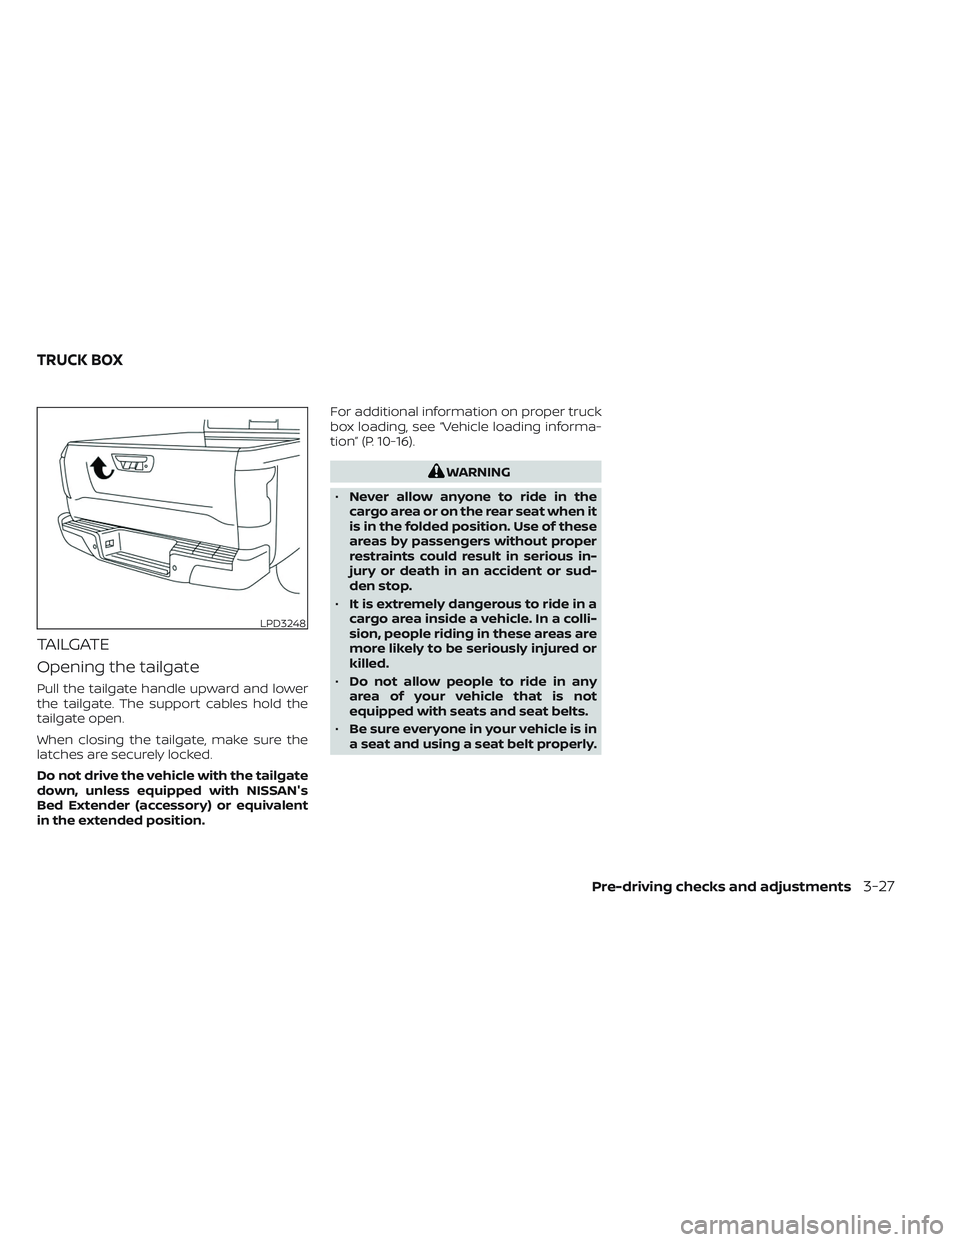
Pull the tailgate handle upward and lower
the tailgate. The support cables hold the
tailgate open.
When closing the tailgate, make sure the
latches are securely locked.
Do not drive the vehicle with the tailgate
down, unless equipped with NISSAN's
Bed Extender (accessory) or equivalent
in the extended position.For additional information on proper truck
box loading, see “Vehicle loading informa-
tion” (P. 10-16).
WARNING
• Never allow anyone to ride in the
cargo area or on the rear seat when it
is in the folded position. Use of these
areas by passengers without proper
restraints could result in serious in-
jury or death in an accident or sud-
den stop.
• It is extremely dangerous to ride in a
cargo area inside a vehicle. In a colli-
sion, people riding in these areas are
more likely to be seriously injured or
killed.
• Do not allow people to ride in any
area of your vehicle that is not
equipped with seats and seat belts.
• Be sure everyone in your vehicle is in
a seat and using a seat belt properly.
LPD3248
TRUCK BOX
Pre-driving checks and adjustments3-27
Page 231 of 572
Removing the tailgate
1. Release the tailgate support cables.
CAUTION
• The tailgate is heavy. Two people
should remove or install it. Be careful
not to drop it during removal.
• Af ter releasing the support cables,
do not let the tailgate rest on the
bumper. 2. Hold the tailgate at a 15 degree angle.
3. Pull the tailgate out from the lef t side
hinge at an angle.
4. The tailgate slides out of the right side hinge.
Installing the tailgate
1. Insert the tailgate into the right sidehinge.
2. Insert the tailgate into the lef t side hinge.
3. Continue to hold the tailgate at a 15 de- gree angle and attach the tailgate sup-
port cables.
4. Close the tailgate securely.
LPD2208
Pre-driving checks and adjustments3-29
Page 232 of 572

Connecting the rear camera
Before closing the tailgate reconnect the
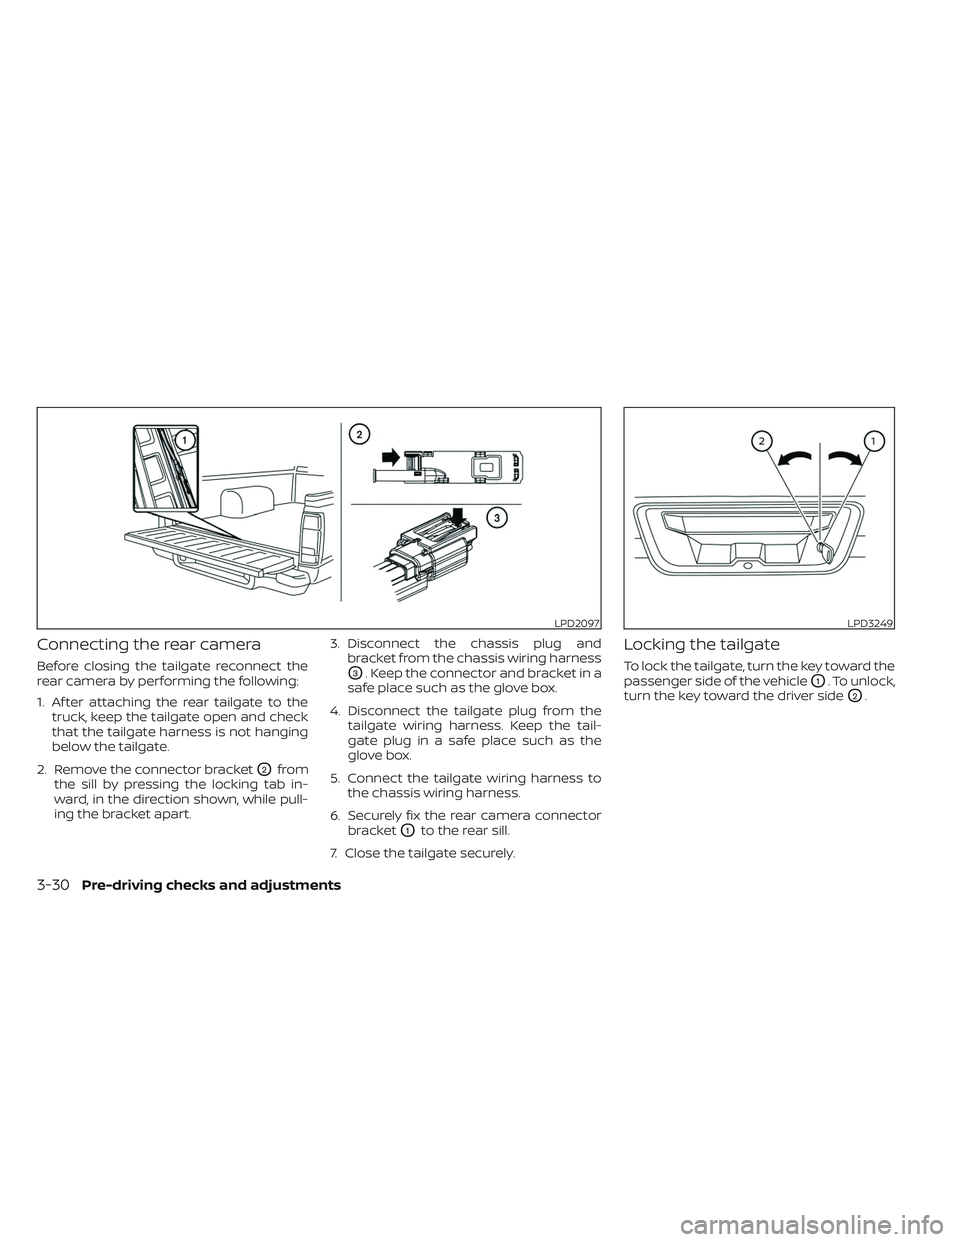
rear camera by performing the following:
1. Af ter attaching the rear tailgate to thetruck, keep the tailgate open and check
that the tailgate harness is not hanging
below the tailgate.
2. Remove the connector bracket
O2from
the sill by pressing the locking tab in-
ward, in the direction shown, while pull-
ing the bracket apart. 3. Disconnect the chassis plug and
bracket from the chassis wiring harness
O3. Keep the connector and bracket in a
safe place such as the glove box.
4. Disconnect the tailgate plug from the tailgate wiring harness. Keep the tail-
gate plug in a safe place such as the
glove box.
5. Connect the tailgate wiring harness to the chassis wiring harness.
6. Securely fix the rear camera connector bracket
O1to the rear sill.
7. Close the tailgate securely.
Locking the tailgate
To lock the tailgate, turn the key toward the
passenger side of the vehicle
O1. To unlock,
turn the key toward the driver side
O2.
LPD2097LPD3249
3-30Pre-driving checks and adjustments
Page 233 of 572
TIE DOWN HOOKS
For your convenience, tie down hooks are
placed at each corner of the truck box.
These may be used to help secure cargo
loaded into the truck box.
• The weight of the cargo load must beevenly distributed over both the front and
the rear axles.
• All cargo should be securely fastened with ropes or straps to prevent it from
shif ting or sliding within the vehicle.
WARNING
Properly secure all cargo with ropes or
straps to help prevent it from sliding or
shif ting. In a sudden stop or collision,
unsecured cargo could cause personal
injury.
LTI0102
Pre-driving checks and adjustments3-31