2023 NISSAN FRONTIER lock
[x] Cancel search: lockPage 229 of 572

TAILGATE
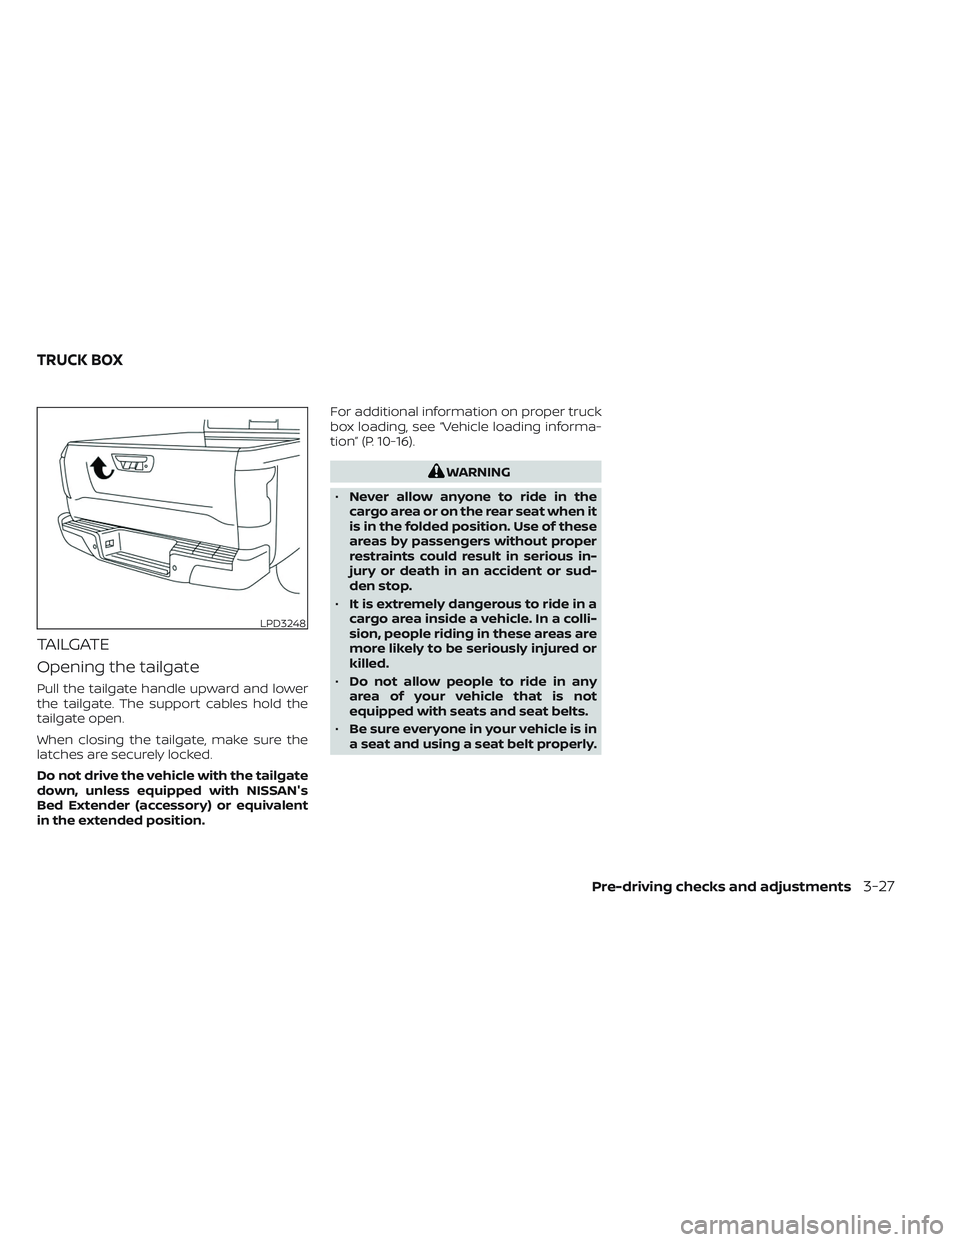
Opening the tailgate
Pull the tailgate handle upward and lower
the tailgate. The support cables hold the
tailgate open.
When closing the tailgate, make sure the
latches are securely locked.
Do not drive the vehicle with the tailgate
down, unless equipped with NISSAN's
Bed Extender (accessory) or equivalent
in the extended position.For additional information on proper truck
box loading, see “Vehicle loading informa-
tion” (P. 10-16).
WARNING
• Never allow anyone to ride in the
cargo area or on the rear seat when it
is in the folded position. Use of these
areas by passengers without proper
restraints could result in serious in-
jury or death in an accident or sud-
den stop.
• It is extremely dangerous to ride in a
cargo area inside a vehicle. In a colli-
sion, people riding in these areas are
more likely to be seriously injured or
killed.
• Do not allow people to ride in any
area of your vehicle that is not
equipped with seats and seat belts.
• Be sure everyone in your vehicle is in
a seat and using a seat belt properly.
LPD3248
TRUCK BOX
Pre-driving checks and adjustments3-27
Page 230 of 572

Disconnecting the rear camera
Before removing the tailgate disconnect
the rear camera by performing the follow-
ing:
1. Open the tailgate to access the rearcamera connector bracket
O1located
on the rear sill.
2. Remove the connector bracket
O2from
the sill by pressing the locking tab in-
ward, in the direction shown, while pull-
ing the bracket apart. 3. Disconnect the chassis wiring harness
O3by pressing inward on the locking
tab, in the direction shown, while pulling
the connectors apart. Hold the connec-
tor firmly to prevent the connector in the
chassis harness from falling into the sill.
4. Take the chassis plug and bracket from the glove box and connect them to the
chassis wiring harness to avoid con-
tamination to the terminals which will
lead to malfunction of the rear camera.
5. Insert the bracket back into the sill. 6. Take the tailgate plug from the glove box
and connect it to the tailgate wiring har-
ness to avoid contamination which will
lead to malfunction of the rear camera.
7. Remove the tailgate. For additional infor- mation, see “Removing the tailgate”
(P. 3-29).
LPD2097
3-28Pre-driving checks and adjustments
Page 232 of 572

Connecting the rear camera
Before closing the tailgate reconnect the
rear camera by performing the following:
1. Af ter attaching the rear tailgate to thetruck, keep the tailgate open and check
that the tailgate harness is not hanging
below the tailgate.
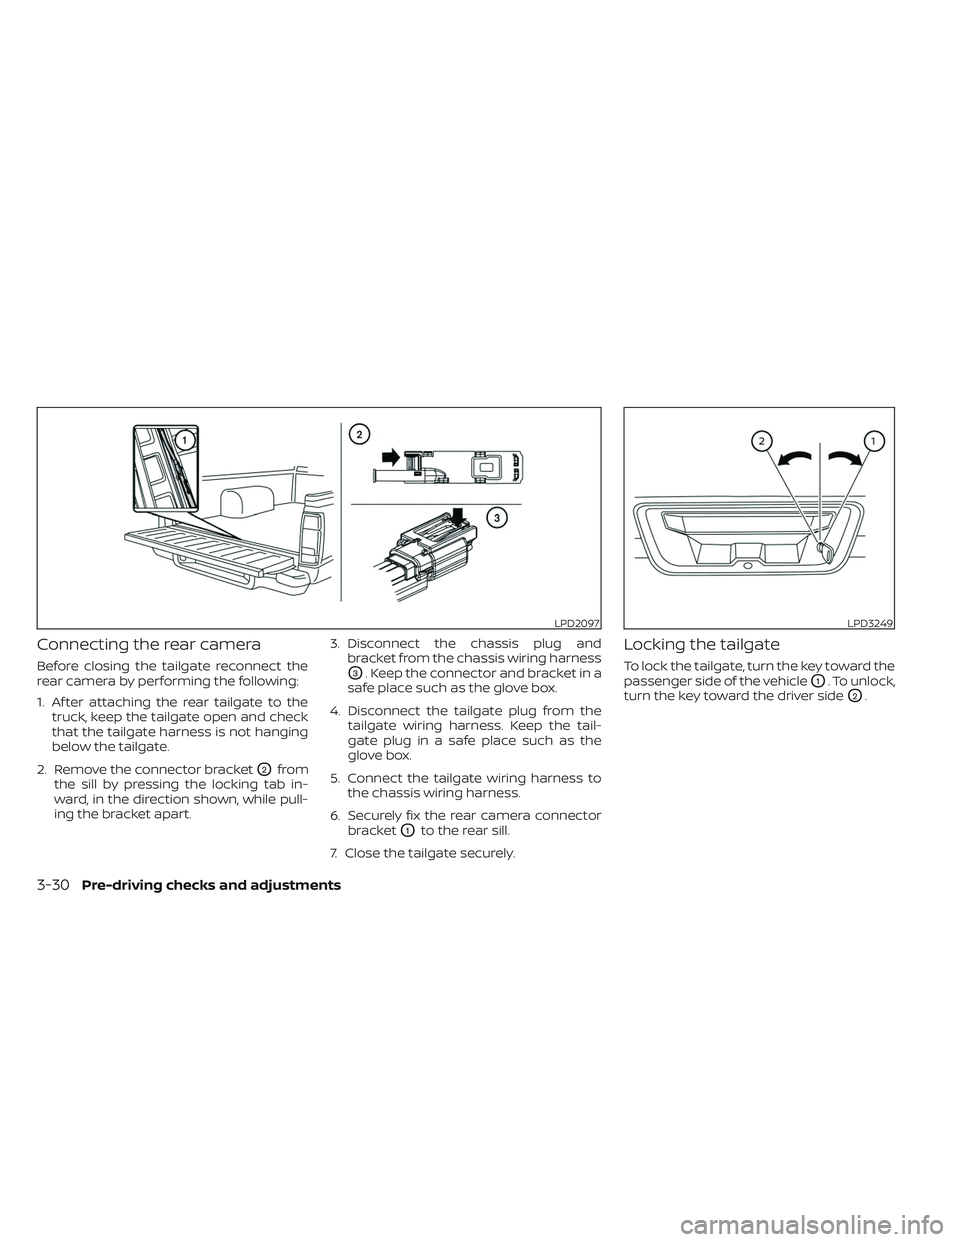
2. Remove the connector bracket
O2from
the sill by pressing the locking tab in-
ward, in the direction shown, while pull-
ing the bracket apart. 3. Disconnect the chassis plug and
bracket from the chassis wiring harness
O3. Keep the connector and bracket in a
safe place such as the glove box.
4. Disconnect the tailgate plug from the tailgate wiring harness. Keep the tail-
gate plug in a safe place such as the
glove box.
5. Connect the tailgate wiring harness to the chassis wiring harness.
6. Securely fix the rear camera connector bracket
O1to the rear sill.
7. Close the tailgate securely.
Locking the tailgate
To lock the tailgate, turn the key toward the
passenger side of the vehicle
O1. To unlock,
turn the key toward the driver side
O2.
LPD2097LPD3249
3-30Pre-driving checks and adjustments
Page 241 of 572

object when backing up to the positionOA
if the object projects over the actual back-
ing up course.
HOW TO PARK WITH PREDICTED
COURSE LINES
WARNING
• If the tires are replaced with different
sized tires, the predicted course lines
may be displayed incorrectly.
• On a snow-covered or slippery road,
there may be a difference between
the predicted course line and the ac-
tual course line.
• If the battery is disconnected or be-
comes discharged, the predicted
course lines may be displayed incor-
rectly. If this occurs, please perform
the following procedures:
–
Turn the steering wheel from lock
to lock while the engine is running.
– Drive the vehicle on a straight road
for more than 5 minutes.
• When the steering wheel is turned
with the ignition switch in the ACC
position, the predicted course lines
may be displayed incorrectly. 1. Visually check that the parking space is
safe before parking your vehicle.
2. The rear view of the vehicle is displayed on the screen
OAwhen the shif t lever is
moved to the R (Reverse) position. 3. Slowly back up the vehicle adjusting the
steering wheel so that the predicted
course lines
OBenter the parking space
OC.
LHA5340LHA5341
Monitor, climate, audio, phone and voice recognition systems4-7
Page 252 of 572

Backing up behind a projecting
object
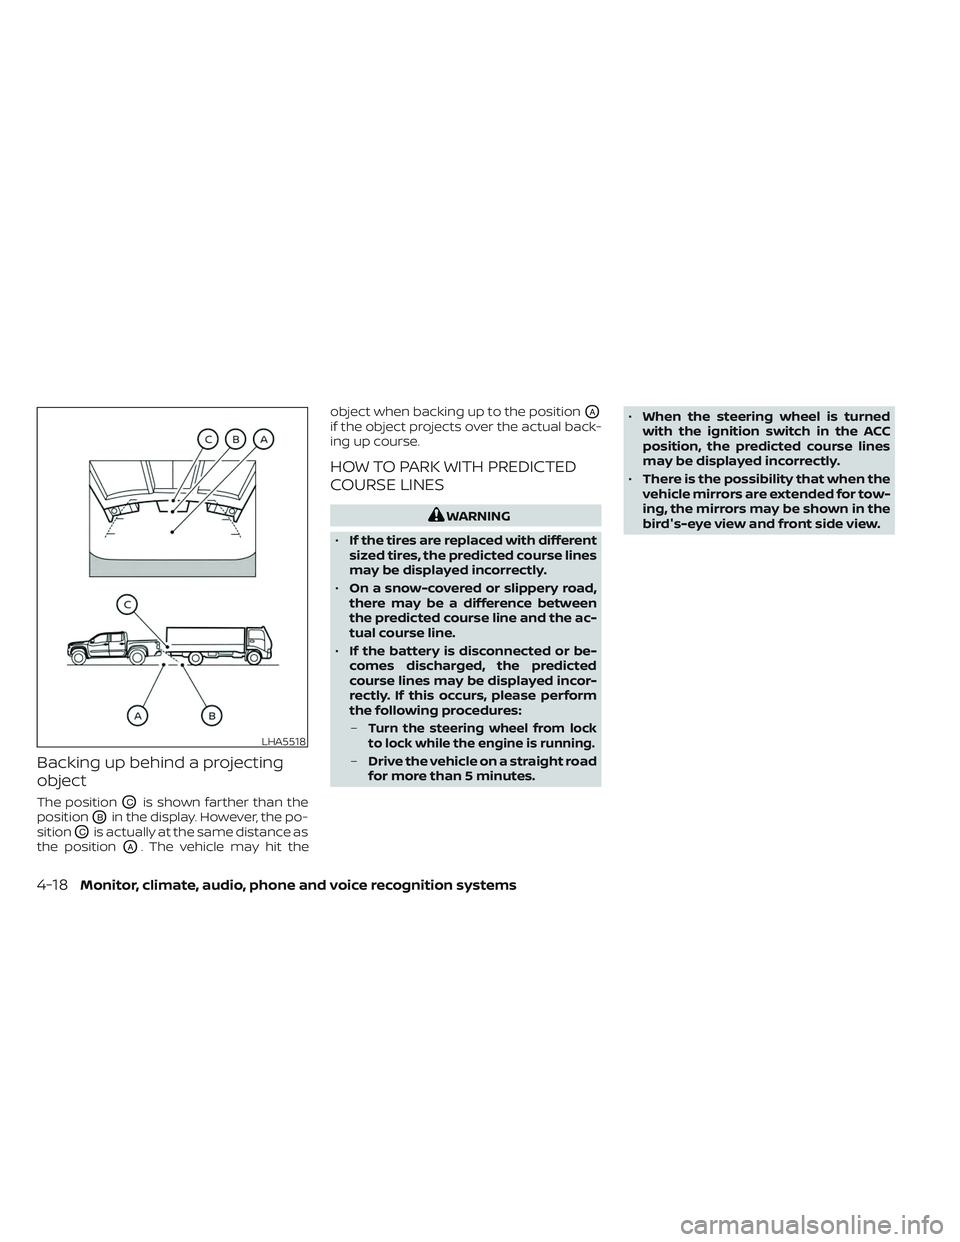
The positionOCis shown farther than the
position
OBin the display. However, the po-
sition
OCis actually at the same distance as
the position
OA. The vehicle may hit the object when backing up to the position
OA
if the object projects over the actual back-
ing up course.
HOW TO PARK WITH PREDICTED
COURSE LINES
WARNING
• If the tires are replaced with different
sized tires, the predicted course lines
may be displayed incorrectly.
• On a snow-covered or slippery road,
there may be a difference between
the predicted course line and the ac-
tual course line.
• If the battery is disconnected or be-
comes discharged, the predicted
course lines may be displayed incor-
rectly. If this occurs, please perform
the following procedures:
–
Turn the steering wheel from lock
to lock while the engine is running.
– Drive the vehicle on a straight road
for more than 5 minutes. •
When the steering wheel is turned
with the ignition switch in the ACC
position, the predicted course lines
may be displayed incorrectly.
• There is the possibility that when the
vehicle mirrors are extended for tow-
ing, the mirrors may be shown in the
bird's-eye view and front side view.
LHA5518
4-18Monitor, climate, audio, phone and voice recognition systems
Page 261 of 572

MOD SYSTEM LIMITATIONS
WARNING
Listed below are the system limitations
for MOD. Failure to operate the vehicle
in accordance with these system limi-
tations could result in serious injury or
death.
• Do not use the MOD system when
towing a trailer. The system may not
function properly.
• Excessive noise (for example, audio
system volume or open vehicle win-
dow) will interfere with the chime
sound, and it may not be heard.
• The MOD system performance will be
limited according to environmental
conditions and surrounding objects
such as:
– When there is low contrast be-
tween background and the mov-
ing objects.
– When there is a blinking source of
light.
– When strong light such as another
vehicle’s headlight or sunlight is
present. –
When camera orientation is not in
its usual position, such as when a
mirror is folded.
– When there is dirt, water drops or
snow on the camera lens.
– When the position of the moving
objects in the display is not
changed.
• The MOD system might detect flow-
ing water droplets on the camera
lens, white smoke from the muffler,
moving shadows, etc.
• The MOD system may not function
properly depending on the speed, di-
rection, distance or shape of the
moving objects.
• If your vehicle sustains damage to
the parts where the camera is in-
stalled, leaving it misaligned or bent,
the sensing zone may be altered and
the MOD system may not detect ob-
jects properly.
• When the temperature is extremely
high or low, the screen may not dis-
play objects clearly. This is not a
malfunction.
NOTE:
The blue MOD icon will change to or-
ange if one of the following has oc-
curred:
• When the system is malfunctioning.
• When the component temperature reaches a high level (icon will blink).
• When the rearview camera has de- tected a blockage (icon will blink).
If the icon light continues to illuminate
orange, have the MOD system checked. It
is recommended that you visit a NISSAN
dealer for this service.
Monitor, climate, audio, phone and voice recognition systems4-27
Page 266 of 572

• When theposition is selected, the air
conditioner automatically turns on. This
dehumidifies the air which helps defog
the windshield. The
mode automati-
cally turns off, allowing outside air to be
drawn into the passenger compartment
to further improve the defogging perfor-
mance. Under this condition, the indica-
tor light on the A/C button indicator will
not turn on if the user had selected the
A/C off. Turning off the air conditioning via
the A/C button is not allowed In this
mode. If the A/C button indicator was on
when entering this mode, and the A/C
button is selected in this mode, the A/C
button indicator will turn off, but the A/C
compressor will still be automatically en-
abled. The recirculation button indicator
will not illuminate if the button is pressed
in this mode.
• Defrosting performance can be in- creased by increasing the fan setting.
Bi-level heating
The bi-level mode directs warmed air to
the side and center vents and to the front
and rear floor outlets.
1. Press the
button to the off position.
The indicator light on thebutton
willgooff.
2. Press the
air flow control button.
3. Turn the
fan speed control dial to
the desired position.
4. Turn the temperature control dial to the desired position.
Heating and defogging
This mode heats the interior and defogs
the windshield.
1. Press the
air flow control button.
2. Turn the
fan speed control dial to
the desired position.
3. Turn the temperature control dial to the desired position between the middle
and the hot position. • When the
position is selected, the
air conditioner automatically turns on.
Under this condition, the indicator light
on the A/C button indicator will not turn
on if the user had selected A/C off. Turn-
ing off the air conditioning via the A/C
button is not allowed in this mode. If the
A/C button indicator was on when enter-
ing this mode, and the A/C button is se-
lected in this mode, the A/C compressor
will still be automatically enabled. It is rec-
ommended that
mode be turned
off for maximum defogging. The recircu-
lation button can be selected in this
mode to block outside odors. However,
for maximum defogging in this mode, it is
recommended to turn recirculation off
when possible.
• Defrosting performance can be in- creased by increasing the fan setting.
Operating tips
Clear snow and ice from the wiper blades
and air inlet in front of the windshield.
This improves heater operation.
4-32Monitor, climate, audio, phone and voice recognition systems
Page 275 of 572

MANUAL OPERATION
Fan speed control
Press thefan speed control buttons
to manually control the fan speed.
Press the AUTO button to return to auto-
matic control of the fan speed.
When adjusting the manual fan from auto
mode, the outlet direction (floor, floor/
defrost, vent, bi-level) will still automatically
change. To fix the outlet to a manual mode,
select the desired air flow location using
the MODE button.
Temperature control dial
The temperature control dial allows you to
adjust the temperature of the outlet air. To
lower the temperature, turn the dial to the
lef t. To increase the temperature, turn the
dial to the right. Temperature can be ad-
justed on the driver’s and passenger’s side.
Air recirculation
Press theair recirculation button to
recirculate interior air inside the vehicle
when:
• driving on a dusty road
• to prevent traffic fumes from entering passenger compartment. • for maximum cooling when using the air
conditioning system.
Press the AUTO button to return to auto-
matic mode.
The air recirculation button will not be acti-
vated or allowed when the air conditioner
is in
mode.
When the outside temperature exceeds
approximately 70°F (21°C), the air condition-
ing system may default to air recirculation
mode automatically to reduce overall
power consumption. To exit air recircula-
tion mode, select the fresh air intake but-
ton to enter fresh air mode.
In Floor/Defrost mode, the recirculation
button can be selected to block outside
odors. However, for maximum defogging in
this mode, it is recommended to turn recir-
culation off when possible.
Fresh air intake
Press thefresh air intake button to
draw outside air into the passenger
compartment.
Automatic intake air control
In the AUTO mode, the intake air will be
controlled automatically. When the outside
temperature exceeds approximately 70°F
(21°C), the air conditioning system may de-
fault to air recirculation mode automati-
cally to reduce overall power consumption.
To exit air recirculation mode, select the
fresh air intake button to enter fresh air
mode. The air recirculation indicator will
turn off, the fresh air indicator will turn on.
To manually control the intake air, press the
fresh air intake button. To return to the
automatic control mode if thefresh
air indicator is illuminated, press and hold
the
fresh air intake button for about 2
seconds. The fresh air indicator and air re-
circulation indicator lights will flash twice,
and then the intake air will be controlled
automatically. To return to the automatic
control mode if the
air recirculation
icon is illuminated, press and hold the
air recirculation or the AUTO button for
about 2 seconds. Theair recirculation
indicator andfresh air intake indicator
lights will flash twice and the intake air will
be controlled automatically. When OFF is
selected, the intake door is automatically
forced to recirculate. To get fresh air in OFF
Monitor, climate, audio, phone and voice recognition systems4-41