2023 NISSAN ARMADA buttons
[x] Cancel search: buttonsPage 115 of 604
— “NISSAN all-mode 4WD®” (P.5-124).
. Intelligent Back-up Intervention (I-BI)
— “Intelligent Back-up Intervention (I-
BI)” (P.5-63).
. Intelligent Cruise Control (ICC)
— “Intelligent Cruise Control (ICC)”
(P.5-74).
. Intelligent Key system
— “Intelligent Key system” (P.3-7).
— “Push-button ignition switch” (P.5-
13).
. Automatic Emergency Braking (AEB)
with pedestrian detection
— “Automatic Emergency Braking
(AEB) with pedestrian detection
system” (P.5-96).
. Intelligent Forward Collision Warning
(I-FCW)
— “Intelligent Forward Collision Warn-
ing (I-FCW)” (P.5-106).
. Lane Departure Warning (LDW)
— “Lane Departure Warning (LDW)”
(P.5-26).
. Intelligent Lane Intervention (I-LI)
— “Intelligent Lane Intervention (I-LI)”
(P.5-31).
. Intelligent Blind Spot Intervention (I-
BSI)
— “Intelligent Blind Spot Intervention
(I-BSI)” (P.5-46). .
Blind Spot Warning (BSW)
— “Blind Spot Warning (BSW)” (P.5-38).
. Rear Automatic Braking (RAB)
— “Rear Automatic Braking (RAB)” (P.5-
116).
. Intelligent Driver Alertness (I-DA)
— “Intelligent Driver Alertness (I-DA)”
(P.5-114).
. Traffic Sign Recognition (TSR)
— “Traffic Sign Recognition (TSR)” (P.5-
23).
. Rear Cross Traffic Alert (RCTA)
— “Rear Cross Traffic Alert (RCTA)”
(P.5-57).
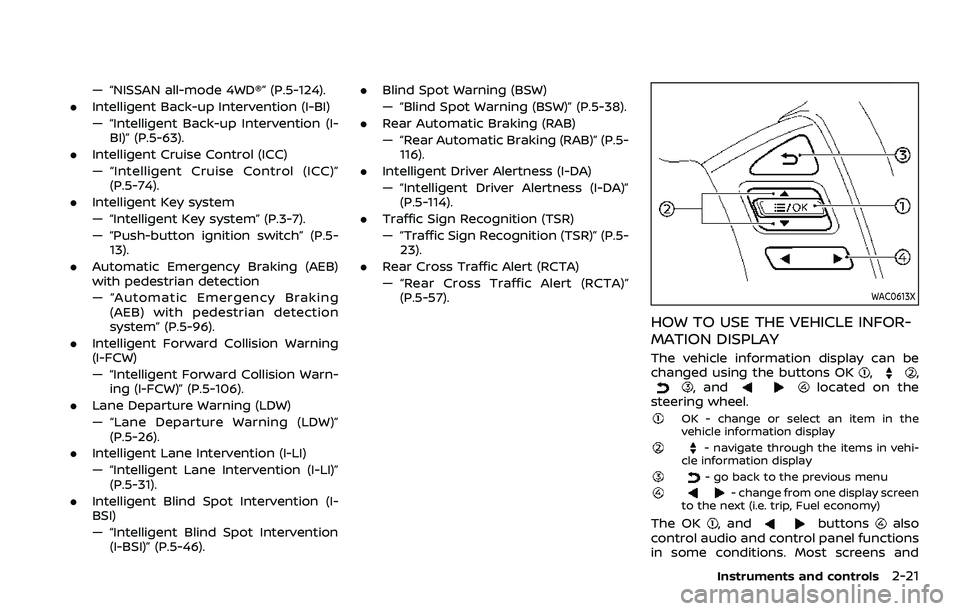
WAC0613X
HOW TO USE THE VEHICLE INFOR-
MATION DISPLAY
The vehicle information display can be
changed using the buttons OK,,, andlocated on the
steering wheel.
OK - change or select an item in the
vehicle information display
- navigate through the items in vehi-
cle information display
- go back to the previous menu- change from one display screen
to the next (i.e. trip, Fuel economy)
The OK, andbuttonsalso
control audio and control panel functions
in some conditions. Most screens and
Instruments and controls2-21
Page 116 of 604

2-22Instruments and controls
menus offer instruction prompts of the
steering switch buttons to indicate how
to control the vehicle information display.
The OK
button changes the audio
source and thebuttonsalso
control voice recognition manual mode.
The OK
button can be used to change
the audio source when the audio screen
is displayed. The
buttonscan be
used when controlling voice recognition
prompts manually. (See NissanConnect®
Owner’s Manual.)
STARTUP DISPLAY
When the ignition switch is placed in the
ON position, the vehicle information dis-
play may display the following screens if
the vehicle is equipped with them:
. Home
. Speed
. Drive Computer
. Fuel Economy
. Navigation
. Audio
. CRUISE
. Driving Aids
. TPMS
. Speed Limit Sign
Warnings will only display if there are any
present. (See “Operational indicators” (P.2-
30).) To control what items display in the
vehicle information display, see “Settings”
(P.2-22).
SETTINGS
The setting mode allows user to change
the information displayed in the vehicle
information display and some settings:
.
Driver Assistance
. TPMS Setting
. Clock
. Vehicle settings
. Maintenance
. Customize Display
. Unit/Language
. Factory Reset
Driver Assistance
To change the status, warnings or turn on
or off any of the systems/warnings dis-
played in the “Driver Assistance” menu,
use the
buttonsto select and
change a menu item:
. Emergency Brake
. Lane
. Blind Spot
. Speed Limit Sign
. Cross Traffic Alert
. Driver Attention Alert .
Timer Alert
. Low Temp. Alert
Emergency Brake:
. Front
Allows user to turn the Automatic
Emergency Braking (AEB) with pedes-
trian detection system and Intelligent
Forward Collision Warning (I-FCW) sys-
tem ON/OFF.
. Rear
Allows user to turn the Rear Auto-
matic Braking (RAB) system ON/OFF.
(See “Automatic Emergency Braking (AEB)
with pedestrian detection system” (P.5-
96), “Intelligent Forward Collision Warning
(I-FCW)” (P.5-106) and “Rear Automatic
Braking (RAB)” (P.5-116).)
Lane:
. Warning(LDW)
Allows user to turn the Lane Depar-
ture Warning (LDW) system ON/OFF.
. Prevention(LDP)
Allows user to turn the Intelligent Lane
Intervention (I-LI) system ON/OFF.
(See “Lane Departure Warning (LDW)” (P.5-
26) and “Intelligent Lane Intervention (I-
LI)” (P.5-31).)
Page 118 of 604

2-24Instruments and controls
Tire Pressure Unit:
The unit for tire pressure that is shown in
the vehicle information display can be
changed to:
.kPa
. psi
. bar
. kgf/cm2
Use the
buttonsand the OKbutton to select and change the unit.
If necessary, refer to the following table to
convert between units.
JVI0938X
Clock
Allows user to adjust the clock settings
and time within the vehicle information
display.
. Clock Mode (if so equipped)
. Clock Format
. Daylight Saving (if so equipped)
. Time Zone (if so equipped)
. Set Clock Manually
The clock may also be set in the touch
screen display. For additional information,
refer to the separate NissanConnect®
Owner’s Manual.
Vehicle settings
The vehicle settings allow user to change
settings for the following menus.
. Lighting
. Locking
. Wipers (if so equipped)
. Driving Position (if so equipped)
. Rear Door Alert
. ACC Off Delay
The vehicle settings can be changed
using the
buttonsand the OKbutton.
Lighting:
The “Lighting” menu has the following
Page 119 of 604
options:
.Auto Room Lamp
The interior light can be set to be ON
or OFF. Use the OK
button to turn
this feature ON or OFF.
. Auto Headlight
The sensitivity of the Intelligent Auto
Headlight (if so equipped) or autolight
(if so equipped) can be adjusted. From
the “Lighting” menu, select “Auto
Headlight”. Use the
buttonsand the OKbutton to select the
required sensitivity. The following op-
tions are available:
— Turn on earliest
— Turn on earlier
— Turn on standard
— Turn on later
. Light Off Delay
The duration of the automatic head-
lights can be changed from 0 to 180
seconds. Use the OK
button to
change the duration.
Locking:
The “Locking” menu has the following
options:
. Ext. Door Switch (if so equipped)
When this item is turned on, the
request switch on the door is acti-
vated. Use the OK
button to activate or deactivate this function.
. Selective Unlock (if so equipped)
When this item is turned on, and the
door handle request switch is pushed,
only the corresponding door is un-
locked. All the doors can be unlocked
if the door handle request switch is
pushed again within 1 minute. When
this item is turned to off, all the doors
will be unlocked when the door han-
dle request switch is pushed once. Use
the OK
button to activate or deac-
tivate this function.
. Auto Door Unlock
The “Auto Door Unlock” feature allows
user to customize the auto door
unlock options. Use the OK
button
to change the mode.
— Shift to P
— IGN OFF
— OFF
Wipers (if so equipped):
The “Wipers” menu has the following
options:
. Speed Dependent
The “Speed Dependent” feature can be
activated or deactivated. Use the OK
button to turn this feature ON or OFF. Driving Position (if so equipped):
.
Exit Seat Slide
This allows user to turn the entry/exit
function ON or OFF. Use the OK
button to turn this function ON or OFF.
(See “Memory seat” (P.3-40).)
. Exit Steering Up (if so equipped)
This allows user to turn the entry/exit
function ON or OFF. Use the OK
button to turn this function ON or OFF.
(See “Memory seat” (P.3-40).)
Rear Door Alert:
The “Rear Door Alert” feature allows user
to customize the Rear Door Alert options.
Use the OK
button to change the mode.
. Horn & Alert
When selected, the alert is displayed
and the horn sounds.
. Alert Only
When selected, only the alert is dis-
played.
. OFF
When selected, no alert or horn will be
active.
(See “Rear door alert” (P.2-61).)
ACC Off Delay (if so equipped):
This allows user to turn the ACC delay
timer function ON or OFF. (See “ACC
(Accessories) delay timer function” (P.5-
Instruments and controls2-25
Page 120 of 604
2-26Instruments and controls
15).)
Maintenance
The maintenance mode allows user to set
alerts for the reminding of maintenance
intervals. To change an item:
Select “Maintenance” using the
but-
tonsand press the OKbutton.
. Oil and Filter
. Tire
. Other
Oil and Filter:
This indicator appears when user set
distance comes for changing the engine
oil and filter. You can set or reset the
distance for checking or replacing these
items. For scheduled maintenance items
and intervals, refer to the “9. Maintenance
and schedules” section.
Tire:
This indicator appears when the user set
distance comes for replacing tires. You
can set or reset the distance for replacing
tires.
WARNING
The tire replacement indicator is not
a substitute for regular tire checks,
including tire pressure checks. (See “Changing wheels and tires” (P.8-
36).) Many factors including tire in-
flation, alignment, driving habits and
road conditions affect tire wear and
when tires should be replaced.
Setting the tire replacement indica-
tor for a certain driving distance
does not mean your tires will last
that long. Use the tire replacement
indicator as a guide only and always
perform regular tire checks. Failure
to perform regular tire checks, in-
cluding tire pressure checks could
result in tire failure. Serious vehicle
damage could occur and may lead to
a collision, which could result in
serious personal injury or death.
Other:
This indicator appears when the user set
distance comes for checking or replacing
maintenance items other than the engine
oil, oil filter and tires. Other maintenance
items can include such things as air filter
or tire rotation. You can set or reset the
distance for checking or replacing the
items.
Customize Display
The display settings allows user to
choose from the various meter selections.
The display settings can be changed
using the
buttons.
Main Menu Selection:
Displays available screens that can be
shown in the vehicle information display.
Route Guidance (if so equipped):
To change the setting, use the
buttonsand press the OKbutton.
. Alerts
The “Alerts” allows user to turn the Route
Guidance alerts on or off.
Welcome Effect:
The “Welcome Effect” displays the avail-
able welcome effect settings.
. gauges (if so equipped)
. Animation
Page 121 of 604

Unit/Language
The units that are shown in the vehicle
information display can be changed:
.Mileage/Fuel
. Temperature
. Language
Use the
buttonsand the OKbutton to select and change the units of
the vehicle information display.
Mileage/Fuel:
The unit for the mileage that is shown in
the vehicle information display can be
changed.
. km, l/100km
. km, km/l
. miles, MPG(US)
Use the
buttonsand the OKbutton to select and change the unit.
Temperature:
The temperature that is shown in the
vehicle information display can be chan-
ged from:
. °C
. °F
Use the OK
button to toggle choices.
Language:
The language of the vehicle information
display can be changed. Use the
buttonsand the OKbutton to select and change the lan-
guage of the vehicle information display.
Factory Reset
The settings in the vehicle information
display can be reset back to the factory
default. To reset the vehicle information
display:
1. Select “Factory Reset” using the
buttonsand press the OKbutton.
2. Select “Yes” to return all settings back to default by pushing the OK
button.
Instruments and controls2-27
Page 177 of 604
SIC4448
The light on the vanity mirror will turn on
when the cover on the vanity mirror is
opened.
When the cover is closed, the light will
turn off.
The lights will also turn off after a
period of time when the lights remain
illuminated to prevent the battery from
becoming discharged.
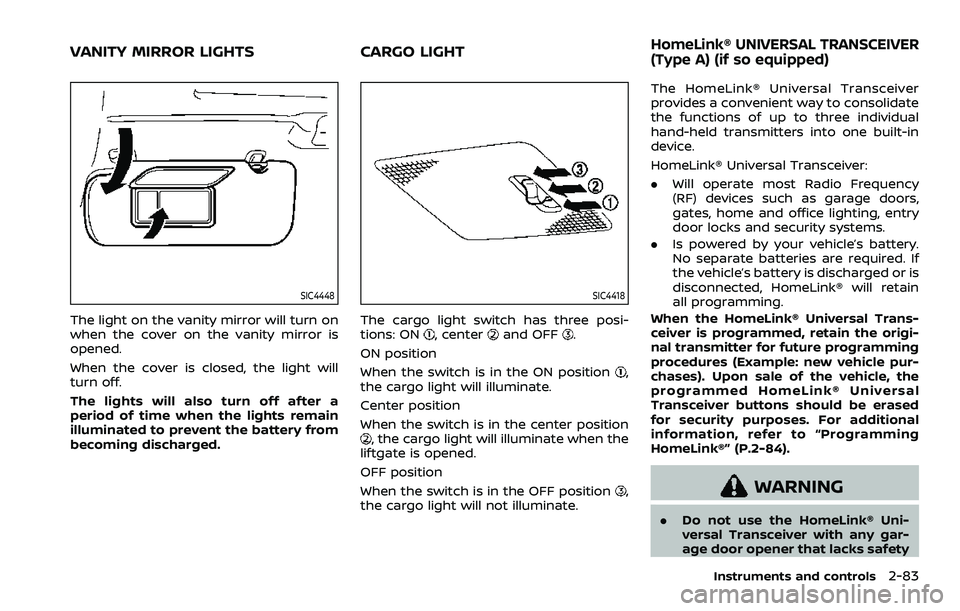
SIC4418
The cargo light switch has three posi-
tions: ON, centerand OFF.
ON position
When the switch is in the ON position
,
the cargo light will illuminate.
Center position
When the switch is in the center position
, the cargo light will illuminate when the
liftgate is opened.
OFF position
When the switch is in the OFF position
,
the cargo light will not illuminate. The HomeLink® Universal Transceiver
provides a convenient way to consolidate
the functions of up to three individual
hand-held transmitters into one built-in
device.
HomeLink® Universal Transceiver:
.
Will operate most Radio Frequency
(RF) devices such as garage doors,
gates, home and office lighting, entry
door locks and security systems.
. Is powered by your vehicle’s battery.
No separate batteries are required. If
the vehicle’s battery is discharged or is
disconnected, HomeLink® will retain
all programming.
When the HomeLink® Universal Trans-
ceiver is programmed, retain the origi-
nal transmitter for future programming
procedures (Example: new vehicle pur-
chases). Upon sale of the vehicle, the
programmed HomeLink® Universal
Transceiver buttons should be erased
for security purposes. For additional
information, refer to “Programming
HomeLink®” (P.2-84).WARNING
. Do not use the HomeLink® Uni-
versal Transceiver with any gar-
age door opener that lacks safety
Instruments and controls2-83
VANITY MIRROR LIGHTS CARGO LIGHTHomeLink® UNIVERSAL TRANSCEIVER
(Type A) (if so equipped)
Page 178 of 604
2-84Instruments and controls
stop and reverse features as re-
quired by federal safety stan-
dards. (These standards became
effective for opener models man-
ufactured after April 1, 1982). A
garage door opener which cannot
detect an object in the path of a
closing garage door and then
automatically stop and reverse,
does not meet current federal
safety standards. Using a garage
door opener without these fea-
tures increases the risk of serious
injury or death.
. During the programming proce-
dure your garage door or security
gate will open and close (if the
transmitter is within range). Make
sure that people or objects are
clear of the garage door, gate,
etc. that you are programming.
. Your vehicle’s engine should be
turned off while programming
the HomeLink® Universal Trans-
ceiver. Do not breathe exhaust
gases; they contain colorless
and odorless carbon monoxide.
Carbon monoxide is dangerous. It
can cause unconsciousness or
death.PROGRAMMING HomeLink®
The following steps show generic instruc-
tions how to program a HomeLink®
button. If you have any questions or are
having difficulty programming your
HomeLink® buttons, refer to the
HomeLink® web site at: www.homelink.
com/nissan or call 1-800-355-3515.
NOTE:
It is also recommended that a new
battery be placed in the hand-held
transmitter of the device being pro-
grammed to HomeLink® for quicker
programming and accurate transmis-
sion of the radio-frequency.
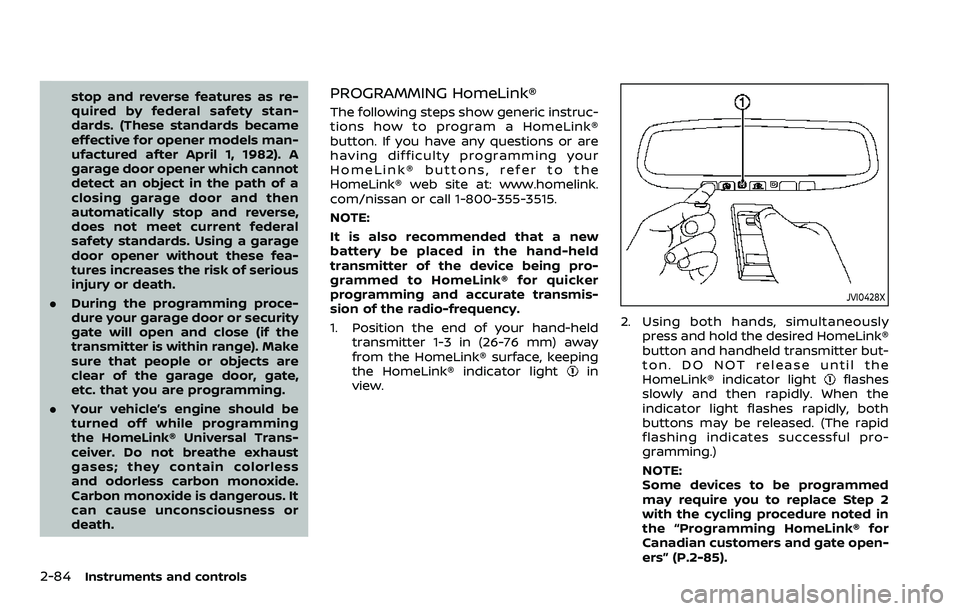
1. Position the end of your hand-held
transmitter 1-3 in (26-76 mm) away
from the HomeLink® surface, keeping
the HomeLink® indicator light
in
view.
JVI0428X
2. Using both hands, simultaneously
press and hold the desired HomeLink®
button and handheld transmitter but-
ton. DO NOT release until the
HomeLink® indicator light
flashes
slowly and then rapidly. When the
indicator light flashes rapidly, both
buttons may be released. (The rapid
flashing indicates successful pro-
gramming.)
NOTE:
Some devices to be programmed
may require you to replace Step 2
with the cycling procedure noted in
the “Programming HomeLink® for
Canadian customers and gate open-
ers” (P.2-85).