2023 NISSAN ARMADA horn
[x] Cancel search: hornPage 199 of 604

When you carry the Intelligent Key with
you, you can lock or unlock all doors by
pushing the door handle request switch
(driver’s or front passenger’s)
or the
liftgate request switchwithin the range
of operation.
When you lock or unlock the doors or the
liftgate, the hazard indicator will flash and
the horn (or the outside chime) will sound
as a confirmation. For details, see “Setting
hazard indicator and horn mode” (P.3-17).
Welcome light and farewell light
function
When you lock or unlock the doors
including the liftgate, the parking lights,
tail lights, side marker light and the
license plate light will illuminate for a
period of time. The welcome light and
farewell light function can be disabled.
For information about disabling the wel-
come light and farewell light function, it is
recommended you see a NISSAN dealer.
Locking doors
1. Move the shift lever to the P (Park) position, push the ignition switch to
the OFF position and make sure you
carry the Intelligent Key with you.*1
2. Close all the doors.*2 3. Push the door handle request switch
(driver’s or front passenger’s)
or the
liftgate request switchwhile carry-
ing the Intelligent Key with you.*3
4. All the doors will lock.
5. The hazard indicator flashes twice and the outside chime sounds twice.
*1: Doors will lock with the Intelligent Key
while the ignition switch is in the ACC or
ON position.
*2: Doors will not lock with the Intelligent
Key while any door is open.
*3: Doors will not lock by pushing the door
handle request switch with the Intelligent
Key inside the vehicle.
However, when an Intelligent Key is inside
the vehicle, doors can be locked with
another registered Intelligent Key.
NOTE:
Request switches for all doors can be
deactivated when the “Ext. Door Switch”
is turned off in the Vehicle Settings of
the vehicle information display. See
“Vehicle settings” (P.2-24).
CAUTION
. After locking the doors using the
request switch, make sure that
the doors have been securely locked by operating the door
handles.
. When locking the doors using the
request switch, make sure to
have the Intelligent Key in your
possession before operating the
request switch to prevent the
Intelligent Key from being left in
the vehicle.
. The request switch is operational
only when the Intelligent Key has
been detected by the Intelligent
Key system.
Lockout protection:
To prevent the Intelligent Key from being
accidentally locked in the vehicle, lockout
protection is equipped with the Intelligent
Key system.
When the driver’s side door is open, the
doors are locked, and then the Intelligent
Key is put inside the vehicle and all the
doors are closed; the lock will automati-
cally unlock and the door buzzer sounds.
NOTE:
The doors may not lock when the
Intelligent Key is in the same hand that
is operating the request switch to lock
the door. Put the Intelligent Key in a
purse, pocket or your other hand.
Pre-driving checks and adjustments3-11
Page 201 of 604

TROUBLESHOOTING GUIDE
SymptomPossible causeAction to take
When pushing the ignition
switch to stop the engine The Shift to Park warning appears on
the display and the inside warning chime
sounds continuously or for a few sec-
onds. The shift lever is not in the P (Park)
position.
Shift the shift lever to the P (Park)
position.
When shifting the shift lever
to the P (Park) position. The inside warning chime sounds con-
tinuously. The ignition switch is in the ACC or
ON position.Push the ignition switch to the OFF
position.
When opening the driver’s
door to get out of the vehicle The inside warning chime sounds con-
tinuously. The ignition switch is in the ACC
position.Push the ignition switch to the OFF
position.
When closing the door after
getting out of the vehicle The No Key Detected warning appears
on the display, the outside chime sounds
3 times and the inside warning chime
sounds for a few seconds.
The ignition switch is in the ACC or
ON position.
Push the ignition switch to the OFF
position.
The Rear Door Alert warning message
appears on the display, the horn sounds
three times twice and Check Rear Seat
for all articles warning appears on the
display. The rear door alert is activated.
Open a rear door and check the rear
seat for all articles to clear the warn-
ing message.
The Shift to Park warning appears on
the display and the outside chime
sounds continuously. The ignition switch is in the ACC or
OFF position and the shift lever is
not in the P (Park) position.Move the shift lever to the P (Park)
position and push the ignition switch
to the OFF position.
When closing the door with
the inside lock knob turned
to LOCK The outside chime sounds for a few
seconds and all the doors unlock.
The Intelligent Key is inside the
vehicle or cargo area.
Carry the Intelligent Key with you.
When pushing the request
switch or the LOCK
but-
ton on the Intelligent Key to
lock the door The outside chime sounds for a few
seconds. The Intelligent Key is inside the
vehicle.
Carry the Intelligent Key with you.
A door is not closed securely. Close the door securely.
Pre-driving checks and adjustments3-13
Page 204 of 604

3-16Pre-driving checks and adjustments
SPA1926B
Type C (if so equipped)LOCK buttonUNLOCK buttonPower liftgate buttonPANIC buttonRemote engine start button
HOW TO USE REMOTE KEYLESS
ENTRY SYSTEM
When you lock or unlock the doors or the
liftgate, the hazard indicator will flash and
the horn (or the outside chime) will sound
as a confirmation. For details, see “Setting
hazard indicator and horn mode” (P.3-17).
Locking doors
1. Move the shift lever to the P (Park)position, push the ignition switch to
the OFF position and make sure you
carry the Intelligent Key with you.*
2. Close all the doors and the liftgate.
3. Push the LOCK
buttonon the
Intelligent Key.
4. All the doors and the liftgate will lock.
5. The hazard indicator flashes twice and the horn chirps once.
*: Doors will lock with the Intelligent Key
while the ignition switch is in the ACC or
ON position.
Unlocking doors
1. Push the UNLOCKbuttonon
the Intelligent Key once.
2. The hazard indicator flashes once. The driver’s door will unlock.
The puddle light and the passenger
cabin illumination will illuminate and
stay on for a short period of time (if so
equipped). (See “Welcome light” (P.2-
80).)
3. Push the UNLOCK
button on the
Intelligent Key again within 60 sec-
onds. 4. The hazard indicator flashes once
again. All the doors will unlock.
All doors will be locked automatically
unless one of the following operations is
performed within 1 minute after pushing
the UNLOCK button on the Intelligent Key
while the doors are locked. If during this 1-
minute time period, the UNLOCK button
on the Intelligent Key is pushed, all doors
will be locked automatically after another
1 minute.
. Opening any door
. Pushing the ignition switch
NOTE:
The unlocking operation can be chan-
ged in selective unlock in the Vehicle
Settings of the vehicle information dis-
play. See “Vehicle settings” (P.2-24).
Opening windows
To open the windows, push the door
UNLOCKbutton on the Intelligent
Key for about 3 seconds after the door is
unlocked.
To stop opening, release the UNLOCK
button.
Window cannot be closed using the
Intelligent Key.
The door windows can be opened or
closed by turning the mechanical key in
a door lock. (See “Doors” (P.3-4).)
Page 205 of 604

Opening/closing liftgate (if so
equipped)
1. Push the power liftgate buttonfor more than 1 second.
2. The liftgate will automatically open.
The hazard indicator flashes 4 times and
the outside chime sounds for approxi-
mately 3 seconds.
To close the liftgate, push the power
liftgate button
for more than 1
second.
The liftgate will automatically close.
If the button
is pushed while the
liftgate is being opened or closed, the
liftgate will reverse.
Using panic alarm
If you are near your vehicle and feel
threatened, you may activate the alarm
to call attention as follows:
1. Push the PANIC
buttonon the
Intelligent Key for more than 1 sec-
ond.
2. The theft warning alarm and head- lights will stay on for 25 seconds.
3. The panic alarm stops when:
.It has run for 25 seconds, or.Any of the buttons on the Intelligent Key are pushed. (Note: Panic button
or power liftgate button should be pushed for more than 1 second.)
Remote engine start (if so
equipped)
The remote engine startbuttonis
on the Intelligent Key if the vehicle has
remote engine start function. This func-
tion allows the engine to start from
outside the vehicle. See “Remote engine
start” (P.3-19) for more details.
Setting hazard indicator and horn
mode
This vehicle is set in hazard indicator and
horn mode when you first receive the
vehicle.
In hazard indicator and horn mode, when
the LOCK
button is pushed, the
hazard indicator flashes twice and the
horn chirps once. When the UNLOCK
button is pushed, the hazard indicator
flashes once.
If horns are not necessary, the system
can be switched to the hazard indicator
mode.
In hazard indicator mode, when the LOCK
button is pushed, the hazard indica-
tor flashes twice. When the UNLOCK
button is pushed, neither the hazard
indicator nor the horn operates.
Pre-driving checks and adjustments3-17
Page 206 of 604

3-18Pre-driving checks and adjustments
Hazard indicator and horn mode:
DOOR LOCKDOOR UNLOCK
Intelligent Key system
(Using door handle request switch) HAZARD -
twice
OUTSIDE CHIME - twiceHAZARD -
once
OUTSIDE CHIME - once
Remote keyless entry system (Using
orbutton) HAZARD -
twice
HORN - once HAZARD -
once
HORN - none
Hazard indicator mode:
DOOR LOCK DOOR UNLOCK
Intelligent Key system
(Using door handle request switch) HAZARD -
twice HAZARD - none
Remote keyless entry system (Using
orbutton) HAZARD - twiceHAZARD - none
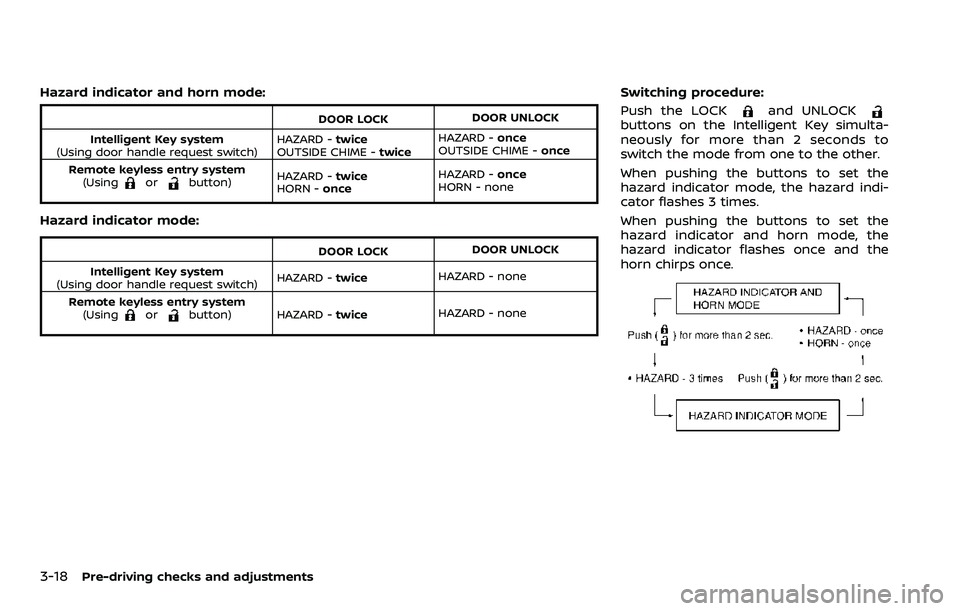
Switching procedure:
Push the LOCK
and UNLOCKbuttons on the Intelligent Key simulta-
neously for more than 2 seconds to
switch the mode from one to the other.
When pushing the buttons to set the
hazard indicator mode, the hazard indi-
cator flashes 3 times.
When pushing the buttons to set the
hazard indicator and horn mode, the
hazard indicator flashes once and the
horn chirps once.
Page 320 of 604

5-8Starting and driving
TPMS with Easy Fill Tire Alert
When adding air to an under-inflated tire,
the TPMS with Easy Fill Tire Alert provides
visual and audible signals outside the
vehicle to help you inflate the tires to
the recommended COLD tire pressure.
Vehicle set-up:
1. Park the vehicle in a safe and levelplace.
2. Apply the parking brake and place the shift lever in the P (Park) position.
3. Place the ignition switch in the ON position. Do not start the engine.
Operation:
1. Add air to the tire.
2. After a few seconds, the hazard in- dicators will start flashing.
3. When the designated pressure is reached, the horn beeps once and
the hazard indicators stop flashing.
4. Perform the above steps for each tire.
. If the tire is over-inflated more than
approximately 4 psi (30 kPa), the horn
beeps and the hazard indicators flash
3 times. To correct the pressure, push
the core of the valve stem on the tire
briefly to release pressure. When the
pressure reaches the designated
pressure, the horn beeps once. .
If the hazard indicator does not flash
within approximately 15 seconds after
starting to inflate the tire, it indicates
that the TPMS with Easy Fill Tire Alert
is not operating.
. The TPMS will not activate the Easy Fill
Tire Alert under the following condi-
tions:
— If there is interference from an
external device or transmitter
— The air pressure from the inflation device such as those using a power
socket is not sufficient to inflate the
tire
— If an electrical equipment is being used in or near the vehicle
— There is a malfunction in the TPMS system
— There is a malfunction in the horn or hazard indicators
. If the TPMS with Easy Fill Tire Alert
does not operate due to TPMS inter-
ference, move the vehicle about 3 ft
(1m) backward or forward and try
again.
If the TPMS with Easy Fill Tire Alert is not
working, use a tire pressure gauge.
AVOIDING COLLISION AND ROLL-
OVER
WARNING
Failure to operate this vehicle in a
safe and prudent manner may result
in loss of control or an accident.
Be alert and drive defensively at all times.
Obey all traffic regulations. Avoid exces-
sive speed, high speed cornering, or
sudden steering maneuvers, because
these driving practices could cause you
to lose control of your vehicle. As with
any vehicle, a loss of control could
result in a collision with other vehicles
or objects, or cause the vehicle to roll-
over, particularly if the loss of control
causes the vehicle to slide sideways. Be
attentive at all times, and avoid driving
when tired. Never drive when under the
influence of alcohol or drugs (including
prescription or over-the-counter drugs
which may cause drowsiness). Always
wear your seat belt as outlined in the
“Seat belts” (P.1-20), and also instruct your
passengers to do so.
Seat belts help reduce the risk of injury in
collisions and rollovers. In a rollover
crash, an unbelted or improperly belted
Page 448 of 604

5-136Starting and driving
SSD0622
The sonar system sounds a tone to
inform the driver of obstacles near the
bumper.
When the sonar system is turned on, the
sonar view will automatically appear in
the touch screen display when the cam-
era is activated.
WARNING
.The sonar system is a conveni-
ence but it is not a substitute for
proper parking.
. The driver is always responsible
for safety during parking and other maneuvers. Always look
around and check that it is safe
to do so before parking.
. Read and understand the limita-
tions of the sonar system as
contained in this section. The
colors of the sonar indicator in-
dicates different distances to the
object.
. Inclement weather or ultrasonic
sources such as an automatic car
wash, a truck’s compressed-air
brakes or a pneumatic drill may
affect the function of the system;
this may include reduced perfor- mance or a false activation.
. The sonar system is designed as
an aid to the driver in detecting
large stationary objects to help
avoid damaging the vehicle.
. The sonar system is not designed
to prevent contact with small or
moving objects. Always move
slowly. The system will not detect
small objects below the bumper,
and may not detect objects close
to the bumper or on the ground.
. The sonar system may not detect
the following objects: fluffy ob-
jects such as snow, cloth, cotton,
glass-wool, etc.; thin objects such
as rope, wire and chain, etc.; or
wedge-shaped objects.
. The front and rear sonar sensors
detect the distance between the
vehicle and the obstacle by de-
tecting the sound wave reflected
from the surface of an obstacle.
When there is a sound such as
horn, or an ultrasonic source
(such as sonar of other vehicles)
around the vehicle, the sonar
sensors may not detect objects
properly.
FRONT AND REAR SONAR SYSTEM
(if so equipped)
Page 597 of 604

Front seatFront seat adjustment ......................... 1-4, 1-11
Front-seat active head restraint..................... 1-19
Fuel Capacities and
recommended fluids/lubricants............... 10-2
Fuel economy...................................................... 5-124
Fuel information.................................................... 10-4
Fuel octane rating ............................................... 10-4
Fuel-filler cap............................................................ 3-26
Fuel-filler door......................................................... 3-26
Gauge........................................................................\
........ 2-9
Loose Fuel Cap warning................................. 3-28
Fuel efficient driving tips .................................... 5-123
Fuses........................................................................\
.............. 8-18
Fusible links...................................................................... 8-19
G
Garage door opener HomeLink®
Universal Transceiver ......................... 2-83, 2-87
Gas cap........................................................................\
........ 3-26
Gauge........................................................................\
................ 2-6 Engine coolant temperature gauge......... 2-8
Engine oil pressure gauge ............................... 2-9
Fuel gauge .................................................................... 2-9
Odometer....................................................................... 2-7
Speedometer .............................................................. 2-7
Tachometer.................................................................. 2-8
Trip computer ......................................................... 2-37
General maintenance................................................... 9-2
Glove box ........................................................................\
... 2-71
H
Hazard warning flasher switch ............................ 6-2
Head restraints/headrests................................... 1-15
Headlights Bulb replacement ................................................. 8-25
Headlight switch ................................................... 2-47
Heated seats ................................................................... 2-55
Heated steering wheel ............................................ 2-54
Heater Automatic air conditioner ............................. 4-38
Engine block heater ....................................... 5-148
Heater and air
conditioner operation....................................... 4-37
High beam assist ......................................................... 2-50
Hill start assist system ......................................... 5-132
HomeLink® Universal Transceiver ..... 2-83, 2-87
Hood release ................................................................... 3-21
Hook Coat hooks ................................................................ 2-73
Luggage hook ......................................................... 2-73
Horn........................................................................\
................ 2-55
I
Ignition switch (Push-button)............................ 5-13
Immobilizer system.................................................... 2-41
In-cabin microfilter ..................................................... 4-43
Indicator Lights..................................................................\
............ 2-15
Vehicle information display.......................... 2-20
Inside mirror .................................................................... 3-30
Inspection/Maintenance (I/M) test............. 10-38
Instrument brightness control ......................... 2-53
Instrument panel ............................................................. 2-5
Intelligent Around View® Monitor................... 4-12
Intelligent Auto Headlight system ................. 2-47 Intelligent Back-up Intervention (I-BI) ......... 5-63
Intelligent Blind Spot
Intervention (I-BSI) ...................................................... 5-46
Intelligent Cruise Control (ICC) ........................ 5-74
Intelligent Driver Alertness (I-DA) ................. 5-114
Intelligent Forward Collision
Warning (I-FCW).......................................................... 5-106
Intelligent Key..................................................................... 3-2
Intelligent Key system ................................................. 3-7
Battery replacement.......................................... 8-21
Key operating range ............................................. 3-9
Key operation .......................................................... 3-10
Warning signals...................................................... 3-12
Intelligent Lane Intervention (I-LI) .................. 5-31
Intelligent Rear View Mirror................................. 3-31
Interior light replacement..................................... 8-26
Interior light switch.................................................... 2-81
Interior lights................................................................... 2-81
ISOFIX child restraint ................................................ 1-35
J
Jump starting ................................................................. 6-12
K
Keyless entry (See remote keyless
entry system) .................................................................. 3-15
Keys ........................................................................\
.................... 3-2 For Intelligent Key system................................ 3-7
L
LabelsAir bag warning labels ..................................... 1-73
Air conditioner specification label....... 10-13
Emission control information label .... 10-12
11-3