2023 NISSAN ALTIMA parking brake
[x] Cancel search: parking brakePage 423 of 644

To reset at a slower cruising speed, use one
of the following three methods:
1. Lightly tap the brake pedal. When thevehicle attains the desired speed, push
the SET- switch and release it.
2. Push and hold the SET- switch. Release the switch when the vehicle slows down
to the desired speed.
3. Push, then quickly release the SET- switch. Each time you do this, the set
speed will decrease by about 1 mph (1.6
km/h).
To resume the preset speed, push and re-
lease the RES+ switch. The vehicle will re-
sume the last set cruising speed when the
vehicle speed is over 25 mph (40 km/h).WARNING
Failure to follow the warnings and in-
structions for proper use of the RAB
system could result in serious injury or
death.
• The RAB system is a supplemental
aid to the driver. It is not a replace-
ment for proper driving procedures.
Always use the side and rear mirrors
and turn and look in the direction you
will move before and while backing
up. Never rely solely on the RAB sys-
tem. It is the driver’s responsibility to
stay alert, drive safely, and be in con-
trol of the vehicle at all times.
• There is a limitation to the RAB sys-
tem capability. The RAB system is not
effective in all situations.
• Inclement weather or ultrasonic
sources such as an automatic car
wash, a truck’s compressed-air
brakes or a pneumatic drill may af-
fect the function of the system; this
may include reduced performance or
a false activation.
The RAB system can assist the driver when
the vehicle is backing up and approaching
objects directly behind the vehicle. The RAB system detects obstacles behind
the vehicle using the parking sensors
O1
located on the rear bumper.
NOTE:
You can temporarily cancel the sonar
function in the vehicle, but the RAB sys-
tem will continue to operate. For addi-
tional information, please see “Rear So-
nar System (RSS)” (P. 5-179).
LSD3241
REAR AUTOMATIC BRAKING (RAB) (if
so equipped)
Starting and driving5-127
Page 428 of 644

RAB SYSTEM LIMITATIONS
WARNING
Listed below are the system limitations
for the RAB system. Failure to follow the
warnings and instructions for proper
use of the RAB system could result in
serious injury or death.
• When the vehicle approaches an ob-
stacle while the accelerator or brake
pedal is depressed, the function may
not operate or the start of operation
may be delayed. The RAB system
may not operate or may not perform
sufficiently due to vehicle conditions,
driving conditions, the traffic envi-
ronment, the weather, road surface
conditions, etc. Do not wait for the
system to operate. Operate the brake
pedal by yourself as soon as
necessary.
• If it is necessary to override RAB op-
eration, strongly press the accelera-
tor pedal. •
Always check your surroundings and
turn to check what is behind you be-
fore and while backing up. The RAB
system detects stationary objects
behind the vehicle. The RAB system
does not detect the following ob-
jects:
– Moving objects
– Low objects
– Narrow objects
– Wedge-shaped objects
– Objects close to the bumper (less
than approximately 1 f t [30 cm])
– Objects that suddenly appear
– Thin objects such as rope, wire,
chain, etc.
• The RAB system may not operate for
the following obstacles:
– Obstacles located high off the
ground
– Obstacles in a position offset from
your vehicle
– Obstacles, such as spongy materi-
als or snow, that have sof t outer
surfaces and can easily absorb a
sound wave •
The RAB system may not operate in
the following conditions:
– There is rain, snow, ice, dirt, etc.,
attached to the sonar sensors.
– A loud sound is heard in the area
around the vehicle.
– The surface of the obstacle is di-
agonal to the rear of the vehicle.
• The RAB system may unintentionally
operate in the following conditions:
– There is overgrown grass in the
area around the vehicle.
– There is a structure (e.g., a wall, toll
gate equipment, a narrow tunnel,
a parking lot gate) near the side of
the vehicle.
– There are bumps, protrusions, or
manhole covers on the road
surface.
– The vehicle drives through a
draped flag or a curtain.
– There is an accumulation of snow
or ice behind the vehicle.
– An ultrasonic wave source, such as
another vehicle’s sonar, is near
the vehicle.
5-132Starting and driving
Page 467 of 644
WARNING
• Do not stop or park the vehicle over
flammable materials such as dry
grass, waste paper or rags. They may
ignite and cause a fire. •
Safe parking procedures require that
both the parking brake be set and the
transmission placed into P (Park).
Failure to do so could cause the ve-
hicle to move unexpectedly or roll
away and result in an accident. Make
sure the shif t lever has been pushed
as far forward as it can go and cannot
be moved without depressing the
foot brake pedal.
• Never leave the engine running while
the vehicle is unattended. •
Do not leave children unattended in-
side the vehicle. They could unknow-
ingly activate switches or controls or
make the vehicle move. Unattended
children could become involved in
serious accidents.
• To help avoid risk of injury or death
through unintended operation of the
vehicle and/or its systems, do not
leave children, people who require
the assistance of others or pets unat-
tended in your vehicle. Additionally,
the temperature inside a closed ve-
hicle on a warm day can quickly be-
come high enough to cause a signifi-
cant risk of injury or death to people
and pets.
1. Firmly apply the parking brake.
2. Move the shif t lever to the P (Park) position.
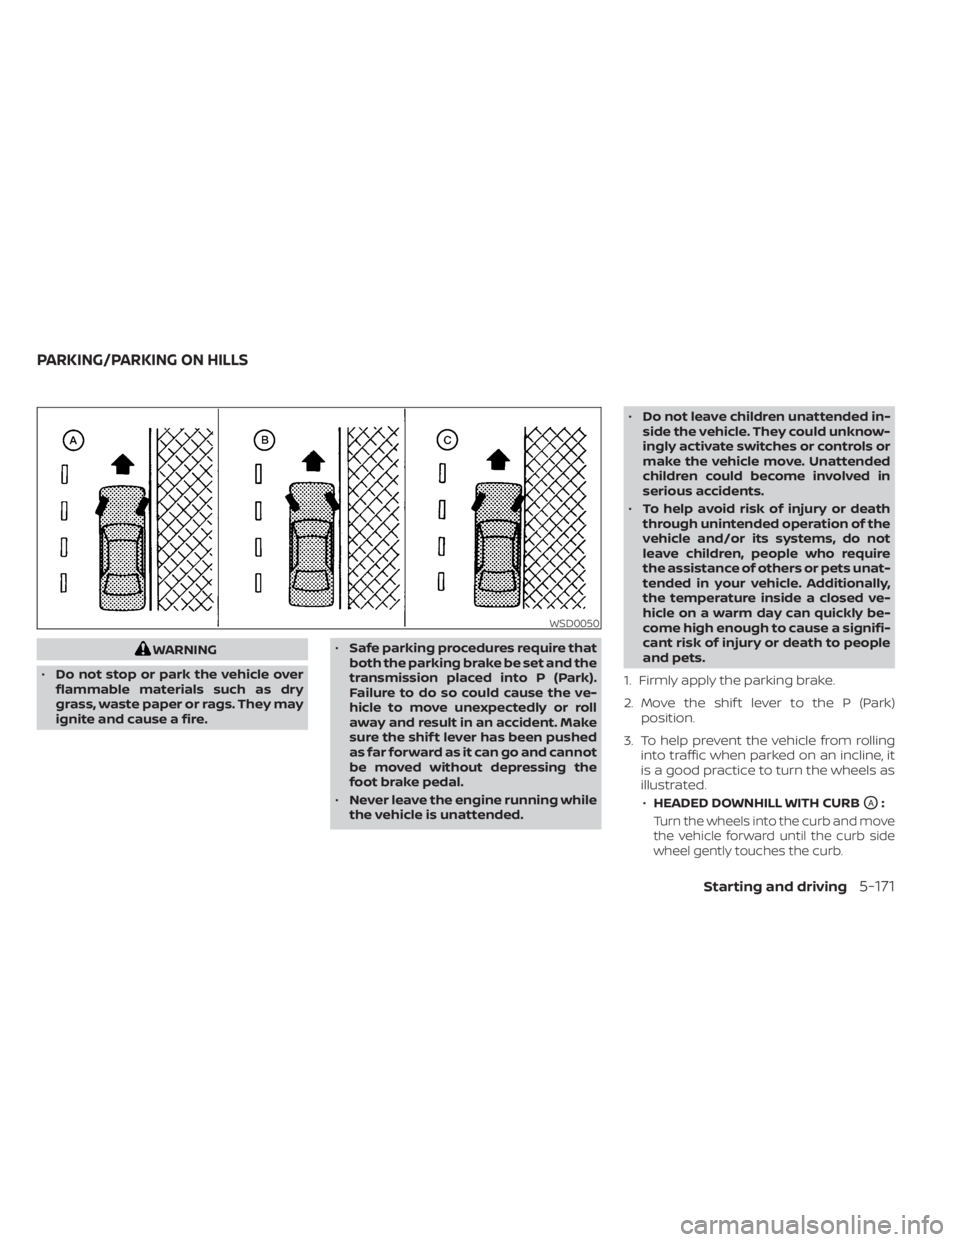
3. To help prevent the vehicle from rolling into traffic when parked on an incline, it
is a good practice to turn the wheels as
illustrated.
• HEADED DOWNHILL WITH CURB
OA:
Turn the wheels into the curb and move
the vehicle forward until the curb side
wheel gently touches the curb.
WSD0050
PARKING/PARKING ON HILLS
Starting and driving5-171
Page 469 of 644
The brake system has two separate hy-
draulic circuits. If one circuit malfunctions,
you will still have braking at two wheels.
BRAKE PRECAUTIONS
Vacuum assisted brakes
The brake booster aids braking by using
engine vacuum. If the engine stops, you
can stop the vehicle by depressing the
brake pedal. However, greater foot pres-
sure on the brake pedal will be required to
stop the vehicle and stopping distance will
be longer.
Using the brakes
Avoid resting your foot on the brake pedal
while driving. This will overheat the brakes,
wear out the brake pads faster, and reduce
gas mileage.
To help reduce brake wear and to prevent
the brakes from overheating, reduce speed
and downshif t to a lower gear before going
down a slope or long grade. Overheated
brakes may reduce braking performance
and could result in loss of vehicle control.
WARNING
• While driving on a slippery surface,
be careful when braking, accelerat-
ing or downshif ting. Abrupt braking
or accelerating could cause the
wheels to skid and result in an
accident.
• If the engine is not running or is
turned off while driving, the power
assist for the brakes will not work.
Braking will be harder.
Wet brakes
When the vehicle is washed or driven
through water, the brakes may get wet. As
a result, your braking distance will be lon-
ger and the vehicle may pull to one side
during braking.
To dry the brakes, drive the vehicle at a safe
speed while lightly pressing the brake
pedal to heat up the brakes. Do this until
the brakes return to normal. Avoid driving
the vehicle at high speeds until the brakes
function correctly.
Parking brake break-in
Break in the parking brake shoes whenever
the stopping effect of the parking brake is
weakened or whenever the parking brake
shoes and/or drums/rotors are replaced,
in order to assure the best braking
performance.
This procedure is described in the vehicle
service manual. It is recommended that
you visit a NISSAN dealer for this service.
ANTI-LOCK BRAKING SYSTEM (ABS)
WARNING
• The ABS is a sophisticated device, but
it cannot prevent accidents resulting
from careless or dangerous driving
techniques. It can help maintain ve-
hicle control during braking on slip-
pery surfaces. Remember that stop-
ping distances on slippery surfaces
will be longer than on normal sur-
faces even with ABS. Stopping dis-
tances may also be longer on rough,
gravel or snow covered roads, or if
you are using tire chains. Always
maintain a safe distance from the ve-
hicle in front of you. Ultimately, the
driver is responsible for safety.
BRAKE SYSTEM
Starting and driving5-173
Page 475 of 644
When the vehicle is stopped on a hill, the hill
start assist system automatically keeps
the brakes applied to help prevent the ve-
hicle from rolling backward in the time it
takes the driver to release the brake pedal
and apply the accelerator.
The hill start assist system will operate au-
tomatically under the following conditions:
• The transmission is shif ted to a forwardor reverse gear.
• The vehicle is stopped completely on a hill by applying the brake. The maximum
holding time is 2 seconds. Af ter 2 sec-
onds the vehicle will begin to roll back and
the hill start assist system will stop oper-
ating completely.
The hill start assist system will not operate
when the shif t lever is placed in the N (Neu-
tral) or P (Park) position or on a flat and level
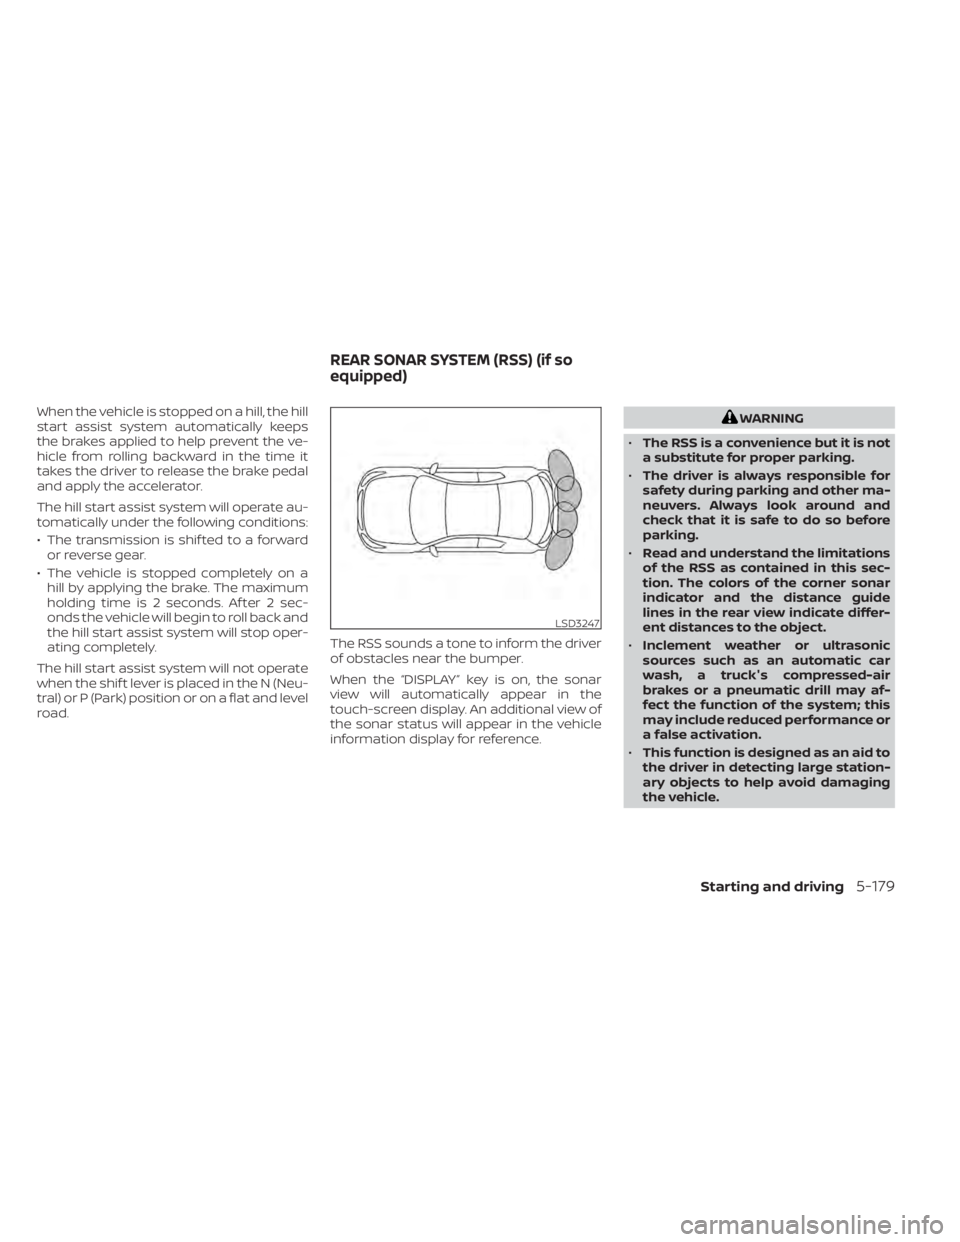
road. The RSS sounds a tone to inform the driver
of obstacles near the bumper.
When the “DISPLAY” key is on, the sonar
view will automatically appear in the
touch-screen display. An additional view of
the sonar status will appear in the vehicle
information display for reference.WARNING
• The RSS is a convenience but it is not
a substitute for proper parking.
• The driver is always responsible for
safety during parking and other ma-
neuvers. Always look around and
check that it is safe to do so before
parking.
• Read and understand the limitations
of the RSS as contained in this sec-
tion. The colors of the corner sonar
indicator and the distance guide
lines in the rear view indicate differ-
ent distances to the object.
• Inclement weather or ultrasonic
sources such as an automatic car
wash, a truck's compressed-air
brakes or a pneumatic drill may af-
fect the function of the system; this
may include reduced performance or
a false activation.
• This function is designed as an aid to
the driver in detecting large station-
ary objects to help avoid damaging
the vehicle.
LSD3247
REAR SONAR SYSTEM (RSS) (if so
equipped)
Starting and driving5-179
Page 488 of 644
CHANGING A FLAT TIRE (for
models with spare tire)
If you have a flat tire, follow the instructions
below:
NOTE:
For models with the emergency tire
puncture repair kit, a spare tire, jack
and rod are not equipped as stan-
dard.
Stopping the vehicle
1. Safely move the vehicle off the road andaway from traffic.
2. Turn on the hazard warning flashers.
3. Park on a level surface and apply the parking brake. Move the shif t lever to P
(Park).
4. Turn off the engine.
5. Raise the hood to warn other traffic and to signal professional road assistance
personnel that you need assistance.
6. Have all passengers get out of the ve- hicle and stand in a safe place, away
from traffic and clear of the vehicle.
WARNING
• Make sure the parking brake is se-
curely applied and the Continuously
Variable Transmission (CVT) is
shif ted into P (Park).
• Never change tires when the vehicle
is on a slope, ice or slippery areas.
This is hazardous.
• Never change tires if oncoming traf-
fic is close to your vehicle. Wait for
professional road assistance.
Blocking wheels
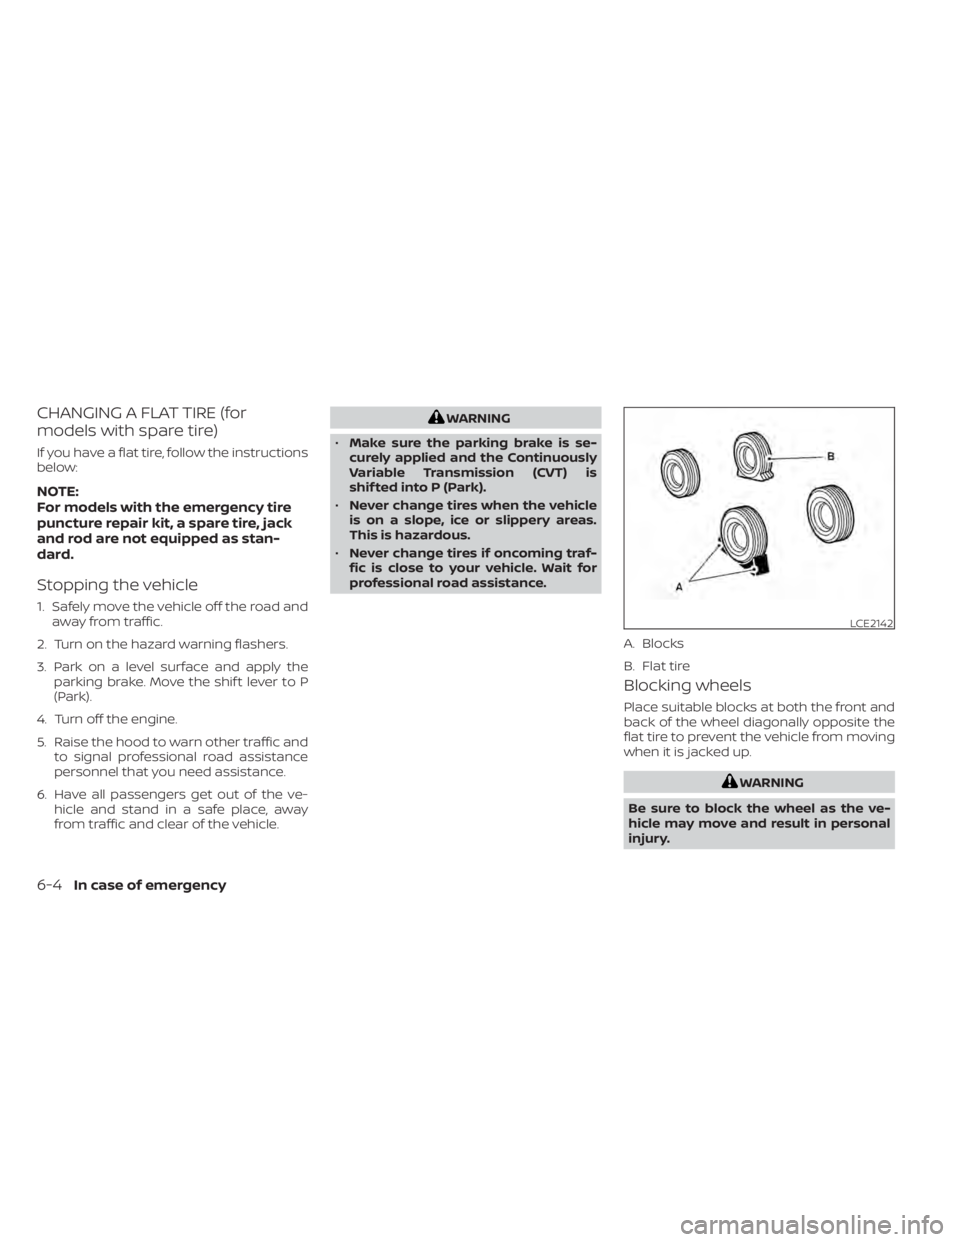
Place suitable blocks at both the front and
back of the wheel diagonally opposite the
flat tire to prevent the vehicle from moving
when it is jacked up.
WARNING
Be sure to block the wheel as the ve-
hicle may move and result in personal
injury.
LCE2142
A. Blocks
B. Flat tire
6-4In case of emergency
Page 496 of 644
–Only use the kit to inflate the tires
of your vehicle and to check the
vehicle’s tire pressure.
– Only plug the compressor into a
12-volt DC car power point.
– Keep the kit free of water and dirt.
– Do not disassemble or modif y the
kit.
– Do not drop the kit or allow hard
impacts to the kit.
• Do not use the emergency tire punc-
ture repair kit under the following
conditions. It is recommended that
you visit a NISSAN dealer or profes-
sional road assistance.
– when the sealant has passed its
expiration date (shown on the la-
bel attached to the bottle)
– when the cut or the puncture is
approximately 0.25 in (6 mm) or
longer
– when the tire sidewall is damaged
– when the vehicle has been driven
with extremely low tire pressure
– when the tire has come off the in-
side or the outside of the wheel
– when the tire wheel is damaged
– when two or more tires are flat If you have a flat tire, follow the instructions
below.
Stopping the vehicle
1. Safely move the vehicle off the road and
away from traffic.
2. Turn on the hazard warning flashers.
3. Park on a level surface and apply the parking brake.
4. Move the shif t lever to the P (Park) position.
5. Turn off the engine.
6. Raise the hood to warn other traffic and to signal professional road assistance
personnel that you need assistance.
7. Have all passengers get out of the ve- hicle and stand in a safe place, away
from traffic and clear of the vehicle.
WARNING
• Make sure the parking brake is se-
curely applied and the vehicle is
placed into the P (Park) position.
• Never repair tires when the vehicle is
on a slope, ice or slippery areas. This
is hazardous.
• Never repair tires if oncoming traffic
is close to your vehicle. Wait for pro-
fessional road assistance.
6-12In case of emergency
Page 502 of 644
WARNING
Always follow the instructions below.
Failure to do so could result in damage
to the charging system and cause per-
sonal injury.
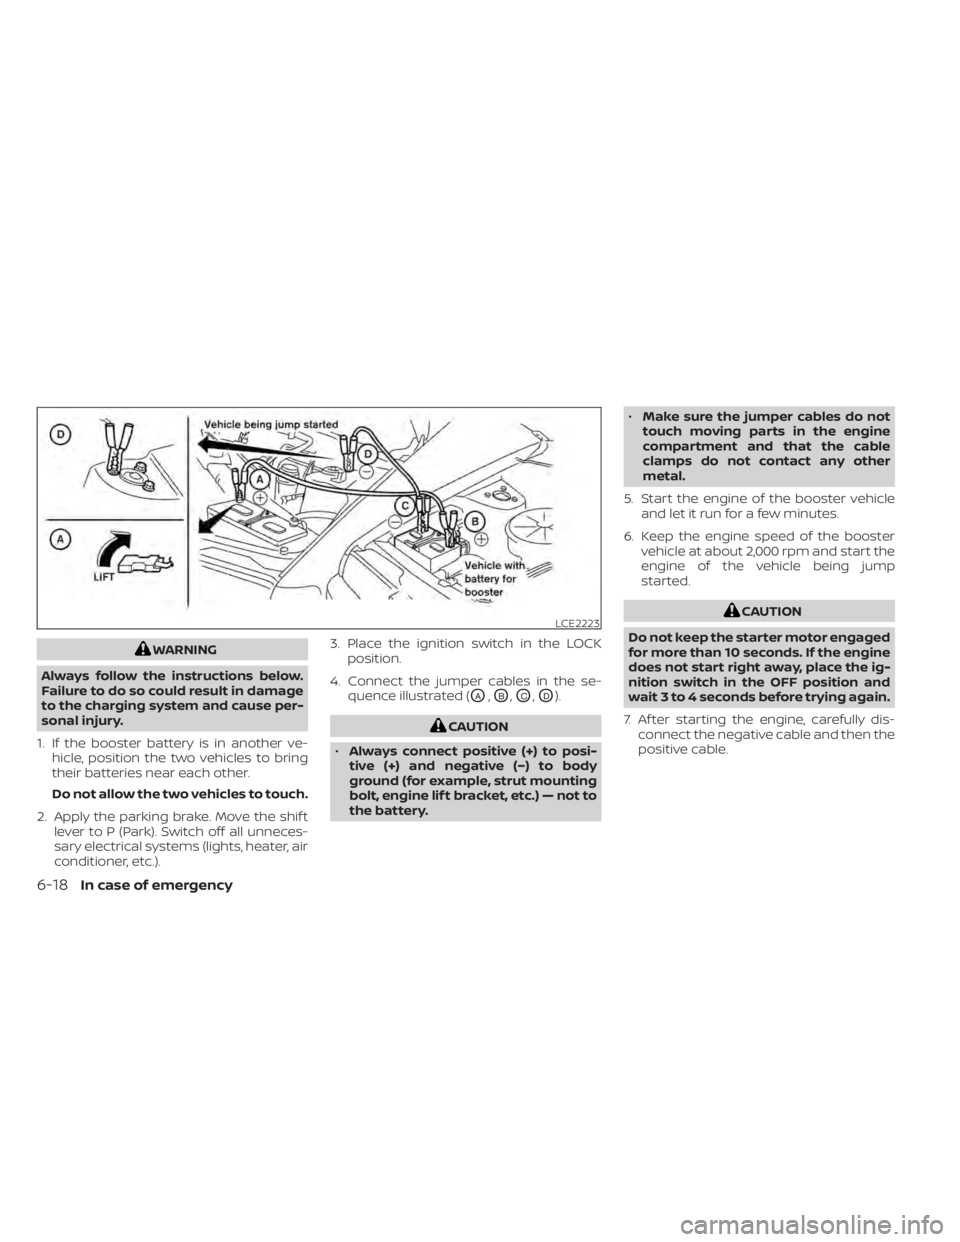
1. If the booster battery is in another ve- hicle, position the two vehicles to bring
their batteries near each other.
Do not allow the two vehicles to touch.
2. Apply the parking brake. Move the shif t lever to P (Park). Switch off all unneces-
sary electrical systems (lights, heater, air
conditioner, etc.). 3. Place the ignition switch in the LOCK
position.
4. Connect the jumper cables in the se- quence illustrated (
OA,OB,OC,OD).
CAUTION
• Always connect positive (+) to posi-
tive (+) and negative (−) to body
ground (for example, strut mounting
bolt, engine lif t bracket, etc.) — not to
the battery. •
Make sure the jumper cables do not
touch moving parts in the engine
compartment and that the cable
clamps do not contact any other
metal.
5. Start the engine of the booster vehicle and let it run for a few minutes.
6. Keep the engine speed of the booster vehicle at about 2,000 rpm and start the
engine of the vehicle being jump
started.
CAUTION
Do not keep the starter motor engaged
for more than 10 seconds. If the engine
does not start right away, place the ig-
nition switch in the OFF position and
wait 3 to 4 seconds before trying again.
7. Af ter starting the engine, carefully dis- connect the negative cable and then the
positive cable.LCE2223
6-18In case of emergency