2023 NISSAN ALTIMA radio
[x] Cancel search: radioPage 277 of 644
When installing a CB, ham radio or car
phone in your vehicle, be sure to observe
the following precautions; otherwise, the
new equipment may adversely affect the
engine control system and other electronic
parts.
WARNING
• A cellular phone should not be used
for any purpose while driving so full
attention may be given to vehicle op-
eration. Some jurisdictions prohibit
the use of cellular phones while
driving.
• If you must make a call while your
vehicle is in motion, the hands free
cellular phone operational mode is
highly recommended. Exercise ex-
treme caution at all times so full at-
tention may be given to vehicle
operation.
• If you are unable to devote full atten-
tion to vehicle operation while talk-
ing on the phone, pull off the road to
a safe location and stop your vehicle.
CAUTION
• Keep the antenna as far away as pos-
sible from the electronic control
modules.
• Keep the antenna wire more than 8 in
(20 cm) away from the electronic
control system harnesses. Do not
route the antenna wire next to any
harness.
• Adjust the antenna standing-wave
ratio as recommended by the
manufacturer.
• Connect the ground wire from the CB
radio chassis to the body.
• For additional information, it is rec-
ommended that you visit a NISSAN
dealer for servicing.WARNING
• Use a phone af ter stopping your ve-
hicle in a safe location. If you have to
use a phone while driving, exercise
extreme caution at all times so full
attention may be given to vehicle
operation.
• If you are unable to devote full atten-
tion to vehicle operation while talk-
ing on the phone, pull off the road to
a safe location and stop your vehicle.
CAUTION
To avoid discharging the vehicle bat-
tery, use a phone af ter starting the
engine.
CAR PHONE OR CB RADIO BLUETOOTH® HANDS-FREE PHONE
SYSTEM
Monitor, climate, audio, phone and voice recognition systems4-67
Page 279 of 644
• You will not be able to use a hands-freephone under the following conditions:– Your vehicle is outside of the cellular service area.
– Your vehicle is in an area where it is difficult to receive a cellular signal; such
as in a tunnel, in an underground park-
ing garage, near a tall building or in a
mountainous area.
– Your cellular phone is locked to prevent it from being dialed.
• When the radio wave condition is not ideal or ambient sound is too loud, it may
be difficult to hear the other person's
voice during a call.
• Do not place the cellular phone in an area surrounded by metal or far away from
the in-vehicle phone module to prevent
tone quality degradation and wireless
connection disruption.
• While a cellular phone is connected through the Bluetooth® wireless connec-
tion, the battery power of the cellular
phone may discharge quicker than usual.
The Bluetooth® Hands-Free Phone Sys-
tem cannot charge cellular phones. • Some cellular phones or other devices
may cause interference or a buzzing
noise to come from the audio system
speakers. Storing the device in a different
location may reduce or eliminate the
noise.
• For additional information, refer to the cellular phone owner's manual regarding
the telephone charges, cellular phone
antenna and body, etc.
REGULATORY INFORMATION
FCC Regulatory information
– CAUTION: To maintain compliance with FCC’s RF exposure guidelines, use only
the supplied antenna. Unauthorized an-
tenna, modification, or attachments
could damage the transmitter and may
violate FCC regulations.
– Operation is subject to the following two conditions:1. 1) This device may not cause interfer- ence and
2.2) this device must accept any interfer- ence, including interference that may
cause undesired operation of the
device. IC Regulatory information
– Operation is subject to the following two
conditions: (1) this device may not cause
interference, and (2) this device must ac-
cept any interference, including interfer-
ence that may cause undesired opera-
tion of the device.
– This Class B digital apparatus meets all requirements of the Canadian
Interference-Causing Equipment
Regulations.BLUETOOTH® is a
trademark owned by
Bluetooth SIG, Inc. and
licensed to
Panasonic.
USING THE SYSTEM
The system allows hands-free operation of
the Bluetooth® Hands-Free Phone System.
If the vehicle is in motion, some commands
may not be available so full attention may
be given to vehicle operation.
Monitor, climate, audio, phone and voice recognition systems4-69
Page 280 of 644
Initialization
When the ignition switch is placed in the ON
position, NISSAN Voice Recognition is initial-
ized, which takes a few seconds. If the
button is pressed before the initialization
completes, the system will announce
“There is no phone connected” and will not
react to voice commands.
Operating tips
To get the best performance out of the
NISSAN Voice Recognition System, observe
the following:
• Keep the interior of the vehicle as quiet aspossible. Keep all vents pointed away
from the microphone and close the win-
dows to eliminate surrounding noises
(traffic noises, vibration sounds, etc.),
which may prevent the system from rec-
ognizing voice commands correctly.
• Wait until the tone sounds before speak- ing a command. Otherwise, the com-
mand will not be received properly.
• Start speaking a command within 5 sec- onds af ter the tone sounds.
• Speak in a natural voice without pausing between words. • For calling contacts by name, please say
both the first and last name of the con-
tact for better recognition.
Giving voice commands
To operate NISSAN Voice Recognition,
press thebutton located on the steer-
ing wheel for less than 1.5 seconds. Af ter
the tone sounds, speak a command.
The command given is picked up by the
microphone, and voice feedback is given
when the command is accepted.
• If a command is not recognized, the sys- tem announces, “Please say or select a
command from the displayed list.” Make
sure the command is said exactly as
prompted by the system and repeat the
command in a clear voice.
• If you want to go back to the previous command, you can say “Go back” or “Cor-
rection” any time the system is waiting for
a response. • You can cancel a command when the
system is waiting for a response by say-
ing, “Cancel” or “Quit.” The system an-
nounces “Exit” and ends the Voice Recog-
nition session. You can also press and
hold the
button on the steering
wheel for 1.5 seconds at any time to end
the Voice Recognition session. Whenever
the Voice Recognition session is can-
celed, a double beep is played to indicate
you have exited the system.
• If you want to adjust the volume of the voice feedback, push the (+ or -) volume
control switches on the steering wheel
while being provided with feedback. You
can also use the radio volume control
knob.
Voice Prompt Interrupt
In most cases you can interrupt the voice
feedback to speak the next command by
pressing the
button on the steering
wheel. Af ter interrupting the system, wait
for a beep before speaking your command.
One Shot Call (if so equipped)
To use the system faster, you may speak
the second level commands with the main
menu command on the main menu. For
example, press the
button and af ter
the tone say, “Call Redial”.
4-70Monitor, climate, audio, phone and voice recognition systems
Page 302 of 644
Additional information:
• When using a wheel without the TPMSsuch as the spare tire, the TPMS does not
monitor the tire pressure of the spare tire.
• The TPMS will activate only when the ve- hicle is driven at speeds above 16 mph (25
km/h). Also, this system may not detect a
sudden drop in tire pressure (for example,
a flat tire while driving).
• The low tire pressure warning light does not automatically turn off when the tire
pressure is adjusted on all four tires. Af ter
all four tires are inflated to the recom-
mended pressure, the vehicle must be
driven at speeds above 16 mph (25 km/h)
to activate the TPMS and turn off the low
tire pressure warning light. Use a tire
pressure gauge to check the tire
pressure.
• The “Tire Pressure Low - Add Air” warning appears in the vehicle information dis-
play when the low tire pressure warning
light is illuminated and low tire pressure is
detected. The “Tire Pressure Low - Add
Air” warning turns off when the low tire
pressure warning light turns off. • The “Tire Pressure Low - Add Air” warning
appears each time the ignition switch is
placed in the ON position as long as the
low tire pressure warning light remains
illuminated.
• The “Tire Pressure Low - Add Air” warning does not appear if the low tire pressure
warning light illuminates to indicate a
TPMS malfunction.
• Tire pressure rises and falls depending on the heat caused by the vehicle’s opera-
tion and the outside temperature. Do not
reduce the tire pressure af ter driving be-
cause the tire pressure rises af ter driving.
Low outside temperature can lower the
temperature of the air inside the tire
which can cause a lower tire inflation
pressure. This may cause the low tire
pressure warning light to illuminate. If the
warning light illuminates, check the tire
pressure for all four tires.
• The Tire and Loading Information label is located in the driver's door opening.
• You can also check the tire pressure of all tires (except the spare) on the vehicle in-
formation display screen. The order of
the tire pressure figures displayed on the
screen corresponds with the actual order
of the tire position. For additional information, see “Low tire
pressure warning light” (P. 2-13), “Tire Pres-
sure Monitoring System (TPMS)” (P. 6-3) and
“Tire pressure” (P. 8-29).
WARNING
• Radio waves could adversely affect
electric medical equipment. Those
who use a pacemaker should contact
the electric medical equipment
manufacturer for the possible influ-
ences before use.
5-6Starting and driving
Page 303 of 644
•If the low tire pressure warning light
illuminates while driving, avoid sud-
den steering maneuvers or abrupt
braking, reduce vehicle speed, pull
off the road to a safe location and
stop the vehicle as soon as possible.
Driving with underinflated tires may
permanently damage the tires and
increase the likelihood of tire failure.
Serious vehicle damage could occur
and may lead to an accident and
could result in serious personal in-
jury. Check the tire pressure for all
four tires. Adjust the tire pressure to
the recommended COLD tire pres-
sure shown on the Tire and Loading
Information label to turn the low tire
pressure warning light off. If you have
a flat tire, replace it with a spare tire
as soon as possible. (For additional
information, see “Flat tire” (P. 6-3) for
changing a flat tire.) •
When using a wheel without the
TPMS such as the spare tire, when a
spare tire is mounted or a wheel is
replaced, tire pressure will not be in-
dicated, the TPMS will not function
and the low tire pressure warning
light will flash for approximately 1
minute. The light will remain on af ter
1 minute. It is recommended that you
visit a NISSAN dealer for tire replace-
ment and/or system resetting.
• Replacing tires with those not origi-
nally specified by NISSAN could af-
fect the proper operation of the
TPMS.
• Do not inject any tire liquid or aerosol
tire sealant into the tires, as this may
cause a malfunction of the tire pres-
sure sensors.
CAUTION
Do not place metalized film or any
metal parts (antenna, etc.) on the win-
dows. This may cause poor reception of
the signals from the tire pressure sen-
sors, and the TPMS will not function
properly. Some devices and transmitters may tem-
porarily interfere with the operation of the
TPMS and cause the low tire pressure
warning light to illuminate.
Some examples are:
• Facilities or electric devices using similar
radio frequencies are near the vehicle.
• If a transmitter set to similar frequencies is being used in or near the vehicle.
• If a computer (or similar equipment) or a DC/AC converter is being used in or near
the vehicle.
The low tire pressure warning light may
illuminate in the following cases:
• If the vehicle is equipped with a wheel and tire without TPMS.
• If the TPMS has been replaced and the ID has not been registered.
• If the wheel is not originally specified by NISSAN.
Starting and driving5-7
Page 310 of 644
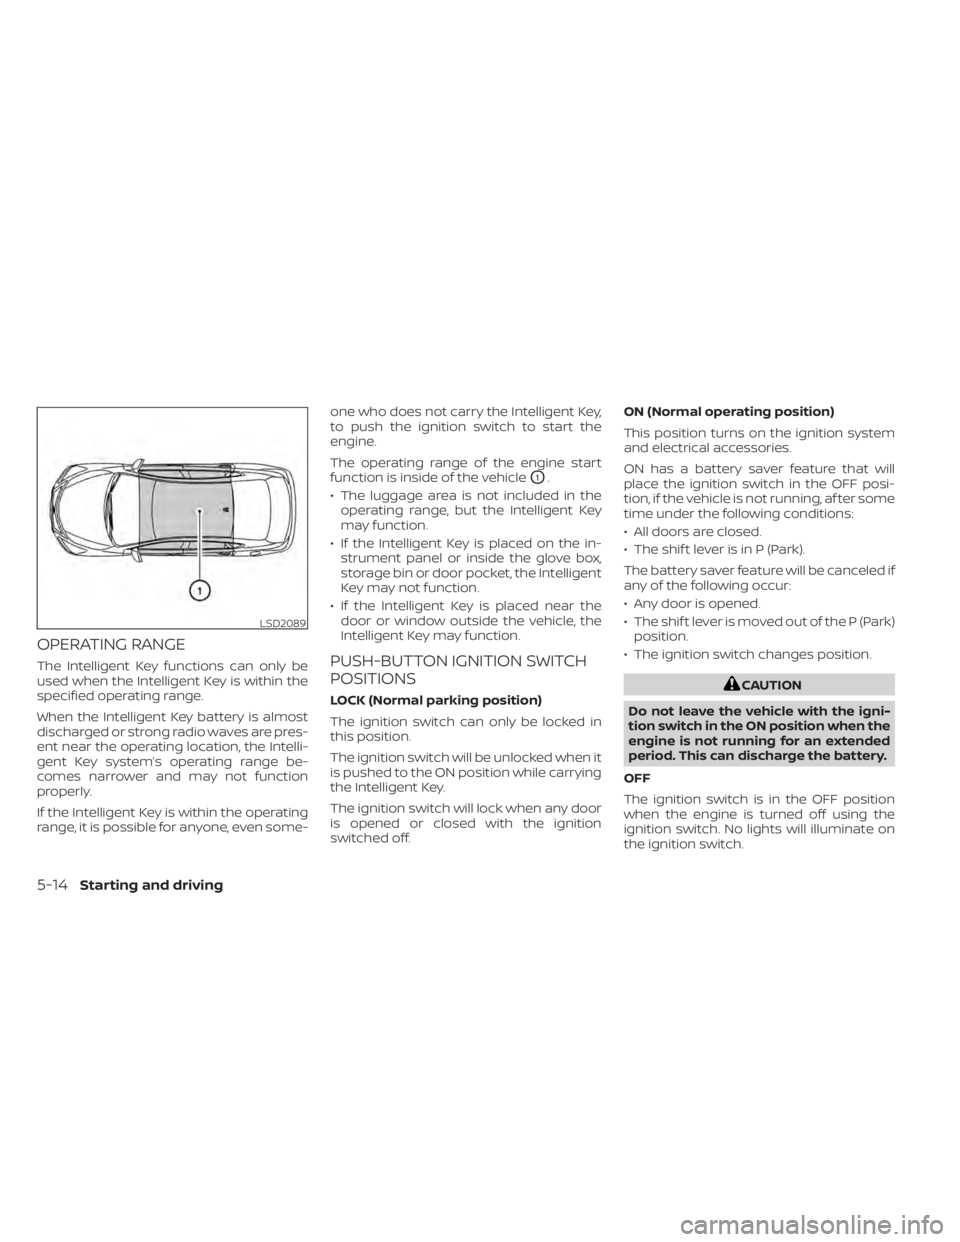
OPERATING RANGE
The Intelligent Key functions can only be
used when the Intelligent Key is within the
specified operating range.
When the Intelligent Key battery is almost
discharged or strong radio waves are pres-
ent near the operating location, the Intelli-
gent Key system’s operating range be-
comes narrower and may not function
properly.
If the Intelligent Key is within the operating
range, it is possible for anyone, even some-one who does not carry the Intelligent Key,
to push the ignition switch to start the
engine.
The operating range of the engine start
function is inside of the vehicle
O1.
• The luggage area is not included in the operating range, but the Intelligent Key
may function.
• If the Intelligent Key is placed on the in- strument panel or inside the glove box,
storage bin or door pocket, the Intelligent
Key may not function.
• If the Intelligent Key is placed near the door or window outside the vehicle, the
Intelligent Key may function.
PUSH-BUTTON IGNITION SWITCH
POSITIONS
LOCK (Normal parking position)
The ignition switch can only be locked in
this position.
The ignition switch will be unlocked when it
is pushed to the ON position while carrying
the Intelligent Key.
The ignition switch will lock when any door
is opened or closed with the ignition
switched off. ON (Normal operating position)
This position turns on the ignition system
and electrical accessories.
ON has a battery saver feature that will
place the ignition switch in the OFF posi-
tion, if the vehicle is not running, af ter some
time under the following conditions:
• All doors are closed.
• The shif t lever is in P (Park).
The battery saver feature will be canceled if
any of the following occur:
• Any door is opened.
• The shif t lever is moved out of the P (Park)
position.
• The ignition switch changes position.CAUTION
Do not leave the vehicle with the igni-
tion switch in the ON position when the
engine is not running for an extended
period. This can discharge the battery.
OFF
The ignition switch is in the OFF position
when the engine is turned off using the
ignition switch. No lights will illuminate on
the ignition switch.
LSD2089
5-14Starting and driving
Page 311 of 644
AUTO ACC:
With the vehicle in the P (Park) position, the
Intelligent Key with you and the ignition
switch placed from the ON position to the
OFF position, the radio can still be used for
a period of time, or until the driver’s door is
opened.
Af ter a period of time, functions such as
radio, navigation, and Bluetooth® Hands-
Free Phone System may be restarted by
pressing the POWER button/VOLUME con-
trol knob or the key fob unlock button. For
additional information, refer to the sepa-
rate NissanConnect® Owner’s Manual.
EMERGENCY ENGINE SHUT OFF
To shut off the engine in an emergency
situation while driving, perform the follow-
ing procedure:
• Rapidly push the ignition switch threeconsecutive times in less than 1.5 sec-
onds, or
• Push and hold the ignition switch for more than 2 seconds.
NISSAN INTELLIGENT KEY®
BATTERY DISCHARGE
If the battery of the NISSAN Intelligent Key®
is discharged or environmental conditions
interfere with the Intelligent Key operation,
start the engine according to the following
procedure:
1. Place the shif t lever in the P (Park) position.
2. Firmly apply the foot brake.
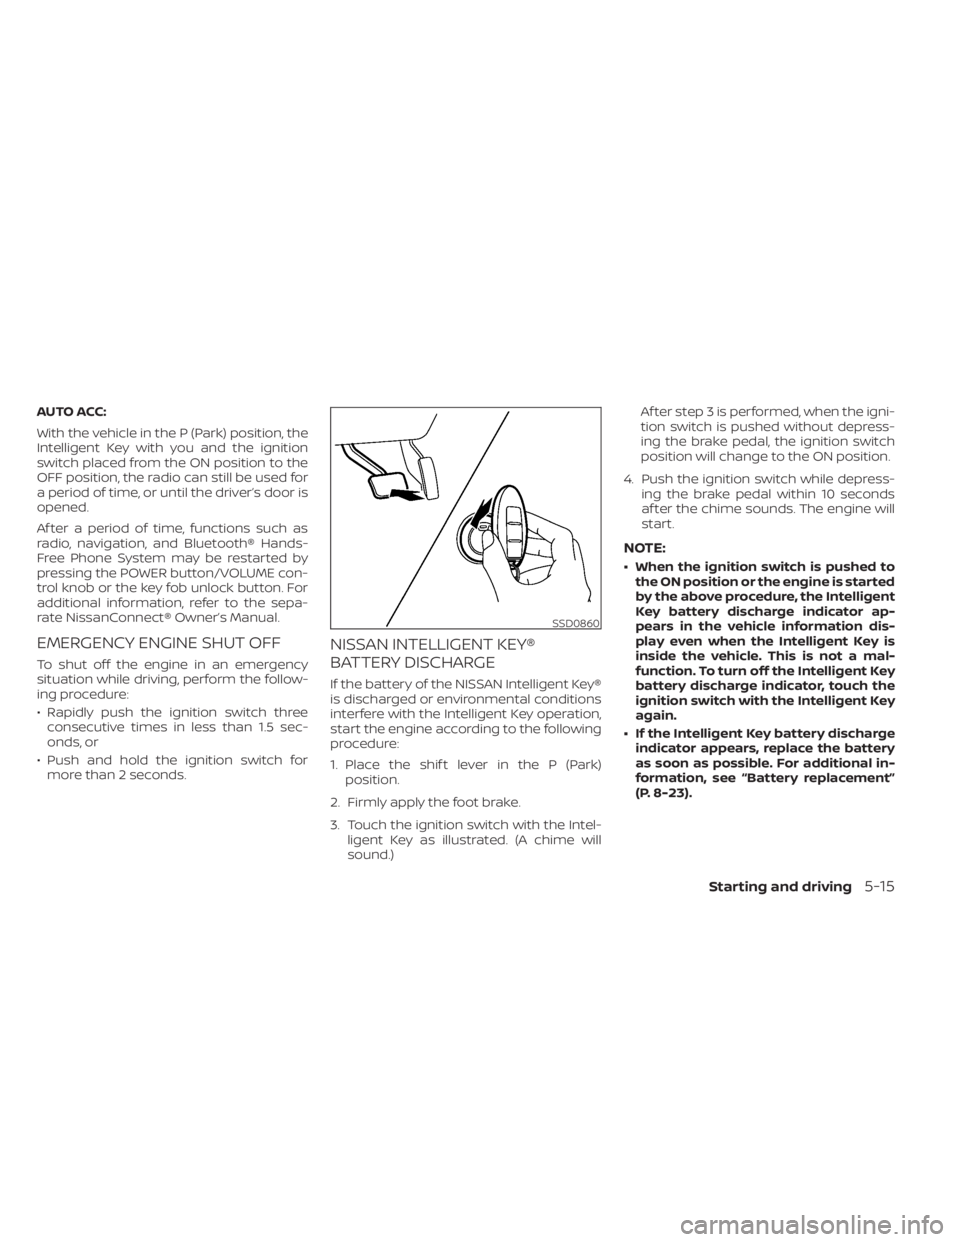
3. Touch the ignition switch with the Intel- ligent Key as illustrated. (A chime will
sound.) Af ter step 3 is performed, when the igni-
tion switch is pushed without depress-
ing the brake pedal, the ignition switch
position will change to the ON position.
4. Push the ignition switch while depress- ing the brake pedal within 10 seconds
af ter the chime sounds. The engine will
start.
NOTE:
• When the ignition switch is pushed tothe ON position or the engine is started
by the above procedure, the Intelligent
Key battery discharge indicator ap-
pears in the vehicle information dis-
play even when the Intelligent Key is
inside the vehicle. This is not a mal-
function. To turn off the Intelligent Key
battery discharge indicator, touch the
ignition switch with the Intelligent Key
again.
• If the Intelligent Key battery discharge indicator appears, replace the battery
as soon as possible. For additional in-
formation, see “Battery replacement”
(P. 8-23).
SSD0860
Starting and driving5-15
Page 353 of 644
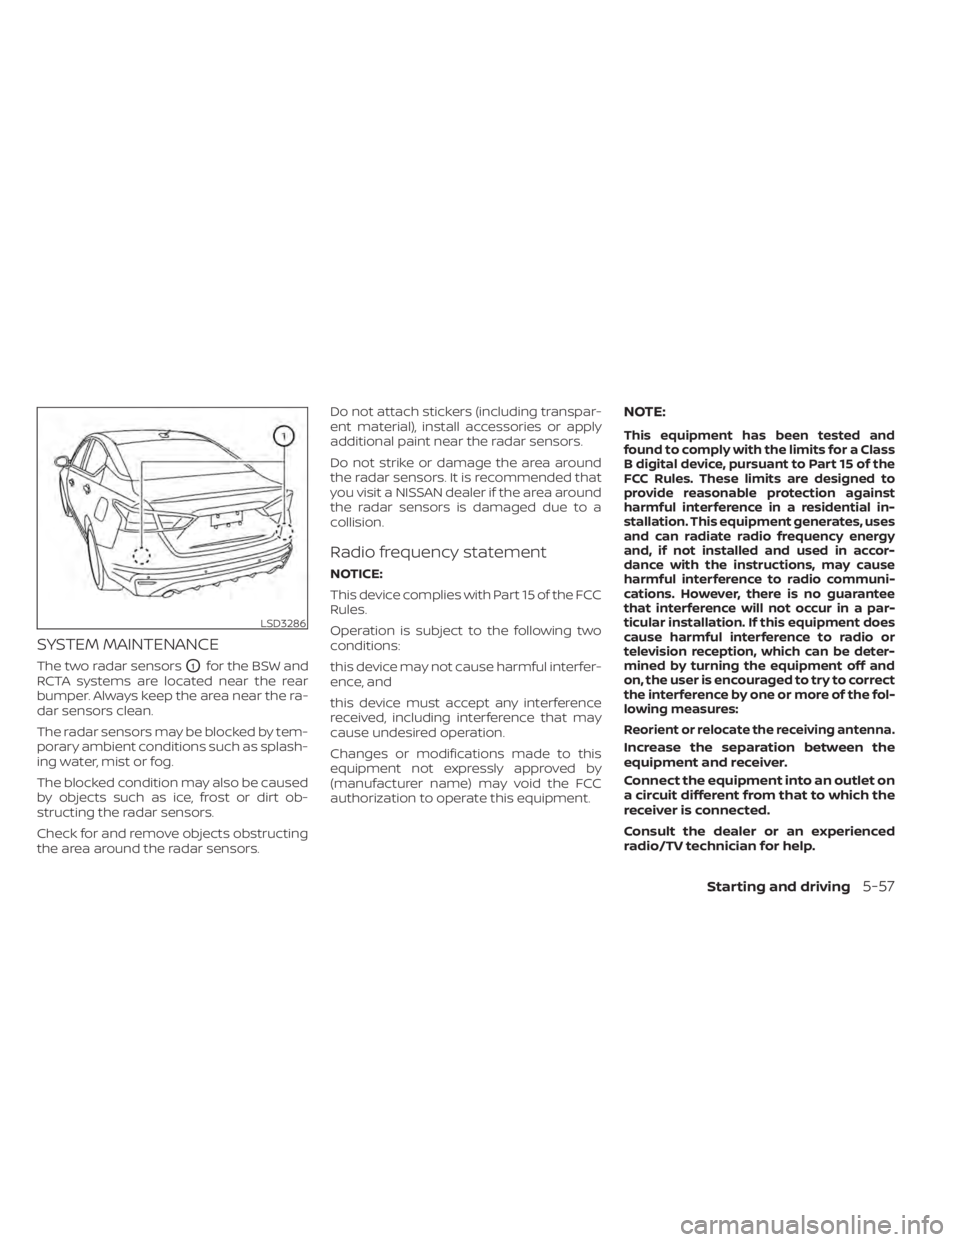
SYSTEM MAINTENANCE
The two radar sensorsO1for the BSW and
RCTA systems are located near the rear
bumper. Always keep the area near the ra-
dar sensors clean.
The radar sensors may be blocked by tem-
porary ambient conditions such as splash-
ing water, mist or fog.
The blocked condition may also be caused
by objects such as ice, frost or dirt ob-
structing the radar sensors.
Check for and remove objects obstructing
the area around the radar sensors. Do not attach stickers (including transpar-
ent material), install accessories or apply
additional paint near the radar sensors.
Do not strike or damage the area around
the radar sensors. It is recommended that
you visit a NISSAN dealer if the area around
the radar sensors is damaged due to a
collision.
Radio frequency statement
NOTICE:
This device complies with Part 15 of the FCC
Rules.
Operation is subject to the following two
conditions:
this device may not cause harmful interfer-
ence, and
this device must accept any interference
received, including interference that may
cause undesired operation.
Changes or modifications made to this
equipment not expressly approved by
(manufacturer name) may void the FCC
authorization to operate this equipment.
NOTE:
This equipment has been tested and
found to comply with the limits for a Class
B digital device, pursuant to Part 15 of the
FCC Rules. These limits are designed to
provide reasonable protection against
harmful interference in a residential in-
stallation. This equipment generates, uses
and can radiate radio frequency energy
and, if not installed and used in accor-
dance with the instructions, may cause
harmful interference to radio communi-
cations. However, there is no guarantee
that interference will not occur in a par-
ticular installation. If this equipment does
cause harmful interference to radio or
television reception, which can be deter-
mined by turning the equipment off and
on, the user is encouraged to try to correct
the interference by one or more of the fol-
lowing measures:
Reorient or relocate the receiving antenna.
Increase the separation between the
equipment and receiver.
Connect the equipment into an outlet on
a circuit different from that to which the
receiver is connected.
Consult the dealer or an experienced
radio/TV technician for help.
LSD3286
Starting and driving5-57