2023 NISSAN ALTIMA check oil
[x] Cancel search: check oilPage 523 of 644
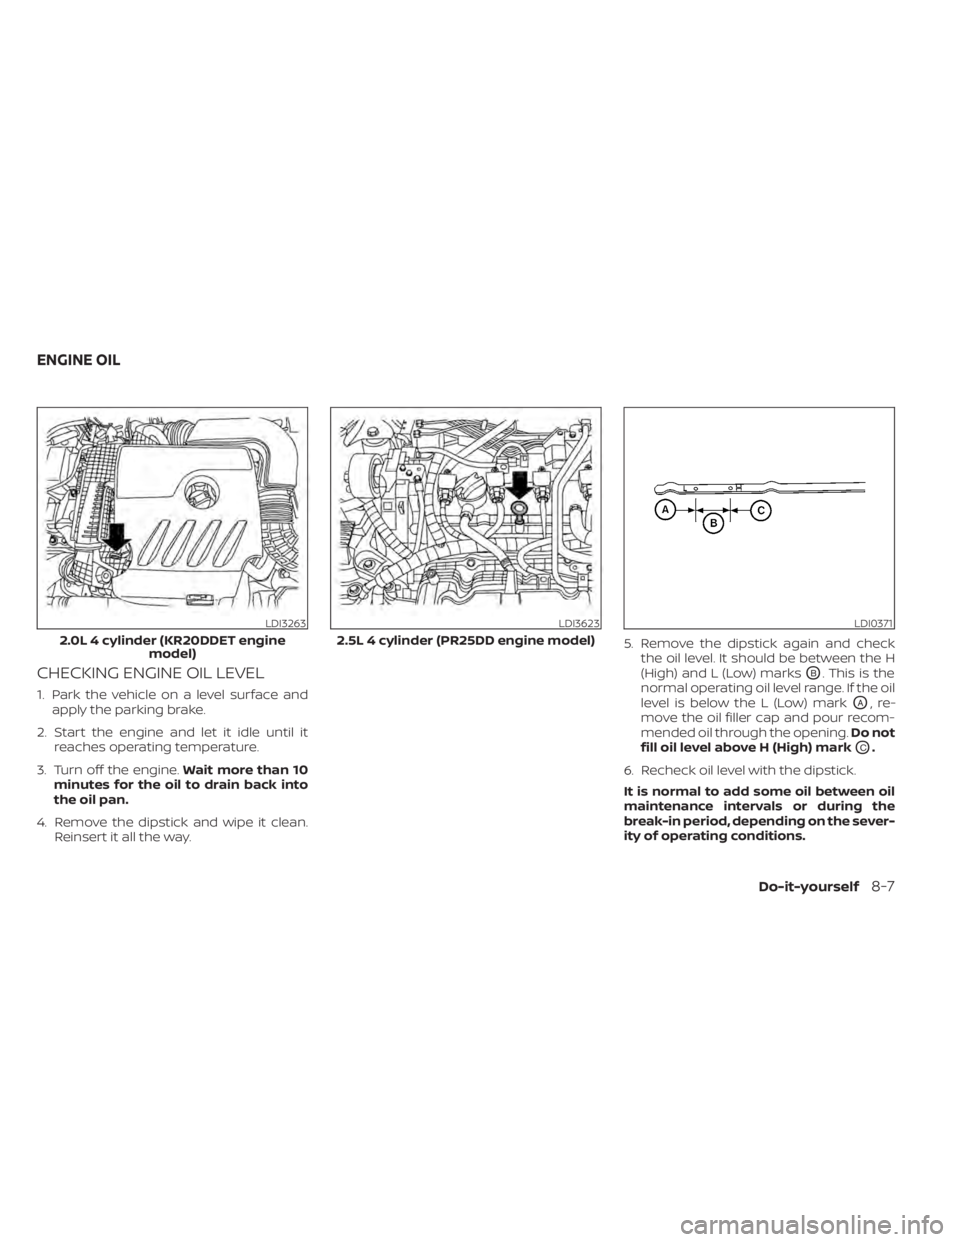
CHECKING ENGINE OIL LEVEL
1. Park the vehicle on a level surface andapply the parking brake.
2. Start the engine and let it idle until it reaches operating temperature.
3. Turn off the engine. Wait more than 10
minutes for the oil to drain back into
the oil pan.
4. Remove the dipstick and wipe it clean. Reinsert it all the way. 5. Remove the dipstick again and check
the oil level. It should be between the H
(High) and L (Low) marks
OB. This is the
normal operating oil level range. If the oil
level is below the L (Low) mark
OA,re-
move the oil filler cap and pour recom-
mended oil through the opening. Do not
fill oil level above H (High) mark
OC.
6. Recheck oil level with the dipstick.
It is normal to add some oil between oil
maintenance intervals or during the
break-in period, depending on the sever-
ity of operating conditions.
LDI3263
2.0L 4 cylinder (KR20DDET engine model)
LDI3623
2.5L 4 cylinder (PR25DD engine model)
LDI0371
ENGINE OIL
Do-it-yourself8-7
Page 524 of 644
CAUTION
• Oil level should be checked regularly.
Operating the engine with an insuffi-
cient amount of oil can damage the
engine, and such damage is not cov-
ered by warranty.
• It is normal to add some oil between
oil maintenance intervals or during
the break-in period, depending on
the severity of operating conditions.
CHANGING ENGINE OIL AND OIL
FILTER
For additional information on engine oil
and oil filter change, refer to the instruc-
tions outlined in this section.
Vehicle set-up
1. Park the vehicle on a level surface and apply the parking brake.
2. Run the engine until it reaches operating temperature.
3. Turn the engine off and wait for 15 minutes.
4. Raise and support the vehicle using a suitable floor jack and safety jack
stands. • Place the safety jack stands under the
vehicle jack-up points.
• A suitable adapter should be attached to the jack stand saddle.
CAUTION
Make sure the correct lif ting and sup-
port points are used to avoid vehicle
damage.
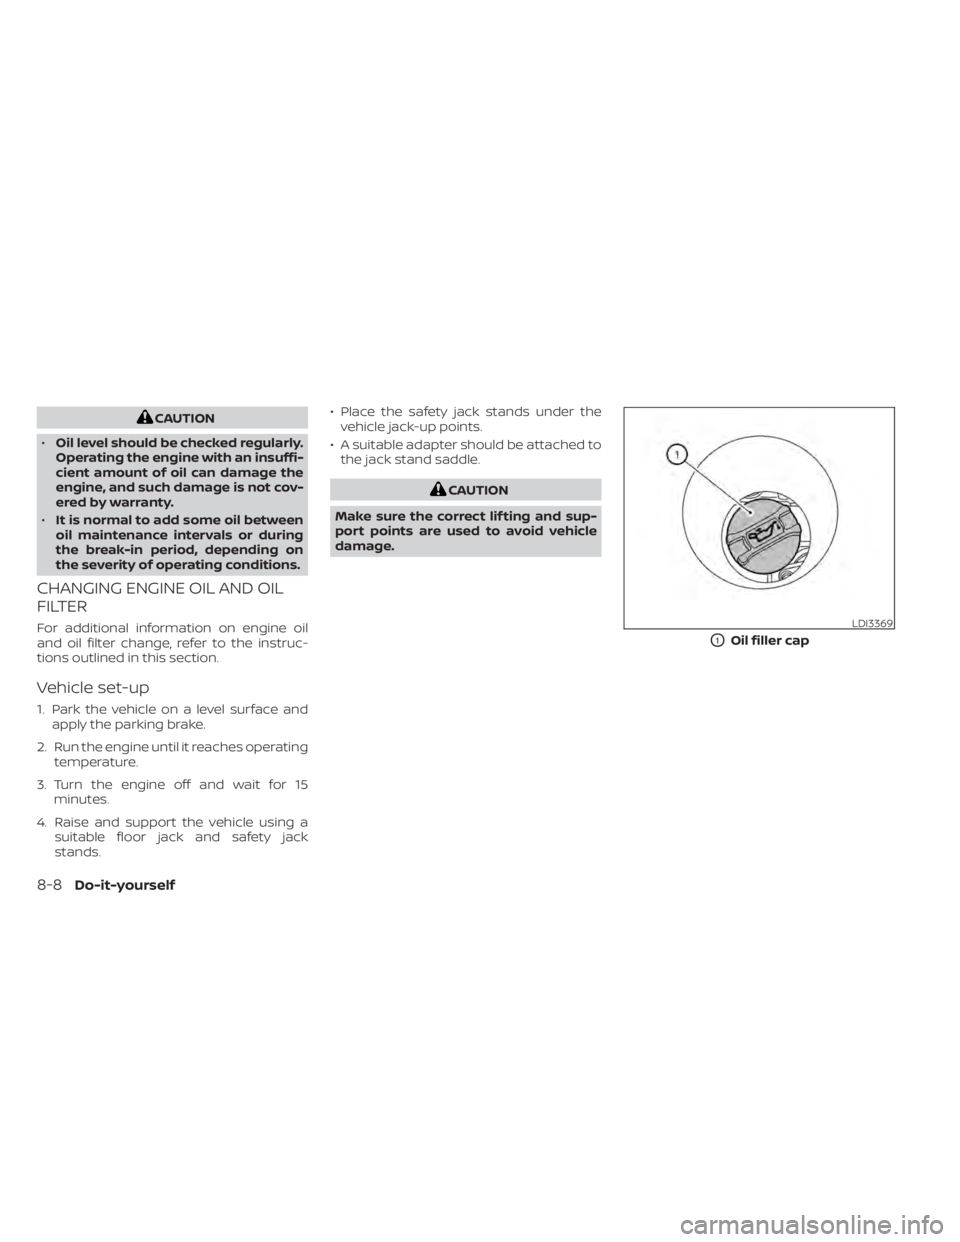
LDI3369
O1Oil filler cap
8-8Do-it-yourself
Page 527 of 644
CAUTION
Be careful not to burn yourself, as the
engine oil is hot.
WARNING
• Prolonged and repeated contact
with used engine oil may cause skin
cancer.
• Try to avoid direct skin contact with
used oil. If skin contact is made, wash
thoroughly with soap or hand
cleaner as soon as possible.
• Keep used engine oil out of reach of
children.
4. Loosen the oil filter with an oil filter wrench by turning it counterclockwise.
Remove the oil filter by turning it by
hand.
5. Wipe the engine oil filter mounting sur- face with a clean rag.
CAUTION
Be sure to remove any old gasket ma-
terial remaining on the sealing surface
of the engine. Failure to do so could
lead to an oil leak and engine damage. •
The dipstick must be inserted in
place to prevent oil spillage from the
dipstick hole when filling the engine
with oil.
6. Coat the gasket on the new filter with clean engine oil.
7. Screw in the oil filter clockwise until a slight resistance is felt, then tighten addi-
tionally more than 2/3 turn.
Oil filter tightening torque: 11 to 15 f t-lb (14.7 to 20.6 N·m)
8. Clean and re-install the drain plug with a new washer. Securely tighten the drain
plug with a wrench. Do not use exces-
sive force.
Drain plug tightening torque: 22 to 29 f t-lb (29.4 to 39.2 N·m)
9. Refill the engine with the recommended oil through the oil filler opening, and in-
stall the oil filler cap securely.
For additional information about drain and
refill capacity, see “Recommended fluids/
lubricants and capacities” (P. 10-2). The
drain and refill capacity depends on the oil
temperature and drain time. Use these
specifications for reference only. Always use the dipstick to determine the proper
amount of oil in the engine.
10. Start the engine and check for leakage
around the drain plug and the oil filter.
Correct as required. Turn the engine off
and wait more than 15 minutes. Check
the oil level with the dipstick. Add en-
gine oil if necessary.
Af ter the operation
1. Reinstall undercover in reverse order ofremoval.
2. Lower the vehicle carefully to the ground.
3. Reset the oil control system (if so equipped) and oil and filter maintenance
reminder. For additional information,
see “Vehicle information display – 5 inch
(13 cm) Type A” (P. 2-18) or “Vehicle infor-
mation display – 7 inch (18 cm) Type B”
(P. 2-34)
• Dispose of waste oil and filter properly.
• Check your local regulations.
Do-it-yourself8-11
Page 564 of 644
Brakes:Check that the brakes do not pull
the vehicle to one side when applied.
Continuously Variable Transmission
(CVT) P (Park) position mechanism: On a
fairly steep hill check that the vehicle is held
securely with the shif t lever in the P (Park)
position without applying any brakes.
Parking brake: Check the parking brake
operation regularly. The vehicle should be
securely held on a fairly steep hill with only
the parking brake applied. If the parking
brake needs adjustment, it is recom-
mended that you visit a NISSAN dealer for
this service.
Seats: Check seat position controls such
as seat adjusters, seatback recliner, etc., to
ensure they operate smoothly and all
latches lock securely in every position.
Check that the head restraints/headrests
move up and down smoothly and the locks
(if so equipped) hold securely in all latched
positions.
Seat belts: Check that all parts of the seat
belt system (for example, buckles, anchors,
adjusters and retractors) operate properly
and smoothly, and are installed securely.
Check the belt webbing for cuts, fraying,
wear or damage. Steering wheel:
Check for changes in the
steering system, such as excessive free
play, hard steering or strange noises.
Warning lights and chimes: Make sure all
warning lights and chimes are operating
properly.
Windshield defroster: Check that the air
comes out of the defroster outlets properly
and in sufficient quantity when operating
the heater or air conditioner.
Windshield wiper and washer*: Check
that the wipers and washer operate prop-
erly and that the wipers do not streak.
Under the hood and vehicle
The maintenance items listed here should
be checked periodically (for example, each
time you check the engine oil or refuel).
Battery*: This vehicle is equipped with a
sealed maintenance free battery. It is rec-
ommended that you visit a NISSAN dealer
for service.
NOTE:
Care should be taken to avoid situations
that can lead to potential battery dis-
charge and potential no-start conditions
such as:
1. Installation or extended use of elec- tronic accessories that consume bat-
tery power when the engine is not
running (Phone chargers, GPS, DVD
players, etc.).
2. Vehicle is not driven regularly and/or only driven short distances.
In these cases, the battery may need to
be charged to maintain battery health.
Brake fluid level*: Make sure that the brake
fluid level is between the MAX and MIN lines
on the reservoir.
Engine coolant level*: Check the coolant
level when the engine is cold.
Engine drive belts*: Make sure the drive
belts are not frayed, worn, cracked or oily.
Engine oil level*: Check the level af ter
parking the vehicle on a level spot and
turning off the engine. Wait more than 15
minutes for the oil to drain back into the oil
pan.
9-4Maintenance and schedules
Page 565 of 644
Exhaust system:Make sure there are no
loose supports, cracks or holes. If the
sound of the exhaust seems unusual or
there is a smell of exhaust fumes, immedi-
ately have the exhaust system inspected. It
is recommended that you visit a NISSAN
dealer for this service. For additional infor-
mation, see “Exhaust gas (carbon monox-
ide)” (P. 5-4).
Fluid leaks: Check under the vehicle for
fuel, oil, water or other fluid leaks af ter the
vehicle has been parked for a while. Water
dripping from the air conditioner af ter use
is normal. If you should notice any leaks or if
fuel fumes are evident, check for the cause
and have it corrected immediately.
Radiator and hoses: Check the front of the
radiator and clean off any dirt, insects,
leaves, etc., that may have accumulated.
Make sure the hoses have no cracks, defor-
mation, rot or loose connections.
Underbody: The underbody is frequently
exposed to corrosive substances such as
those used on icy roads or to control dust. It
is very important to remove these sub-
stances, otherwise rust may form on the
floor pan, frame, fuel lines and around the
exhaust system. At the end of winter, the
underbody should be thoroughly flushed
with plain water, being careful to clean those areas where mud and dirt may accu-
mulate. For additional information, see the
“Cleaning exterior” (P. 7-2).
Windshield-washer fluid*:
Check that
there is adequate fluid in the reservoir. The following descriptions are provided to
give you a better understanding of the
scheduled maintenance items that should
be regularly checked or replaced. The
maintenance schedule indicates at which
mileage/time intervals each item requires
service.
In addition to scheduled maintenance,
your vehicle requires that some items be
checked during normal day-to-day opera-
tion. For additional information, see “Gen-
eral maintenance” (P. 9-2).
Items marked with
“*”are recommended
by NISSAN for reliable vehicle operation.
You are not required to perform mainte-
nance on these items in order to maintain
the warranties which come with your
NISSAN. Other maintenance items and in-
tervals are required.
When applicable, additional information
can be found in the “Do-it-yourself ” section
of this manual.
EXPLANATION OF SCHEDULED
MAINTENANCE ITEMS
Maintenance and schedules9-5
Page 566 of 644

NOTE:
NISSAN does not advocate the use of
non-OEM approved af termarket flush-
ing systems and strongly advises
against performing these services on a
NISSAN product. Many of the af termar-
ket flushing systems use non-OEM ap-
proved chemicals or solvents, the use of
which has not been validated by NISSAN.
For recommended fuel, lubricants, fluids,
grease, and refrigerant, see “Recom-
mended fluids/lubricants and capaci-
ties” (P. 10-2).
EMISSION CONTROL SYSTEM
MAINTENANCE:
Drive belts*:Check engine drive belts for
wear, fraying or cracking and for proper
tension. Replace any damaged drive belts.
Engine air filter: Replace at specified inter-
vals. When driving for prolonged periods in
dusty conditions, check/replace the filter
more frequently.
Engine coolant*: Replace coolant at the
specified interval. When adding or replac-
ing coolant, be sure to use only Genuine
NISSAN Long Life Antifreeze/Coolant (blue)
or equivalent with the proper mixture. (For additional information on the proper mix-
ture for your area, see “Engine cooling sys-
tem” (P. 8-5).
NOTE: Mixing any other type of coolant
or the use of non-distilled water may re-
duce the recommended service interval
of the coolant.
Engine oil and oil filter:
Replace engine oil
and oil filter at the specified intervals. For
recommended oil grade and viscosity see
“Recommended fluids/lubricants and ca-
pacities” (P. 10-2).
Engine valve clearance*: Inspect only if
valve noise increases. Adjust valve clear-
ance if necessary.
Fuel tank vapor vent system*: Check va-
por lines for leaks or looseness. Tighten
connections or replace parts as necessary.
Fuel filter: Periodic maintenance is not re-
quired. (in-tank type filter)
Fuel lines/connections*: Check the fuel
hoses, piping and connections for leaks,
looseness, or deterioration. Tighten con-
nections or replace parts as necessary.
Spark plugs: Replace at specified intervals.
Install new plugs of the type as originally
equipped.
CHASSIS AND BODY
MAINTENANCE:
Brake lines and cables: Visually inspect for
proper installation. Check for chafing,
cracks, deterioration, and signs of leaking.
Replace any deteriorated or damaged
parts immediately.
Brake pads and rotors: Check for wear,
deterioration and fluid leaks. Replace any
deteriorated or damaged parts
immediately.
Exhaust system: Visually inspect the ex-
haust pipes, muffler and hangers for leaks,
cracks, deterioration, and damage. Tighten
connections or replace parts as necessary.
Propeller shaf t(s): Check for damage,
looseness, and grease leakage. (AWD)
In-cabin microfilter: Replace at specified
intervals. When driving for prolonged peri-
ods in dusty conditions, replace the filter
more frequently.
Steering gear and linkage, axle and sus-
pension parts, drive shaf t boots: Check
for damage, looseness, and leakage of oil
or grease. Under severe driving conditions,
inspect more frequently.
9-6Maintenance and schedules
Page 567 of 644
Tire rotation:Rotate tires at the specified
interval shown in the maintenance sched-
ule. When rotating tires, check for damage
and uneven wear. Replace if necessary.
Transmission fluid/oil, differential oil,
and transfer case oil: Visually inspect for
signs of leakage at specified intervals.
Replace at specified intervals. To help ensure smooth, safe and economi-
cal driving, NISSAN provides two mainte-
nance schedules that may be used, de-
pending upon the conditions in which you
usually drive. These schedules contain
both distance and time intervals, up to
120,000 miles (192,000 km)/144 months. For
most people, the odometer reading will in-
dicate when service is needed. However, if
you drive very little, your vehicle should be
serviced at the regular time intervals
shown in the schedule.
Af ter 120,000 miles (192,000 km)/144
months, continue maintenance at the
same mileage/time intervals.
ADDITIONAL MAINTENANCE ITEMS
FOR SEVERE OPERATING
CONDITIONS
Additional maintenance items for severe
operating conditions
should be per-
formed on vehicles that are driven under
especially demanding conditions. Addi-
tional maintenance items should be per-
formed if you primarily operate your vehicle
under the following conditions:
• Repeated short trips of less than 5 miles (8 km). • Repeated short trips of less than 10 miles
(16 km) with outside temperatures re-
maining below freezing.
• Operating in hot weather in stop-and-go “rush hour” traffic.
• Extensive idling and/or low speed driving for long distances, such as police, taxi or
door-to-door delivery use.
• Driving in dusty conditions.
• Driving on rough, muddy or salt spread roads.
• Using a car-top carrier.
If your vehicle is mainly operated under the
severe conditions, follow the severe use
maintenance intervals shown in the main-
tenance schedule.
OIL CONTROL SYSTEM (if so
equipped)
Your vehicle is equipped with oil control
system. It calculates engine oil and filter
change intervals based on driving condi-
tions. Driving in the following severe condi-
tions will shorten the engine oil and filter
change interval.
MAINTENANCE SCHEDULES
Maintenance and schedules9-7
Page 628 of 644
Brightness controlInstrument panel.............2-62Brightness/contrast button.........4-7Bulb check/instrument panel........2-10Bulb replacement...............8-26
C
C.M.V.S.S. certification label.........10-13Capacities and recommended
fuel/lubricants................ .10-2Car phone or CB radio............4-67Cargo
(See vehicle loading information).....10-16Chassis control................5-178Check tire pressure..........2-31, 2-48Child restraints.......1-21,1-22,1-23,1-25LATCH (Lower Anchors and Tethers for
CHildren) System..............1-25Precautions on child
restraints............1-31, 1-38, 1-43Top tether strap anchor point
locations...................1-28Child safety rear door lock..........3-7Cleaning exterior and interior......7-2,7-5Clock set/adjustment.............4-5Cold weather driving............5-185Console box..................2-72Continuously Variable Transmission
(CVT).......................5-18Continuously Variable Transmission (CVT)
fluid......................8-12
Driving with Continuously Variable
Transmission (CVT)............5-18Control panel buttons.............4-3Brightness/contrast button........4-7Controls
Audio controls (steering wheel).....4-63Heater and air conditioner
controls................4-33, 4-41CoolantCapacities and recommended
fuel/lubricants
...............10-2Changing engine coolant.........8-6Checking engine coolant level......8-6Engine coolant temperature gauge. . .2-6Corrosion protection..............7-8Cruise control................ .5-68Cup holders...............2-73,2-74
D
Daytime Running Light System......2-62Defroster switch
Rear window and outside mirror defroster
switch
................... .2-56Dimensions and weights..........10-11Dimmer switch for instrument panel. . .2-62Display controls (see control panel
buttons).................... .4-3Door locks....................3-4Drive belt....................8-16Driving
Cold weather driving...........5-185
Driving with Continuously Variable
Transmission (CVT)............5-18Precautions when starting and
driving................. .5-4, 5-10Driving the vehicle...............5-18
E
Economy - fuel................5-168Emergency call (SOS) button........2-67Emergency engine shutoff.......5-15,6-2Emission control information label. . . .10-14Emission control system warranty. . . .10-22Engine
Before starting the engine........5-16Capacities and recommended
fuel/lubricants...............10-2Changing engine coolant.........8-6Changing engine oil............8-8Changing engine oil filter.........8-8Checking engine coolant level......8-6Checking engine oil level..........8-7Engine compartment check
locations.................. .8-3Engine coolant temperature gauge. . .2-6Engine cooling system...........8-5Engine oil...................8-7Engine oil and oil filter
recommendation.............10-7Engine oil pressure warning light. . . .2-11Engine oil viscosity.............10-7Engine serial number..........10-13Engine specifications...........10-9
11-2