2023 NISSAN ALTIMA change wheel
[x] Cancel search: change wheelPage 138 of 644
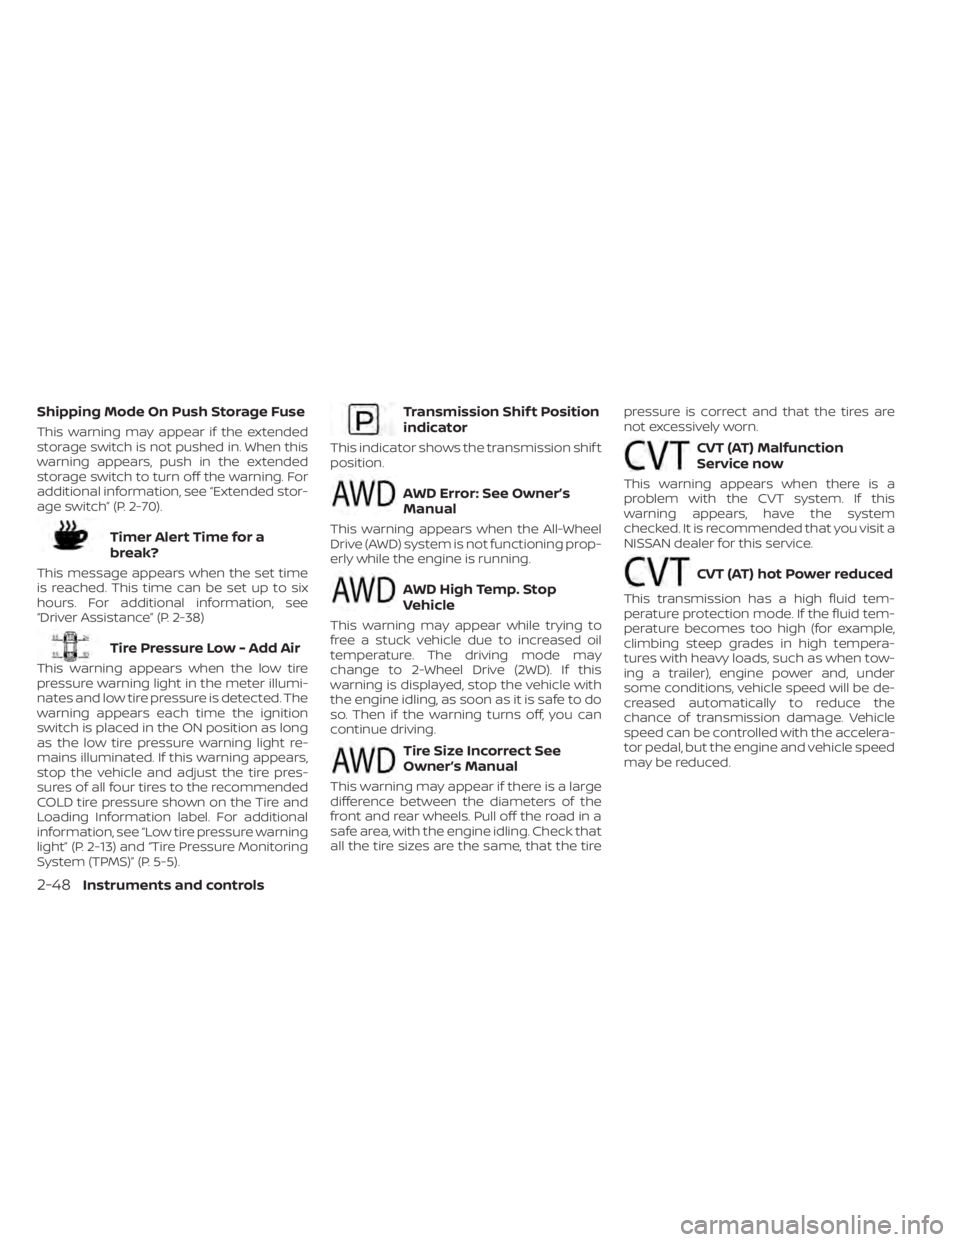
Shipping Mode On Push Storage Fuse
This warning may appear if the extended
storage switch is not pushed in. When this
warning appears, push in the extended
storage switch to turn off the warning. For
additional information, see “Extended stor-
age switch” (P. 2-70).
Timer Alert Time for a
break?
This message appears when the set time
is reached. This time can be set up to six
hours. For additional information, see
“Driver Assistance” (P. 2-38)
Tire Pressure Low - Add Air
This warning appears when the low tire
pressure warning light in the meter illumi-
nates and low tire pressure is detected. The
warning appears each time the ignition
switch is placed in the ON position as long
as the low tire pressure warning light re-
mains illuminated. If this warning appears,
stop the vehicle and adjust the tire pres-
sures of all four tires to the recommended
COLD tire pressure shown on the Tire and
Loading Information label. For additional
information, see “Low tire pressure warning
light” (P. 2-13) and “Tire Pressure Monitoring
System (TPMS)” (P. 5-5).
Transmission Shif t Position
indicator
This indicator shows the transmission shif t
position.
AWD Error: See Owner’s
Manual
This warning appears when the All-Wheel
Drive (AWD) system is not functioning prop-
erly while the engine is running.
AWD High Temp. Stop
Vehicle
This warning may appear while trying to
free a stuck vehicle due to increased oil
temperature. The driving mode may
change to 2-Wheel Drive (2WD). If this
warning is displayed, stop the vehicle with
the engine idling, as soon as it is safe to do
so. Then if the warning turns off, you can
continue driving.
Tire Size Incorrect See
Owner’s Manual
This warning may appear if there is a large
difference between the diameters of the
front and rear wheels. Pull off the road in a
safe area, with the engine idling. Check that
all the tire sizes are the same, that the tirepressure is correct and that the tires are
not excessively worn.
CVT (AT) Malfunction
Service now
This warning appears when there is a
problem with the CVT system. If this
warning appears, have the system
checked. It is recommended that you visit a
NISSAN dealer for this service.
CVT (AT) hot Power reduced
This transmission has a high fluid tem-
perature protection mode. If the fluid tem-
perature becomes too high (for example,
climbing steep grades in high tempera-
tures with heavy loads, such as when tow-
ing a trailer), engine power and, under
some conditions, vehicle speed will be de-
creased automatically to reduce the
chance of transmission damage. Vehicle
speed can be controlled with the accelera-
tor pedal, but the engine and vehicle speed
may be reduced.
2-48Instruments and controls
Page 150 of 644
High Beam Assist
The High Beam Assist system will operate
when the vehicle is driven at speeds of ap-
proximately 25 mph (40 km/h) and above. If
an oncoming vehicle or leading vehicle ap-
pears in front of your vehicle when the
headlight high beam is on, the headlight
will be switched to the low beam
automatically.
WARNING
• The High Beam Assist system is a
convenience but it is not a substitute
for safe driving operation. The driver
should remain alert at all times, en-
sure safe driving practices and
switch the high beams and low beam
manually when necessary.
• The high beam or low beam may not
switch automatically under the fol-
lowing conditions. Switch the high
beam and low beam manually.
– During bad weather (rain, fog,
snow, wind, etc.).
– When a light source similar to a
headlight or tail light is in the vi-
cinity of the vehicle. –
When the headlights of the on-
coming vehicle or the leading ve-
hicle are turned off, when the color
of the light is affected due to for-
eign materials on the lights, or
when the light beam is out of
position.
– When there is a sudden, continu-
ous change in brightness.
– When driving on a road that
passes over rolling hills, or a road
that has level differences.
– When driving on a road with many
curves.
– When a sign or mirror-like surface
is reflecting intense light towards
the front of the vehicle.
– When the container, etc. being
towed by a leading vehicle is re-
flecting intense light.
– When a headlight on your vehicle
is damaged or dirty.
– When the vehicle is leaning at an
angle due to a punctured tire, be-
ing towed, etc. •
The timing of switching the low
beam and high beam may change
under the following situations.
– The brightness of the headlights
of the oncoming vehicle or leading
vehicle.
– The movement and direction of
the oncoming vehicle and the
leading vehicle.
– When only one light on the on-
coming vehicle or the leading ve-
hicle is illuminated.
– When the oncoming vehicle or the
leading vehicle is a two-wheeled
vehicle.
– Road conditions (incline, curve,
the road surface, etc.).
– The number of passengers and
the amount of luggage.
2-60Instruments and controls
Page 253 of 644
Synchronize climate settings
Press the SYNC button to synchronize cli-
mate settings. The sync indicator will turn
on.
Pressing SYNC will synchronize driver's and
front passenger's climate settings.
To change climate settings when SYNC is
active (the SYNC indicator is on):
• The driver's side temperature control dialwill control the driver and front passenger
temperatures.
• The fan speed control dial will control the fan speeds.
To exit SYNC:
• To remove the front passenger from SYNC, turn the passenger's side tem-
perature control dial.
• Pressing SYNC multiple times will re- activate SYNC.
To turn system off
Press the ON-OFF button.
Rear window and outside mirror
defroster switch
For additional information, see “Rear win-
dow and outside mirror (if so equipped)
defroster switch” (P. 2-56).
Heated seat switches
For additional information, see “Heated
seat switches” (P. 2-64).
Heated steering wheel switch
For additional information, see “Heated
steering wheel switch” (P. 2-65).OPERATING TIPS
The sunload sensor, located on the top
center of the instrument panel, helps the
system maintain a constant temperature.
Do not put anything on or around this
sensor.
LHA4943
Monitor, climate, audio, phone and voice recognition systems4-43
Page 262 of 644
• Refresh: Touch the “Refresh” key to scanand update the station list displayed on
the right side of the AM Menu screen.
(SEEK/TRACK) buttons
Press the
orbuttons to tune
from low to high or high to low frequencies
and to stop at the next broadcasting
station.
1 to 6 Station memory operations
Up to six stations can be registered in the
preset list.
1. Select the AM radio band.
2. Tune to the station you wish to store.
3. Touch and hold one of the preset num- bers in the preset list.
The information such as frequency will be
displayed on the preset list.
To select and listen to the preset stations,
push
on the steering wheel briefly or
touch a preferred station on the preset list
on the radio screen.
FM radio operation
Press theMENU button and touch the
“FM Menu” key or press the AUDIO button
and select FM on the bottom of the Launch
Bar to bring up the FM display screen. If another audio source is playing when the
“FM” key is pressed, the audio source play-
ing will automatically be turned off and the
last radio station played will begin playing.
The FM stereo indicator (STEREO) is shown
on the screen during FM stereo reception.
When the stereo broadcast signal is weak,
the radio automatically changes from ste-
reo to monaural reception.
FM Menu
Touch the “FM” Menu key to display the FM
Menu screen options:
• SCAN: To scan tune the stations, touch
the “FM Menu” key on the radio screen
and then touch the “SCAN” key. The sta-
tions will be tuned from low to high fre-
quencies and stop at each broadcasting
stations for several seconds. Touching
the “SCAN” key again during this period of
several seconds will stop tuning and the
radio will remain tuned to that station.
• Refresh: Touch the “Refresh” key to up- date the station list displayed on the right
side of the FM Menu screen.
• RDS Info: Radio station and song informa- tion can be displayed on the FM display
screen.
(SEEK/TRACK) buttons
Press the
orbuttons to tune
from low to high or high to low frequencies
and to stop at the next broadcasting
station.
1 to 12 Station memory operations
Up to 12 stations can be registered in the
preset list.
1. Select the FM radio band.
2. Tune to the station you wish to store.
3. Touch and hold one of the preset num- bers in the preset list.
The information such as frequency will be
displayed on the preset list.
To select and listen to the preset stations,
push
on the steering wheel briefly or
touch a preferred station on the preset list
on the radio screen.
Auxiliary (AUX) devices operation
Connecting auxiliary devices
Connect an AUX device into the AUX input
jack located on the center console below
the heater and air conditioner controls.
4-52Monitor, climate, audio, phone and voice recognition systems
Page 263 of 644
The AUX input jack accepts any standard
analog audio input such as from a portable
cassette player, CD player, MP3 player or
phone.
Insert a 1/8 in (3.5 mm) stereo mini plug in
the audio input jack. If a cable with a mono
plug is used, the audio output may not
function normally.
Activation and playing
Turn on the AUX device. Connect an AUX
cable to the AUX device and the AUX input
jack. Select AUX mode from the audio
source menu screen or by pressing the
Source button on the steering wheel.
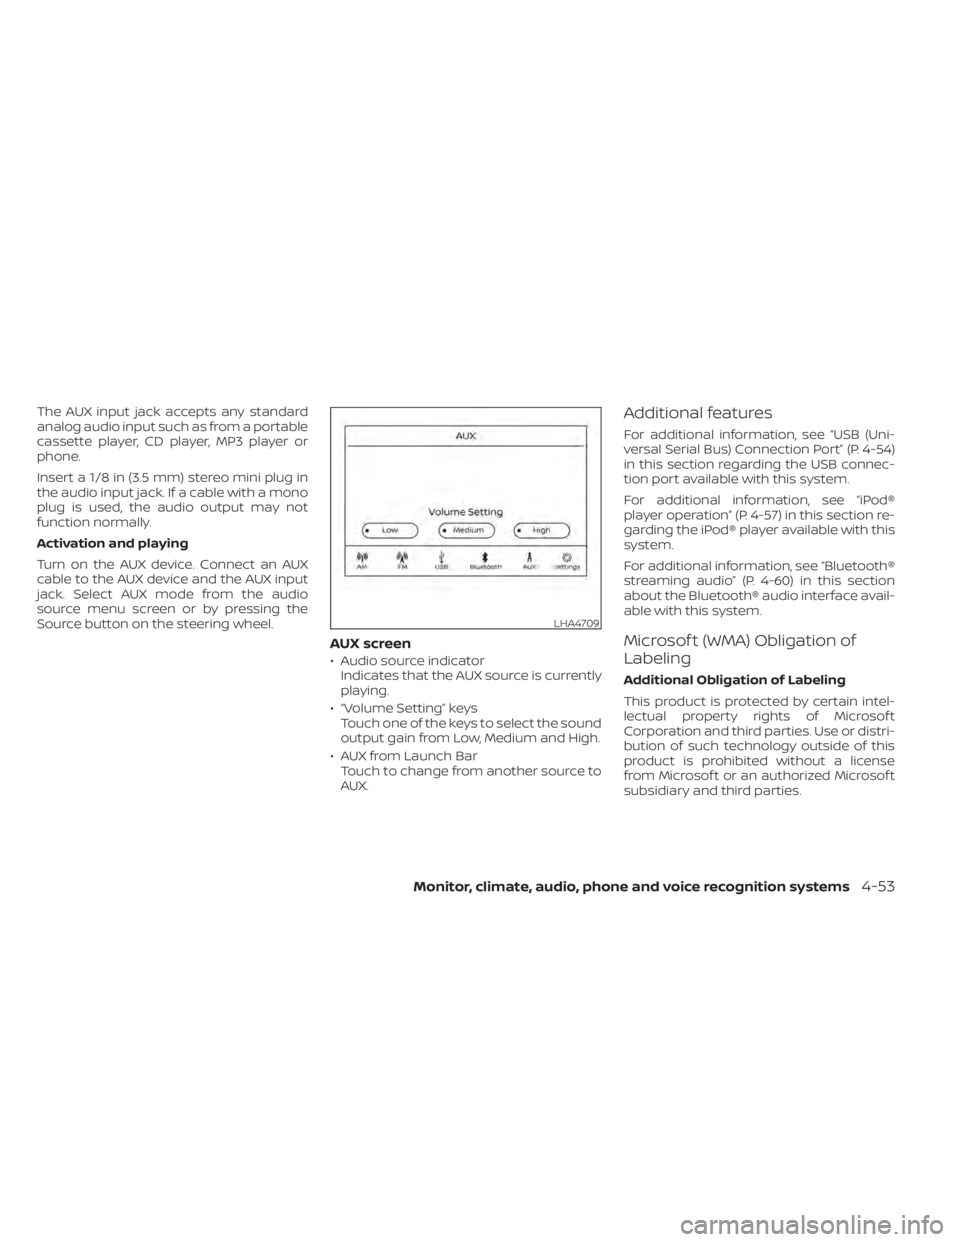
AUX screen
• Audio source indicatorIndicates that the AUX source is currently
playing.
• “Volume Setting” keys Touch one of the keys to select the sound
output gain from Low, Medium and High.
• AUX from Launch Bar Touch to change from another source to
AUX.
Additional features
For additional information, see “USB (Uni-
versal Serial Bus) Connection Port” (P. 4-54)
in this section regarding the USB connec-
tion port available with this system.
For additional information, see “iPod®
player operation” (P. 4-57) in this section re-
garding the iPod® player available with this
system.
For additional information, see “Bluetooth®
streaming audio” (P. 4-60) in this section
about the Bluetooth® audio interface avail-
able with this system.
Microsof t (WMA) Obligation of
Labeling
Additional Obligation of Labeling
This product is protected by certain intel-
lectual property rights of Microsof t
Corporation and third parties. Use or distri-
bution of such technology outside of this
product is prohibited without a license
from Microsof t or an authorized Microsof t
subsidiary and third parties.
LHA4709
Monitor, climate, audio, phone and voice recognition systems4-53
Page 271 of 644
Automatic Connecting Procedure
If no phone is connected to the system,
press and hold the
button on the
steering wheel for less than 1.5 seconds.
Af ter the prompt, speak “Add Phone”, the
system will announce “transferring to the
add phone settings menu”. The system will
start the pairing procedure. When a com-
patible phone is found, a message with a
PIN appears on the screen. Operate the
Bluetooth® phone to complete the con-
nection process. For additional informa-
tion, see “Bluetooth® connections screen”
(P. 4-81).
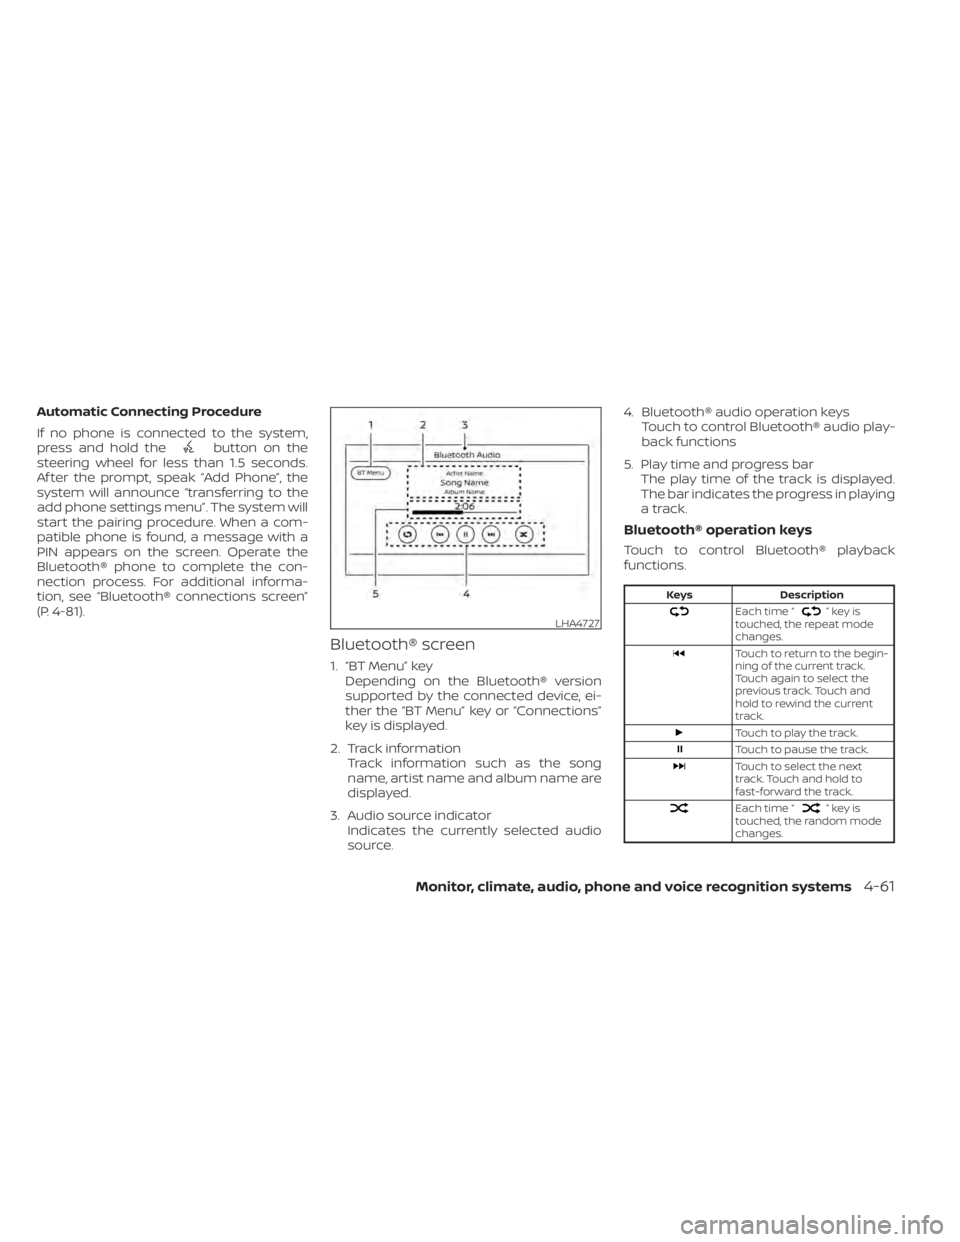
Bluetooth® screen
1. “BT Menu” key Depending on the Bluetooth® version
supported by the connected device, ei-
ther the “BT Menu” key or “Connections”
key is displayed.
2. Track information Track information such as the song
name, artist name and album name are
displayed.
3. Audio source indicator Indicates the currently selected audio
source. 4. Bluetooth® audio operation keys
Touch to control Bluetooth® audio play-
back functions
5. Play time and progress bar The play time of the track is displayed.
The bar indicates the progress in playing
a track.
Bluetooth® operation keys
Touch to control Bluetooth® playback
functions.
Keys Description
Each time “”keyis
touched, the repeat mode
changes.
Touch to return to the begin-
ning of the current track.
Touch again to select the
previous track. Touch and
hold to rewind the current
track.
Touch to play the track.
Touch to pause the track.
Touch to select the next
track. Touch and hold to
fast-forward the track.
Each time “”keyis
touched, the random mode
changes.
LHA4727
Monitor, climate, audio, phone and voice recognition systems4-61
Page 273 of 644
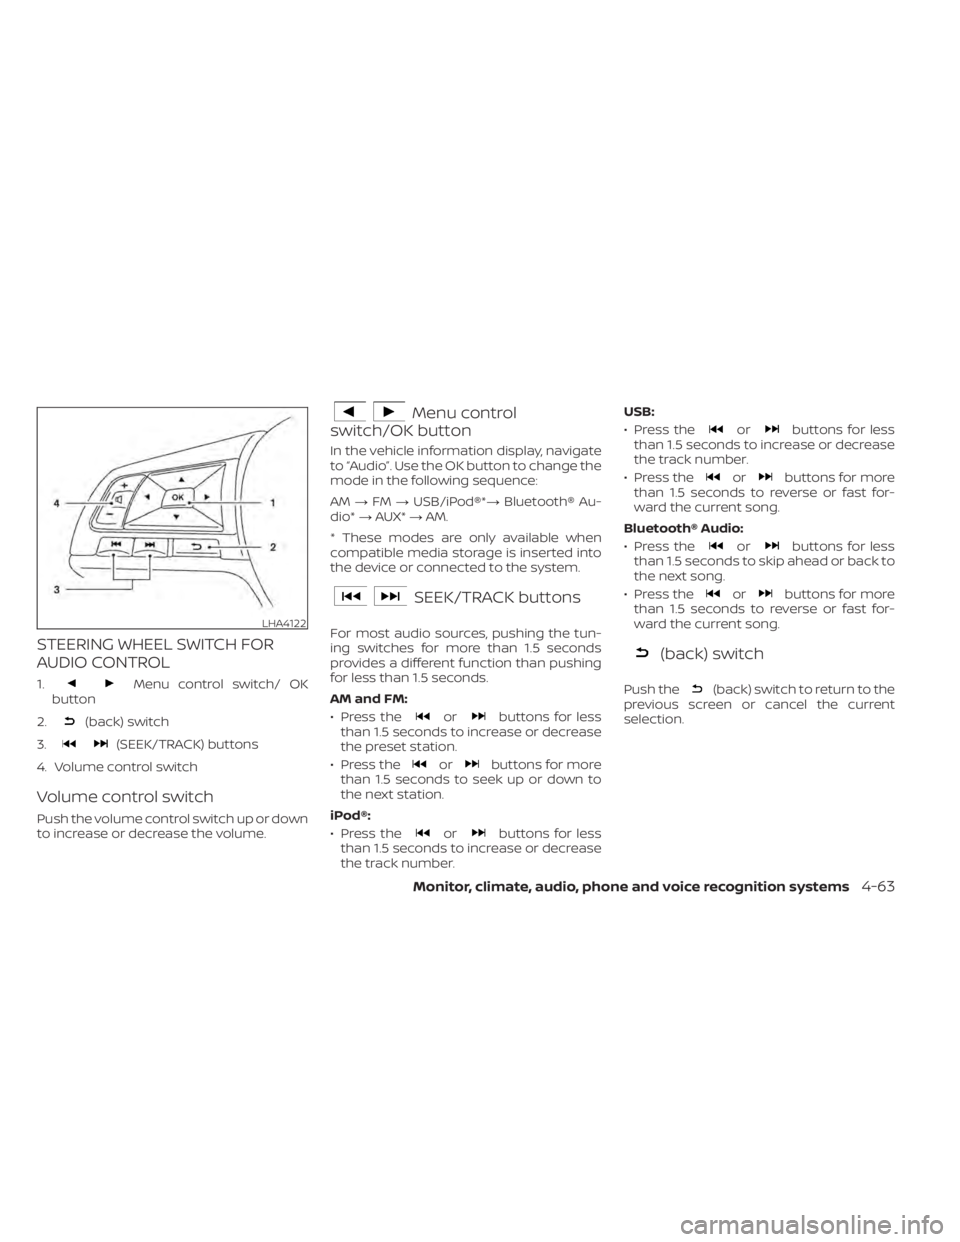
STEERING WHEEL SWITCH FOR
AUDIO CONTROL
1.Menu control switch/ OK
button
2.
(back) switch
3.
(SEEK/TRACK) buttons
4. Volume control switch
Volume control switch
Push the volume control switch up or down
to increase or decrease the volume.
Menu control
switch/OK button
In the vehicle information display, navigate
to “Audio”. Use the OK button to change the
mode in the following sequence:
AM →FM →USB/iPod®*→ Bluetooth® Au-
dio* →AUX* →AM.
* These modes are only available when
compatible media storage is inserted into
the device or connected to the system.
SEEK/TRACK buttons
For most audio sources, pushing the tun-
ing switches for more than 1.5 seconds
provides a different function than pushing
for less than 1.5 seconds.
AM and FM:
• Press the
orbuttons for less
than 1.5 seconds to increase or decrease
the preset station.
• Press the
orbuttons for more
than 1.5 seconds to seek up or down to
the next station.
iPod®:
• Press the
orbuttons for less
than 1.5 seconds to increase or decrease
the track number. USB:
• Press the
orbuttons for less
than 1.5 seconds to increase or decrease
the track number.
• Press the
orbuttons for more
than 1.5 seconds to reverse or fast for-
ward the current song.
Bluetooth® Audio:
• Press the
orbuttons for less
than 1.5 seconds to skip ahead or back to
the next song.
• Press the
orbuttons for more
than 1.5 seconds to reverse or fast for-
ward the current song.
(back) switch
Push the(back) switch to return to the
previous screen or cancel the current
selection.
LHA4122
Monitor, climate, audio, phone and voice recognition systems4-63
Page 276 of 644
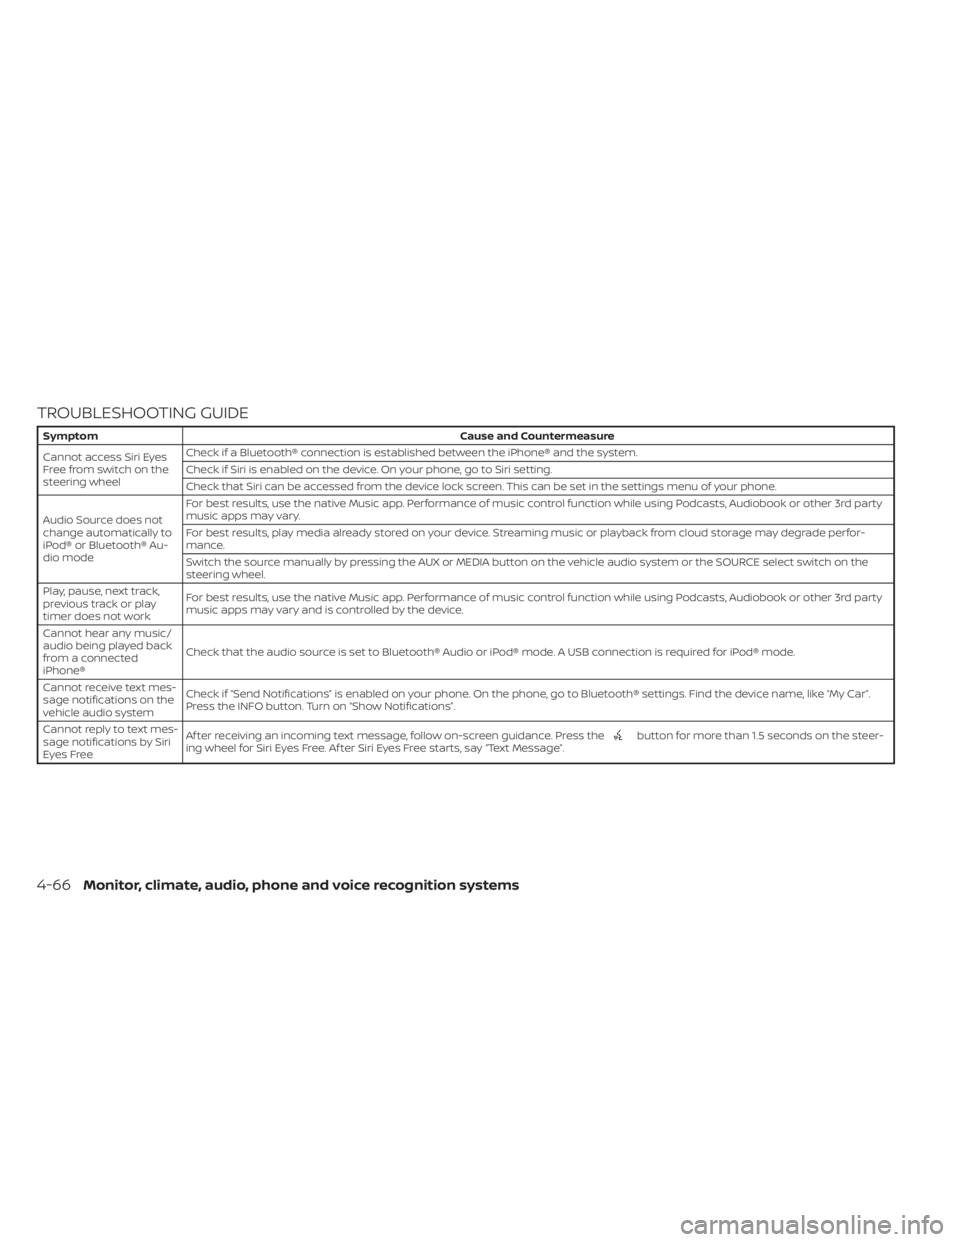
TROUBLESHOOTING GUIDE
SymptomCause and Countermeasure
Cannot access Siri Eyes
Freefromswitchonthe
steering wheel Check if a Bluetooth® connection is established between the iPhone® and the system.
Check if Siri is enabled on the device. On your phone, go to Siri setting.
Check that Siri can be accessed from the device lock screen. This can be set in the settings menu of your phone.
Audio Source does not
change automatically to
iPod® or Bluetooth® Au-
dio mode For best results, use the native Music app. Performance of music control function while using Podcasts, Audiobook or other 3rd party
music apps may vary.
For best results, play media already stored on your device. Streaming music or playback from cloud storage may degrade perfor-
mance.
Switch the source manually by pressing the AUX or MEDIA button on the vehicle audio system or the SOURCE select switch on the
steering wheel.
Play, pause, next track,
previous track or play
timer does not work For best results, use the native Music app. Performance of music control function while using Podcasts, Audiobook or other 3rd party
music apps may vary and is controlled by the device.
Cannot hear any music/
audio being played back
from a connected
iPhone® Check that the audio source is set to Bluetooth® Audio or iPod® mode. A USB connection is required for iPod® mode.
Cannot receive text mes-
sage notifications on the
vehicle audio system Check if “Send Notifications” is enabled on your phone. On the phone, go to Bluetooth® settings. Find the device name, like “My Car”.
Press the INFO button. Turn on “Show Notifications”.
Cannot reply to text mes-
sage notifications by Siri
Eyes Free Af ter receiving an incoming text message, follow on-screen guidance. Press the
button for more than 1.5 seconds on the steer-
ing wheel for Siri Eyes Free. Af ter Siri Eyes Free starts, say “Text Message”.
4-66Monitor, climate, audio, phone and voice recognition systems