2023 MAZDA MX5 MIATA check
[x] Cancel search: checkPage 155 of 503
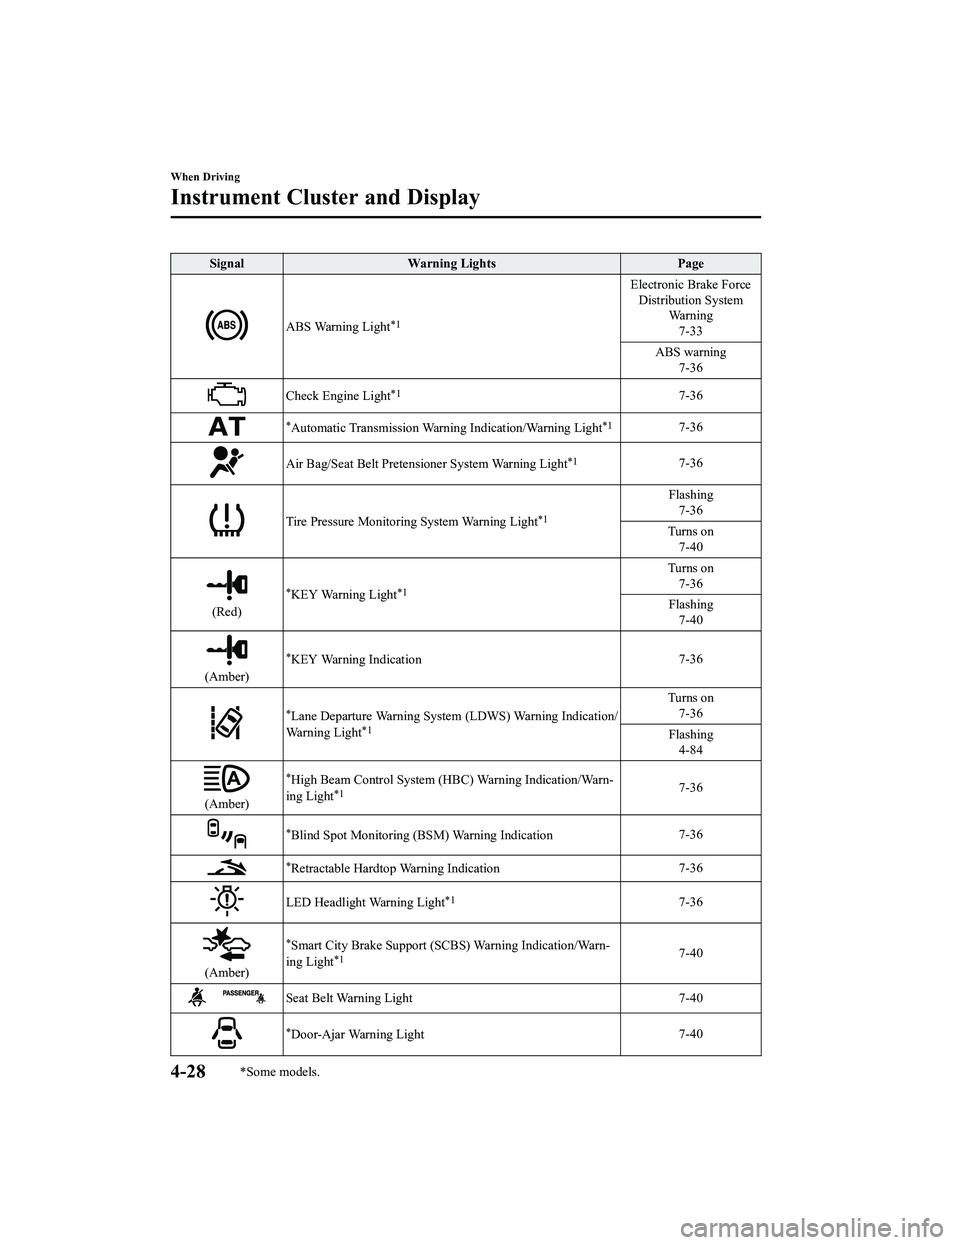
SignalWarning Lights Page
ABS Warning Light*1
Electronic Brake Force
Distribution System Wa r n i n g
7-33
ABS warning 7-36
Check Engine Light*17-36
*Automatic Transmission Warnin g Indication/Warning Light*17-36
Air Bag/Seat Belt Pretensioner System Warning Light*17-36
Tire Pressure Monitoring System Warning Light*1
Flashing
7-36
Turns on 7-40
(Red)
*KEY Warning Light*1
Turns on7-36
Flashing 7-40
(Amber)
*KEY Warning Indication 7-36
*Lane Departure Warning System (LDWS) Warning Indication/
Warning Light*1
Turns on 7-36
Flashing 4-84
(Amber)
*High Beam Control System (HBC) Warning Indication/Warn ‐
ing Light*17-36
*Blind Spot Monitoring (BSM) Warning Indication 7-36
*Retractable Hardtop Warning Indication
7-36
LED Headlight Warning Light*17-36
(Amber)
*Smart City Brake
Support (SCBS) Warning Indication/Warn ‐
ing Light*17-40
Seat Belt Warning Light 7-40
*Door-Ajar Warning Light7-40
When Driving
Instrument Cluster and Display
4-28*Some models.
MX-5_8LE7-EA-22K_Edition1_old
2022-8-4 8:12:24
Page 156 of 503

SignalWarning Lights Page
*Door-Ajar Warning Indication 7-40
*Trunk lid-Ajar Warning Indication7-40
*Low Fuel Warning Indication/Warning Light
7-40
Check Fuel Cap Warning Light*17-40
*Low Washer Fluid Level Warning Indication/Warning Light7-40
*1 The light turns on when the ignition is switched on for an operation check, and turns off a few seconds later or
when the engine is started. If the light does not turn on or remains turned on, have the vehicle inspected at an
Authorized Mazda Dealer.
*2 The light turns on continuously when the parking brake is applied.
▼ Indication/Indicator Lights
These lights turn on or flash to notify the us
er of the system operation status or a system
malfunction.
Signal Indicator Lights Page
*Passenger Air Bag Deactivation Indicator Light (Type A)*12-49
*Passenger Air Bag Deactivation Indicator Light (Type B)*12-49
(White/Green)
*KEY Indicator/Indicator Light 3-10
Security Indicator Light*13-45
*Retractable Hardtop Operation Indicator Light
3-40
*Wrench Indication/Indicator Light*14-31
(Blue)Low Engine Coolant Temperature Indicator Light 4-31
*Shift Position Indication
4-37
When Driving
Instrument Cluster and Display
*Some models.4-29
MX-5_8LE7-EA-22K_Edition1_old
2022-8-4 8:12:24
Page 158 of 503

SignalIndicator Lights Page
(White)
*Cruise Main Indication 4-110
(Green)
*Cruise Set Indication/Indicator Light4-110
*1 The light turns on when the ignition is switched on for an operatio
n check, and turns off
a few seconds later or when the engine is star ted. If the light does not turn on or remains
turned on, have the vehicle inspected at an Authorized Mazda Dealer.
▼ Wrench Indication/Indicator Light*
Type A instrument cluster
Perform maintenance
in accordance with
the message.
Type B instrument cluster
When the ignition is switched ON, the
wrench indicator light is illuminated and
then turns off after a few seconds.
The wrench indicator light turns on when
the preset maintenance period arrives.
Verify the content and perform
maintenance.
Refer to the Maintena nce Monitor section
in the Mazda Connect Owner's Manual.
▼ Low Engine Coolant Temperature
Indicator Light (Blue)
The light illuminates continuously when
the engine coolant temperature is low and
turns off after the engine is warm.
If the low engine coolant temperature
indicator light remains illuminated after
the engine has been sufficiently warmed
up, the temperature sensor could have a
malfunction. Consult an Authorized
Mazda Dealer.
When Driving
Instrument Cluster and Display
*Some models.4-31
MX-5_8LE7-EA-22K_Edition1_old
2022-8-4 8:12:24
Page 163 of 503

Shift-Lock System
The shift-lock system prevents shifting out
of P unless the brake pedal is depressed.
To shift from P:
1. Depress and hold the brake pedal.
2. Start the engine.
3. Press and hold the lock-release button.
4. Move the selector lever.
NOTE
When the ignition is switched to ACC or
the ignition is switched off, the selector
lever cannot be shifted from P position.
The ignition cannot be switched to OFF
if the selector lever is not in P position.
▼ Shift-Lock Override
If the selector lever will not move from P
using the proper shift procedure, continue
to hold down the brake pedal.
1. Remove the shift-lock override cover
using a cloth-wr apped flat head
screwdriver.
2. Insert a screwdriver and push it down.
Cover
3. Press and hold the lock-release button.
4. Move the selector lever.
Take the vehicle to an Authorized Mazda
Dealer to have the system checked.
Transmission Ranges
The shift position indication in the
instrument cluster illuminates.
Refer to Warning/Indicator Lights on
page 4-27.
The selector lever must be in P or N
position to operate the starter.
P (Park)
P locks the transmission and prevents the
rear wheels from rotating.
WA R N I N G
Always set the selector lever to P position
and set the parking brake:
Only setting the selector lever to the P
position without using the parking brake to
hold the vehicle is dangerous. If P fails to
hold, the vehicle could move and cause an
accident.
CAUTION
Shifting into P, N or R while the vehicle is
moving can damage your transmission.
Shifting into a driving gear or reverse
when the engine is running faster than
idle can damage the transmission.
R (Reverse)
In position R, the vehicle moves only
backward. You must be at a complete stop
before shifting to or from R, except under
rare circumstances as explained in
Rocking the Vehicle (page 3-50).
When Driving
Automatic Transmission
4-36
MX-5_8LE7-EA-22K_Edition1_old 2022-8-4 8:12:24
Page 185 of 503

Hazard Warning Flasher
The hazard warning lights should always
be used when you stop on or near a
roadway in an emergency.
The hazard warning lights warn other
drivers that your vehicle is a traffic hazard
and that they must take extreme caution
when near it.
Depress the hazard warning flasher and all
the turn signals will flash. The hazard
warning indicator ligh ts in the instrument
cluster flash simultaneously.
NOTE
The turn signals do not work when the
hazard warning lights are on.
Check local regulations about the use of
hazard warning lights while the vehicle
is being towed to verify that it is not in
violation of the law.
HomeLink Wireless
Control System
*
NOTE
HomeLink and HomeLink house icon are
registered trademarks of Gentex
Corporation.
The HomeLink system replaces up to 3
hand-held transmitters with a single
built-in component in the auto-dimming
mirror. Pressing the HomeLink button on
the auto-dimming mirror activates garage
doors, gates and other devices surrounding
your home.
HomeLink button
Indicator light
WA R N I N G
Do not use the HomeLink system with any
garage door opener that lacks the safety
stop and reverse feature:
Using the HomeLink system with any
garage door opener that lacks the safety
stop and reverse feature as required by
federal safety standards is dangerous. (This
includes garage doors manufactured
before April 1, 1982.)
When Driving
Switches and Controls
4-58*Some models.
MX-5_8LE7-EA-22K_Edition1_old 2022-8-4 8:12:24
Page 186 of 503

Using these garage door openers can
increase the risk of serious injury or death.
For further information, contact HomeLink
at 1-800-355-3515 or www.homelink.com
or an Authorized Mazda Dealer.
Always check the areas surrounding
garage doors and gates for people or
obstructions before programming or
during operation of the HomeLink system:
Programming or operating the HomeLink
system without verifying the safety of areas
surrounding garage doors and gates is
dangerous and could result in an
unexpected accident and serious injury if
someone were to be hit.
NOTE
The programming will not be erased even
if the battery is disconnected.
▼Pre-programming the HomeLink
System
NOTE
It is recommended that a new battery be
placed in the hand-held transmitter of the
device being programmed to HomeLink
for quicker training and accurate
transmission of the radio-frequency signal.
Verify that there is a remote control
transmitter available for the device you
would like to program.
Disconnect the power to the device.
▼Programming the HomeLink
System
CAUTION
When programming a garage door opener
or a gate, disconnect the power to these
devices before performing programming.
Continuous operation of the devices could
damage the motor.
The HomeLink system provides 3 buttons
which can be individually selected and
programmed using the transmitters for
current, on-market devices as follows:
1. Disconnect the power to the garage
door opener or gate programmed to the
hand-held transmitter.
2. Position the end of your hand-held transmitter 2.5 ―7.5 cm (1―3 inches)
away from the HomeLink button you
wish to program while keeping the
indicator light in view.
3. Simultaneously press and hold both the chosen HomeLink and hand-held
transmitter buttons. Do not release the
buttons until step 3 has been
completed.
NOTE
Some gate operators and garage door
openers may require you to replace
this Programming Step 2 with
procedures noted in the “Gate
Operator/Canadian Programming”
section.
4. After the HomeLink indicator light changes from a slow to a rapidly
blinking light, release both the
HomeLink and hand-held transmitter
buttons.
When Driving
Switches and Controls
4-59
MX-5_8LE7-EA-22K_Edition1_old 2022-8-4 8:12:24
Page 212 of 503

Blind Spot Monitoring (BSM)*
The BSM is designed to assist the driver in checking the area to the rear of the vehicle on
both sides during lane changes by alerting the driver to the presence of vehicles approaching
from the rear in an adjacent lane.
The BSM detects vehicles approaching from the rear while traveling in the forward
direction at a speed of 10 km/h (6.3 mph) or faster and turns on the BSM warning lights
equipped on the door mirrors depending on the conditions. If the turn signal lever is
operated to signal a lane change in the direction in which the BSM warning light is
illuminated, the system warns the driver of a vehicle in the detection area by flashing the
BSM warning light and activating a beep sound.
The detection area on this system covers the driving lanes on both sides of the vehicle and
from the rear part of the doors to about 50 m (164 ft) behind the vehicle.
Detection areas Your vehicle
WA R N I N G
Always check the surrounding area visually before making an actual lane change:
The system is only designed to assist you in checking for vehicles at your rear when making a
lane change. Due to certain limitations with the operation of this system, the BSM warning
light may not flash or it might be delayed even th ough a vehicle is in an adjacent driving lane.
Always make it your responsibility as a driver to check the rear.
When Driving
i-ACTIVSENSE
*Some models.4-85
MX-5_8LE7-EA-22K_Edition1_old 2022-8-4 8:12:24
Page 218 of 503

Stop sign
Sign recognized and
displayed at same time
Instrument cluster
WA R N I N G
Always check the traffic signs visually while driving.
The TSR helps prevent the driver from overlookin g traffic signs and provides support for safer
driving. Depending on the weath er conditions or problems with
traffic signs, a
traffic sign
may not be recognized or a traffic sign different from the actual traffic sign may be displayed.
Always make it your responsibility as a driver to check the actual
traffic signs. Otherwise, it
could result in an accident.
NOTE
The TSR does not operate if there is a malf unction in the Forward Sensing Camera (FSC).
Under the following conditions, the TSR may not operate normally.
An object placed on the dashboard is reflected in the windshield and picked up by the
camera.
Heavy luggage is loaded in the luggage compartment or on the rear seat and the
vehicle is tilted.
The tire pressures are not adjusted to the specified pressure.
Tires other than standard tires are equipped.
The vehicle is driven on the ramp and surrounding area to or from a rest area or a
tollgate on a highway.
When surrounding brightness suddenly changes such as when entering or exiting a
tunnel.
When Driving
i-ACTIVSENSE
4-91
MX-5_8LE7-EA-22K_Edition1_old 2022-8-4 8:12:24