Page 21 of 80
20
RC350 AWD_RC350_RC300 AWD_RC300_QG_(U)
Wiper intervals can be adjusted when inter-
mittent operation is selected.
5Increases the intermittent windshield
wiper frequency
6Decreases the intermittent windshield
wiper frequency
7 Washer/wiper dual operation
Pulling the lever operates the wipers
and washer.
The wipers will automatically operate a
couple of times after the washer
squirts.
Vehicles with headlight cleaners:
When the engine switch is in IGNI-
TION ON mode and the headlights
are on, if the lever is pulled, the head-
light cleaners will operate once. After
this, the headlight cl eaners will operate
every 5th time the lever is pulled.
Rain-sensing windshield wipers
1 (U.S.A.) or (Canada)
Move the lever up by 2 levels
2 Move the lever up by 1 level
3 (U.S.A.) or (Canada)
Move the lever down by 1 level
4 (U.S.A.) or (Canada)
Move the lever down by 2 levels
5 AUTO mode on/off switch
The AUTO mode indicator will turn
on when AUTO mode is selected.
A
Page 23 of 80
22
RC350 AWD_RC350_RC300 AWD_RC300_QG_(U)
• Current wiper operation: AUTO mode (Continuously)
*1: After temporary operation, the mode will return to AUTO mode.
*2: AUTO mode will be canceled.When AUTO mode is selected, the sensor
sensitivity can be adjusted by turning the
switch ring.
6Increases the sensitivity
7Decreases the sensitivity
8 Washer/wiper dual operation
Pulling the lever operates the wipers
and washer.
The wipers will automatically operate a
couple of times after the washer
squirts.
Vehicles with headlight cleaners:
When the engine switch is in IGNI-
TION ON mode and the headlights
are on, if the lever is pulled, the head-
light cleaners will operate once. After
this, the headlight cl eaners will operate
every 5th time the lever is pulled.
Wiper lever operationWiper operation
or Off
No change
or Low speed operation*2
or High speed operation*2
Page 24 of 80
23
RC350 AWD_RC350_RC300 AWD_RC300_QG_(U)
Turns the intuitive parking assist on/off
When on, the indicator light comes on to
inform the driver that the system is opera-
tional.
Intuitive Parking Assist (if equipped)
The distance from your vehicle to nearby obstacles when parallel parking or maneuvering
into a garage is measured by the sensors and communicated via the multi-information dis-
play, Center Display and a buzzer. Always check the surrounding area when using this
system.
Intuitive parking assist switch
Page 26 of 80

25
RC350 AWD_RC350_RC300 AWD_RC300_QG_(U)
The tire pressure detected by the tire pres-
sure warning system can be displayed on
the multi-information display.
The illustration used is intended as an exam-
ple, and may differ from the image that is
actually displayed on the multi-information
display.
1Park the vehicle in a safe place, turn the engine switch off and wait 20 minutes or more.
Initialization cannot be performe d while the vehicle is moving.
2Adjust the tire inflation pressure to the sp ecified cold tire inflation pressure level.
Make sure to adjust the tire pressure to the specified cold tire inflation pressure level.
The tire pressure warning system will operate based on this pressure level.
3Start the engine.
4Press and hold the tire pressure warn-
ing reset switch until the tire pressure
warning light blinks slowly 3 times.
Then a message will be displayed on
the multi-information display.
5Drive straight (with occasional left and righ t turns) at approximately 25 mph (40 km/h)
or more for approximat ely 10 to 30 minutes.
Initialization is complete when the position of each tire is determined and the inflation
pressure of each tire is displayed on the multi-information display.
Tire Pressure Warning System
Your vehicle is equipped with a tire pressure warning system that uses tire pressure warn-
ing valves and transmitters to detect low tire inflation pressure before serious problems
arise.
The tire inflation pressure display function
Initializing the tire pressure warning system
Page 52 of 80

51
RC350 AWD_RC350_RC300 AWD_RC300_QG_(U)
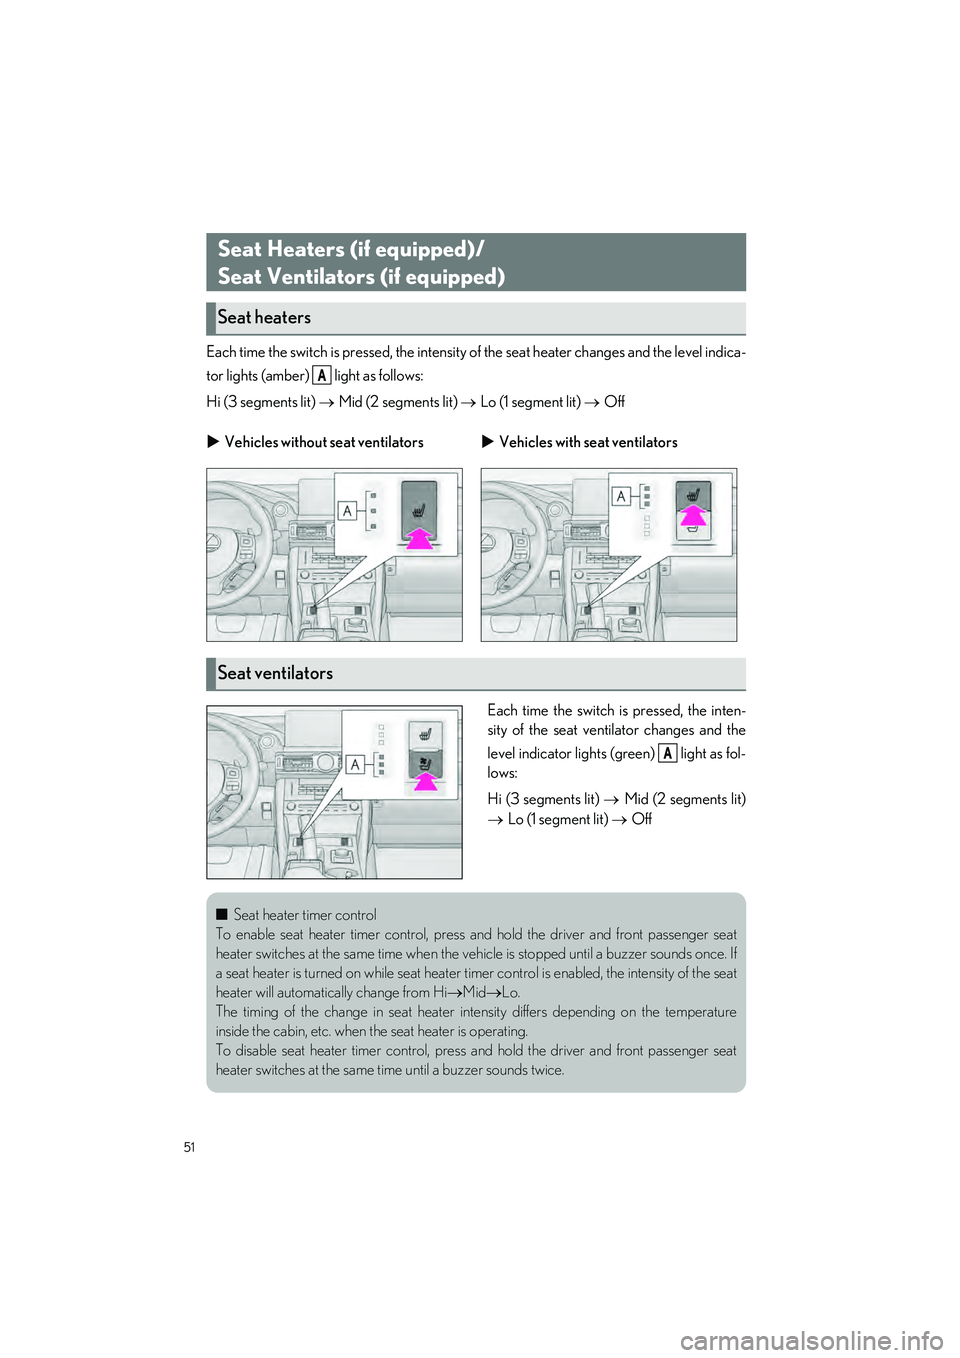
Each time the switch is pressed, the intensity of the seat heater changes and the level indica-
tor lights (amber) light as follows:
Hi (3 segments lit)
Mid (2 segments lit) Lo (1 segment lit) Off
Each time the switch is pressed, the inten-
sity of the seat ventilator changes and the
level indicator lights (g reen) light as fol-
lows:
Hi (3 segments lit)
Mid (2 segments lit)
Lo (1 segment lit) Off
Seat Heaters (if equipped)/
Seat Ventilators (if equipped)
Seat heaters
A
Vehicles without seat ventilators Vehicles with seat ventilators
Seat ventilators
A
■Seat heater timer control
To enable seat heater timer control, press and hold the driver and front passenger seat
heater switches at the same ti me when the vehicle is stopped until a buzzer sounds once. If
a seat heater is turned on whil e seat heater timer control is en abled, the intensity of the seat
heater will automati cally change from Hi MidLo.
The timing of the change in seat heater intensity differs depending on the temperature
inside the cabin, etc. when th e seat heater is operating.
To disable seat heater timer control, press and hold the driver and front passenger seat
heater switches at the same ti me until a buzzer sounds twice.
Page 61 of 80

60
RC350 AWD_RC350_RC300 AWD_RC300_QG_(U)
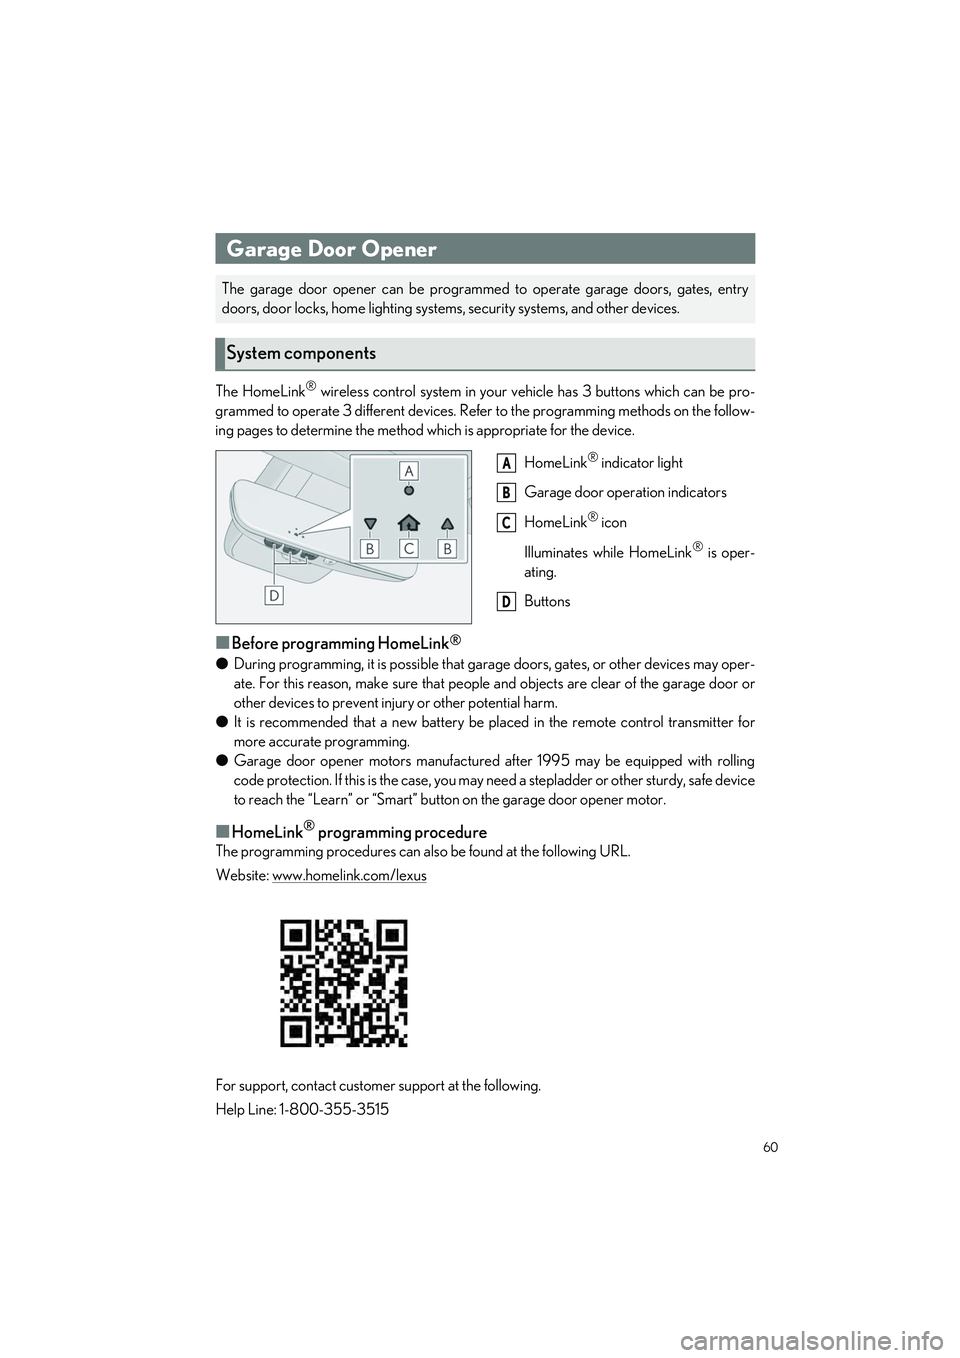
The HomeLink® wireless control system in your vehicle has 3 buttons which can be pro-
grammed to operate 3 different devices. Refe r to the programming methods on the follow-
ing pages to determine the method wh ich is appropriate for the device.
HomeLink
® indicator light
Garage door operation indicators
HomeLink
® icon
Illuminates while HomeLink
® is oper-
ating.
Buttons
■Before programming HomeLink®
● During programming, it is possible that gara ge doors, gates, or other devices may oper-
ate. For this reason, make su re that people and objects ar e clear of the garage door or
other devices to prevent injury or other potential harm.
● It is recommended that a new battery be placed in the remote control transmitter for
more accurate programming.
● Garage door opener motors manufactured after 1995 may be equipped with rolling
code protection. If this is the case, you may need a stepladder or other sturdy, safe device
to reach the “Learn” or “Smart” button on the garage door opener motor.
■HomeLink® programming procedure
The programming procedures can also be found at the following URL.
Website: www.homelink.com/lexus
For support, contact customer support at the following.
Help Line: 1-800-355-3515
Garage Door Opener
The garage door opener can be programmed to operate garage doors, gates, entry
doors, door locks, home lighting system s, security systems, and other devices.
System components
A
B
C
D
Page 62 of 80

61
RC350 AWD_RC350_RC300 AWD_RC300_QG_(U)
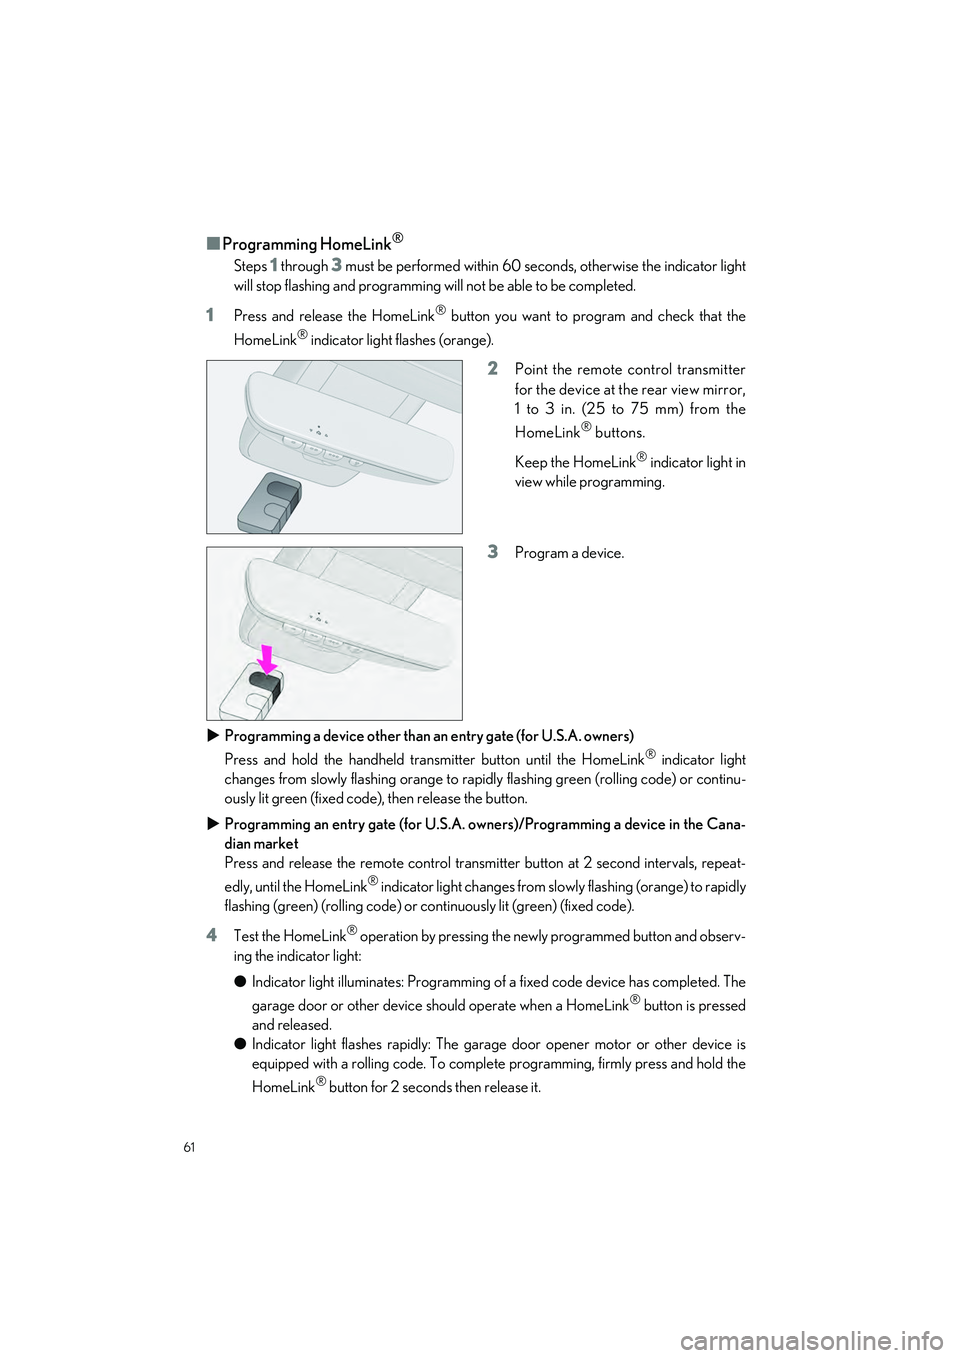
■Programming HomeLink®
Steps 1 through 3 must be performed within 60 seconds, otherwise the indicator light
will stop flashing and programming will not be able to be completed.
1Press and release the HomeLink® button you want to program and check that the
HomeLink
® indicator light flashes (orange).
2Point the remote control transmitter
for the device at the rear view mirror,
1 to 3 in. (25 to 75 mm) from the
HomeLink
® buttons.
Keep the HomeLink
® indicator light in
view while programming.
3Program a device.
Programming a device other than an entry gate (for U.S.A. owners)
Press and hold the handheld transmitter button until the HomeLink
® indicator light
changes from slowly flashing orange to rapi dly flashing green (rolling code) or continu-
ously lit green (fixed code), then release the button.
Programming an entry gate (for U.S.A. owners)/Programming a device in the Cana-
dian market
Press and release the remote control transmit ter button at 2 second intervals, repeat-
edly, until the HomeLink
® indicator light changes from slow ly flashing (orange) to rapidly
flashing (green) (rolling code) or co ntinuously lit (green) (fixed code).
4Test the HomeLink® operation by pressing the newly programmed button and observ-
ing the indicator light:
● Indicator light illuminates: Programming of a fixed code device has completed. The
garage door or other device should operate when a HomeLink
® button is pressed
and released.
● Indicator light flashes rapidly: The garage door opener motor or other device is
equipped with a rolling code. To complete programming, firmly press and hold the
HomeLink
® button for 2 second s then release it.
Page 64 of 80

63
RC350 AWD_RC350_RC300 AWD_RC300_QG_(U)
■Enabling 2-way communication with a garage door (only available for compat-
ible devices)
When enabled, 2-way communication allows yo u to check the status of the opening and
closing of a garage door throug h indicators in your vehicle.
2-way communication is only av ailable if the garage door opener motor used is a compati-
ble device. (To check device compatibility, refer to www.homelink.com.)
1Within 5 seconds afte r programming the garage door opener has been completed, if
the garage door opener motor is trained to HomeLink
®, both garage door operation
indicators will flash rapidly (green) and the light on the garage door opener motor will
blink twice, indicating that 2-way communication is enabled.
If the indicators do not flash, perform
2 and 3 within the first 10 presses of the HomeLink®
button after programming has been completed.
2Press a programmed HomeLink® button to operate a garage door.
3Within 1 minute of pressing the HomeLink® button, after the garage door operation
has stopped, press th e “Learn” or “Smart” button on the garage door opener motor.
Within 5 seconds of the establishment of 2-way communication with the garage door
opener, both garage door operation indicators in the vehicle will flash rapidly (green)
and the light on the garage door opener motor will blink twice, indicating that 2-way
communication is enabled.
■Reprogramming a single HomeLink® button
When the following procedure is performed, buttons which already have devices registered
to them can be overwritten:
1With one hand, press and hold the desired HomeLink® button.
2When the HomeLink® indicator starts flashing (orange), continue to hold the
HomeLink
® button and perform “Programming HomeLink®” 1 (it takes 20 seconds
for the HomeLink
® indicator to start flashing).
Press the appropriate HomeLink
® button. The HomeLink® indicator light should turn on.
Operating HomeLink®