Page 79 of 172
4-9
Selecting radio channels
by using channel numbers
If you know the exact channel number,
you can enter it to select the radio channel
directly.
1 On the radio screen, press
Band > SiriusXM.
2 On the SiriusXM radio screen,
press Enter Channel .
3 Enter a channel number and
press OK.
Searching for SiriusXM
radio channels
You can select a radio channel from the
available SiriusXM channels list.
1 On the radio screen, press
Band > SiriusXM.
2 On the SiriusXM radio screen,
press Menu > Channel List .
3 Select a category and a radio
channel.
\225To add a radio channel to the preset
list, press the star icon next to the
channel (if equipped).
\225To skip a radio channel when
scanning, press Skip next to the
channel. To cancel your skip settings
for all channels, press Unskip All. (if
equipped)
\225To sort by saved radio channels,
press Prioritize Presets (if
equipped).
Page 80 of 172
4-10
Listening to Featured
Favorites channels
You can listen to Featured Favorites
channels on SiriusXM radio. Multiple sets
of channels can be broadcast and can be
changed by SiriusXM.
1 On the radio screen, press
Band > SiriusXM.
2 On the SiriusXM radio screen,
press Menu > Featured
Favorites.
3 Select a radio channel.
Viewing the program
schedule
You can view the program schedule and
information for the radio channels on
your preset list.
1 On the radio screen, press
Band > SiriusXM.
2 On the SiriusXM radio screen,
press Menu > What is on My
Presets?.
3 Set a date and time on the top
line of the screen.
\225 To select a date, press the date
display field above the preset list and
select a date and time zone.
\225To select a time, press the left or
right arrow.
4 Select a radio channel and a
program to view its detailed
information.
\333 Note
If there are multiple programs in one time
slot, arrows will appear in the time slot
next to the first program. Press the arrows
to view information about the previous or
next program.
Page 93 of 172
6-5
b b Return to the previous level.
c c List of Bluetooth devices paired
with the system. Press a device
name to connect or disconnect the
device.
d d Pair a new device with your system.
e e Delete paired devices. Downloaded
data from devices will also be
deleted.
3 Select a function you want to
use and press OK.
\333Note
\225If you cannot connect a Bluetooth
device, check if Bluetooth is activated on
the device.
\225If a connection ends because a device is
out of the connection range or a device
error occurs, the connection will be
restored automatically when the device
enters the connection range or when
the error is cleared.
\225If a connection is unstable due to a
communication error, reset Bluetooth
by pressing All Menus > Setup >
Device Connections > Bluetooth >
Reset, and then reconnect the device (if
equipped).
Disconnecting a device
If you want to stop using a Bluetooth
device or connect another device,
disconnect your currently connected
device.
Depending on the vehicle model or
specifications, displayed screens and
available functions may vary.
[ Option A
1 On the Home screen, press
All Menus > Setup > Device
Connections > Bluetooth >
Bluetooth Connections .
2 Press a device name or
Disconnect.
3 Press Yes.
[Option B
1 On the Home screen, press
All Menus > Setup > Device
Connections > Bluetooth >
Bluetooth Connections .
2 Press a device name.
3 Press Disconnect .
Page 114 of 172
8-6
Checking maintenance
service intervals
You can view the service intervals
between your last and next scheduled
maintenance. This feature will help you
maintain your vehicle on a regular basis.
1 On the Home screen, press
All Menus > Kia Connect >
Maintenance .
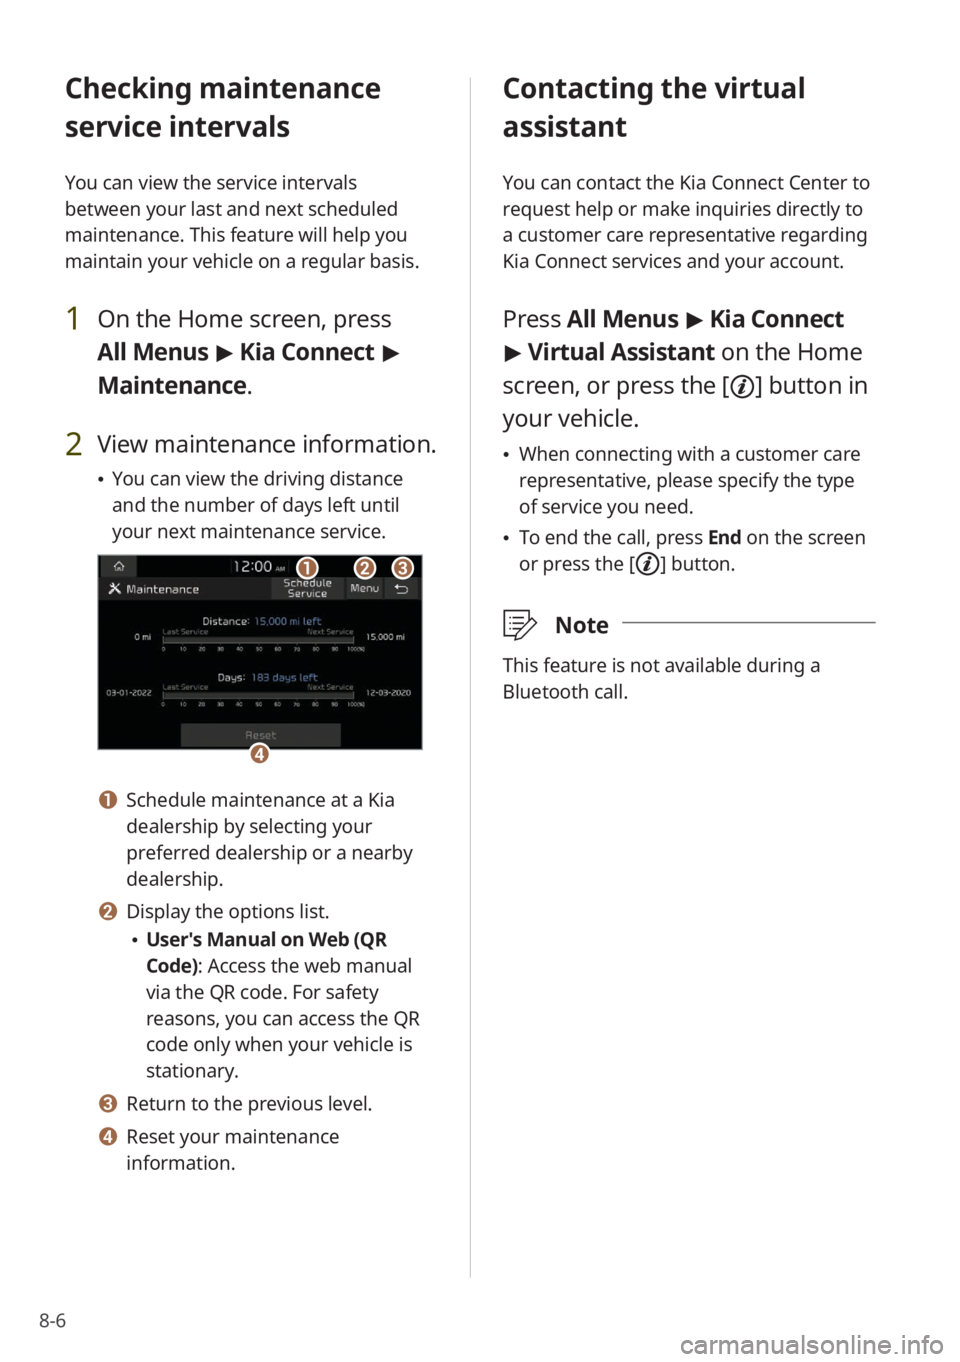
2 View maintenance information.
\225You can view the driving distance
and the number of days left until
your next maintenance service.
bbaacc
dd
a a Schedule maintenance at a Kia
dealership by selecting your
preferred dealership or a nearby
dealership.
b b Display the options list.
\225User′s Manual on Web (QR
Code): Access the web manual
via the QR code. For safety
reasons, you can access the QR
code only when your vehicle is
stationary.
c c Return to the previous level.
d d Reset your maintenance
information.
Contacting the virtual
assistant
You can contact the Kia Connect Center to
request help or make inquiries directly to
a customer care representative regarding
Kia Connect services and your account.
Press All Menus > Kia Connect
> Virtual Assistant on the Home
screen, or press the [
] button in
your vehicle.
\225 When connecting with a customer care
representative, please specify the type
of service you need.
\225To end the call, press End on the screen
or press the [
] button.
\333 Note
This feature is not available during a
Bluetooth call.
Page 119 of 172
9-3
\225AWD : Select a four-wheel drive mode.
-ECO : This drive mode is for optimum
fuel efficiency.
- NORMAL: This drive mode is
optimized for a comfortable ride.
-SPORT: This drive mode is optimized
for dynamic driving.
[Drive Mode Change Alert (if
equipped)
You can set to display a notification when
you change your vehicle′s drive mode.
\225 Detailed Alert: When you change the
drive mode, a detailed notification will
be displayed with the vehicle image.
\225Simple Alert: When you change the
drive mode, a brief notification will be
displayed at the top of the screen.
\225Off: When you change the drive mode,
no notification will be displayed.
[Coasting (if equipped)
You can set the vehicle to disengage
the engine from the transmission while
coasting in ECO or SMART mode to save
fuel.
[ECO (if equipped)
This is a drive mode for increasing the
vehicle′s energy efficiency. You can
change the climate control mode, the
active coast energy regeneration level,
and other settings.
[NORMAL (if equipped)
This is a drive mode focused on the driver
and passenger′s comfort. You can change
the climate control mode and the active
coast energy regeneration level.
[SPORT (if equipped)
This drive mode enables a more dynamic
driving performance. You can change the
climate control mode and the active coast
energy regeneration level.
[Reset ECO/NORMAL/SPORT (if
equipped)
Reset your drive mode settings to the
default values.
\333 Note
You can view how to improve ECO
potential by pressing Help. If the ECO
potential improves, the drivable distance
will be longer. (electric vehicles only)
Page 122 of 172
9-6
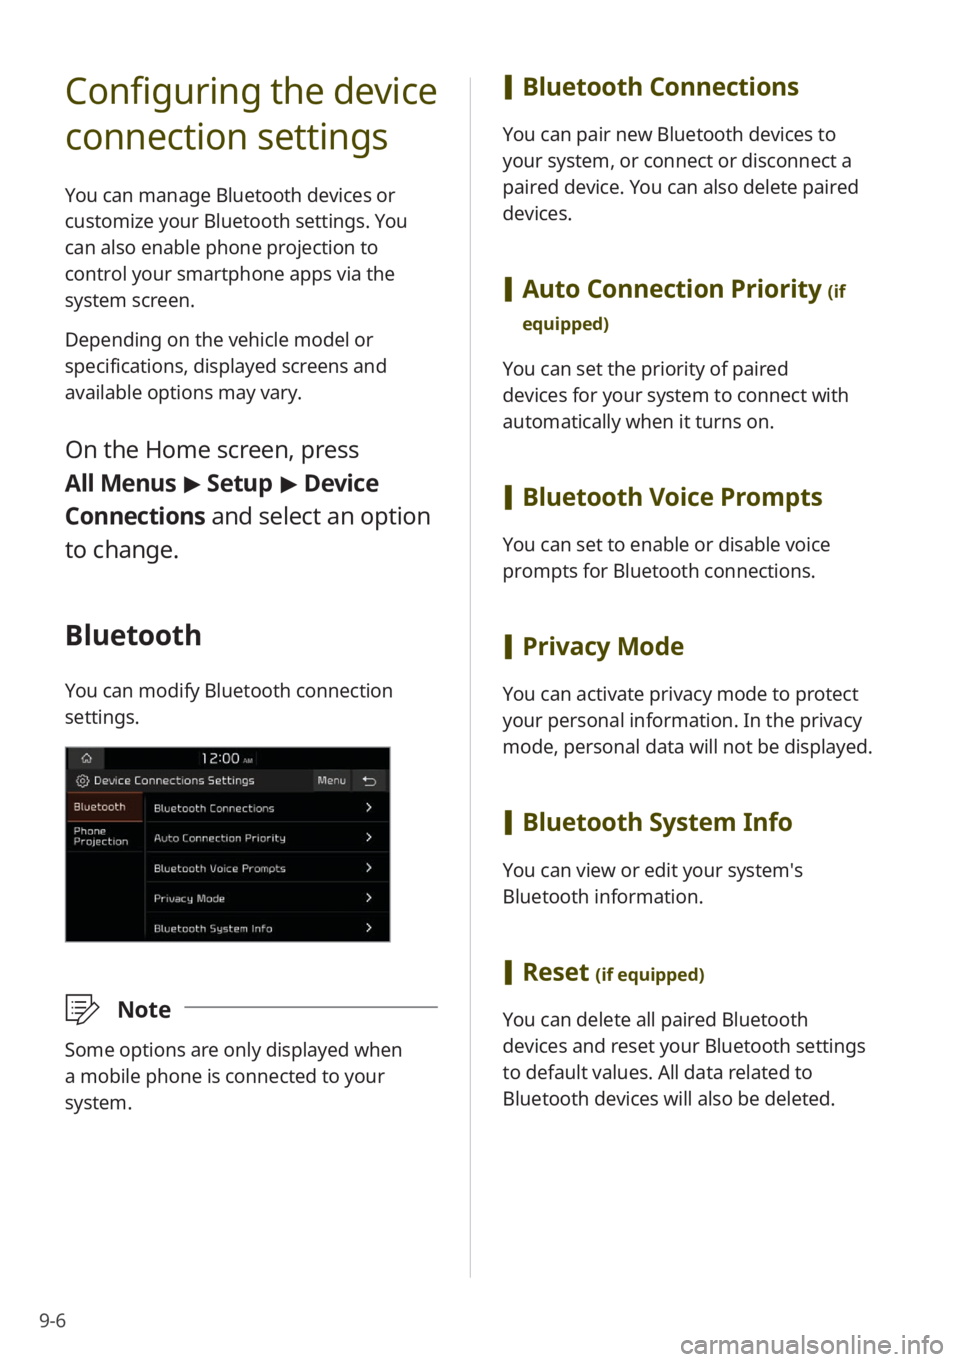
Configuring the device
connection settings
You can manage Bluetooth devices or
customize your Bluetooth settings. You
can also enable phone projection to
control your smartphone apps via the
system screen.
Depending on the vehicle model or
specifications, displayed screens and
available options may vary.
On the Home screen, press
All Menus > Setup > Device
Connections and select an option
to change.
Bluetooth
You can modify Bluetooth connection
settings.
\333 Note
Some options are only displayed when
a mobile phone is connected to your
system.
[Bluetooth Connections
You can pair new Bluetooth devices to
your system, or connect or disconnect a
paired device. You can also delete paired
devices.
[Auto Connection Priority (if
equipped)
You can set the priority of paired
devices for your system to connect with
automatically when it turns on.
[ Bluetooth Voice Prompts
You can set to enable or disable voice
prompts for Bluetooth connections.
[Privacy Mode
You can activate privacy mode to protect
your personal information. In the privacy
mode, personal data will not be displayed.
[Bluetooth System Info
You can view or edit your system′s
Bluetooth information.
[Reset (if equipped)
You can delete all paired Bluetooth
devices and reset your Bluetooth settings
to default values. All data related to
Bluetooth devices will also be deleted.
Page 126 of 172
![KIA NIRO PHEV 2023 Quick Start Guide Base Audio 9-10
[∧ ]/[∨ ] Buttons (Steering
Wheel)
(if equipped)
You can assign a function to the Search
lever/button on your steering wheel.
Configuring the
general system
settings
You can customize yo KIA NIRO PHEV 2023 Quick Start Guide Base Audio 9-10
[∧ ]/[∨ ] Buttons (Steering
Wheel)
(if equipped)
You can assign a function to the Search
lever/button on your steering wheel.
Configuring the
general system
settings
You can customize yo](/manual-img/2/54741/w960_54741-125.png)
9-10
[∧ ]/[∨ ] Buttons (Steering
Wheel)
(if equipped)
You can assign a function to the Search
lever/button on your steering wheel.
Configuring the
general system
settings
You can customize your system settings,
such as the time and date, the system
language, and more.
Depending on the vehicle model or
specifications, displayed screens and
available options may vary.
On the Home screen, press All
Menus > Setup > General and
select an option to change.
SW Info/Update (if equipped)
You can view your system′s version
information or update it to the latest
version. To update your system, visit your
local dealership.
\335 Caution
\225Depending on data size, an update may
take several minutes.
\225Do not turn off the system or remove
the storage device while the update is in
progress. If the power supply is cut off
or the storage device is removed from
the system, it may corrupt the data or
cause a system malfunction.
System Info
You can view your system information
or reset your system settings to default
values.
Page 127 of 172
9-11
[SW Info/Update (if equipped)
You can view your system′s version
information or update it to the latest
version. To update your system, visit your
local dealership.
\335 Caution
\225Depending on data size, an update may
take several minutes.
\225Do not turn off the system or remove
the storage device while the update is in
progress. If the power supply is cut off
or the storage device is removed from
the system, it may corrupt the data or
cause a system malfunction.
[Storage
You can view your system′s memory
storage information.
[User′s Manual on Web (QR
Code)
You can access the web manual of the
system by scanning the QR code with your
smartphone.
\334 Warning
Park your vehicle in a safe location before
scanning the QR code. For safety reasons,
you are not able to access QR codes from
the system′s screen while the vehicle is
moving.
[Reset (if equipped)
You can reset your system settings to
default values. All user data stored in the
system will also be deleted.
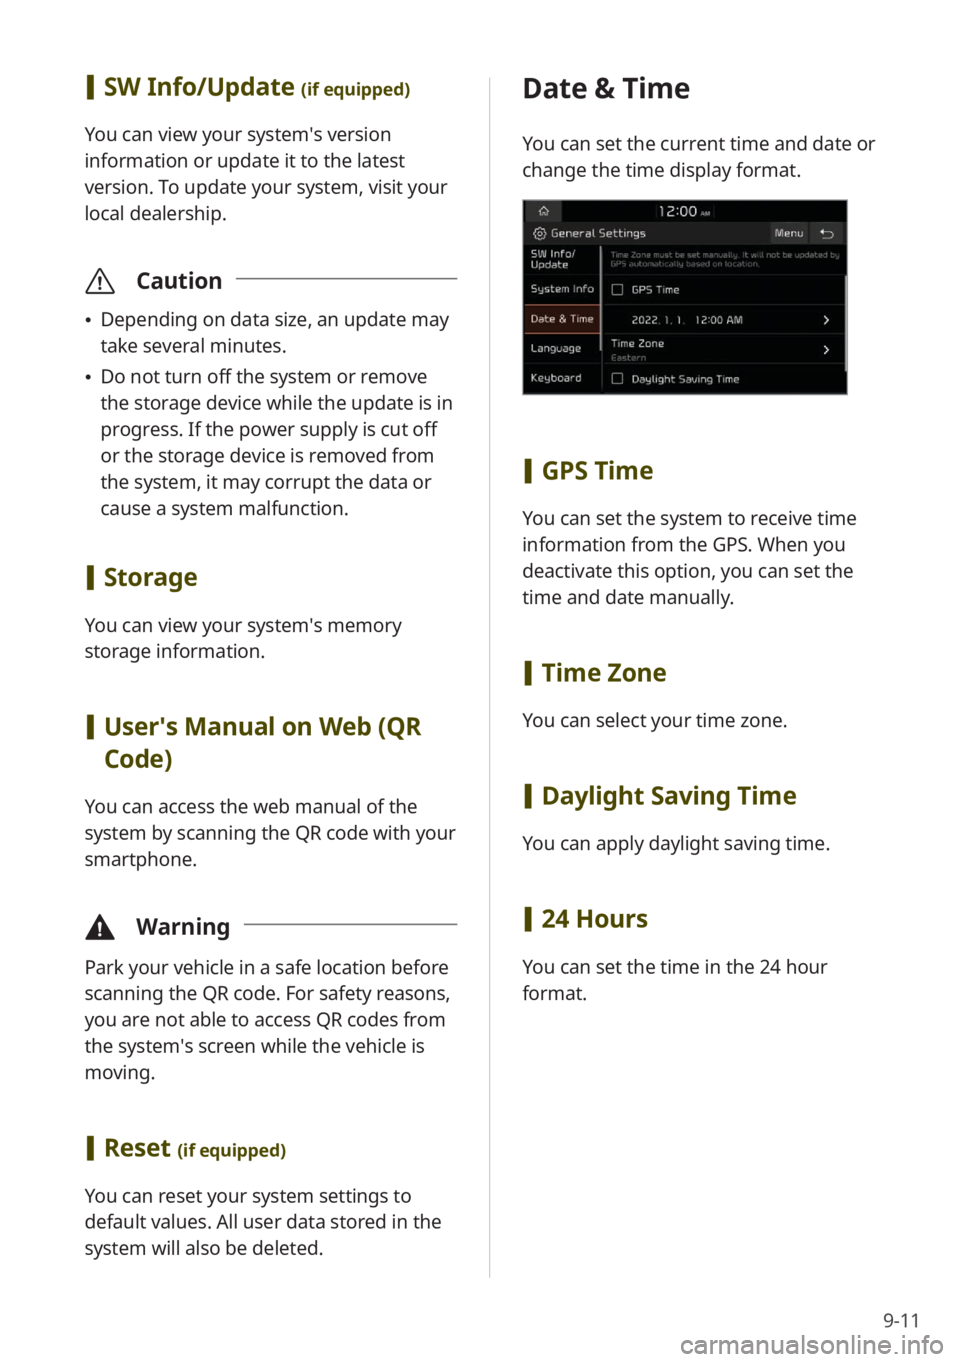
Date & Time
You can set the current time and date or
change the time display format.
[GPS Time
You can set the system to receive time
information from the GPS. When you
deactivate this option, you can set the
time and date manually.
[Time Zone
You can select your time zone.
[Daylight Saving Time
You can apply daylight saving time.
[24 Hours
You can set the time in the 24 hour
format.