Page 92 of 372
3-6
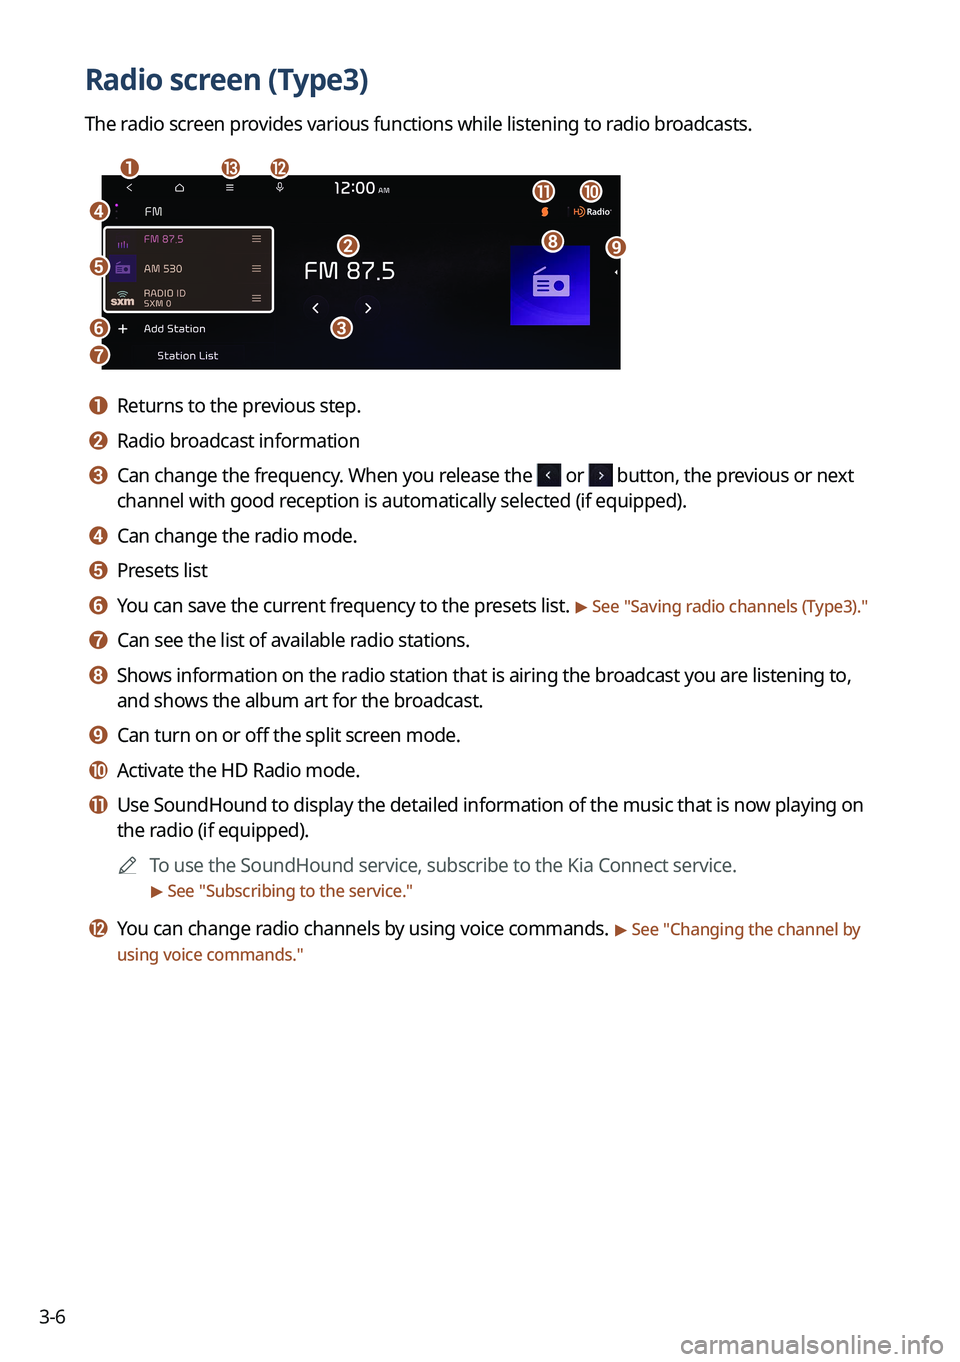
Radio screen (Type3)
The radio screen provides various functions while listening to radio broadcasts.
a
dj
ihb
c
ml
k
e
f
g
a a Returns to the previous step.
b b Radio broadcast information
c c Can change the frequency. When you release the or button, the previous or next
channel with good reception is automatically selected (if equipped).
d d Can change the radio mode.
e e Presets list
f f You can save the current frequency to the presets list. > See "Saving radio channels (Type3)."
g g Can see the list of available radio stations.
h h Shows information on the radio station that is airing the broadcast you are listening to,
and shows the album art for the broadcast.
i i Can turn on or off the split screen mode.
j j Activate the HD Radio mode.
k k Use SoundHound to display the detailed information of the music that is \
now playing on
the radio (if equipped).
A
To use the SoundHound service, subscribe to the Kia Connect service.
> See "Subscribing to the service."
l l You can change radio channels by using voice commands. > See "Changing the channel by
using voice commands."
Page 93 of 372
3-7
m m The list of menu items appears.
�Display Off: Turns off the screen. To switch the screen back on, press the screen or
briefly press the power button.
�Enter Station: Can select or directly enter the desired radio frequency.
�Scan FM (Available only with FM): Select a broadcast of your choice after listening
briefly to broadcasts from different radio stations.
�Scan AM (Available only with AM): Select a broadcast of your choice after listening
briefly to broadcasts from different radio stations.
�Tune FM Manually (Available only with FM): Tune the radio frequency manually.
�Tune AM Manually (Available only with AM): Tune the radio frequency manually.
�Delete Presets: Can delete a registered channel from the presets list. > See "
Deleting a
registered channel."
� Reorder Presets: Rearrange the presets list.
�SoundHound History: Can see recently searched music files through the
SoundHound service (if equipped).
A
To use the SoundHound service, subscribe to the Kia Connect service.
> See "Subscribing to the service."
� Radio Noise (Available only with FM): Customize sound quality when listening to F\
M
radio by adjusting background noise of the original sound (if equipped).
�Sound Settings: Displays the system sound settings screen. > See "
Configuring the
sound settings (Type2)."
� User's Manual on Web (QR Code): Displays the QR code that provides access to the
online user manual for the system.
�Split Screen: Can turn on or off the split screen mode.
A
The screen may differ depending on the vehicle model and specifications.
A
The sound effect settings button may appear on the screen depending on the amp.
ÝWarning
Driving while distracted can result in a loss of vehicle control that may lead to an accident,
severe bodily injury, or death. The driver's primary responsibility is the safe and legal
operation of the vehicle, and the use of any vehicle systems, including the \
touch screen and
steering wheel controls, which take the driver's eyes, attention, and focus away from the safe
operation of the vehicle, or which are not permissible by law, should never be used during
the operation of the vehicle.
Page 102 of 372
3-16
HD Radio™ Technology
Program Info: Presents song name, artist, station IDs,
and other relevant data streams.
Digital, CD-quality sound. HD Radio™ Technology
enables local radio stations to broadcast a clean digital
signal. AM sounds like today's FM and FM sounds like
a CD.
FM stations can provide additional digital-only audio
programming on HD2/HD3 Channels.
Real-Time Traffic reports, alerts, and flow data
displayed on screen via interactive traffic maps and/or
data.
Page 104 of 372
3-18
k k Can turn on or off the split screen mode.
l l Displays the options list.
�Channel List: Can see the list of available SiriusXM channels.
�What is on My Presets?: Displays the broadcast schedule.
�Featured Favorites: Can listen to groups of channels provided by SiriusXM.
�Delete Presets: Can delete a registered channel from the presets list.
�Sound Settings: Displays the system sound settings screen.
�User's Manual on Web (QR Code): Displays the QR code that provides access to the
online user manual for the system.
�Split Screen: Can turn on or off the split screen mode.
A
The
icon appears next to the first 10 SiriusXM channels saved. Once preset
channels have been saved, the broadcasts from them are buffered automatically for your
convenience each time you start the vehicle.
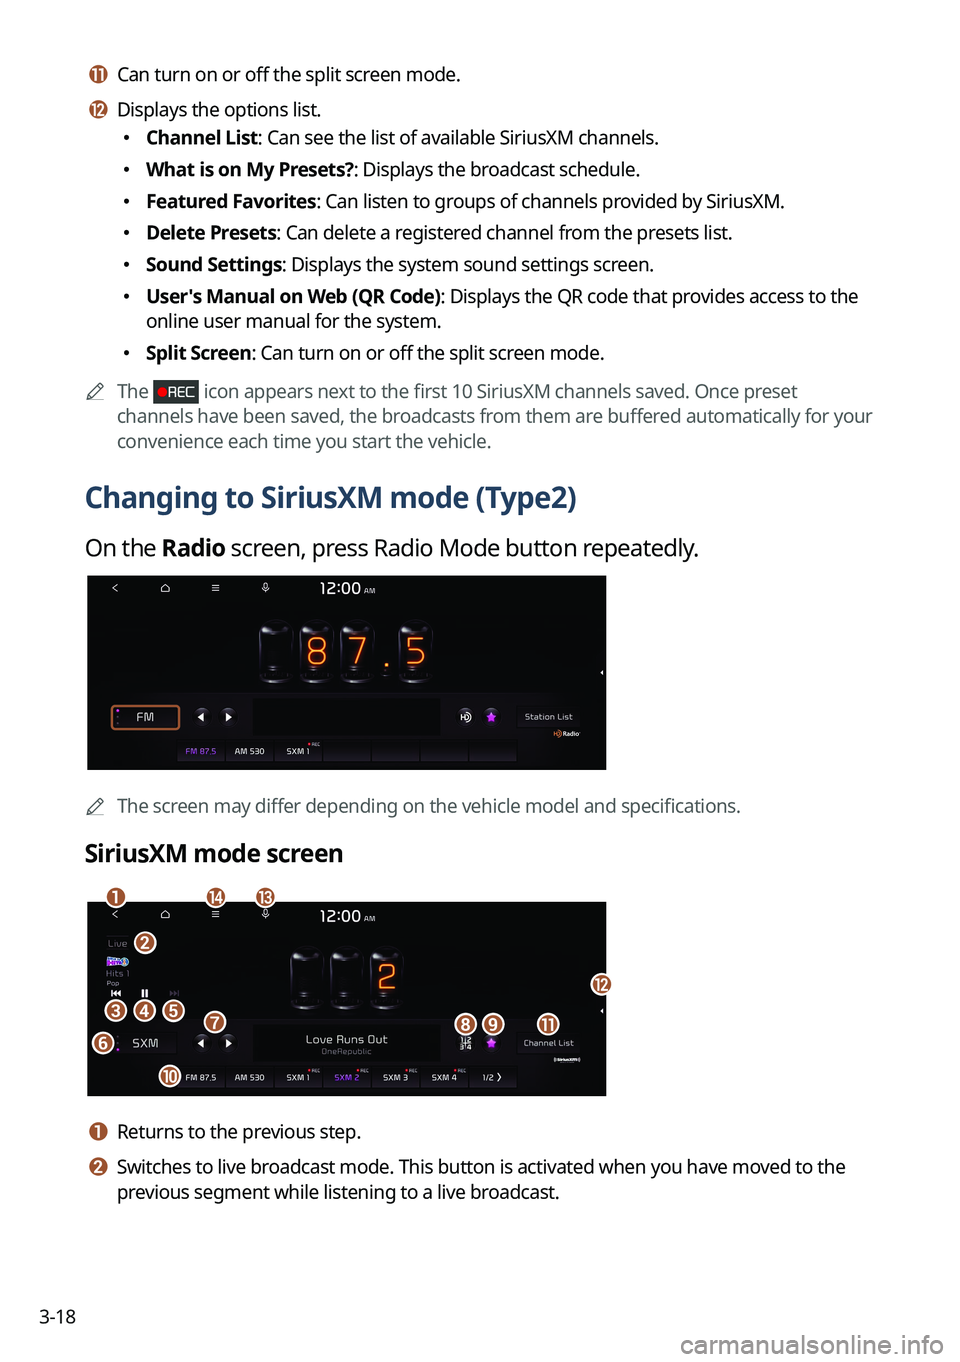
Changing to SiriusXM mode (Type2)
On the Radio screen, press Radio Mode button repeatedly.
AThe screen may differ depending on the vehicle model and specifications.
SiriusXM mode screen
eh
a
cd
fgi
j
b
nm
k
l
a a Returns to the previous step.
b b Switches to live broadcast mode. This button is activated when you have moved to the
previous segment while listening to a live broadcast.
Page 105 of 372
3-19
c c Moves to the previous segment. Press and hold to rewind the broadcast.
d d Pauses or restarts the broadcast.
e e Moves to the next segment. Press and hold to fast-forward the broadcast.
f f Can change the radio mode.
g g You can go to the previous or next channel.
h h Can enter channel number to select the channel directly.
i i You can delete or save the current frequency to the presets list.
j j Presets list
k k Can see the list of available SiriusXM channels (if equipped).
l l Can turn on or off the split screen mode.
m m You can change radio channels by using voice commands. > See "Changing the channel by
using voice commands."
n n Displays the options list.
� Display Off: Turns off the screen. To switch the screen back on, press the screen or
briefly press the power button.
�Channel List: Can see the list of available SiriusXM channels.
�Scan SXM Channels: Scan and play each SiriusXM channel for 5 seconds.
�Delete Presets: Can delete a registered channel from the presets list.
�What is on My Presets?: Displays the broadcast schedule.
�Featured Favorites: Can listen to groups of channels provided by SiriusXM.
�Sound Settings: Displays the system sound settings screen.
�User's Manual on Web (QR Code): Displays the QR code that provides access to the
online user manual for the system.
�Split Screen: Can turn on or off the split screen mode.
A
The screen may differ depending on the vehicle model and specifications.
A
The
icon appears next to the first 10 SiriusXM channels saved. Once preset
channels have been saved, the broadcasts from them are buffered automatically for your
convenience each time you start the vehicle.
Page 107 of 372
3-21
m m Displays the options list.
�Display Off: Turns off the screen. To switch the screen back on, press the screen or
briefly press the power button.
�Scan SXM Channels: Scan and play each SiriusXM channel for 5 seconds.
�Delete Presets: Can delete a registered channel from the presets list.
�Reorder Presets: Rearrange the presets list.
�What is on My Presets?: Displays the broadcast schedule.
�Featured Favorites: Can listen to groups of channels provided by SiriusXM.
�Sound Settings: Displays the system sound settings screen.
�User's Manual on Web (QR Code): Displays the QR code that provides access to the
online user manual for the system.
�Split Screen: Can turn on or off the split screen mode.
A
The screen may differ depending on the vehicle model and specifications.
A
The
icon appears next to the first 10 SiriusXM channels saved. Once preset
channels have been saved, the broadcasts from them are buffered automatically for your
convenience each time you start the vehicle.
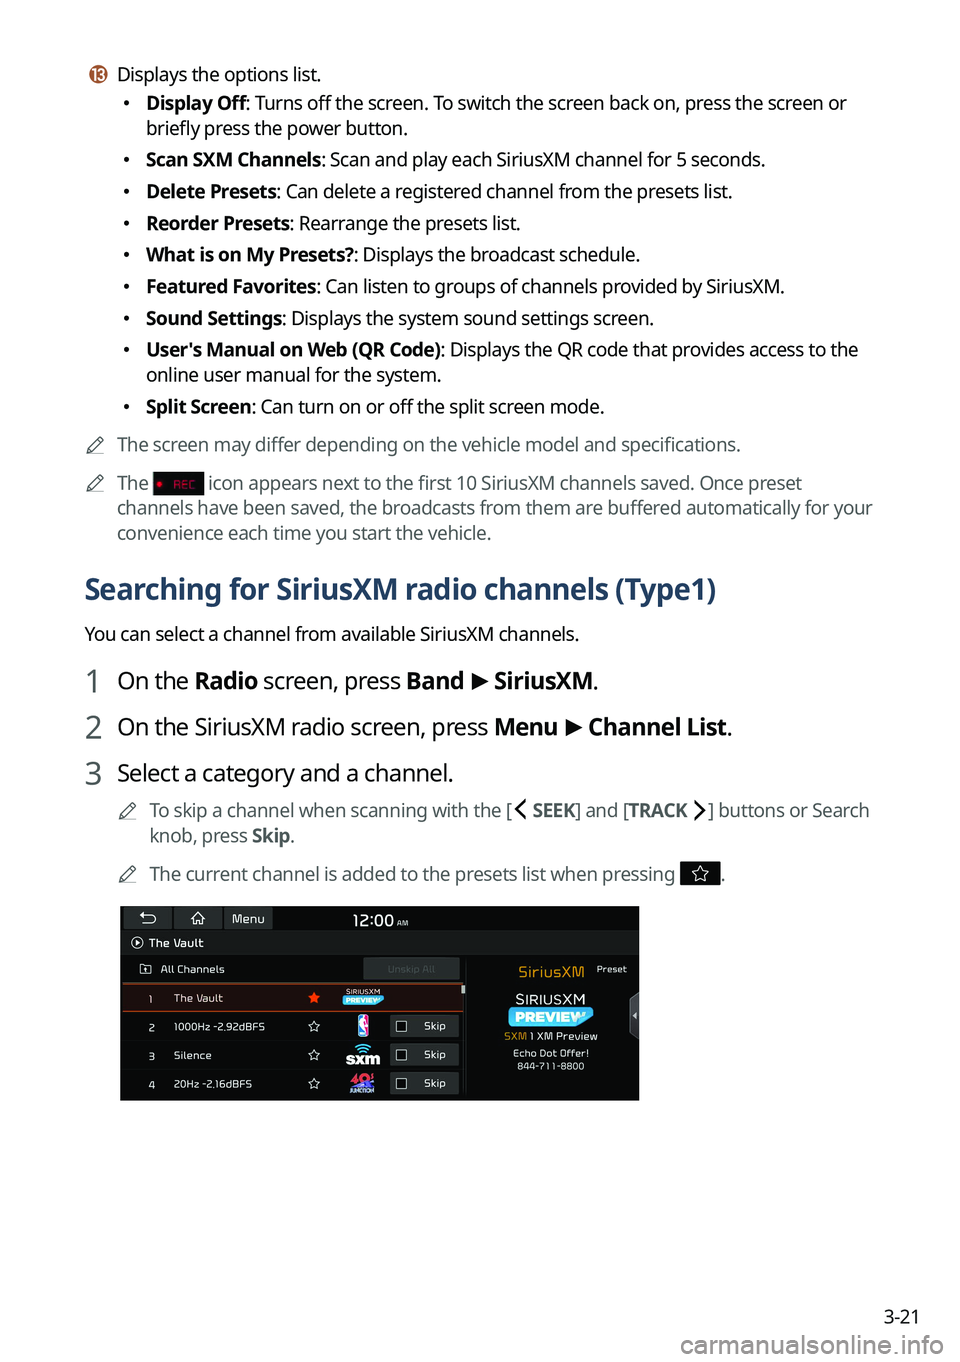
Searching for SiriusXM radio channels (Type1)
You can select a channel from available SiriusXM channels.
1 On the Radio screen, press Band >
SiriusXM.
2 On the SiriusXM radio screen, press Menu >
Channel List.
3 Select a category and a channel.
A
To skip a channel when scanning with the [ SEEK] and [TRACK ] buttons or Search
knob, press Skip.
A
The current channel is added to the presets list when pressing
.
Page 111 of 372
3-25
Viewing the program schedule (Type1)
You can see the program schedule and information for the channels saved in your preset list.
1 On the Radio screen, press Band >
SiriusXM.
2 On the SiriusXM radio screen, press Menu >
What is on My Presets?.
3 Set the date and time on the top line of the screen.
A
To select a date, press the date display field at the top left of the preset list and select
the date and time zone.
A
To select a time, press
or .
4 Select a channel and a program to see its detailed information.
A
If any hidden information, an arrow appears next to the program. Press the arrow to
see the hidden information.
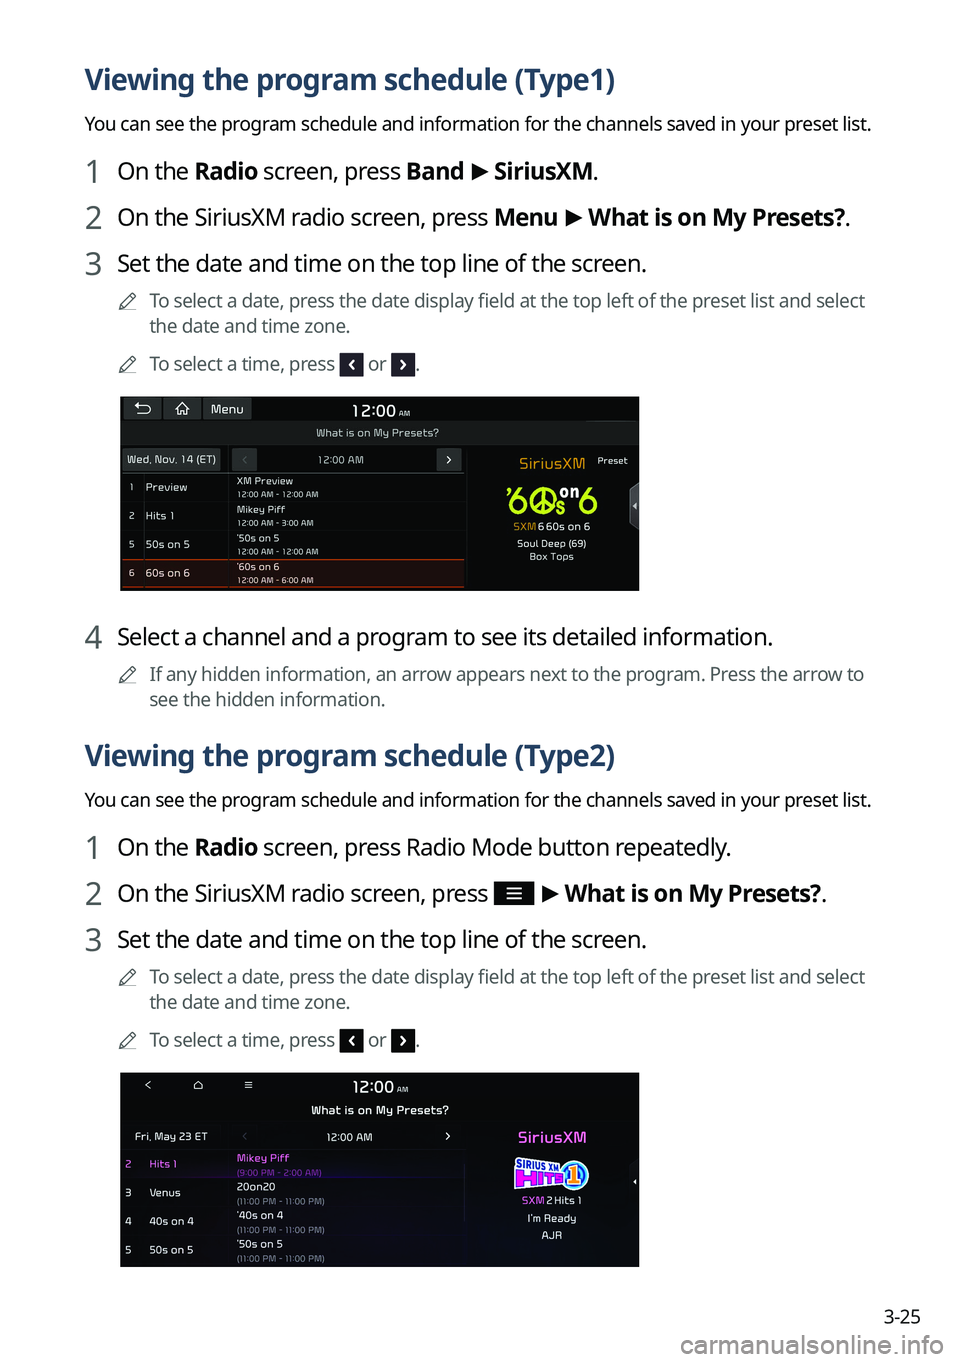
Viewing the program schedule (Type2)
You can see the program schedule and information for the channels saved in your preset list.
1 On the Radio screen, press Radio Mode button repeatedly.
2 On the SiriusXM radio screen, press >
What is on My Presets?.
3 Set the date and time on the top line of the screen.
A
To select a date, press the date display field at the top left of the preset list and select
the date and time zone.
A
To select a time, press
or .
Page 112 of 372
3-26
4 Select a channel and a program to see its detailed information.
A
If any hidden information, an arrow appears next to the program. Press the arrow to
see the hidden information.
Viewing the program schedule (Type3)
You can see the program schedule and information for the channels saved in your preset list.
1 On the Radio screen, press Radio Mode button repeatedly.
2 On the SiriusXM radio screen, press >
What is on My Presets?.
3 Set the date and time on the top line of the screen.
A
To select a date, press the date display field at the top left of the preset list and select
the date and time zone.
A
To select a time, press
or .
4 Select a channel and a program to see its detailed information.
A
If any hidden information, an arrow appears next to the program. Press the arrow to
see the hidden information.