2023 JEEP WAGONEER weight
[x] Cancel search: weightPage 272 of 396

270SAFETY
The Air Bag Warning Light in the instrument
panel will turn on whenever the OCS is unable
to classify the front passenger seat status.
A malfunction in the OCS may affect the
operation of the air bag system.
If the Air Bag Warning Light does not come on,
or stays on after you start the vehicle, or it
comes on as you drive, take the vehicle to an
authorized dealer for service immediately.
The passenger seat assembly contains critical OCS
components that may affect the Passenger Advanced
Front Air Bag inflation. In order for the OCS to properly
classify the seated weight of a front seat passenger, the
OCS components must function as designed. Do not make
any modifications to the front passenger seat
components, assembly, or to the seat cover. If the seat,
trim cover, or cushion needs service for any reason, take
the vehicle to an authorized dealer. Only FCA US LLC
approved seat accessories may be used.
The following requirements must be strictly followed:
Do not modify the front passenger seat assembly or
components in any way.
Do not use prior or future model year seat covers or
cushions not designated by FCA US LLC for the specific
model being repaired. Always use the correct seat
cover and cushion specified for the vehicle.
Do not replace the seat cover or cushion with an after -
market seat cover or cushion.
Do not add a secondary seat cover or mat.
At no time should any Supplemental Restraint System
(SRS) component or SRS related component or
fastener be modified or replaced with any part except
those which are approved by FCA US LLC.
Knee Impact Bolsters
The Knee Impact Bolsters help protect the knees of the
driver and front passenger, and position the front
occupants for improved interaction with the front air bags.
Supplemental Driver And Front Passenger
Knee Air Bags
This vehicle is equipped with a Supplemental Driver Knee
Air Bag mounted in the instrument panel below the
steering column and a Supplemental Passenger Knee Air
Bag mounted in the instrument panel below the glove
compartment. The Supplemental Knee Air Bags provide
enhanced protection during a frontal impact by working
together with the seat belts, pretensioners, and front
air bags.
Supplemental Side Air Bags
Supplemental Seat-Mounted Side Air Bags (SABs)
This vehicle is equipped with Supplemental Seat-Mounted
Side Air Bags (SABs).
Supplemental Seat-Mounted Side Air Bags (SABs) are
located in the outboard side of the front seats. The SABs
are marked with “SRS AIRBAG” or “AIRBAG” on a label or
on the seat trim on the outboard side of the seats.
WARNING!
Unapproved modifications or service procedures to
the passenger seat assembly, its related compo -
nents, seat cover or cushion may inadvertently
change the air bag deployment in case of a frontal
collision. This could result in death or serious injury
to the front passenger if the vehicle is involved in a
collision. A modified vehicle may not comply with
required Federal Motor Vehicle Safety Standards
(FMVSS) and/or Canadian Motor Vehicle Safety
Standards (CMVSS).
If it is necessary to modify the air bag system for
persons with disabilities, contact an authorized
dealer.
WARNING!
Do not drill, cut, or tamper with the knee impact
bolsters in any way.
Do not mount any accessories to the knee impact
bolsters such as alarm lights, stereos, citizen band
radios, etc.
23_WS_OM_EN_USC_t.book Page 270
Page 278 of 396

276SAFETY
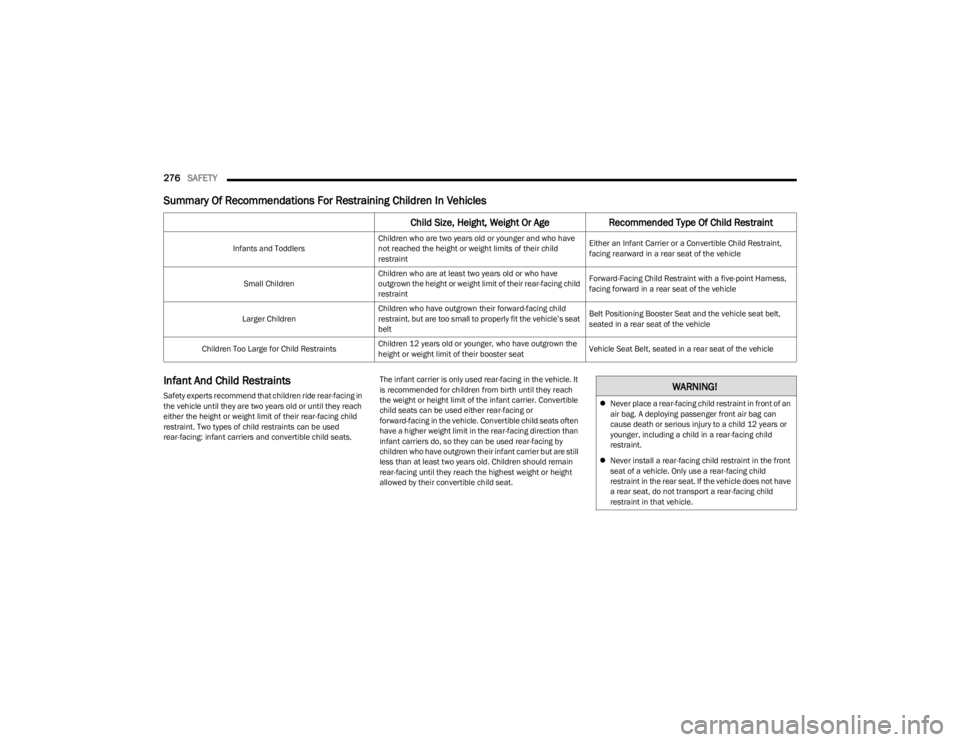
Summary Of Recommendations For Restraining Children In Vehicles
Infant And Child Restraints
Safety experts recommend that children ride rear-facing in
the vehicle until they are two years old or until they reach
either the height or weight limit of their rear-facing child
restraint. Two types of child restraints can be used
rear-facing: infant carriers and convertible child seats. The infant carrier is only used rear-facing in the vehicle. It
is recommended for children from birth until they reach
the weight or height limit of the infant carrier. Convertible
child seats can be used either rear-facing or
forward-facing in the vehicle. Convertible child seats often
have a higher weight limit in the rear-facing direction than
infant carriers do, so they can be used rear-facing by
children who have outgrown their infant carrier but are still
less than at least two years old. Children should remain
rear-facing until they reach the highest weight or height
allowed by their convertible child seat.
Child Size, Height, Weight Or Age
Recommended Type Of Child Restraint
Infants and ToddlersChildren who are two years old or younger and who have
not reached the height or weight limits of their child
restraint Either an Infant Carrier or a Convertible Child Restraint,
facing rearward in a rear seat of the vehicle
Small Children Children who are at least two years old or who have
outgrown the height or weight limit of their rear-facing child
restraint Forward-Facing Child Restraint with a five-point Harness,
facing forward in a rear seat of the vehicle
Larger Children Children who have outgrown their forward-facing child
restraint, but are too small to properly fit the vehicle’s seat
belt Belt Positioning Booster Seat and the vehicle seat belt,
seated in a rear seat of the vehicle
Children Too Large for Child Restraints Children 12 years old or younger, who have outgrown the
height or weight limit of their booster seat Vehicle Seat Belt, seated in a rear seat of the vehicle
WARNING!
Never place a rear-facing child restraint in front of an
air bag. A deploying passenger front air bag can
cause death or serious injury to a child 12 years or
younger, including a child in a rear-facing child
restraint.
Never install a rear-facing child restraint in the front
seat of a vehicle. Only use a rear-facing child
restraint in the rear seat. If the vehicle does not have
a rear seat, do not transport a rear-facing child
restraint in that vehicle.
23_WS_OM_EN_USC_t.book Page 276
Page 279 of 396

SAFETY277
(Continued)
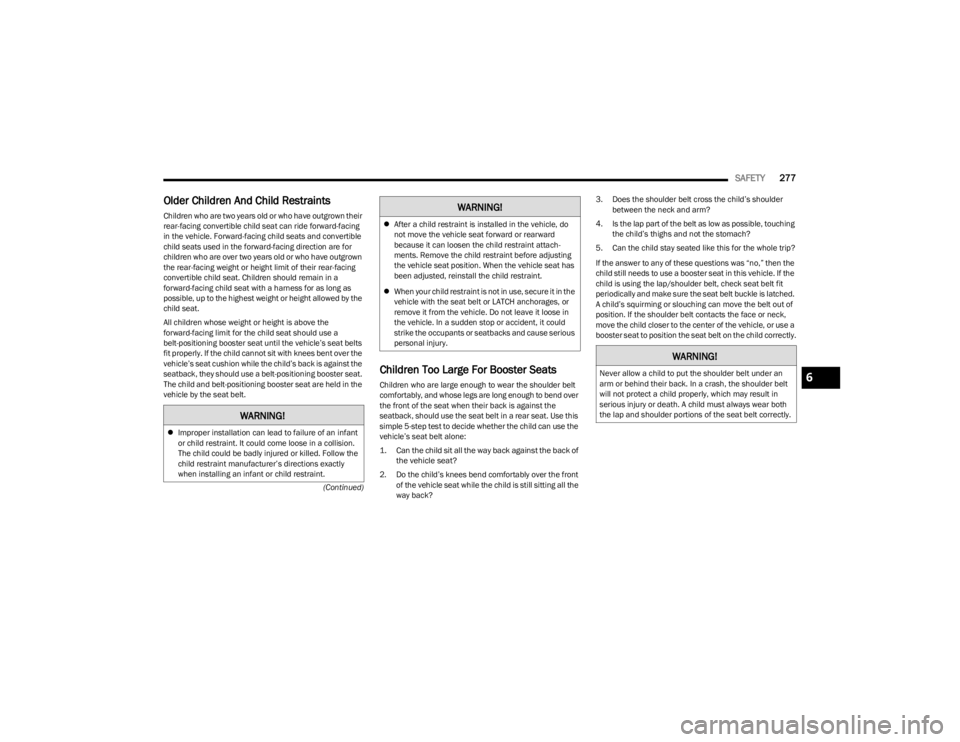
Older Children And Child Restraints
Children who are two years old or who have outgrown their
rear-facing convertible child seat can ride forward-facing
in the vehicle. Forward-facing child seats and convertible
child seats used in the forward-facing direction are for
children who are over two years old or who have outgrown
the rear-facing weight or height limit of their rear-facing
convertible child seat. Children should remain in a
forward-facing child seat with a harness for as long as
possible, up to the highest weight or height allowed by the
child seat.
All children whose weight or height is above the
forward-facing limit for the child seat should use a
belt-positioning booster seat until the vehicle’s seat belts
fit properly. If the child cannot sit with knees bent over the
vehicle’s seat cushion while the child’s back is against the
seatback, they should use a belt-positioning booster seat.
The child and belt-positioning booster seat are held in the
vehicle by the seat belt.
Children Too Large For Booster Seats
Children who are large enough to wear the shoulder belt
comfortably, and whose legs are long enough to bend over
the front of the seat when their back is against the
seatback, should use the seat belt in a rear seat. Use this
simple 5-step test to decide whether the child can use the
vehicle’s seat belt alone:
1. Can the child sit all the way back against the back of
the vehicle seat?
2. Do the child’s knees bend comfortably over the front of the vehicle seat while the child is still sitting all the
way back? 3. Does the shoulder belt cross the child’s shoulder
between the neck and arm?
4. Is the lap part of the belt as low as possible, touching the child’s thighs and not the stomach?
5. Can the child stay seated like this for the whole trip?
If the answer to any of these questions was “no,” then the
child still needs to use a booster seat in this vehicle. If the
child is using the lap/shoulder belt, check seat belt fit
periodically and make sure the seat belt buckle is latched.
A child’s squirming or slouching can move the belt out of
position. If the shoulder belt contacts the face or neck,
move the child closer to the center of the vehicle, or use a
booster seat to position the seat belt on the child correctly.
WARNING!
Improper installation can lead to failure of an infant
or child restraint. It could come loose in a collision.
The child could be badly injured or killed. Follow the
child restraint manufacturer’s directions exactly
when installing an infant or child restraint.
After a child restraint is installed in the vehicle, do
not move the vehicle seat forward or rearward
because it can loosen the child restraint attach-
ments. Remove the child restraint before adjusting
the vehicle seat position. When the vehicle seat has
been adjusted, reinstall the child restraint.
When your child restraint is not in use, secure it in the
vehicle with the seat belt or LATCH anchorages, or
remove it from the vehicle. Do not leave it loose in
the vehicle. In a sudden stop or accident, it could
strike the occupants or seatbacks and cause serious
personal injury.
WARNING!
WARNING!
Never allow a child to put the shoulder belt under an
arm or behind their back. In a crash, the shoulder belt
will not protect a child properly, which may result in
serious injury or death. A child must always wear both
the lap and shoulder portions of the seat belt correctly.6
23_WS_OM_EN_USC_t.book Page 277
Page 280 of 396

278SAFETY
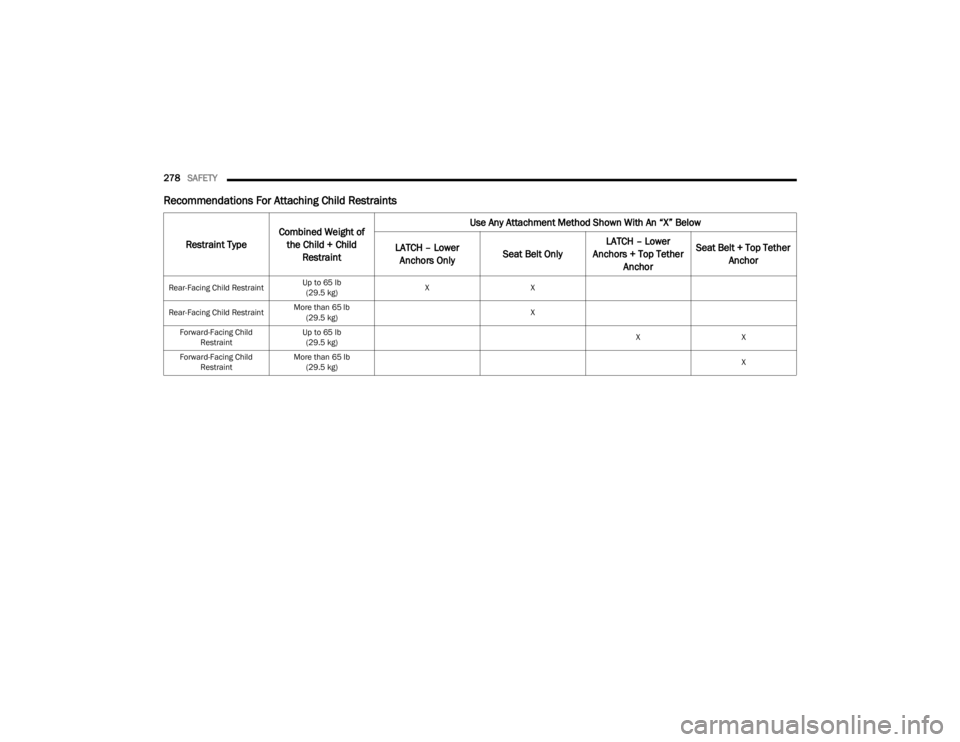
Recommendations For Attaching Child Restraints
Restraint Type Combined Weight of
the Child + Child Restraint Use Any Attachment Method Shown With An “X” Below
LATCH – Lower Anchors Only Seat Belt Only LATCH – Lower
Anchors + Top Tether Anchor Seat Belt + Top Tether
Anchor
Rear-Facing Child Restraint Up to 65 lb
(29.5 kg) X
X
Rear-Facing Child Restraint More than 65 lb
(29.5 kg) X
Forward-Facing Child Restraint Up to 65 lb
(29.5 kg) X
X
Forward-Facing Child Restraint More than 65 lb
(29.5 kg) X
23_WS_OM_EN_USC_t.book Page 278
Page 282 of 396

280SAFETY
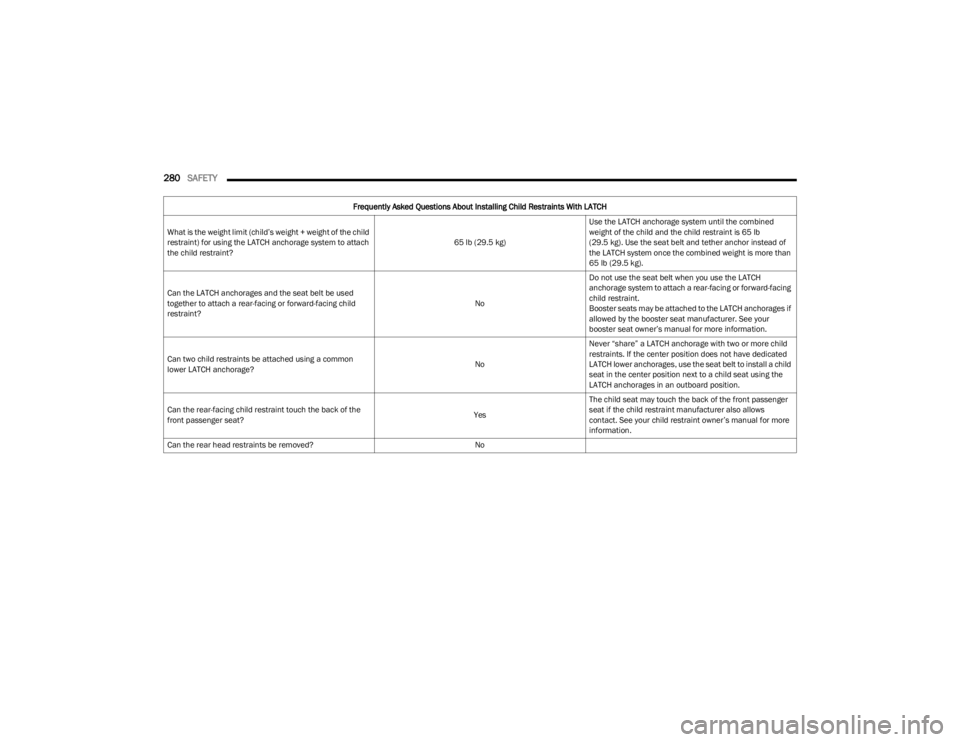
Frequently Asked Questions About Installing Child Restraints With LATCH
What is the weight limit (child’s weight + weight of the child
restraint) for using the LATCH anchorage system to attach
the child restraint? 65 lb (29.5 kg)Use the LATCH anchorage system until the combined
weight of the child and the child restraint is 65 lb
(29.5 kg). Use the seat belt and tether anchor instead of
the LATCH system once the combined weight is more than
65 lb (29.5 kg).
Can the LATCH anchorages and the seat belt be used
together to attach a rear-facing or forward-facing child
restraint? NoDo not use the seat belt when you use the LATCH
anchorage system to attach a rear-facing or forward-facing
child restraint.
Booster seats may be attached to the LATCH anchorages if
allowed by the booster seat manufacturer. See your
booster seat owner’s manual for more information.
Can two child restraints be attached using a common
lower LATCH anchorage? NoNever “share” a LATCH anchorage with two or more child
restraints. If the center position does not have dedicated
LATCH lower anchorages, use the seat belt to install a child
seat in the center position next to a child seat using the
LATCH anchorages in an outboard position.
Can the rear-facing child restraint touch the back of the
front passenger seat? YesThe child seat may touch the back of the front passenger
seat if the child restraint manufacturer also allows
contact. See your child restraint owner’s manual for more
information.
Can the rear head restraints be removed? No
23_WS_OM_EN_USC_t.book Page 280
Page 287 of 396

SAFETY285
Installing A Child Restraint With A
Switchable Automatic Locking Retractor
(ALR):
Child restraint systems are designed to be secured in
vehicle seats by lap belts or the lap belt portion of a lap/
shoulder belt.
1. Place the child seat in the center of the seating
position. If the second row seat can be reclined, you
may recline the seat and/or raise the head restraint
(if adjustable) to get a better fit. If the rear seat can
be moved forward and rearward in the vehicle, you
may wish to move it to its rear-most position to make
room for the child seat. You may also move the front
seat forward to allow more room for the child seat.
2. Pull enough of the seat belt webbing from the retractor to pass it through the belt path of the child
restraint. Do not twist the belt webbing in the belt
path.
3. Slide the latch plate into the buckle until you hear a “click.” 4. Pull on the webbing to make the lap portion tight
against the child seat.
5. To lock the seat belt, pull down on the shoulder part of the belt until you have pulled all the seat belt
webbing out of the retractor. Then, allow the webbing
to retract back into the retractor. As the webbing
retracts, you will hear a clicking sound. This means
the seat belt is now in the Automatic Locking mode.
6. Try to pull the webbing out of the retractor. If it is locked, you should not be able to pull out any
webbing. If the retractor is not
locked, repeat step 5.
7. Finally, pull up on any excess webbing to tighten the lap portion around the child restraint while you push
the child restraint rearward and downward into the
vehicle seat.
Frequently Asked Questions About Installing Child Restraints With Seat Belts
What is the weight limit (child’s weight + weight of the child
restraint) for using the Tether Anchor with the seat belt to
attach a forward-facing child restraint? Weight limit of the Child RestraintAlways use the tether anchor when using the seat belt to
install a forward-facing child restraint, up to the
recommended weight limit of the child restraint.
Can the rear-facing child restraint touch the back of the
front passenger seat? YesContact between the front passenger seat and the child
restraint is allowed, if the child restraint manufacturer also
allows contact.
Can the rear head restraints be removed? No
Can the buckle stalk be twisted to tighten the seat belt
against the belt path of the child restraint? NoDo not twist the buckle stalk in a seating position with an
ALR retractor.
WARNING!
Improper installation or failure to properly secure a
child restraint can lead to failure of the restraint.
The child could be badly injured or killed.
Follow the child restraint manufacturer’s directions
exactly when installing an infant or child restraint.
6
23_WS_OM_EN_USC_t.book Page 285
Page 356 of 396

354SERVICING AND MAINTENANCE
Tire Loading And Tire Pressure
NOTE:The proper cold tire inflation pressure is listed on the
driver’s side B-pillar or the rear edge of the driver's side
door.
Check the inflation pressure of each tire, including the
spare tire (if equipped), at least monthly and inflate to the
recommended pressure for your vehicle.
Example Tire Placard Location (Door) Example Tire Placard Location (B-pillar)
Tire And Loading Information Placard
Tire And Loading Information Placard
This placard tells you important information about the:
1. Number of people that can be carried in the vehicle.
2. Total weight your vehicle can carry.
3. Tire size designed for your vehicle.
4. Cold tire inflation pressures for the front, rear, and
spare tires.
Loading
The vehicle maximum load on the tire must not exceed the
load carrying capacity of the tire on your vehicle. You will
not exceed the tire's load carrying capacity if you adhere to
the loading conditions, tire size, and cold tire inflation
pressures specified on the Tire And Loading Information
Placard
Úpage 178.
NOTE:Under a maximum loaded vehicle condition, Gross Axle
Weight Rating (GAWR) for the front and rear axles must
not be exceeded.
For further information on GAWR, vehicle loading, and
trailer towing
Úpage 178.
To determine the maximum loading conditions of your
vehicle, locate the statement “The combined weight of
occupants and cargo should never exceed XXX kg or XXX
lb” on the Tire And Loading Information Placard. The
combined weight of occupants, cargo/luggage and trailer
tongue weight (if applicable) should never exceed the
weight referenced here.
23_WS_OM_EN_USC_t.book Page 354
Page 357 of 396

SERVICING AND MAINTENANCE355 Steps For Determining Correct Load
Limit—
(1) Locate the statement “The combined
weight of occupants and cargo should
never exceed XXX kg or XXX lbs.” on your
vehicle's placard.
(2) Determine the combined weight of
the driver and passengers that will be
riding in your vehicle.
(3) Subtract the combined weight of the
driver and passengers from XXX kg or
XXX lbs. (4) The resulting figure equals the
available amount of cargo and luggage
load capacity. For example, if “XXX”
amount equals 1400 lbs. and there will
be five 150 lbs passengers in your
vehicle, the amount of available cargo
and luggage load capacity is 650 lbs.
(1400-750 (5x150) = 650 lbs.)
(5) Determine the combined weight of
luggage and cargo being loaded on the
vehicle. That weight may not safely
exceed the available cargo and luggage
load capacity calculated in Step 4.(6) If your vehicle will be towing a trailer,
load from your trailer will be transferred
to your vehicle. Consult this manual to
determine how this reduces the
available cargo and luggage load
capacity of your vehicle.
Metric Example For Load Limit
For example, if “XXX” amount equals 635 kg and there will
be five 68 kg passengers in your vehicle, the amount of
available cargo and luggage load capacity is 295 kg
(635-340 (5x68) = 295 kg) as shown in step 4.
NOTE:
If your vehicle will be towing a trailer, load from your
trailer will be transferred to your vehicle. The following
table shows examples on how to calculate total load,
cargo/luggage, and towing capacities of your vehicle
with varying seating configurations and number and
size of occupants. This table is for illustration purposes
only and may not be accurate for the seating and load
carry capacity of your vehicle.
For the following example, the combined
weight of occupants and cargo should never exceed
865 lbs (392 kg).
8
23_WS_OM_EN_USC_t.book Page 355