Page 63 of 364

GETTING TO KNOW YOUR VEHICLE 61
Cargo Box — If Equipped
The cargo area contains a preformed cargo box
that can be used for the storage of objects that
allows you to obtain a uniform level when loading.
Cargo Box
NOTE:
The cargo box is sized for a maximum capacity of
distr i
buted weight equal to 242 lb (110 kg).
ROOF LUGGAGE RACK — IF EQUIPPED
Your vehicle may be equipped with a Roof Luggage
Rack for transporting accessories.
Crossbars should always be used whenever cargo
is pla
ced on the Roof Luggage Rack. Check the
straps frequently to be sure that the load remains
securely attached.
NOTE:
Crossbars can be purchased at an authorized
deale r
through Mopar® parts. External racks do
not increase the total load carrying capacity of the
vehicle. Be sure that the total occupant and
luggage load inside the vehicle, plus the load on
the Roof Luggage Rack, do not exceed the
maximum vehicle load capacity.
The load carried on the roof, when equipped with a
lugga g
e rack, must not exceed 150 lb (68 kg), and
it should be uniformly distributed over the cargo
area.
Do not use the retractable roof when using the
crossba
rs.
WARNING!
Cargo must be securely tied down before driving
your vehicle. Improperly secured loads can fly off
the vehicle, particularly at high speeds, resulting
in personal injury or property damage. Follow
the roof rack cautions when carrying cargo on
your roof rack.
CAUTION!
To avoid damage to the roof rack and vehicle,
do not exceed the maximum roof rack load
capacity. Always distribute heavy loads as
evenly as possible and secure the load appro -
priately.
Long loads, which extend over the windshield,
should be secured to both the front and rear of
the vehicle.
Place a blanket or other protection between
the surface of the roof and the load.
Travel at reduced speeds and turn corners
carefully when carrying large or heavy loads
on the roof rack. Wind forces, due to natural
causes or nearby truck traffic, can add sudden
upward lift. It is recommended to not carry
large flat loads, such as wood panels or surf -
boards, which may result in damage to the
c argo or
your vehicle.
Load should always be secured to crossbars
first, with tie down loops used as additional
securing points if needed. Tie loops are
intended as supplementary tie down points
only. Do not use ratcheting mechanisms with
the tie loops. Check the straps frequently to be
sure that the load remains securely attached.
2
Page 312 of 364
310 SERVICING AND MAINTENANCE
Fuse Holder No. 1
Fuse Holder No. 2
On the controller there is also a 20 amp fuse for the sun visor of the retractable roof.
Cavity Mini Fuse Description
F130 Amp BluePower Inverter
F2 20 Amp YellowHIFI Audio System
F3 20 Amp YellowMY SKY
F5 30 Amp GreenPower Seat (Driver Side)
F6 7.5 Amp BrownLumbar Adjustment Front Seat (Driver Side)
F8 20 Amp YellowHeating Front Seats
CavityMini Fuse Description
F515 Amp BlueController Exterior Lighting Lights (Drivers Side)
F6 15 Amp BlueController Exterior Lighting Lights (Passenger Side)
Page 313 of 364

SERVICING AND MAINTENANCE 311
BULB REPLACEMENT
General Information
Before you replace a bulb, check the contacts to
be sure they are not oxidized.
Replace the bulbs with the same type and
wattage.
After replacing a light bulb, always check the
correct orientation.
Before replacing a bulb that is not functioning,
check that the fuse is intact.
NOTE:
Lens fogging can occur under certain atmospheric
condit i
ons. This will usually clear as atmospheric
conditions change to allow the condensation to
change back into a vapor. Turning the lamps on will
usually accelerate the clearing process.Replacement Bulbs, Names, And Part
Numbers
In the instance a bulb needs to be replaced, this
section includes bulb description and replacement
part numbers.
NOTE:
See an authorized dealer for LED bulb
repla c
ement.
Interior Bulbs
Lamps Bulb Number
Front Courtesy Light C5W
Front Courtesy Lights (Sun Visors) C5W
Rear Dome Light (Models Without Retractable Roof) C5W
Rear Interior Lights (Models With Retractable Roof) C5W
Interior Lights W5W
Dome Light (Glove Compartment) W5W
Exterior Bulbs
Lamps Bulb Number
Low Beam/High Beam Headlamps (LED Version) LED (Serviced at an authorized dealer)
Low Beam/High Beam Headlamps H13
8
Page 322 of 364

320 SERVICING AND MAINTENANCE
4. Insert the new bulbs, making sure that they are
properly locked.
5. Reassemble the bulb housing and courtesy light
housing making sure that they are
properly locked.
6. Install the front courtesy light making sure that it is
properly locked.
Dome Light Vanity Mirror
See below steps to replace:
1. L ift the cover of the mirror and pull out the
visor m
irror light cover.
2. Replace the bulb, releasing it from the side contac
ts, and then insert the new bulb, making
sure that it is properly locked between the
contacts.
Visor
3. Reinstall the visor mirror light cover making
sure
that it is properly locked.
4. Finally lower the visor mirror cover to the mirror
.
Dome Light Glove Compartment
See below steps to replace:
1. O pen the glove compartment.
2. Pla
ce your fingers inside the light assembly,
pull
the bulb to replace it.
Bulb Removal/Installation
3. Insert the new bulb, making sure it is properly locke d
. Rear Dome Light — Without Retractable Roof
See below steps to replace:
1. U
sing a suitable tool release the lamp
asse m
bly at both the ends.
2. Open the flap and replace the bulb.
Rear
Dome Light Housing
3. Insert the new bulb, locking it between the conta c
ts.
4. Reinstall the dome light.
1 — V
isor Mirror Cover
2 — Visor Mirror Light
1 — Bulb
2 — Flap
Page 323 of 364
SERVICING AND MAINTENANCE 321
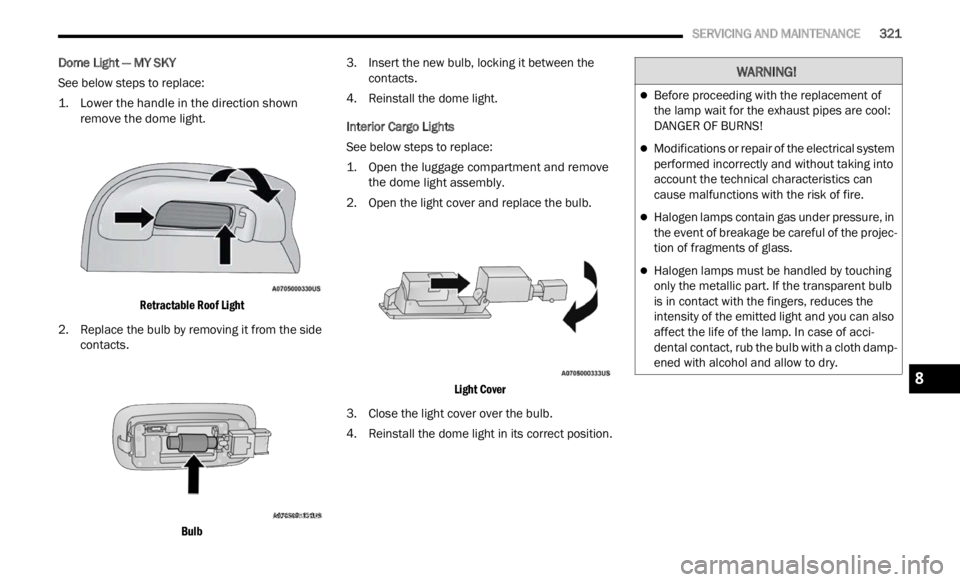
Dome Light — MY SKY
See below steps to replace:
1. L
ower the handle in the direction shown
remove
the dome light.
Retractable Roof Light
2. Replace the bulb by removing it from the side conta c
ts.
Bulb
3. I
nsert the new bulb, locking it between the
c on t
a c
ts.
4. Reinstall the dome light.
Inter
ior Cargo Lights
See below steps to replace:
1. Open the luggage compartment and remove the d o
me light assembly.
2. Open the light cover and replace the bulb.
Light
Cover
3. Close the light cover over the bulb.
4. R ein
stall the dome light in its correct position.
WARNING!
Before proceeding with the replacement of
the lamp wait for the exhaust pipes are cool:
DANGER OF BURNS!
Modifications or repair of the electrical system
performed incorrectly and without taking into
account the technical characteristics can
cause malfunctions with the risk of fire.
Halogen lamps contain gas under pressure, in
the event of breakage be careful of the projec -
tion of fragments of glass.
Halogen lamps must be handled by touching
only the metallic part. If the transparent bulb
is in contact with the fingers, reduces the
intensity of the emitted light and you can also
affect the life of the lamp. In case of acci -
dental contact, rub the bulb with a cloth damp -
ened with alcohol and allow to dry.
8
