2023 JEEP GLADIATOR seats
[x] Cancel search: seatsPage 4 of 448

2
INTRODUCTION
SYMBOLS KEY ........................................................ 10
ROLLOVER WARNING .......................................... 10
CAMPERS ............................................................... 11
VEHICLE MODIFICATIONS/ALTERATIONS .......... 11
SYMBOL GLOSSARY.............................................. 11
GETTING TO KNOW YOUR VEHICLE
KEYS ....................................................................... 15
Key Fob .............................................................15
SENTRY KEY ........................................................... 17
IGNITION SWITCH .................................................. 18
Keyless Enter ‘n Go™ Ignition .........................18
REMOTE START — IF EQUIPPED (GASOLINE) .... 20
How To Use Remote Start ................................20
To Exit Remote Start Mode ..............................21
Remote Start Front Defrost Activation —
If Equipped........................................................21
Remote Start Comfort Systems —
If Equipped .......................................................21
Remote Start Windshield Wiper De-Icer
Activation — If Equipped ..................................22
Remote Start Cancel Message ........................22
REMOTE START — IF EQUIPPED (DIESEL) ......... 22
How To Use Remote Start ................................22
VEHICLE SECURITY SYSTEM — IF EQUIPPED .... 23
To Arm The System .........................................23
To Disarm The System ....................................23
Rearming Of The System .................................24 DOORS ....................................................................24
Manual Door Locks ..........................................24
Power Door Locks — If Equipped ....................25
Keyless Enter ‘n Go™ — Passive Entry
(If Equipped) .....................................................25
Automatic Door Locks —
If Equipped........................................................27
Child-Protection Door Lock System —
Rear Doors ........................................................27
Front Door Removal
S
..................................28
Rear Door Removal
S
...................................32
Door Off Mirror Kit — If Equipped ....................34
Half-Doors — If Equipped
S
..........................35
STEERING WHEEL ..................................................42
Tilt/Telescoping Steering Column ...................42
Heated Steering Wheel —
If Equipped........................................................42
SEATS .....................................................................43
Manual Adjustment Front Seats .....................43
60/40 Split Folding Rear Seat .......................44
Rear Seat Stadium Position ............................46
Heated Seats — If Equipped ...........................47
Rear Seat Armrest — If Equipped ....................47
Head Restraints ..............................................48
UCONNECT VOICE RECOGNITION ........................49
Introducing Voice Recognition.........................49
Basic Voice Commands ...................................50
Get Started .......................................................50
Additional Information .....................................50 MIRRORS ................................................................ 50
Inside Rearview Mirror..................................... 50
Illuminated Vanity Mirrors .............................. 51
Outside Mirrors ................................................ 51
Power Mirrors — If Equipped ........................... 52
Outside Mirrors With Turn
Signal — If Equipped ........................................ 52
Heated Mirrors — If Equipped ......................... 52
UNIVERSAL GARAGE DOOR OPENER
(HOMELINK®)
S
................................................. 52
Before You Begin Programming
HomeLink® ...................................................... 53
Erasing All The HomeLink® Channels ............ 53
Identifying Whether You Have A Rolling
Code Or Non-Rolling Code Device ................... 53
Programming HomeLink® To A Garage Door
Opener ..............................................................53
Programming HomeLink® To A
Miscellaneous Device ...................................... 54
Reprogramming A Single HomeLink®
Button ............................................................... 55
Canadian/Gate Operator Programming ......... 55
Security ............................................................. 56
Troubleshooting Tips........................................ 56
23_JT_OM_EN_USC_t.book Page 2
Page 9 of 448

7
TOWING A DISABLED VEHICLE .......................... 350 Four–Wheel Drive Models ............................ 351
Without The Key Fob ..................................... 351
Emergency Tow Hooks —
If Equipped .................................................... 351
ENHANCED ACCIDENT RESPONSE SYSTEM
(EARS) .................................................................. 352
EVENT DATA RECORDER (EDR) ......................... 352
SERVICING AND MAINTENANCE
SCHEDULED SERVICING — GASOLINE
ENGINE ................................................................. 353
Maintenance Plan ......................................... 354
SCHEDULED SERVICING — DIESEL ENGINE .... 357
Maintenance Plan — Diesel Fuel Up To
B5 Biodiesel................................................... 358Additional Maintenance — B6 To B20
Biodiesel ........................................................ 361
ENGINE COMPARTMENT .................................... 362
3.6L Gasoline Engine ................................... 3623.0L Diesel Engine ........................................ 363
Checking Oil Level ......................................... 364
Adding Washer Fluid ..................................... 364
Maintenance-Free Battery ............................ 364
Pressure Washing ......................................... 365 VEHICLE MAINTENANCE..................................... 365
Engine Oil ....................................................... 365
Engine Oil Filter ............................................. 366Engine Air Cleaner Filter ............................... 366
Draining Fuel/Water Separator Filter —
Diesel Engine ................................................. 368
Fuel Filter Replacement — Diesel Engine .... 369
Priming If The Engine Has Run Out Of
Fuel — Diesel Engine .................................... 370
Intervention Regeneration Strategy —
Message Process Flow ................................ 371Diesel Exhaust Fluid ..................................... 371
Accessory Drive Belt Inspection ................... 372Air Conditioner Maintenance........................ 372
Body Lubrication ........................................... 374Windshield Wiper Blades.............................. 374Exhaust System ............................................ 376
Cooling System .............................................. 377
Charge Air Cooler — Inter-Cooler
(Diesel Engine) .............................................. 379
Brake System ............................................... 380
Front/Rear Axle Fluid ................................... 380Transfer Case ............................................... 381
Manual Transmission — If Equipped............ 381
Automatic Transmission —
If Equipped .................................................... 381
Fuses ............................................................. 382Bulb Replacement ........................................ 392 TIRES ..................................................................... 395
Tire Safety Information ................................. 395
Tires — General Information ......................... 401
Tire Types....................................................... 405Spare Tires — If Equipped ............................ 406
Wheel And Wheel Trim Care......................... 407
Snow Traction Devices ................................. 408
Tire Rotation Recommendations ................. 409
DEPARTMENT OF TRANSPORTATION
UNIFORM TIRE QUALITY GRADES .................... 410
Treadwear...................................................... 410
Traction Grades ............................................. 410Temperature Grades..................................... 410
STORING THE VEHICLE ....................................... 411
BODYWORK .......................................................... 411
Protection From Atmospheric Agents .......... 411
Body And Underbody Maintenance ............. 412
Preserving The Bodywork ............................. 412
INTERIORS ........................................................... 414
Carpet Safety Information ............................ 414
Carpet Removal............................................. 415Seats And Fabric Parts ................................. 416
Plastic And Coated Parts .............................. 417
Leather Surfaces........................................... 417
Glass Surfaces ............................................. 417
23_JT_OM_EN_USC_t.book Page 7
Page 29 of 448

GETTING TO KNOW YOUR VEHICLE27
DO NOT Grab The Door Handle When Locking
NOTE:
After pushing the door handle button, the driver
must wait three seconds before locking or
unlocking the doors, using any Passive Entry
door handle. This is done to allow the driver to
check if the vehicle is locked by pulling the door
handle without the vehicle unlocking.
If Passive Entry is disabled using the Uconnect
system, the key fob protection described in
“Preventing Inadvertent Locking Of Passive
Entry Key Fob In Vehicle” remains active/func -
tional.
The Passive Entry system will not operate if the
key fob battery is depleted Ú page 432.
AUTOMATIC DOOR LOCKS —
I
F EQUIPPED
The Automatic Door Lock feature default condition
is enabled. When enabled, the door locks will lock
automatically when the vehicle's speed exceeds
15 mph (24 km/h). The Automatic Door Lock
feature can be enabled or disabled by an
authorized dealer per written request of the
customer. Please see an authorized dealer for
service.
CHILD-PROTECTION DOOR LOCK
S
YSTEM — REAR DOORS
To provide a safer environment for small children
riding in the rear seats, the rear doors are
equipped with a Child-Protection Door Lock
system.
To use the system, open each rear door,
temporarily remove the sealing plug for access,
and use a flat blade screwdriver (or mechanical
key) to rotate the dial to the lock or unlock position.
Child-Protection Door Lock Location
NOTE:
When the Child-Protection Door Lock system is
engaged, the door can be opened only by using
the outside door handle, even though the inside
door lock is in the unlocked position.
After disengaging the Child-Protection Door
Lock system, always test the door from the
inside to make certain it is in the unlocked posi
-
tion.
After engaging the Child-Protection Door Lock
system, always test the door from the inside to
make certain it is in the locked position.
For emergency exit with the system engaged,
move the lock lever rearward (located on the
door trim panel), lower the window and open the
door with the outside door handle.
2
23_JT_OM_EN_USC_t.book Page 27
Page 31 of 448

GETTING TO KNOW YOUR VEHICLE29
To remove the front doors, proceed as follows:
1. Roll down the glass window to prevent any damage.
2. Remove the hinge pin nut from the upper and lower outside hinges (using a #T50 Torx head
driver).
NOTE:The hinge pin nuts can be stowed in the Fastener
Bin located under the rear seat.
Hinge Pin Nut
3. Remove the plastic wiring access door under the instrument panel by sliding the plastic
panel along the door frame toward the seats
until the tabs are detached.
Wiring Access Door
NOTE:Do not force open; this will break the plastic cover.
4. Pull up on the red locking tab to unlock the
wiring harness.
Closed Wiring Harness
5. Push and hold down the black security tab
under the wiring harness, and lift the harness
lever into the open position.
Open Wiring Harness
6. With the wiring harness open, pull straight
downward on the wiring connector to unplug.
Store the wiring connector in the lower door
basket.
1 — Red Locking Tab
2 — Wiring Harness Lever
1 — Wiring Harness Lever (Open Position)
2 — Black Security Tab
2
23_JT_OM_EN_USC_t.book Page 29
Page 45 of 448

GETTING TO KNOW YOUR VEHICLE43
(Continued)
SEATS
Seats are a part of the Occupant Restraint system
of the vehicle.
MANUAL ADJUSTMENT FRONT SEATS
Manual Front Seat Forward/Rearward
Adjustment
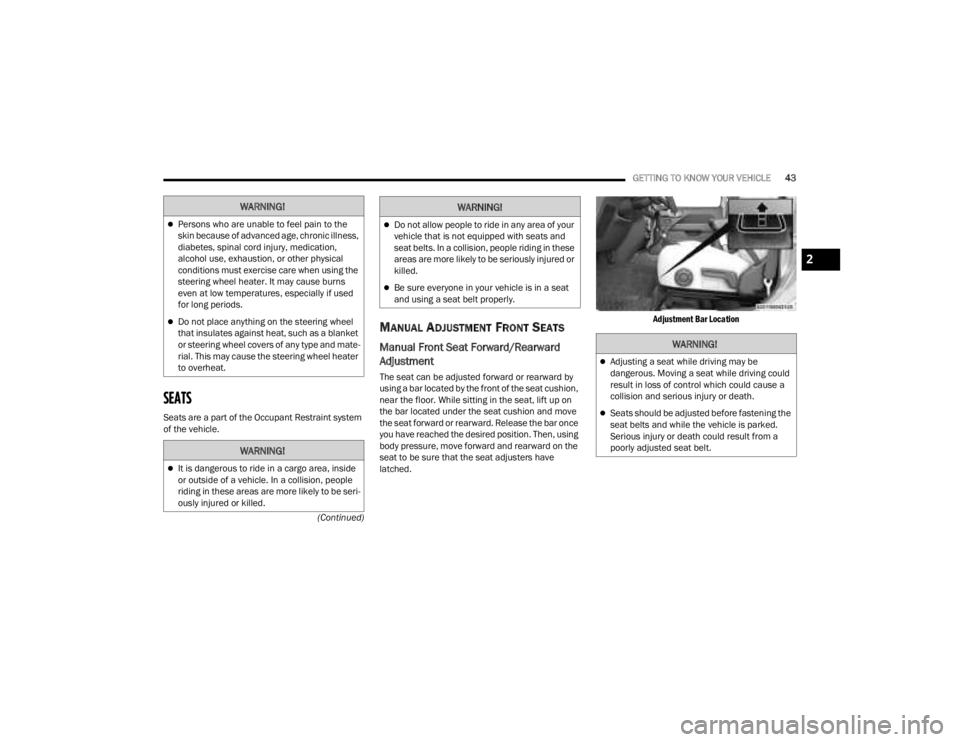
The seat can be adjusted forward or rearward by
using a bar located by the front of the seat cushion,
near the floor. While sitting in the seat, lift up on
the bar located under the seat cushion and move
the seat forward or rearward. Release the bar once
you have reached the desired position. Then, using
body pressure, move forward and rearward on the
seat to be sure that the seat adjusters have
latched.
Adjustment Bar Location
WARNING!
Persons who are unable to feel pain to the
skin because of advanced age, chronic illness,
diabetes, spinal cord injury, medication,
alcohol use, exhaustion, or other physical
conditions must exercise care when using the
steering wheel heater. It may cause burns
even at low temperatures, especially if used
for long periods.
Do not place anything on the steering wheel
that insulates against heat, such as a blanket
or steering wheel covers of any type and mate
-
rial. This may cause the steering wheel heater
to overheat.
WARNING!
It is dangerous to ride in a cargo area, inside
or outside of a vehicle. In a collision, people
riding in these areas are more likely to be seri -
ously injured or killed.
Do not allow people to ride in any area of your
vehicle that is not equipped with seats and
seat belts. In a collision, people riding in these
areas are more likely to be seriously injured or
killed.
Be sure everyone in your vehicle is in a seat
and using a seat belt properly.
WARNING!
WARNING!
Adjusting a seat while driving may be
dangerous. Moving a seat while driving could
result in loss of control which could cause a
collision and serious injury or death.
Seats should be adjusted before fastening the
seat belts and while the vehicle is parked.
Serious injury or death could result from a
poorly adjusted seat belt.
2
23_JT_OM_EN_USC_t.book Page 43
Page 47 of 448

GETTING TO KNOW YOUR VEHICLE45
NOTE:
Be sure that the front seats are fully upright and
positioned forward. This will allow the rear seat
to fold down easily.
The center head restraints must be in the lowest
position to avoid contact with the center console
when folding the seat.
Folding The Rear Seats
To fold down the rear seat, pull the release strap
located on the upper outboard side of the rear seat
to release the seat. The head restraints are folded
independently Úpage 48.
Release Strap Location
Rear Seat Folded Flat
NOTE:Each rear seatback can be locked in an upright
position using the vehicle key. Each seatback must
be unlocked to release for folding.
Locking The Seatback
To raise the seatback to the proper position,
manually lift the seatback until it locks into place.
To return the head restraint to the proper position,
manually lift up until it locks into place. If
interference from the cargo area behind the seat
prevents the seatback from fully locking, you will
have difficulty returning the seats to their proper
position.
WARNING!
It is extremely dangerous to ride in a cargo
area, inside or outside of a vehicle. In a colli -
sion, people riding in these areas are more
likely to be seriously injured or killed.
Do not allow people to ride in any area of your
vehicle that is not equipped with seats and
seat belts.
Be sure everyone in your vehicle is in a seat
and using a seat belt properly.
2
23_JT_OM_EN_USC_t.book Page 45
Page 48 of 448

46GETTING TO KNOW YOUR VEHICLE
NOTE:
The vehicle is equipped with stow clips located
on the lower trim, next to the rear seats. Use
these clips to hold the seat belt out of the path
of the seatback when it is being folded and
raised.
Stow Clip Location
You may experience deformation in the seat
cushion from the seat belt buckles if the seats
are left folded for an extended period of time.
This is normal. By simply unfolding the seats to
the open position, the seat cushion will return to
its normal shape over time.
REAR SEAT STADIUM POSITION
The rear seat bottoms can be folded upward into
the Stadium Position to create more storage space
on the vehicle’s floor, and to access the under seat
storage bins (if equipped).
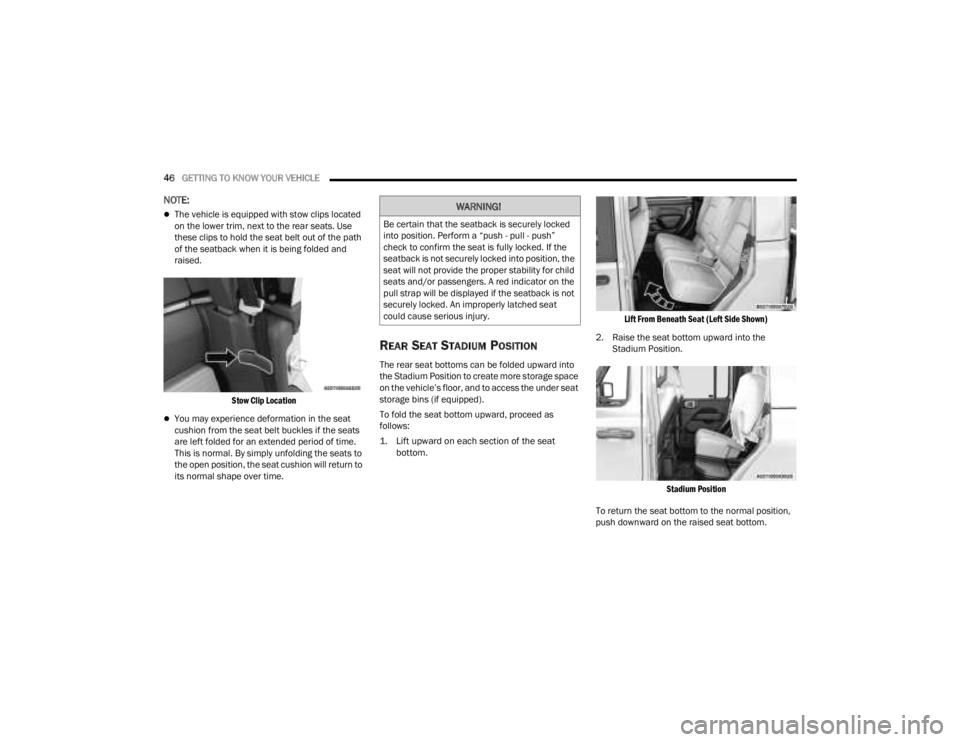
To fold the seat bottom upward, proceed as
follows:
1. Lift upward on each section of the seat bottom.
Lift From Beneath Seat (Left Side Shown)
2. Raise the seat bottom upward into the Stadium Position.
Stadium Position
To return the seat bottom to the normal position,
push downward on the raised seat bottom.
WARNING!
Be certain that the seatback is securely locked
into position. Perform a “push - pull - push”
check to confirm the seat is fully locked. If the
seatback is not securely locked into position, the
seat will not provide the proper stability for child
seats and/or passengers. A red indicator on the
pull strap will be displayed if the seatback is not
securely locked. An improperly latched seat
could cause serious injury.
23_JT_OM_EN_USC_t.book Page 46
Page 49 of 448

GETTING TO KNOW YOUR VEHICLE47
HEATED SEATS — IF EQUIPPED
The heated seat control buttons are
located on the center instrument panel
below the touchscreen and also in the
Climate Control touchscreen menu.
Press the heated seat button once to turn the HI
setting on.
Press the heated seat button a second time to
turn the MED setting on.
Press the heated seat button a third time to turn
the LO setting on.
Press the heated seat button a fourth time to
turn the heating elements off.
NOTE:
The engine must be running for the heated
seats to operate.
The level of heat selected will stay on until the
operator changes it.
For information on use with the Remote Start
system, see Ú page 21.REAR SEAT ARMREST — IF EQUIPPED
The center part of the rear seat can also be used
as a rear armrest with cupholders. To unfold it,
grab the pull strap under the head restraint and
pull it forward.
Rear Seat Armrest
NOTE:The cupholder liner can be removed for cleaning.
WARNING!
Persons who are unable to feel pain to the
skin because of advanced age, chronic illness,
diabetes, spinal cord injury, medication,
alcohol use, exhaustion or other physical
condition must exercise care when using the
seat heater. It may cause burns even at low
temperatures, especially if used for long
periods of time.
Do not place anything on the seat or seatback
that insulates against heat, such as a blanket
or cushion. This may cause the seat heater to
overheat. Sitting in a seat that has been over
-
heated could cause serious burns due to the
increased surface temperature of the seat.
WARNING!
Be certain that the seatback is securely locked
into position. If the seatback is not securely
locked into position the seat will not provide the
proper stability for child seats and/or
passengers. An improperly latched seat could
cause serious injury.
2
23_JT_OM_EN_USC_t.book Page 47