2023 JEEP CHEROKEE height adjustment
[x] Cancel search: height adjustmentPage 30 of 276

28GETTING TO KNOW YOUR VEHICLE
SEATS
Seats are a part of the Occupant Restraint system of the
vehicle.
MANUAL ADJUSTMENT
(FRONT SEATS) — IF EQUIPPED
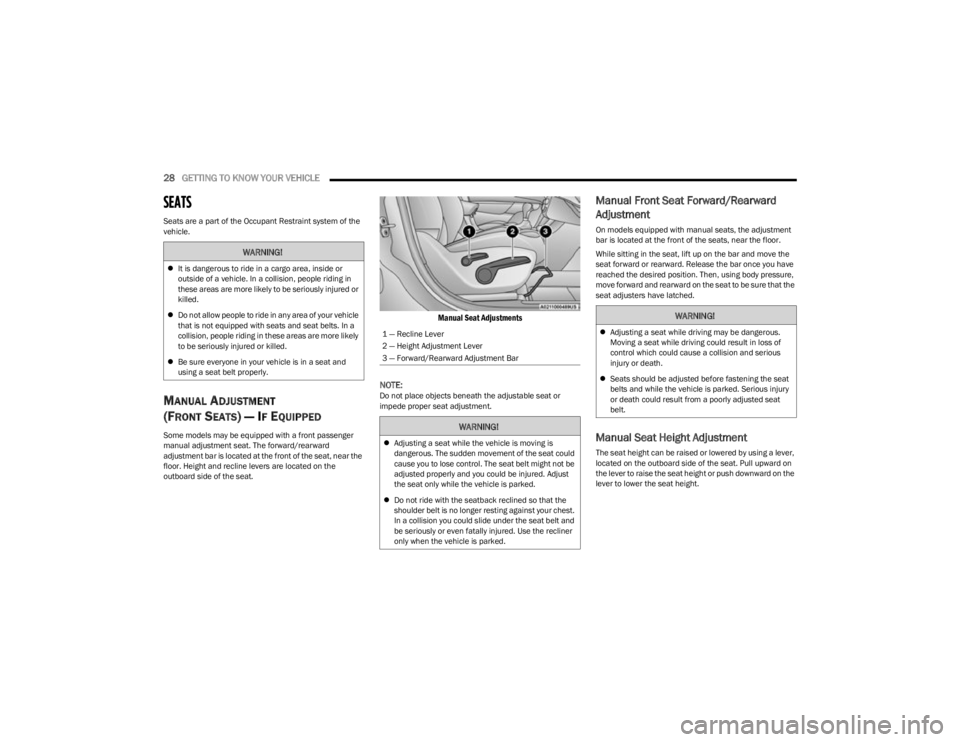
Some models may be equipped with a front passenger
manual adjustment seat. The forward/rearward
adjustment bar is located at the front of the seat, near the
floor. Height and recline levers are located on the
outboard side of the seat.
Manual Seat Adjustments
NOTE:
Do not place objects beneath the adjustable seat or
impede proper seat adjustment.
Manual Front Seat Forward/Rearward
Adjustment
On models equipped with manual seats, the adjustment
bar is located at the front of the seats, near the floor.
While sitting in the seat, lift up on the bar and move the
seat forward or rearward. Release the bar once you have
reached the desired position. Then, using body pressure,
move forward and rearward on the seat to be sure that the
seat adjusters have latched.
Manual Seat Height Adjustment
The seat height can be raised or lowered by using a lever,
located on the outboard side of the seat. Pull upward on
the lever to raise the seat height or push downward on the
lever to lower the seat height.
WARNING!
It is dangerous to ride in a cargo area, inside or
outside of a vehicle. In a collision, people riding in
these areas are more likely to be seriously injured or
killed.
Do not allow people to ride in any area of your vehicle
that is not equipped with seats and seat belts. In a
collision, people riding in these areas are more likely
to be seriously injured or killed.
Be sure everyone in your vehicle is in a seat and
using a seat belt properly.
1 — Recline Lever
2 — Height Adjustment Lever
3 — Forward/Rearward Adjustment Bar
WARNING!
Adjusting a seat while the vehicle is moving is
dangerous. The sudden movement of the seat could
cause you to lose control. The seat belt might not be
adjusted properly and you could be injured. Adjust
the seat only while the vehicle is parked.
Do not ride with the seatback reclined so that the
shoulder belt is no longer resting against your chest.
In a collision you could slide under the seat belt and
be seriously or even fatally injured. Use the recliner
only when the vehicle is parked.
WARNING!
Adjusting a seat while driving may be dangerous.
Moving a seat while driving could result in loss of
control which could cause a collision and serious
injury or death.
Seats should be adjusted before fastening the seat
belts and while the vehicle is parked. Serious injury
or death could result from a poorly adjusted seat
belt.
23_KL_OM_EN_USC_t.book Page 28
Page 32 of 276

30GETTING TO KNOW YOUR VEHICLE
2. Fold the rear seatback completely forward.
NOTE:You may experience deformation in the seat cushion from
the seat belt buckles if the seats are left folded for an
extended period of time. This is normal and by simply
unfolding the seats, over time the seat cushion will return
to its normal shape.
TO RAISE THE REAR SEAT
NOTE:If interference from the cargo area prevents the seatback
from fully locking, you will have difficulty returning the seat
to its proper position.
Raise the seatback and lock it into place.
POWER ADJUSTMENT (FRONT SEATS) —
I
F EQUIPPED
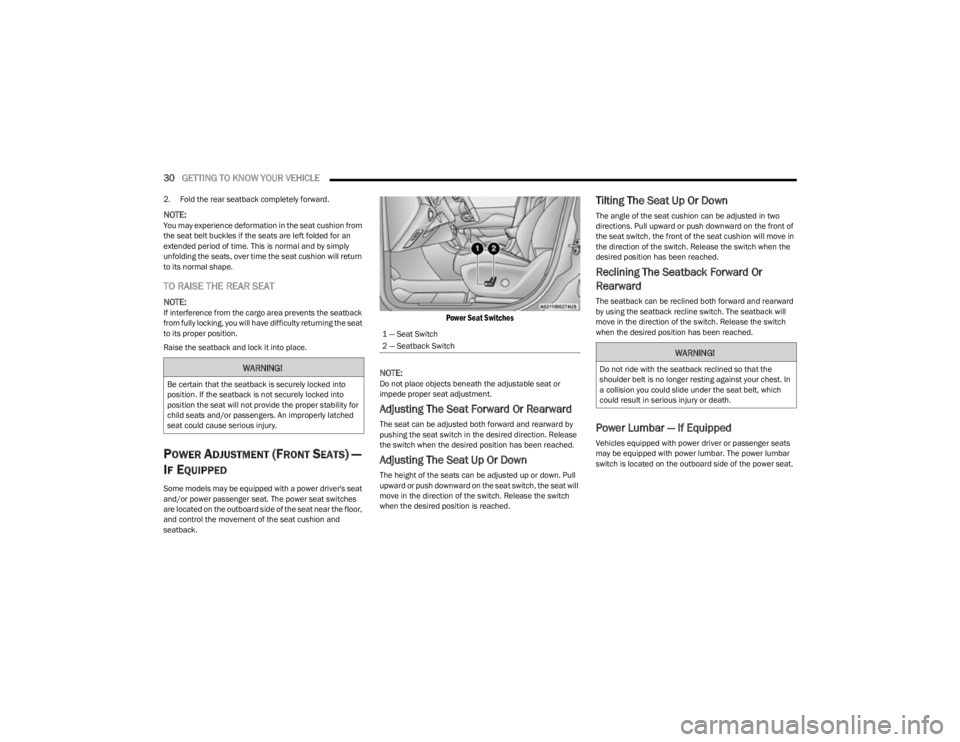
Some models may be equipped with a power driver's seat
and/or power passenger seat. The power seat switches
are located on the outboard side of the seat near the floor,
and control the movement of the seat cushion and
seatback.
Power Seat Switches
NOTE:
Do not place objects beneath the adjustable seat or
impede proper seat adjustment.
Adjusting The Seat Forward Or Rearward
The seat can be adjusted both forward and rearward by
pushing the seat switch in the desired direction. Release
the switch when the desired position has been reached.
Adjusting The Seat Up Or Down
The height of the seats can be adjusted up or down. Pull
upward or push downward on the seat switch, the seat will
move in the direction of the switch. Release the switch
when the desired position is reached.
Tilting The Seat Up Or Down
The angle of the seat cushion can be adjusted in two
directions. Pull upward or push downward on the front of
the seat switch, the front of the seat cushion will move in
the direction of the switch. Release the switch when the
desired position has been reached.
Reclining The Seatback Forward Or
Rearward
The seatback can be reclined both forward and rearward
by using the seatback recline switch. The seatback will
move in the direction of the switch. Release the switch
when the desired position has been reached.
Power Lumbar — If Equipped
Vehicles equipped with power driver or passenger seats
may be equipped with power lumbar. The power lumbar
switch is located on the outboard side of the power seat.
WARNING!
Be certain that the seatback is securely locked into
position. If the seatback is not securely locked into
position the seat will not provide the proper stability for
child seats and/or passengers. An improperly latched
seat could cause serious injury.
1 — Seat Switch
2 — Seatback Switch
WARNING!
Do not ride with the seatback reclined so that the
shoulder belt is no longer resting against your chest. In
a collision you could slide under the seat belt, which
could result in serious injury or death.
23_KL_OM_EN_USC_t.book Page 30
Page 34 of 276

32GETTING TO KNOW YOUR VEHICLE
VENTILATED SEATS — IF EQUIPPED
Located in the seat cushion and seatback are fans that
draw the air from the passenger compartment and move
air through fine perforations in the seat cover to help keep
the occupant cooler in higher ambient temperatures.
Front Ventilated Seats — If Equipped
The front ventilated seat controls are located
within the climate and control screen in the
Uconnect system. The fans operate at two
speeds: HI and LO.
Press the ventilated seat button once to choose HI.
Press the ventilated seat button a second time to
choose LO.
Press the ventilated seat button a third time to turn the
ventilated seat off.
NOTE:The engine must be running for the ventilated seats to
operate.
For information on use with the Remote Start system, see
Úpage 19.
HEAD RESTRAINTS
Head restraints are designed to reduce the risk of injury by
restricting head movement in the event of a rear impact.
Head restraints should be adjusted so that the top of the
head restraint is located above the top of your ear.
NOTE:Do not reverse the head restraints (making the rear of the
head restraint face forward) in an attempt to gain addi -
tional clearance to the back of your head.
Reactive Head Restraints — Front Seats
The front driver and passenger seats are equipped with
Reactive Head Restraints (RHR). In the event of a rear
impact, the RHRs will automatically extend forward
minimizing the gap between the back of the occupant’s
head and the RHR.
The RHRs will automatically return to their normal position
following a rear impact. If the RHRs do not return to their
normal position, see an authorized dealer immediately. To raise the head restraint, pull upward on the head
restraint. To lower the head restraint, push the adjustment
button, located at the base of the head restraint, and push
downward on the head restraint.
NOTE:To remove the head restraint, raise it as far as it can go.
Then, push the release button and the adjustment button
at the base of each post while pulling the head restraint
up. Seatback angle may need to be adjusted to fully
remove the head restraint. To reinstall the head restraint,
put the head restraint posts into the holes and push
downward. Then adjust the head restraint to the appro
-
priate height.
Front Head Restraint
WARNING!
All occupants, including the driver, should not
operate a vehicle or sit in a vehicle’s seat until the
head restraints are placed in their proper positions in
order to minimize the risk of neck injury in the event
of a crash.
Head restraints should never be adjusted while the
vehicle is in motion. Driving a vehicle with the head
restraints improperly adjusted or removed could
cause serious injury or death in the event of a colli -
sion.
1 — Release Button
2 — Adjustment Button
23_KL_OM_EN_USC_t.book Page 32
Page 35 of 276

GETTING TO KNOW YOUR VEHICLE33
Rear Head Restraints
The rear outboard head restraints have two positions: up
and down. The center head restraint has three positions:
up, mid, and down. When the center seat is being
occupied the head restraint should be adjusted to the
occupant. When there is no occupant in the center seat,
the head restraint can be lowered for maximum visibility
for the driver.
To raise the head restraint, pull upward on the head
restraint. To lower the head restraint, push the adjustment
button, located at the base of the head restraint, and push
downward on the head restraint.
NOTE:
To remove the head restraint, raise it as far as it can go.
Then, push the release button and the adjustment
button at the base of each post while pulling the head
restraint up. To reinstall the head restraint, put the
head restraint posts into the holes and push down -
ward. Then, adjust the head restraint to the appro -
priate height.
The seatback may need to be reclined in order to fully
remove the outboard head restraints.
Outboard Head Restraint Center Head Restraint
WARNING!
A loose head restraint thrown forward in a collision or
hard stop could cause serious injury or death to occu -
pants of the vehicle. Always securely stow removed
head restraints in a location outside the occupant
compartment.
ALL the head restraints MUST be reinstalled in the
vehicle to properly protect the occupants. Follow the
reinstallation instructions prior to operating the
vehicle or occupying a seat.
Do not place items over the top of the Reactive Head
Restraint, such as coats, seat covers or portable DVD
players. These items may interfere with the operation
of the Reactive Head Restraint in the event of a colli -
sion and could result in serious injury or death.
1 — Release Button
2 — Adjustment Button
1 — Adjustment Button
2 — Release Button
WARNING!
ALL the head restraints MUST be reinstalled in the
vehicle to properly protect the occupants. Follow the
reinstallation instructions prior to operating the vehicle
or occupying a seat.
2
23_KL_OM_EN_USC_t.book Page 33
Page 165 of 276

SAFETY163
Second Row Center Seat Belt Operating
Instructions — Fixed Rear Seat
(If Equipped)
The second row center seat belt may feature a seat belt
with a mini-latch plate and buckle, which allows the seat
belt to detach from the lower anchor when the seat is
folded. The mini-latch plate and regular latch plate can
then be stored out of the way in the left side trim panel for
added convenience to open up utilization of the storage
areas behind the front seats when the seat is not
occupied.
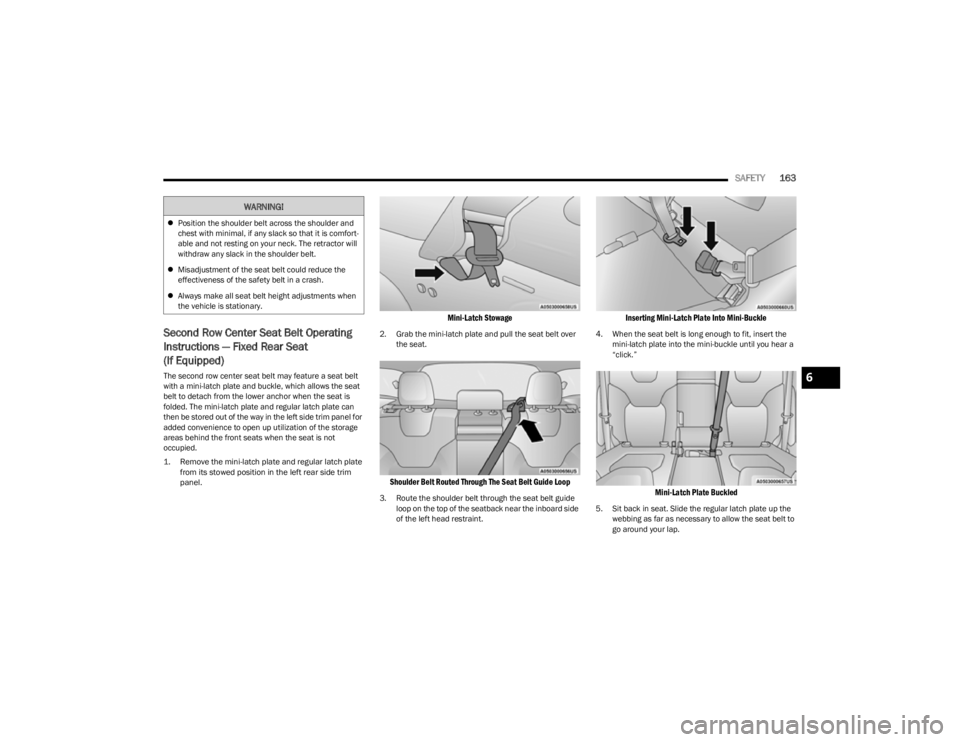
1. Remove the mini-latch plate and regular latch plate
from its stowed position in the left rear side trim
panel.
Mini-Latch Stowage
2. Grab the mini-latch plate and pull the seat belt over the seat.
Shoulder Belt Routed Through The Seat Belt Guide Loop
3. Route the shoulder belt through the seat belt guide loop on the top of the seatback near the inboard side
of the left head restraint.
Inserting Mini-Latch Plate Into Mini-Buckle
4. When the seat belt is long enough to fit, insert the mini-latch plate into the mini-buckle until you hear a
“click.”
Mini-Latch Plate Buckled
5. Sit back in seat. Slide the regular latch plate up the webbing as far as necessary to allow the seat belt to
go around your lap.
Position the shoulder belt across the shoulder and
chest with minimal, if any slack so that it is comfort -
able and not resting on your neck. The retractor will
withdraw any slack in the shoulder belt.
Misadjustment of the seat belt could reduce the
effectiveness of the safety belt in a crash.
Always make all seat belt height adjustments when
the vehicle is stationary.
WARNING!
6
23_KL_OM_EN_USC_t.book Page 163