2023 JEEP CHEROKEE oil
[x] Cancel search: oilPage 220 of 276
218SERVICING AND MAINTENANCE
Refrigerant Recovery And Recycling
R-134a — If Equipped
R-134a Air Conditioning Refrigerant is a Hydrofluo -
rocarbon (HFC) that is an ozone-friendly substance. It is
recommended that air conditioning service be performed
by an authorized dealer or other service facilities using
recovery and recycling equipment.
NOTE:Use only manufacturer approved A/C system PAG
compressor oil and refrigerants.
Refrigerant Recovery And Recycling
R-1234yf — If Equipped
R-1234yf Air Conditioning Refrigerant is a Hydrofluo-
roolefin (HFO) that is endorsed by the Environmental
Protection Agency and is an ozone-friendly substance with
a low global-warming potential. It is recommended that air
conditioning service be performed by an authorized dealer
using recovery and recycling equipment.
NOTE:Use only manufacturer approved A/C system PAG
compressor oil, and refrigerants.
Cabin Air Filter
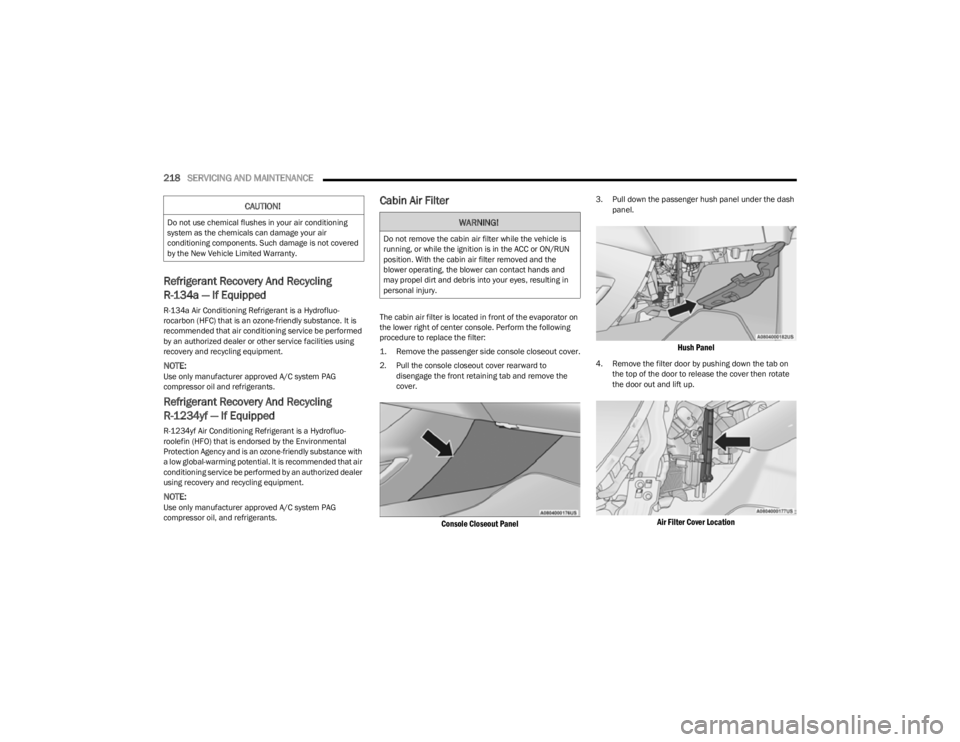
The cabin air filter is located in front of the evaporator on
the lower right of center console. Perform the following
procedure to replace the filter:
1. Remove the passenger side console closeout cover.
2. Pull the console closeout cover rearward to disengage the front retaining tab and remove the
cover.
Console Closeout Panel
3. Pull down the passenger hush panel under the dash panel.
Hush Panel
4. Remove the filter door by pushing down the tab on the top of the door to release the cover then rotate
the door out and lift up.
Air Filter Cover Location
CAUTION!
Do not use chemical flushes in your air conditioning
system as the chemicals can damage your air
conditioning components. Such damage is not covered
by the New Vehicle Limited Warranty.WARNING!
Do not remove the cabin air filter while the vehicle is
running, or while the ignition is in the ACC or ON/RUN
position. With the cabin air filter removed and the
blower operating, the blower can contact hands and
may propel dirt and debris into your eyes, resulting in
personal injury.
23_KL_OM_EN_USC_t.book Page 218
Page 221 of 276

SERVICING AND MAINTENANCE219
5. Remove the cabin air filter by pulling it straight out of
the housing. Take note of the air filter position
indicators.
Cabin Air Filter
6. Install the cabin air filter with the air filter position indicators pointing in the same direction as removal.
7. Install the passenger side hush panel under the dash panel and console closeout cover.
Refer to the Maintenance Plan in this chapter for the
proper maintenance intervals
Úpage 209.
BODY LUBRICATION
Locks and all body pivot points, including such items as
seat tracks, door hinge pivot points and rollers, liftgate,
tailgate, decklid, sliding doors and hood hinges, should be
lubricated periodically with a lithium based grease, such
as Mopar® Spray White Lube to ensure quiet, easy
operation and to protect against rust and wear. Prior to the
application of any lubricant, the parts concerned should
be wiped clean to remove dust and grit; after lubricating,
excess oil and grease should be removed. Particular
attention should also be given to hood latching
components to ensure proper function. When performing
other underhood services, the hood latch, release
mechanism and safety catch should be cleaned and
lubricated.
The external lock cylinders should be lubricated twice a
year, preferably in the Autumn and Spring. Apply a small
amount of a high quality lubricant, such as Mopar® Lock
Cylinder Lubricant directly into the lock cylinder.
WINDSHIELD WIPER BLADES
Clean the rubber edges of the wiper blades and the
windshield periodically with a sponge or soft cloth and a
mild nonabrasive cleaner. This will remove accumulations
of salt or road film.
Operation of the wipers on dry glass for long periods may
cause deterioration of the wiper blades. Always use
washer fluid when using the wipers to remove salt or dirt
from a dry windshield. Avoid using the wiper blades to remove frost or ice from
the windshield. Keep the blade rubber out of contact with
petroleum products such as engine oil, gasoline, etc.
NOTE:Life expectancy of wiper blades varies depending on
geographical area and frequency of use. If chattering,
marks, water lines or wet spots are present, clean the
wiper blades or replace as necessary.
The wiper blades and wiper arms should be inspected
periodically, not just when wiper performance problems
are experienced. This inspection should include the
following points:
Wear or uneven edges
Foreign material
Hardening or cracking
Deformation or fatigue
If a wiper blade or wiper arm is damaged, replace the
affected wiper arm or blade with a new unit. Do not
attempt to repair a wiper arm or blade that is damaged.
CAUTION!
The cabin air filter is identified with an arrow to indicate
airflow direction through the filter. Failure to properly
install the filter will result in the need to replace it more
often.
8
23_KL_OM_EN_USC_t.book Page 219
Page 224 of 276

222SERVICING AND MAINTENANCE
(Continued)
(Continued)
3. Insert the wiper blade pivot pin into the opening on
the end of the wiper arm. Grab the bottom end of the
wiper arm with one hand, and apply pressure on the
wiper blade flush with the wiper arm until it snaps into
place.
4. Lower the wiper blade onto the glass and snap the wiper arm pivot cap back into place.
EXHAUST SYSTEM
The best protection against carbon monoxide entry into
the vehicle body is a properly maintained engine exhaust
system.
If you notice a change in the sound of the exhaust system;
or if the exhaust fumes can be detected inside the vehicle;
or when the underside or rear of the vehicle is damaged;
have an authorized technician inspect the complete
exhaust system and adjacent body areas for broken,
damaged, deteriorated, or mispositioned parts. Open
seams or loose connections could permit exhaust fumes
to seep into the passenger compartment. In addition, have
the exhaust system inspected each time the vehicle is
raised for lubrication or oil change. Replace as required.
Under normal operating conditions, the catalytic converter
will not require maintenance. However, it is important to
keep the engine properly tuned to ensure proper catalyst
operation and prevent possible catalyst damage.
NOTE:Intentional tampering with emissions control systems can
result in civil penalties being assessed against you.
In unusual situations involving grossly malfunctioning
engine operation, a scorching odor may suggest severe
and abnormal catalyst overheating. If this occurs, stop the
vehicle, turn off the engine and allow it to cool. Service,
including a tune-up to manufacturer's specifications,
should be obtained immediately.
To minimize the possibility of catalytic converter damage:
Do not interrupt the ignition when the transmission is
in gear and the vehicle is in motion.
Do not try to start the vehicle by pushing or towing the
vehicle.
Do not idle the engine with any ignition components
disconnected or removed, such as when diagnostic
testing, or for prolonged periods during very rough idle
or malfunctioning operating conditions.
COOLING SYSTEM
WARNING!
Exhaust gases can injure or kill. They contain carbon
monoxide (CO), which is colorless and odorless.
Breathing it can make you unconscious and can
eventually poison you. To avoid breathing CO see
Úpage 186.
A hot exhaust system can start a fire if you park over
materials that can burn. Such materials might be
grass or leaves coming into contact with your
exhaust system. Do not park or operate your vehicle
in areas where your exhaust system can contact
anything that can burn.
CAUTION!
The catalytic converter requires the use of unleaded
fuel only. Leaded gasoline will destroy the effective -
ness of the catalyst as an emissions control device
and may seriously reduce engine performance and
cause serious damage to the engine.
Damage to the catalytic converter can result if your
vehicle is not kept in proper operating condition. In
the event of engine malfunction, particularly
involving engine misfire or other apparent loss of
performance, have your vehicle serviced promptly.
Continued operation of your vehicle with a severe
malfunction could cause the converter to overheat,
resulting in possible damage to the converter and
vehicle.
WARNING!
WARNING!
You or others can be badly burned by hot engine
coolant (antifreeze) or steam from your radiator. If
you see or hear steam coming from under the hood,
do not open the hood until the radiator has had time
to cool. Never open a cooling system pressure cap
when the radiator or coolant bottle is hot.
23_KL_OM_EN_USC_t.book Page 222
Page 226 of 276

224SERVICING AND MAINTENANCE
NOTE:
It is the owner's responsibility to maintain the proper
level of protection against freezing according to the
temperatures occurring in the area where the vehicle is
operated.
Use care when filling under hood fluids such as Engine
Oil, Windshield Washer Solvent, Antifreeze etc. to mini -
mize spillage onto top of engine. Any excess fluid that
is spilled onto the top of the engine should be removed
using compressed air or absorbent cloth.
Some vehicles require special tools to add coolant
properly. Failure to fill these systems properly could
lead to severe internal engine damage. If any coolant is
needed to be added to the system, please contact a
local authorized dealer.
Mixing engine coolant types is not recommended and
can result in cooling system damage. If HOAT and OAT
coolant are mixed in an emergency, have an authorized
dealer drain, flush, and refill with OAT coolant
(conforming to MS.90032) as soon as possible.
Cooling System Pressure Cap
The cap must be fully tightened to prevent loss of engine
coolant (antifreeze), and to ensure that engine coolant will
return to the radiator from the coolant expansion bottle/
recovery tank (if equipped).
The cap should be inspected and cleaned if there is any
accumulation of foreign material on the sealing surfaces.
Disposal Of Used Coolant
Used ethylene glycol-based coolant (antifreeze) is a
regulated substance requiring proper disposal. Check with
your local authorities to determine the disposal rules for
your community. To prevent ingestion by animals or
children, do not store ethylene glycol-based coolant in
open containers or allow it to remain in puddles on the
ground, clean up any ground spills immediately. If
ingested, seek emergency assistance immediately.
Coolant Level
The coolant bottle provides a quick visual method for
determining that the coolant level is adequate. With the
engine off and cold, the level of the engine coolant
(antifreeze) in the bottle should be between the ranges
indicated on the bottle.
The radiator normally remains completely full, so there is
no need to remove the radiator/coolant pressure cap
unless checking for engine coolant freeze point or replacing coolant. Advise your service attendant of this. As
long as the engine operating temperature is satisfactory,
the coolant only needs to be checked once a month.
When additional engine coolant is needed to maintain the
proper level, only OAT coolant that meets the
requirements of the manufacturer Material Standard
MS.90032 should be added to the coolant bottle. Do not
overfill.
Cooling System Notes
NOTE:When the vehicle is stopped after a few miles/kilometers
of operation, you may observe vapor coming from the front
of the engine compartment. This is normally a result of
moisture from rain, snow, or high humidity accumulating
on the radiator and being vaporized when the thermostat
opens, allowing hot engine coolant (antifreeze) to enter
the radiator.
If an examination of your engine compartment shows no
evidence of radiator or hose leaks, the vehicle may be
safely driven. The vapor will soon dissipate.
Do not overfill the coolant expansion bottle.
Check the coolant freeze point in the radiator and in
the coolant expansion bottle. If engine coolant needs
to be added, the contents of the coolant expansion
bottle must also be protected against freezing.
If frequent engine coolant additions are required, the
cooling system should be pressure tested for leaks.
Maintain engine coolant concentration at a minimum
of 50% OAT coolant (conforming to MS.90032) and
distilled water for proper corrosion protection of your
engine which contains aluminum components.
WARNING!
Do not open hot engine cooling system. Never add
engine coolant (antifreeze) when the engine is over -
heated. Do not loosen or remove the cap to cool an
overheated engine. Heat causes pressure to build up
in the cooling system. To prevent scalding or injury,
do not remove the pressure cap while the system is
hot or under pressure.
Do not use a pressure cap other than the one speci -
fied for your vehicle. Personal injury or engine
damage may result.
23_KL_OM_EN_USC_t.book Page 224
Page 227 of 276

SERVICING AND MAINTENANCE225
Make sure that the coolant expansion bottle overflow
hoses are not kinked or obstructed.
Keep the front of the radiator clean. If your vehicle is
equipped with air conditioning, keep the front of the
condenser clean.
Do not change the thermostat for Summer or Winter
operation. If replacement is ever necessary, install
ONLY the correct type thermostat. Other designs may
result in unsatisfactory engine cooling performance,
poor gas mileage, and increased emissions.
BRAKE SYSTEM
In order to ensure brake system performance, all brake
system components should be inspected periodically.
Refer to the Maintenance Plan for the proper
maintenance intervals
Úpage 209.
Fluid Level Check — Brake Master Cylinder
The fluid level of the brake master cylinder should be
checked whenever the vehicle is serviced, or immediately
if the Brake System Warning Light is on. If necessary, add
fluid to bring level within the designated marks on the side
of the reservoir of the brake master cylinder. Be sure to
clean the top of the master cylinder area before removing cap. With disc brakes, fluid level can be expected to fall as
the brake pads wear. Brake fluid level should be checked
when pads are replaced. If the brake fluid is abnormally
low, check the system for leaks. For further information
Úpage 256.
AUTOMATIC TRANSMISSION
Special Additives
It is strongly recommended against using any special
additives in the transmission. Automatic Transmission
Fluid (ATF) is an engineered product and its performance
may be impaired by supplemental additives. Therefore, do
not add any fluid additives to the transmission. Avoid
using transmission sealers as they may adversely affect
seals.
Fluid Level Check
The fluid level is preset at the factory and does not require
adjustment under normal operating conditions. Routine
fluid level checks are not required; therefore the
transmission has no dipstick. An authorized dealer can
check your transmission fluid level using special service
tools. If you notice fluid leakage or transmission
malfunction, visit an authorized dealer immediately to
have the transmission fluid level checked. Operating the
vehicle with an improper fluid level can cause severe
transmission damage.
WARNING!
Riding the brakes can lead to brake failure and possibly
a collision. Driving with your foot resting or riding on the
brake pedal can result in abnormally high brake
temperatures, excessive lining wear, and possible brake
damage. You would not have your full braking capacity
in an emergency.
WARNING!
Use only manufacturer's recommended brake fluid.
For further information Úpage 256. Using the wrong
type of brake fluid can severely damage your brake
system and/or impair its performance. The proper
type of brake fluid for your vehicle is also identified
on the original factory installed hydraulic master
cylinder reservoir.
To avoid contamination from foreign matter or mois -
ture, use only new brake fluid or fluid that has been
in a tightly closed container. Keep the master
cylinder reservoir cap secured at all times. Brake
fluid in a open container absorbs moisture from the
air resulting in a lower boiling point. This may cause
it to boil unexpectedly during hard or prolonged
braking, resulting in sudden brake failure. This could
result in a collision.
Overfilling the brake fluid reservoir can result in
spilling brake fluid on hot engine parts, causing the
brake fluid to catch fire. Brake fluid can also damage
painted and vinyl surfaces, care should be taken to
avoid its contact with these surfaces.
Do not allow petroleum-based fluid to contaminate
the brake fluid. Brake seal components could be
damaged, causing partial or complete brake failure.
This could result in a collision.
CAUTION!
Do not use chemical flushes in your transmission as the
chemicals can damage your transmission components.
Such damage is not covered by the New Vehicle Limited
Warranty.
8
23_KL_OM_EN_USC_t.book Page 225
Page 230 of 276

228SERVICING AND MAINTENANCE
CavityBlade Fuse Cartridge Fuse Description
* If Equipped
F01 –70 Amp Gray Electric Power Str
F02 –150 Amp Gray Aux PDC *
F03 –300 Amp Gray Alternator
F04 ––Battery
F05 –100 Amp Gray Rad Fan
F06 ––Not Used
F07 15 Amp Blue –Powertrain Control Mod (PCM) * / Surge Solenoid Purge Valve *
F08 25 Amp Clear –Fuel Injectors / ECM / PCM/
F09 10 Amp Red
–UREA Coolant Pump/PCM *
15 Amp Blue Coolant Pump *
F10 20 Amp Yellow –Power Transfer Unit (PTU) 4WD *
F11 ––Not Used
F12 10 Amp Red –Purging Pump *
F13 10 Amp Red –Voltage Stability Mod (VSM)/Powertrain Control Mod (PCM)/Engine Control Module (ECM)
F14 10 Amp Red –Drivetrain Control Module (DTCM)*/Power Take-Off Unit (PTU)*/Electric Park Brake (EPB) /
RDM*/ Brake System Module (BSM) / Brake Pedal Switch / Back Up Lamp Switch *
F15 ––Not Used
F16 20 Amp Yellow –Ign Coils / Additional Diesel Content
F17 30 Amp Pink –Brake Vacuum Pump *
F18 ––Not Used
F19 –40 Amp Green Starter
F20 10 Amp Red –A/C Clutch
23_KL_OM_EN_USC_t.book Page 228
Page 245 of 276

SERVICING AND MAINTENANCE243
(Continued)
Tread Wear Indicators
Tread wear indicators are in the original equipment tires to
help you in determining when your tires should be
replaced.
Tire Tread
These indicators are molded into the bottom of the tread
grooves. They will appear as bands when the tread depth
becomes 1/16 of an inch (1.6 mm). When the tread is
worn to the tread wear indicators, the tire should be
replaced
Úpage 243.
Life Of Tire
The service life of a tire is dependent upon varying factors
including, but not limited to:
Driving style.
Tire pressure - Improper cold tire inflation pressures can
cause uneven wear patterns to develop across the tire tread. These abnormal wear patterns will reduce tread
life, resulting in the need for earlier tire replacement.
Distance driven.
Performance tires, tires with a speed rating of V or
higher, and Summer tires typically have a reduced
tread life. Rotation of these tires per the vehicle sched-
uled maintenance is highly recommended.
NOTE:Wheel Valve Stem must be replaced as well when
installing new tires due to wear and tear in existing tires.
Keep dismounted tires in a cool, dry place with as little
exposure to light as possible. Protect tires from contact
with oil, grease, and gasoline.
Replacement Tires
The tires on your new vehicle provide a balance of many
characteristics. They should be inspected regularly for
wear and correct cold tire inflation pressures. The
manufacturer strongly recommends that you use tires
equivalent to the originals in size, quality and performance
when replacement is needed
Úpage 243. Refer to the
Tire And Loading Information Placard or the Vehicle Certification Label for the size designation of your tire. The
Load Index and Speed Symbol for your tire will be found on
the original equipment tire sidewall.
See the Tire Sizing Chart example found in the Tire Safety
Information for more information relating to the Load
Index and Speed Symbol of a tire
Úpage 236.
It is recommended to replace the two front tires or two rear
tires as a pair. Replacing just one tire can seriously affect
your vehicle’s handling. If you ever replace a wheel, make
sure that the wheel’s specifications match those of the
original wheels.
It is recommended you contact an authorized tire dealer or
original equipment dealer with any questions you may
have on tire specifications or capability. Failure to use
equivalent replacement tires may adversely affect the
safety, handling, and ride of your vehicle.
1 — Tread Wear Indicators
WARNING!
Tires and the spare tire should be replaced after six
years, regardless of the remaining tread. Failure to
follow this warning can result in sudden tire failure. You
could lose control and have a collision resulting in
serious injury or death.
WARNING!
Do not use a tire, wheel size, load rating, or speed
rating other than that specified for your vehicle.
Some combinations of unapproved tires and wheels
may change suspension dimensions and perfor -
mance characteristics, resulting in changes to
steering, handling, and braking of your vehicle. This
can cause unpredictable handling and stress to
steering and suspension components. You could
lose control and have a collision resulting in serious
injury or death. Use only the tire and wheel sizes with
load ratings approved for your vehicle.
8
23_KL_OM_EN_USC_t.book Page 243
Page 254 of 276
252SERVICING AND MAINTENANCE
LEATHER SURFACES
Mopar® Total Clean is specifically recommended for
leather upholstery.
Your leather upholstery can be best preserved by regular
cleaning with a damp soft cloth. Small particles of dirt can
act as an abrasive and damage the leather upholstery and
should be removed promptly with a damp cloth. Stubborn
soils can be removed easily with a soft cloth and Mopar®
Total Clean. Care should be taken to avoid soaking your
leather upholstery with any liquid. Please do not use
polishes, oils, cleaning fluids, solvents, detergents, or
ammonia-based cleaners to clean your leather upholstery.
NOTE:If equipped with light colored leather, it tends to show any
foreign material, dirt, and fabric dye transfer more so than
darker colors. The leather is designed for easy cleaning,
and the manufacturer recommends Mopar® Total Clean
leather cleaner applied on a cloth to clean the leather
seats as needed.GLASS SURFACES
All glass surfaces should be cleaned on a regular basis
with Mopar® Glass Cleaner, or any commercial
household-type glass cleaner. Never use an abrasive type
cleaner. Use caution when cleaning the inside rear
window equipped with electric defrosters or windows
equipped with radio antennas. Do not use scrapers or
other sharp instruments that may scratch the elements.
When cleaning the rearview mirror, spray cleaner on the
towel or cloth that you are using. Do not spray cleaner
directly on the mirror.
CAUTION!
Do not use alcohol and alcohol-based and/or
ketone-based cleaning products to clean leather
upholstery, as damage to the upholstery may result.
23_KL_OM_EN_USC_t.book Page 252