2023 HYUNDAI TUCSON remove rear seat
[x] Cancel search: remove rear seatPage 45 of 638
Seats & Safety System
3-14
Head Restraints
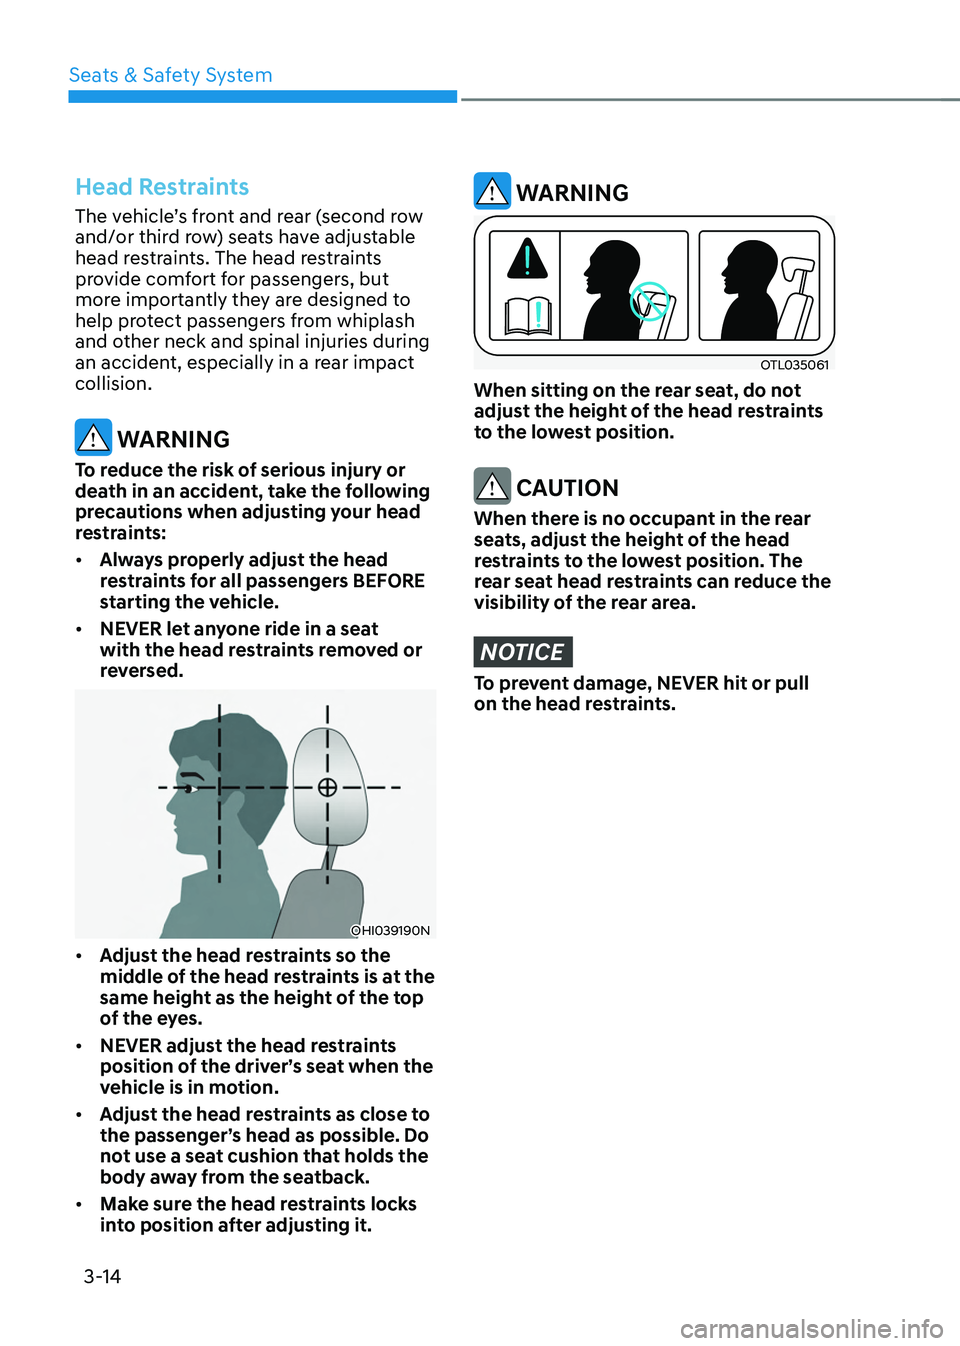
The vehicle’s front and rear (second row
and/or third row) seats have adjustable
head restraints. The head restraints
provide comfort for passengers, but
more importantly they are designed to
help protect passengers from whiplash
and other neck and spinal injuries during
an accident, especially in a rear impact
collision.
WARNING
To reduce the risk of serious injury or
death in an accident, take the following
precautions when adjusting your head
restraints:
• Always properly adjust the head
restraints for all passengers BEFORE
starting the vehicle.
• NEVER let anyone ride in a seat
with the head restraints removed or
reversed.
OHI039190N
• Adjust the head restraints so the
middle of the head restraints is at the
same height as the height of the top
of the eyes.
• NEVER adjust the head restraints
position of the driver’s seat when the
vehicle is in motion.
• Adjust the head restraints as close to
the passenger’s head as possible. Do
not use a seat cushion that holds the
body away from the seatback.
• Make sure the head restraints locks
into position after adjusting it.
WARNING
OTL035061
When sitting on the rear seat, do not
adjust the height of the head restraints
to the lowest position.
CAUTION
When there is no occupant in the rear
seats, adjust the height of the head
restraints to the lowest position. The
rear seat head restraints can reduce the
visibility of the rear area.
NOTICE
To prevent damage, NEVER hit or pull
on the head restraints.
Page 48 of 638
03
3-17
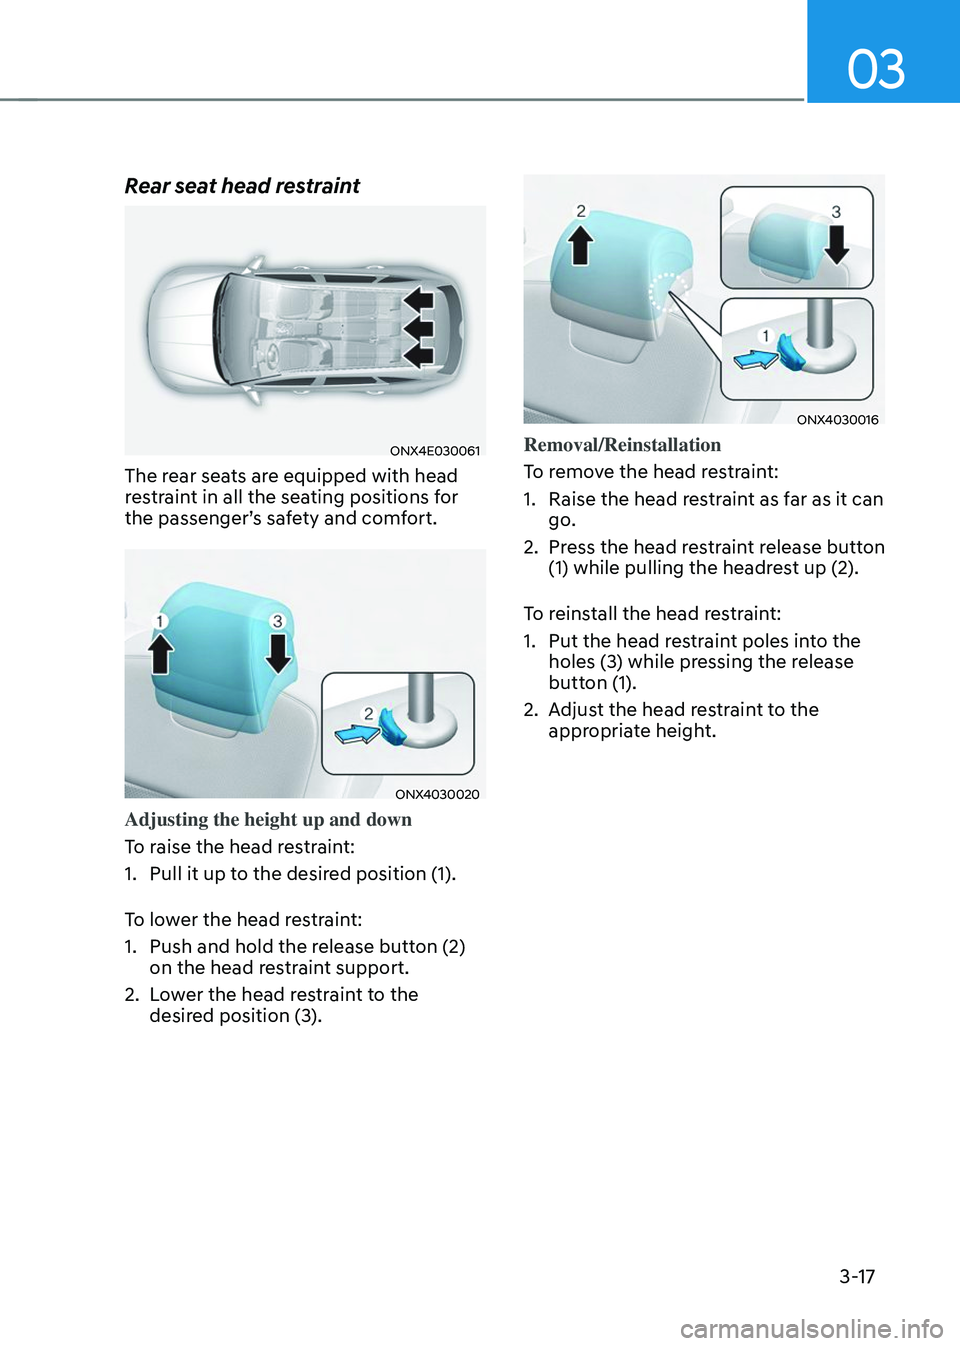
Rear seat head restraint
ONX4E030061
The rear seats are equipped with head
restraint in all the seating positions for
the passenger’s safety and comfort.
ONX4030020
Adjusting the height up and down
To raise the head restraint:
1. Pull it up to the desired position (1).
To lower the head restraint:
1. Push and hold the release button (2)
on the head restraint support.
2. Lower the head restraint to the
desired position (3).
ONX4030016
Removal/Reinstallation
To remove the head restraint:
1. Raise the head restraint as far as it can
go.
2. Press the head restraint release button
(1) while pulling the headrest up (2).
To reinstall the head restraint:
1. Put the head restraint poles into the
holes (3) while pressing the release
button (1).
2. Adjust the head restraint to the
appropriate height.
Page 55 of 638

Seats & Safety System3-24
This section describes how to use the
seat belts properly. It also describes
some of the things not to do when using
seat belts.
Seat belt safety precautions
Always fasten your seat belt and make
sure all passengers have fastened their
seat belts before starting any trip. Air
bags are designed to supplement the
seat belt as an additional safety device,
not a replacement. Most countries
require all occupants of a vehicle to wear
seat belts.
WARNING
Seat belts must be used by ALL
passengers whenever the vehicle is
moving. Take the following precautions
when adjusting and wearing seat belts:
• Children under the age of 13 should
be properly restrained in the rear
seats.
• Never allow children to ride in the
front passenger seat, unless the air
bag is deactivated. If a child is seated
in the front passenger seat, move
the seat as far back as possible and
properly restrain them in the seat.
• NEVER allow an infant or child to be
carried on an occupant’s lap.
• NEVER ride with the seatback
reclined when the vehicle is moving.
• Do not allow children to share a seat
or seat belt.
• Do not wear the shoulder belt under
your arm or behind your back. •
NEVER wear a seat belt over fragile
objects. If there is a sudden stop or
impact, the seat belt can damage it.
• Do not use the seat belt if it is
twisted. A twisted seat belt will not
protect you properly in an accident.
• Do not use a seat belt if the webbing
or hardware is damaged.
• Do not latch the seat belt into the
buckles of other seats.
• NEVER unfasten the seat belt
while driving. This may cause loss
of vehicle control resulting in an
accident.
• Make sure there is nothing in the
buckle interfering with the seat belt
latch mechanism. This may prevent
the seat belt from fastening securely.
• No modifications or additions
should be made by the user which
will either prohibit the seat belt
adjusting devices from operating to
remove slack, or prohibit the seat
belt assembly from being adjusted to
remove slack.
WARNING
Damaged seat belts and seat belt
assemblies will not operate properly.
Always replace:
• Frayed, contaminated, or damaged
webbing.
• Damaged hardware.
• The entire seat belt assembly after it
has been worn in an accident, even
if damage to webbing or assembly is
not apparent.
SEAT BELTS
Page 66 of 638
03
3-35
Children Always in the Rear
WARNING
Always properly restrain children in the
vehicle. Children of all ages are safer
when restrained in the rear seat. A child
riding in the front passenger seat can
be forcefully struck by an inflating air
bag resulting in SERIOUS INJURY or
DEATH.
Children under age 13 should always
ride in the rear seats and must always be
properly restrained to minimize the risk
of injury in an accident, sudden stop or
sudden maneuver.
According to accident statistics, children
are safer when properly restrained in the
rear seats than in the front seat. Even
with air bags, children can be seriously
injured or killed. Children too large for a
Child Restraint System must use the seat
belts provided.
All 50 states have child restraint laws
which require children to travel in
approved Child Restraint Systems.
The laws governing the age or height/
weight restrictions at which seat belts
can be used instead of Child Restraint
System differs among states, so
you should be aware of the specific
requirements in your country, and where
you are travelling.
Child Restraint Systems must be properly
placed and installed in the rear seat.
You must use a commercially available
Child Restraint System that meets the
requirements of the Federal Motor
Vehicle Safety Standards (FMVSS 213).
Child Restraint Systems are generally
designed to be secured in a vehicle seat
by lap belt portion of a lap/shoulder belt,
or by a LATCH system in the rear seats of
the vehicle.
Child Restraint System (CRS)
Infants and younger children must be
restrained in an appropriate rearward-
facing or forward-facing CRS that has
first been properly secured to the seat
of the vehicle. Read and comply with
the instructions for installation and use
provided by the manufacturer of the
Child Restraint System.
WARNING
An improperly secured child restraint
can increase the risk of SERIOUS
INJURY or DEATH in an accident. Always
take the following precautions when
using a Child Restraint System:
• NEVER install a child or infant
restraint in the front passenger's
seat.
• Always properly secure the child
restraint to a rear seat of the vehicle.
• Always follow the child restraint
system manufacturer's instructions
for installation and use.
• Always properly restrain your child in
the child restraint.
• If the vehicle head restraint prevents
proper installation of a child seat
(as described in the child restraint
system manual), the head restraint of
the respective seating position shall
be readjusted or entirely removed.
• Do not use an infant carrier or a
child safety seat that "hooks" over
a seatback, it may not provide
adequate protection in an accident.
• After an accident, have an authorized
HYUNDAI dealer check the child
restraint system, seat belts, tether
anchors and lower anchors.
CHILD RESTRAINT SYSTEM (CRS)
Page 69 of 638
Seats & Safety System
3-38
Installing a Child Restraint
System (CRS)
WARNING
Before installing your Child Restraint
System always:
Read and follow the instructions
provided by the manufacturer of the
Child Restraint System.
Failure to follow all warnings and
instructions could increase the risk of
the SERIOUS INJURY or DEATH if an
accident occurs.
WARNING
If the vehicle head restraint prevents
proper installation of a Child Restraint
System, the head restraint of the
respective seating position shall be
readjusted or entirely removed.
After selecting a proper Child Restraint
System for your child and checking that
the Child Restraint System fits properly
on the seating position, there are three
general steps for a proper installation:
• Properly secure the Child Restraint
System to the vehicle. All Child
Restraint Systems must be secured
to the vehicle with the lap belt or
lap part of a lap/shoulder part of a
lap/shoulder belt or with the LATCH
system. •
Make sure the Child Restraint System
is firmly secured. After installing a
Child Restraint System to the vehicle,
push and pull the seat forward and
from side-to-side to verify that it is
securely attached to the seat. A Child
Restraint System secured with a seat
belt should be installed as firmly as
possible. However, some side-to-side
movement can be expected.
When installing a Child Restraint
System, adjust the vehicle seat and
seatback (up and down, forward
and rearward) so that your child fits
in the Child Restraint System in a
comfortable manner.
• Secure the child in the Child
Restraint System. Make sure the
child is properly strapped in the Child
Restraint System according to the
Child Restraint System manufacturer’s
instructions.
CAUTION
A Child Restraint System in a closed
vehicle can become very hot. To prevent
burns, check the seating surface and
buckles before placing your child in the
Child Restraint System.
Page 136 of 638

Instrument cluster
4-38
4. Door
ItemsExplanation
Automatically
Lock
• Enable on Shift : All doors will be automatically locked if the shift button
is shifted from the P (Park) position to the R (Reverse), N (Neutral), or D
(Drive) position. (only when the engine is running.)
• Enable on Speed : All doors will be automatically locked when the vehicle
speed exceeds 9.3mph (15km/h).
• Off : The auto door lock operation will be deactivated.
Automatically Unlock
• On Shift to P: All doors will be automatically unlocked if the shift button is
shifted to the P (Park) position. (only when the engine is running.)
• On key out/On vehicle off : All doors will be automatically unlocked when
the ignition key is removed from the ignition switch or the Engine Start/
Stop button is set to the OFF position.
• Off : The auto door unlock operation will be canceled.
Power
LiftgateIf this item is checked, the power liftgate function will be activated.
For more details, refer to "Power liftgate" in chapter 5.
Power
Liftgate
Opening SpeedTo adjust the power liftgate speed.• Fast/Normal
For more details, refer to "Power liftgate" in chapter 5.
Smart
LiftgateTo activate or deactivate the smart liftgate.
For more details, refer to "Smart liftgate" in chapter 5.
5. Convenience
Items Explanation
Seat Easy
Access
• Off : The seat easy access function is deactivated.
• Normal/Extended : When you turn off the engine, the driver's seat will
automatically move rearward short (Normal) or long (Extended) for you to
enter or exit the vehicle more comfortably.
For more details, refer to "Driver Position Memory System" in chapter 5.
Rear
Occupant AlertTo activate or deactivate the Rear Occupant Alert.
For more details, refer to "Rear Occupant Alert (ROA) system" in chapter
5.
Welcome
Mirror/Light
• On door unlock : The side view mirrors are unfolded and the welcome
light turns on automatically when the doors are unlocked.
• On driver approach : The side view mirrors are unfolded and the welcome
light turns on automatically when the vehicle is approached with the
smart key.
For more details, refer to ''Welcome System'' in chapter 5."
Page 620 of 638
Maintenance
9-70
-Oil
Remove oil instantly with
absorbable cloth and wipe with
stain remover used only for natural
leather.
-Chewing gum
Harden the gum with ice and
remove gradually.
• Handling prime napa leather (if
equipped)
Try to avoid excessive sunlight and
heat exposure. Excessive sunlight
and heat exposure naturally fades
and dries out napa leather, causing
wrinkles and discoloration. If the napa
leather is wet with liquid, immediately
clean it with lint-free cloth to minimize
damage. Do not scratch the napa
leather surface with a sharp object.
If your napa leather seat is bright
colored, it may be contaminated or
stained from dyed materials such as
jeans.
Interior wooden trim
• Use a wooden furniture protector (e.g.
wax, coating compound) to clean the
interior wooden trim.
• Often wipe the interior wooden
trim with a lint-free, clean cloth to
maintain the unique wooden textures
for a longer period of time.
• If you spill beverage (e.g. water,
coffee) over the interior wooden trim,
immediately wipe it with clean, dry
cloth.
• Sharp objects (e.g. driver, knife),
adhesive materials, or tapes may
damage the interior wooden trim.
• Any strong impacts may damage the
interior wooden trim.
• If the coating finish over the interior
wooden trim is removed, moisture
may damage or change wood traits.
• If the interior wooden trim is
damaged, you may get a splinter
from the wood surface. Therefore,
you should immediately have the
damaged interior wooden trim
replaced by an authorized HYUNDAI
dealer.
Cleaning the seat belt webbing
Clean the belt webbing with any
mild soap solution recommended for
cleaning upholstery or carpet. Follow
the instructions provided with the soap.
Do not bleach or re-dye the webbing
because this may weaken the seat belt.
Cleaning the interior window glass
If the interior glass surfaces of the
vehicle become fogged (that is, covered
with an oily, greasy or waxy film), they
should be cleaned with glass cleaner.
Follow the directions on the glass cleaner
container.
NOTICE
Do not scrape or scratch the inside of
the rear window. This may result in
damage to the rear window defroster
grid.