2023 HYUNDAI TUCSON ECU
[x] Cancel search: ECUPage 270 of 638
Convenient features
5-126
Sunvisor
OTM048089
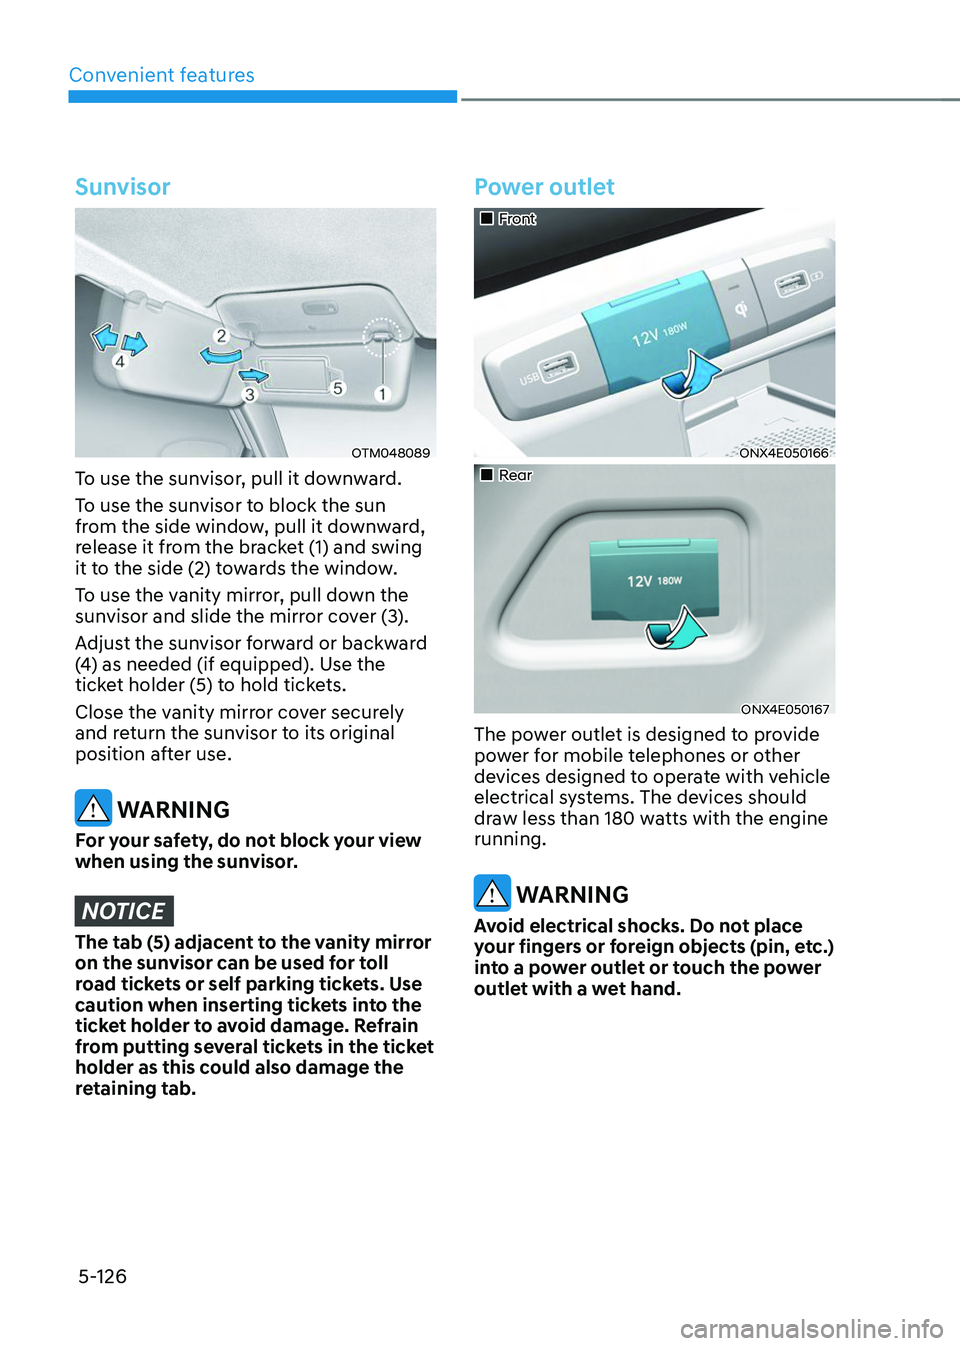
To use the sunvisor, pull it downward.
To use the sunvisor to block the sun
from the side window, pull it downward,
release it from the bracket (1) and swing
it to the side (2) towards the window.
To use the vanity mirror, pull down the
sunvisor and slide the mirror cover (3).
Adjust the sunvisor forward or backward
(4) as needed (if equipped). Use the
ticket holder (5) to hold tickets.
Close the vanity mirror cover securely
and return the sunvisor to its original
position after use.
WARNING
For your safety, do not block your view
when using the sunvisor.
NOTICE
The tab (5) adjacent to the vanity mirror
on the sunvisor can be used for toll
road tickets or self parking tickets. Use
caution when inserting tickets into the
ticket holder to avoid damage. Refrain
from putting several tickets in the ticket
holder as this could also damage the
retaining tab.
Power outlet
„„Front
ONX4E050166
„„Rear
ONX4E050167
The power outlet is designed to provide
power for mobile telephones or other
devices designed to operate with vehicle
electrical systems. The devices should
draw less than 180 watts with the engine
running.
WARNING
Avoid electrical shocks. Do not place
your fingers or foreign objects (pin, etc.)
into a power outlet or touch the power
outlet with a wet hand.
Page 275 of 638

05
5-131
Coat hook
OTM048095
These hooks are not designed to hold
large or heavy items.
WARNING
OTM048096
Do not hang other objects such
as hangers or hard objects except
clothes. Also, do not put heavy, sharp
or breakable objects in the clothes
pockets. In an accident or when the
curtain air bag is inflated, it may cause
vehicle damage or personal injury.
Floor mat anchor(s)
ALWAYS use the Floor Mat Anchors to
attach the front floor mats to the vehicle.
The anchors on the front floor carpet
keep the floor mats from sliding forward.
WARNING
Do not overlay additional mats or liners
over the floor mats. If using All Weather
mats, remove the carpeted floor mats
before installing them. Only use floor
mats designed to connect to the
anchors.
WARNING
The following must be observed when
installing ANY floor mat to the vehicle.
• Ensure to remove a protective
film attached on the carpet
before attaching a floor mat on
the front floor carpet. Otherwise,
the floor mat may move freely on
the protective film and it could
result in unintentional braking or
accelerating.
• Ensure that the floor mats are
securely attached to the vehicle’s
floor mat anchor(s) before driving
the vehicle.
• Do not use ANY floor mat that cannot
be firmly attached to the vehicle’s
floor mat anchors.
• Do not stack floor mats on top of one
another (e.g. all-weather rubber mat
on top of a carpeted floor mat). Only
a single floor mat should be installed
in each position.
IMPORTANT - Your vehicle was
manufactured with driver’s side floor
mat anchors that are designed to
securely hold the floor mat in place.
To avoid any interference with pedal
operation, HYUNDAI recommends that
the HYUNDAI floor mat designed for use
in your vehicle be installed.
Page 276 of 638

Convenient features
5-132
Luggage net holder (if equipped)
ONX4E050080
To keep items from shifting in the
luggage compartment, you can use the 4
holders located in the luggage side trim
to attach the luggage net.
Make sure the luggage net is securely
attached to the holders in the luggage
board.
If necessary, we recommend that you
contact your authorized HYUNDAI dealer
to obtain a luggage net.
WARNING
Avoid eye injury. DO NOT overstretch
the luggage net. ALWAYS keep your
face and body out of the luggage net’s
recoil path. DO NOT use the luggage net
when the strap has visible signs of wear
or damage.
Use the luggage net to keep only light
items from shifting in the luggage
compartment.
Cargo security screen (if
equipped)
ONX4E050170
Use the cargo security screen to cover
items stored in the cargo area.
Page 277 of 638
05
5-133
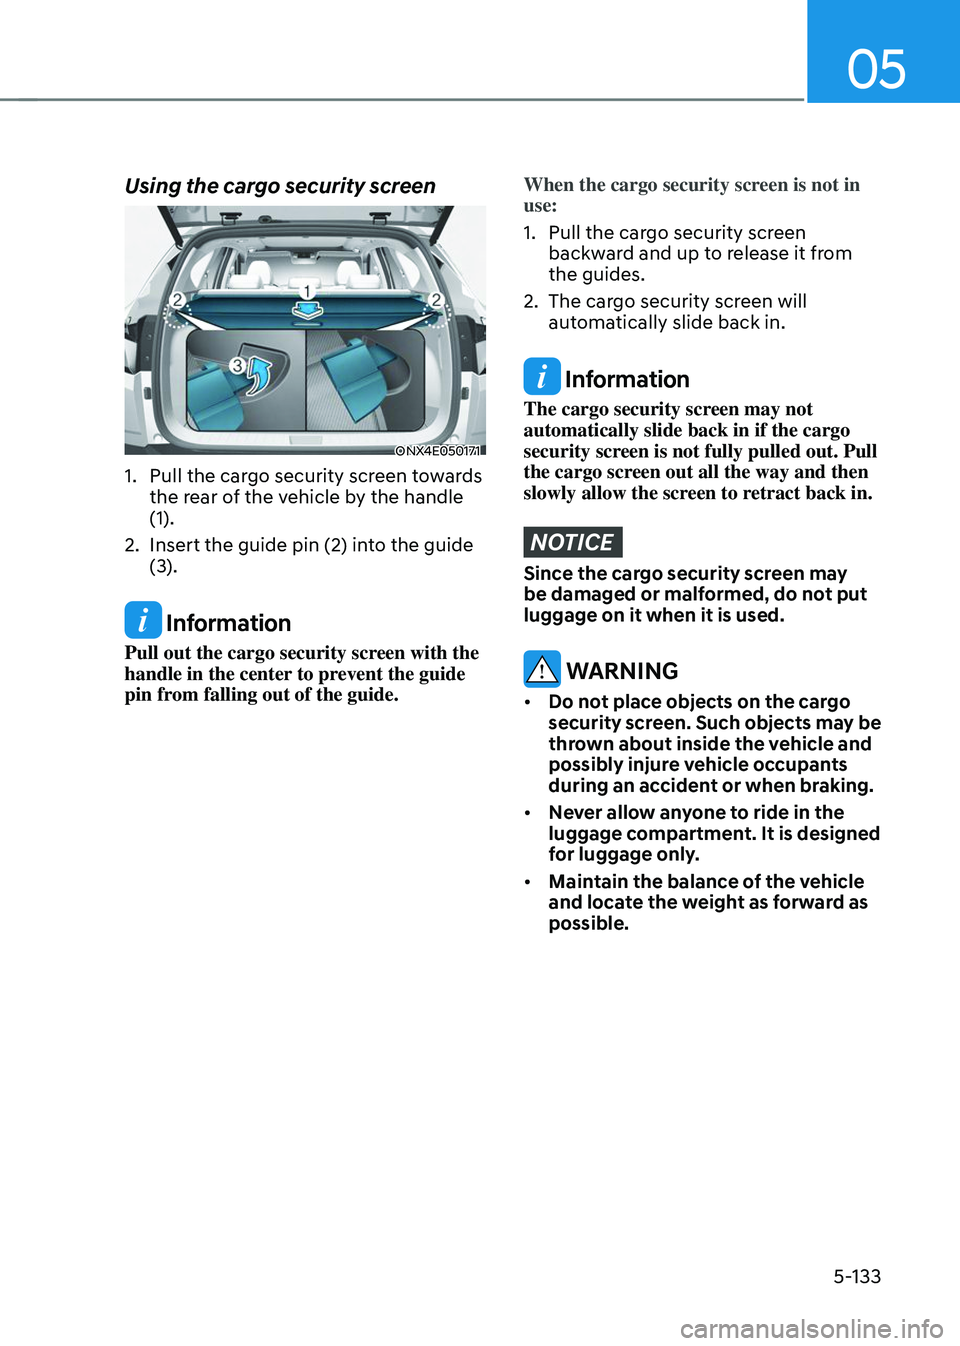
Using the cargo security screen
ONX4E050171
1. Pull the cargo security screen towards
the rear of the vehicle by the handle
(1).
2. Insert the guide pin (2) into the guide
(3).
Information
Pull out the cargo security screen with the
handle in the center to prevent the guide
pin from falling out of the guide.
When the cargo security screen is not in
use:
1. Pull the cargo security screen
backward and up to release it from
the guides.
2. The cargo security screen will
automatically slide back in.
Information
The cargo security screen may not
automatically slide back in if the cargo
security screen is not fully pulled out. Pull
the cargo screen out all the way and then
slowly allow the screen to retract back in.
NOTICE
Since the cargo security screen may
be damaged or malformed, do not put
luggage on it when it is used.
WARNING
• Do not place objects on the cargo
security screen. Such objects may be
thrown about inside the vehicle and
possibly injure vehicle occupants
during an accident or when braking.
• Never allow anyone to ride in the
luggage compartment. It is designed
for luggage only.
• Maintain the balance of the vehicle
and locate the weight as forward as
possible.
Page 278 of 638
Convenient features
5-134
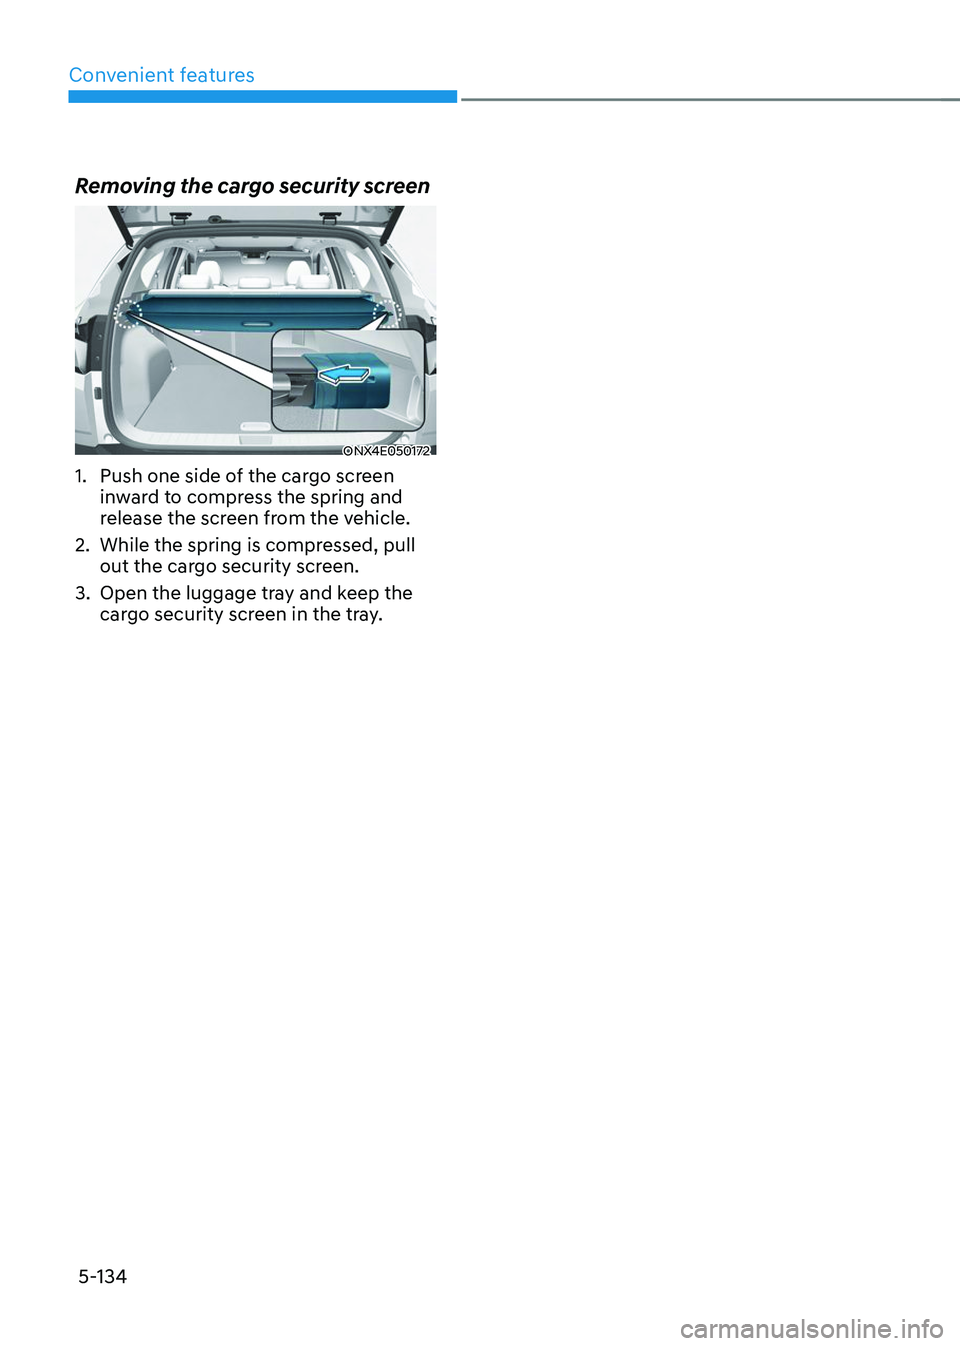
Removing the cargo security screen
ONX4E050172
1. Push one side of the cargo screen
inward to compress the spring and
release the screen from the vehicle.
2. While the spring is compressed, pull
out the cargo security screen.
3. Open the luggage tray and keep the
cargo security screen in the tray.
Page 279 of 638
05
5-135
EXTERIOR FEATURES
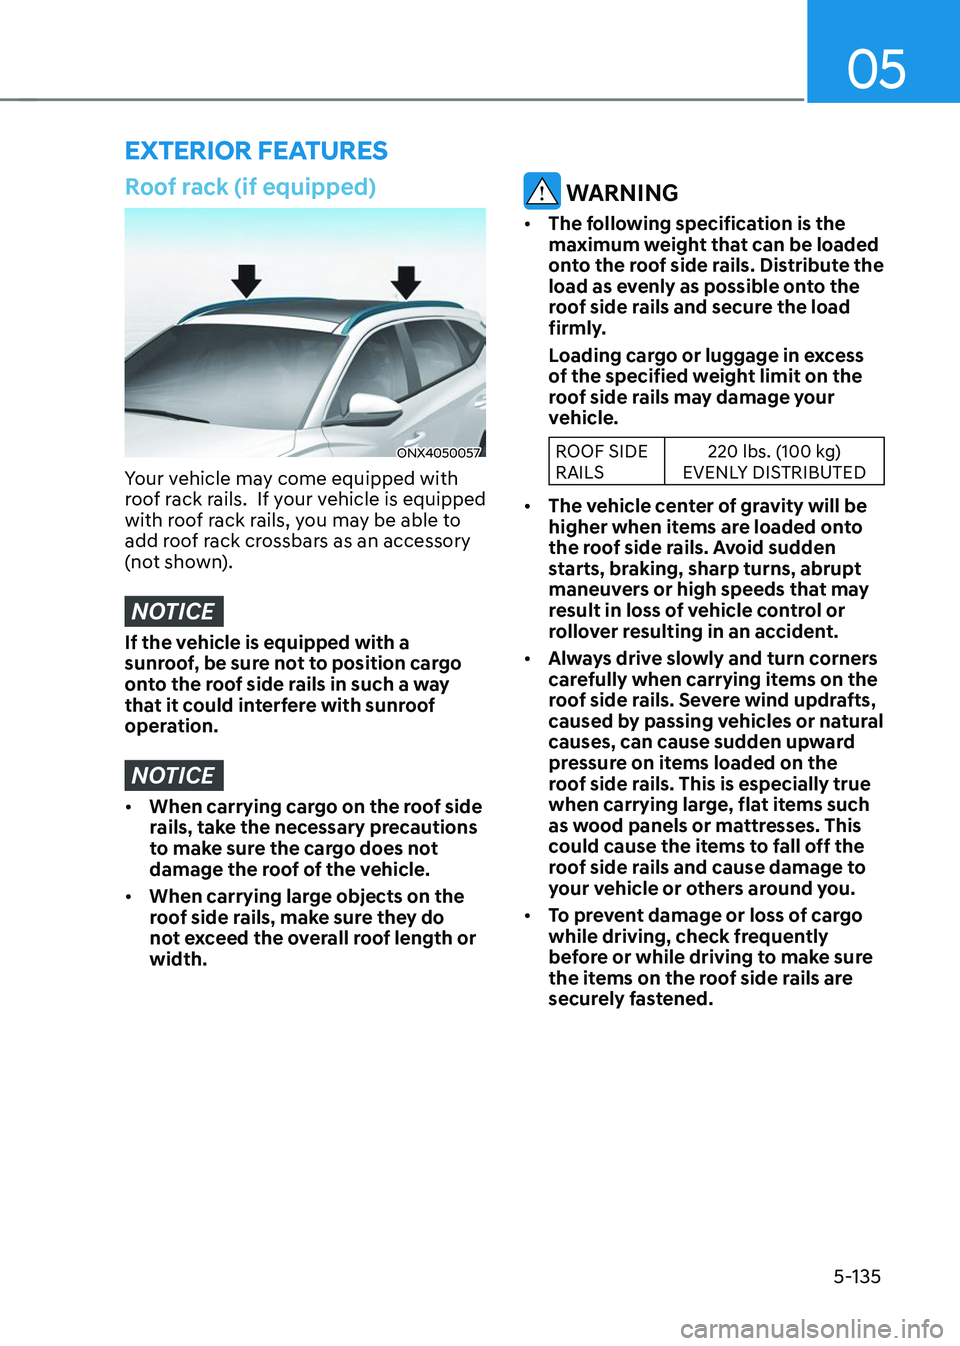
Roof rack (if equipped)
ONX4050057
Your vehicle may come equipped with
roof rack rails. If your vehicle is equipped
with roof rack rails, you may be able to
add roof rack crossbars as an accessory
(not shown).
NOTICE
If the vehicle is equipped with a
sunroof, be sure not to position cargo
onto the roof side rails in such a way
that it could interfere with sunroof
operation.
NOTICE
• When carrying cargo on the roof side
rails, take the necessary precautions
to make sure the cargo does not
damage the roof of the vehicle.
• When carrying large objects on the
roof side rails, make sure they do
not exceed the overall roof length or
width.
WARNING
• The following specification is the
maximum weight that can be loaded
onto the roof side rails. Distribute the
load as evenly as possible onto the
roof side rails and secure the load
firmly.
Loading cargo or luggage in excess
of the specified weight limit on the
roof side rails may damage your
vehicle.
ROOF SIDE
RAILS 220 lbs. (100 kg)
EVENLY DISTRIBUTED
• The vehicle center of gravity will be
higher when items are loaded onto
the roof side rails. Avoid sudden
starts, braking, sharp turns, abrupt
maneuvers or high speeds that may
result in loss of vehicle control or
rollover resulting in an accident.
• Always drive slowly and turn corners
carefully when carrying items on the
roof side rails. Severe wind updrafts,
caused by passing vehicles or natural
causes, can cause sudden upward
pressure on items loaded on the
roof side rails. This is especially true
when carrying large, flat items such
as wood panels or mattresses. This
could cause the items to fall off the
roof side rails and cause damage to
your vehicle or others around you.
• To prevent damage or loss of cargo
while driving, check frequently
before or while driving to make sure
the items on the roof side rails are
securely fastened.
Page 289 of 638
Driving your vehicle
6-4
Before entering the vehicle
• Be sure all windows, outside mirror(s),
and outside lights are clean and
unobstructed.
• Remove frost, snow, or ice.
• Visually check the tires for uneven
wear and damage.
• Check under the vehicle for any sign
of leaks.
• Be sure there are no obstacles behind
you if you intend to back up.
Before starting
• Make sure the hood, the liftgate, and
the doors are securely closed and
locked.
• Adjust the position of the seat and
steering wheel.
• Adjust the inside and side view
mirrors.
• Verify all the lights work.
• Fasten your seat belt. Check that all
passengers have fastened their seat
belts.
• Check the gauges and indicators
in the instrument panel and the
messages on the instrument display
when the ignition switch is in the ON
position.
• Check that any items you are carrying
are stored properly or fastened down
securely.
WARNING
To reduce the risk of SERIOUS INJURY or
DEATH, take the following precautions:
• ALWAYS wear your seat belt. All
passengers must be properly belted
whenever the vehicle is moving.
For more information, refer to “Seat
Belts” section in chapter 3.
• Always drive defensively. Assume
other drivers or pedestrians may be
careless and make mistakes.
• Stay focused on the task of driving.
Driver distraction can cause
accidents.
• Leave plenty of space between you
and the vehicle in front of you.
WARNING
NEVER drink or take drugs and drive.
Drinking or taking drugs and driving
is dangerous and may result in an
accident and SERIOUS INJURY or
DEATH.
Drunk driving is the number one
contributor to the highway death
toll each year. Even a small amount
of alcohol will affect your reflexes,
perceptions and judgment. Just
one drink can reduce your ability to
respond to changing conditions and
emergencies and your reaction time
gets worse with each additional drink.
Driving while under the influence
of drugs is as dangerous or more
dangerous than driving under the
influence of alcohol.
You are much more likely to have a
serious accident if you drink or take
drugs and drive. If you are drinking or
taking drugs, don’t drive. Do not ride
with a driver who has been drinking
or taking drugs. Choose a designated
driver or call a taxi.
BEFORE DRIVING
Page 304 of 638
06
6-19
Information
• Only the eight forward gears can be
selected. To reverse or park the vehicle,
move the shift lever to the R (Reverse)
or P (Park) position as required.
• Downshifts are made automatically
when the vehicle slows down. When the
vehicle stops, 1st gear is automatically
selected.
• When the engine RPM approaches the
red zone the transmission will upshift
automatically.
•
If the driver presses the lever to + (Up) or - (Down) position, the transmission may not make the requested gear
change if the next gear is outside of
the allowable engine RPM range.
The driver must execute upshifts in
accordance with road conditions,
taking care to keep the engine RPMs
below the red zone.
• When driving on a slippery road, push
the shift lever forward into the + (Up) position. This causes the transmission
to shift into the 2nd gear which is better
for smooth driving on a slippery road.
Push the shift lever to the - (Down) side to shift back to the 1st gear.
Shift-lock release (lever type)
If the shift lever cannot be moved from
the P (Park) position into R (Reverse)
position with the brake pedal depressed,
continue depressing the brake, and then
do the following:
ONX4E060037
1. Place the ignition switch in the LOCK/
OFF position.
2. Apply the parking brake.
3. Carefully remove the shift lever boots.
4. Move the Shift lever while holding
the release button (1) with a tool (e.g.
flathead screw-driver).
If you need to use the shift-lock release,
we recommend that the system be
inspected by an authorized HYUNDAI
dealer immediately.