2023 HYUNDAI TUCSON ignition
[x] Cancel search: ignitionPage 186 of 638
Convenient features
5-42
• Auto Comfort Control for Driver (if
equipped)
The Automatic Comfort Control
feature can control the steering
wheel heater operation according
to the ambient temperature and
the set climate control temperature
while the engine is running.
If the heated steering wheel switch
is pressed while the Automatic
Comfort Control feature is
operating, then the heated steering
wheel operation will be controlled
manually.
The Auto Comfort Control feature
is enabled from the Vehicle
Settings menu on the navigation
infotainment screen.
-The heated steering wheel defaults
to the OFF position whenever the
ignition switch is ON. However, if
the Auto Comfort Control function
is ON, the heated steering wheel
will turn on and off depending on
the ambient temperature and the
set climate control temperature.
For more details, we recommend that
you contact an authorized HYUNDAI
dealer.
Information
The heated steering wheel will turn off
automatically approximately 30 minutes
after the heated steering wheel is turned
on.
NOTICE
Do not install any cover or accessory
on the steering wheel. This cover or
accessory could cause damage to the
heated steering wheel system.
Horn
OCN7050016
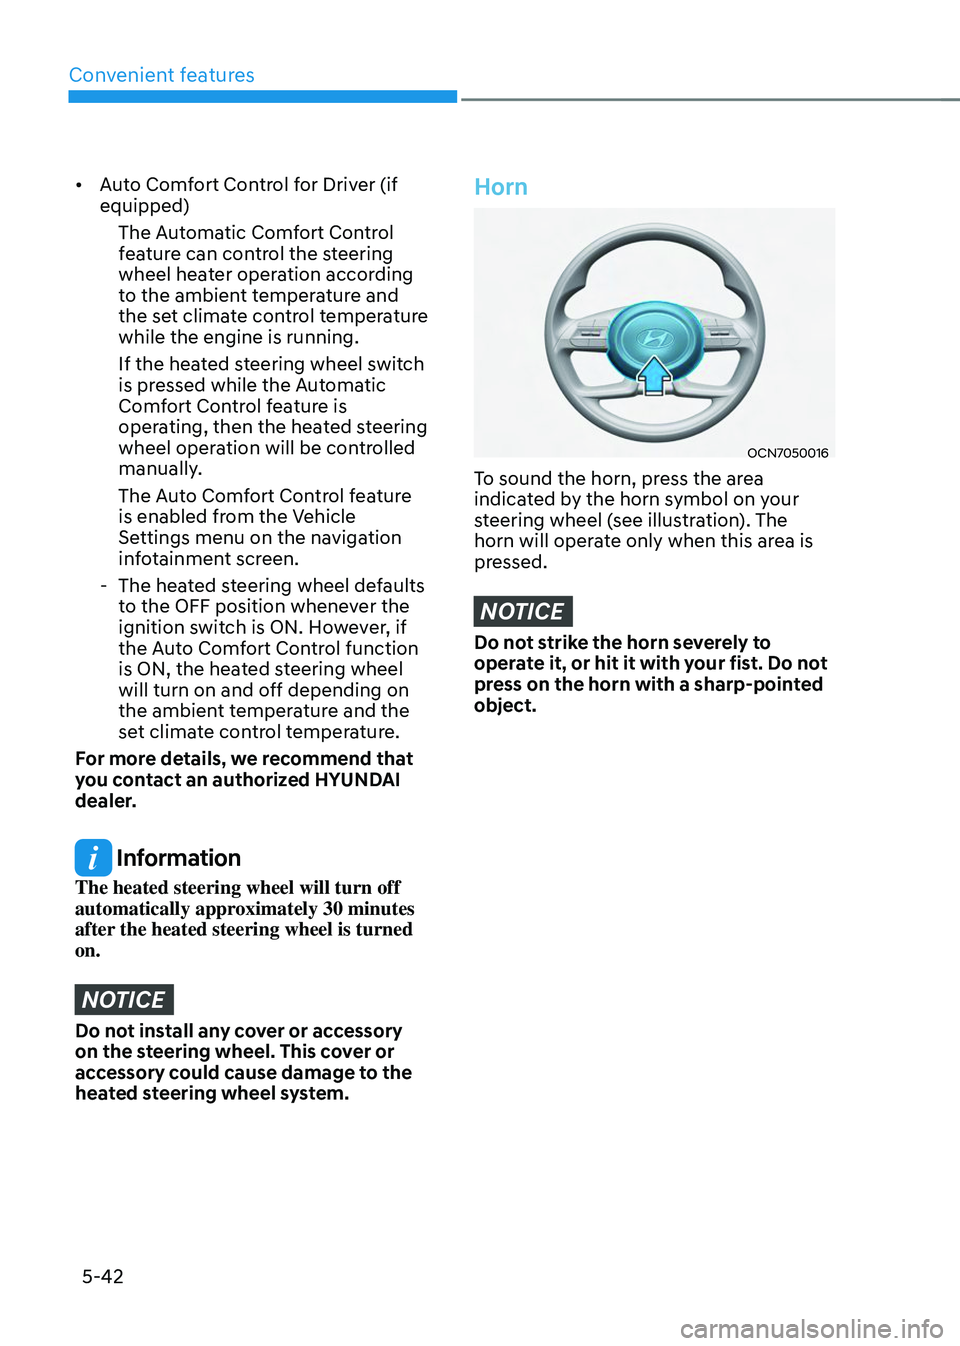
To sound the horn, press the area
indicated by the horn symbol on your
steering wheel (see illustration). The
horn will operate only when this area is
pressed.
NOTICE
Do not strike the horn severely to
operate it, or hit it with your fist. Do not
press on the horn with a sharp-pointed
object.
Page 189 of 638
05
5-45
Integrated HomeLink® Wireless Control
System
The HomeLink® Wireless Control System
provides a convenient way to replace
up to three hand held radio-frequency
transmitters used to activate compatible
devices such as gate operators, garage
door openers, entry door locks, security
systems, and home lighting.
NOTICE
HomeLink® operates while the ignition
switch is in the ACC or ON position
for safety reasons. It is to prevent
unintentional security problems from
happening when the vehicle is parked
outside the garage.
WARNING
Before programming HomeLink® to a
garage door opener or gate operator,
make sure people and objects are out
of the way of the device to prevent
potential harm or damage. Do not
use the HomeLink® with any garage
door opener that lacks the safety
stop and reverse features required
by U.S. federal safety standards (this
includes any garage door opener model
manufactured before April 1, 1982).
A garage door that cannot detect an
object - signaling the door to stop and
reverse - does not meet current U.S.
federal safety standards. Using a garage
door opener without these features
increases the risk of serious injury or
death.
For more information, contact
HomeLink® at www.homelink.com, or
call Home-Link customer support at
1-800-355-3515.
It is also recommended that a new
battery be replaced in the handheld
transmitter of the device being trained
to HomeLink® for quicker training and
accurate transmission of the radio
frequency. 1. Programming HomeLink
®
The following steps show how to
program HomeLink. If you have any
questions or are having difficulty
programming your HomeLink buttons,
refer to the HomeLink website or call the
HomeLink customer support toll-free
number. Do this before going back to the
dealer who sold you the car.
•
Visit the HomeLink website at: www.
homelink.com. Then at the top of the
page, choose your vehicle make. Then
watch the You Tube video, and/or
access additional website information.
• If you choose to access the website
via your cell phone, scan the QR code.
• Or call HomeLink customer support
at 1-800-355-3515 (Please have the
vehicle make/model and the opener
device make/model readily available.)
Page 190 of 638
Convenient features
5-46
1) Programming Preparation
ODN8H050340N
1. When programming a garage door
opener, it is advised to park the
vehicle outside of the garage.
2. It is recommended that a new battery
be placed in the handheld transmitter
of the device being programmed to
HomeLink for quicker training and
accurate transmission of the radio-
frequency signal.
3. Place the ignition switch to the ACC
(Accessory) position for programming
of HomeLink.
2) Programming a New HomeLink®
ODN8H050136N
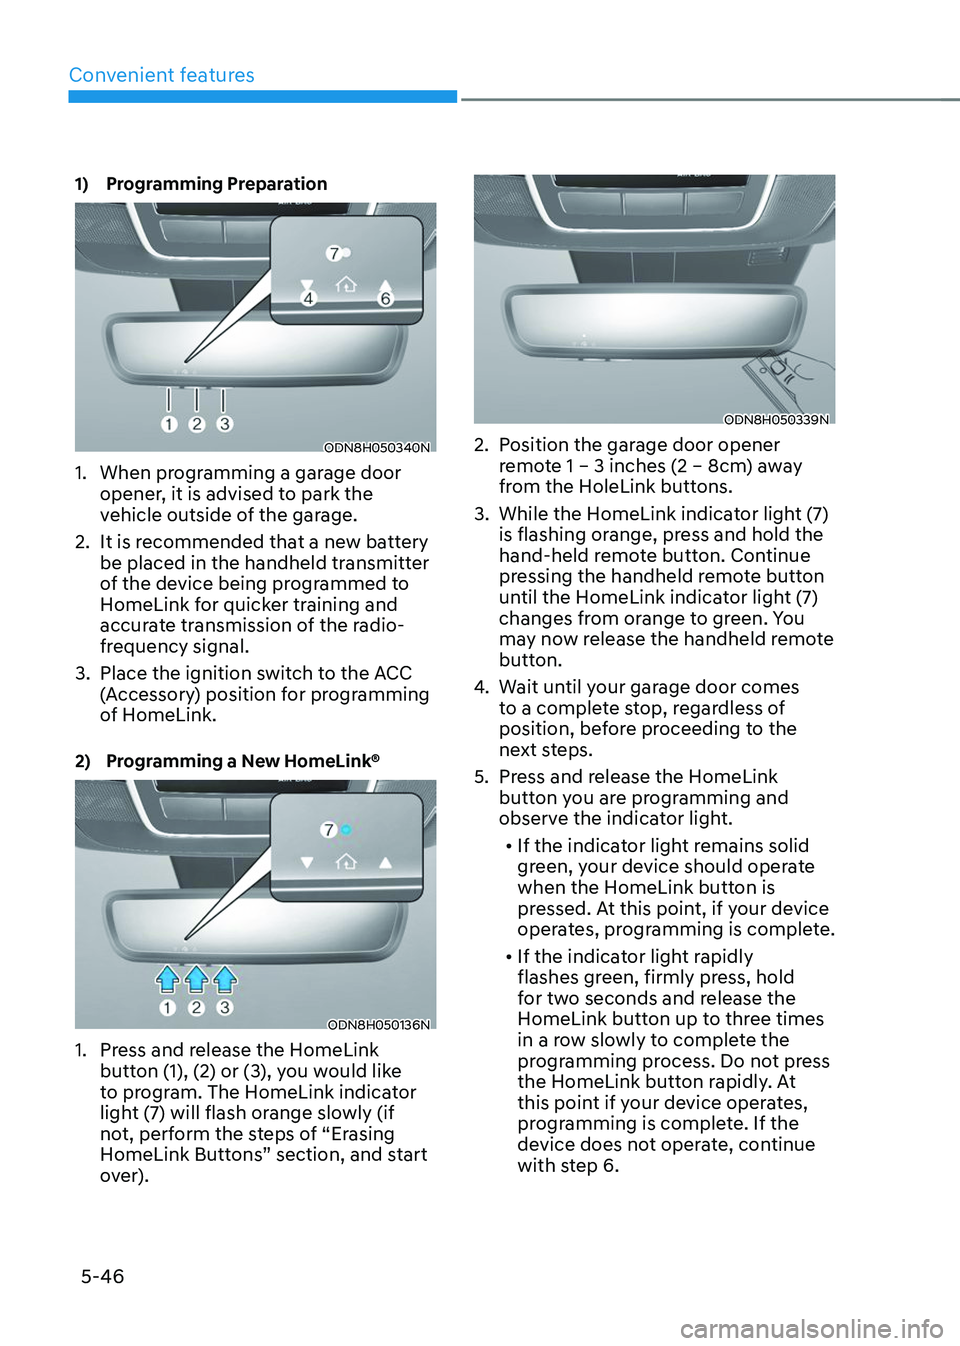
1. Press and release the HomeLink
button (1), (2) or (3), you would like
to program. The HomeLink indicator
light (7) will flash orange slowly (if
not, perform the steps of “Erasing
HomeLink Buttons” section, and start
over).
ODN8H050339N
2. Position the garage door opener
remote 1 – 3 inches (2 – 8cm) away
from the HoleLink buttons.
3. While the HomeLink indicator light (7)
is flashing orange, press and hold the
hand-held remote button. Continue
pressing the handheld remote button
until the HomeLink indicator light (7)
changes from orange to green. You
may now release the handheld remote
button.
4. Wait until your garage door comes
to a complete stop, regardless of
position, before proceeding to the
next steps.
5. Press and release the HomeLink
button you are programming and
observe the indicator light.• If the indicator light remains solid
green, your device should operate
when the HomeLink button is
pressed. At this point, if your device
operates, programming is complete.
• If the indicator light rapidly
flashes green, firmly press, hold
for two seconds and release the
HomeLink button up to three times
in a row slowly to complete the
programming process. Do not press
the HomeLink button rapidly. At
this point if your device operates,
programming is complete. If the
device does not operate, continue
with step 6.
Page 200 of 638
Convenient features
5-56
Power windows
The ignition switch must be in the ON
position to be able to raise or lower
the windows. Each door has a Power
Window switch to control that door’s
window. The driver has a Power Window
Lock switch which can block the
operation of passenger windows. The
power windows will operate for about
3 minutes after the ignition is turned
OFF or if the ignition is placed in the
ACC position, as long as the front doors
remain closed.
If the front doors are opened, battery
power is turned OFF and the Power
Windows will not operate.
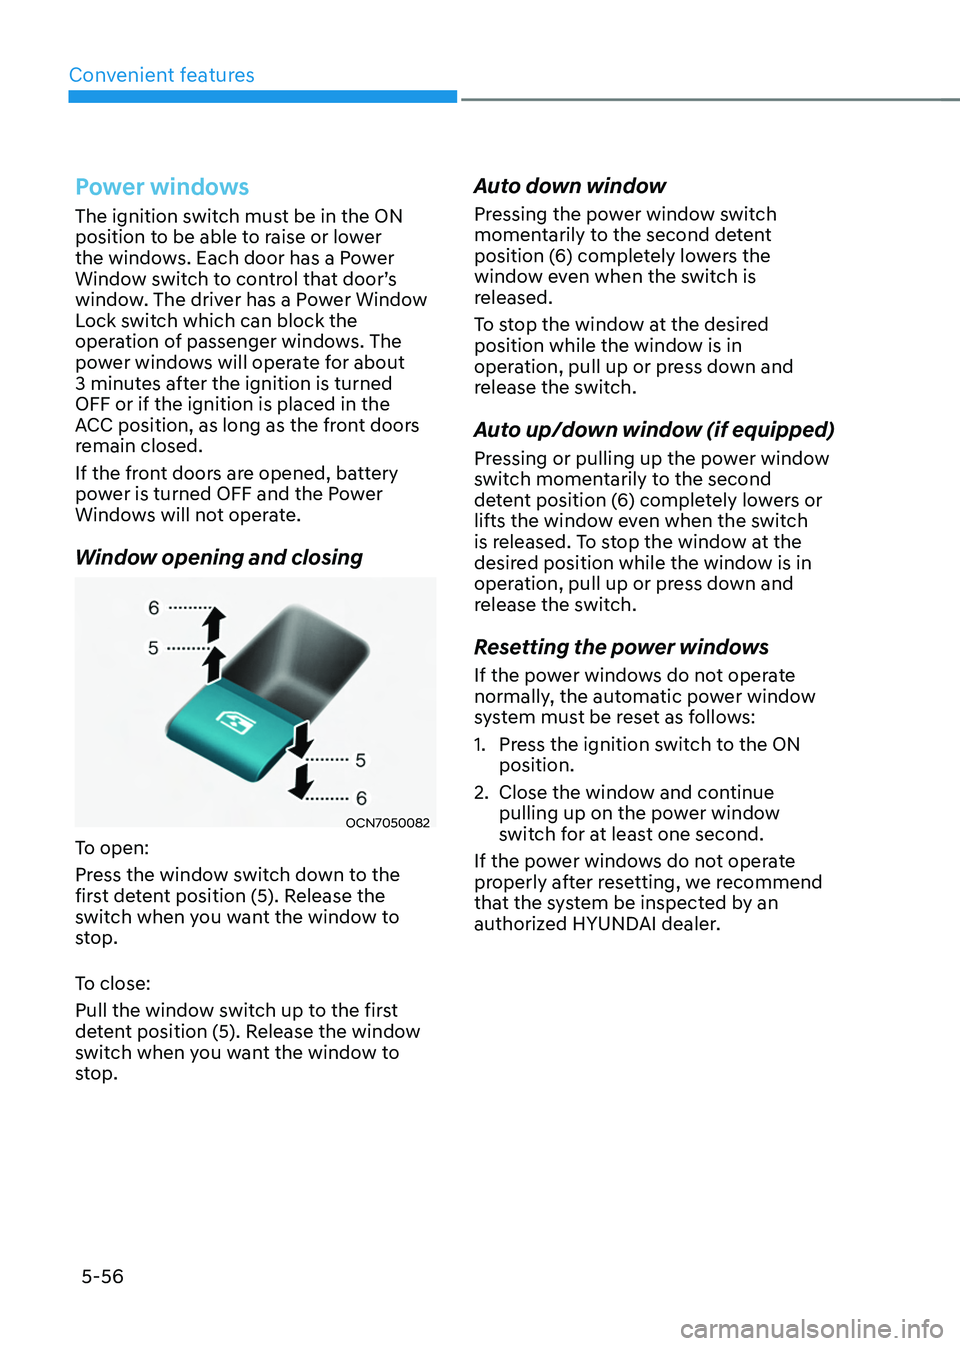
Window opening and closing
OCN7050082
To open:
Press the window switch down to the
first detent position (5). Release the
switch when you want the window to
stop.
To close:
Pull the window switch up to the first
detent position (5). Release the window
switch when you want the window to
stop.
Auto down window
Pressing the power window switch
momentarily to the second detent
position (6) completely lowers the
window even when the switch is
released.
To stop the window at the desired
position while the window is in
operation, pull up or press down and
release the switch.
Auto up/down window (if equipped)
Pressing or pulling up the power window
switch momentarily to the second
detent position (6) completely lowers or
lifts the window even when the switch
is released. To stop the window at the
desired position while the window is in
operation, pull up or press down and
release the switch.
Resetting the power windows
If the power windows do not operate
normally, the automatic power window
system must be reset as follows:
1. Press the ignition switch to the ON
position.
2. Close the window and continue
pulling up on the power window
switch for at least one second.
If the power windows do not operate
properly after resetting, we recommend
that the system be inspected by an
authorized HYUNDAI dealer.
Page 204 of 638
Convenient features
5-60
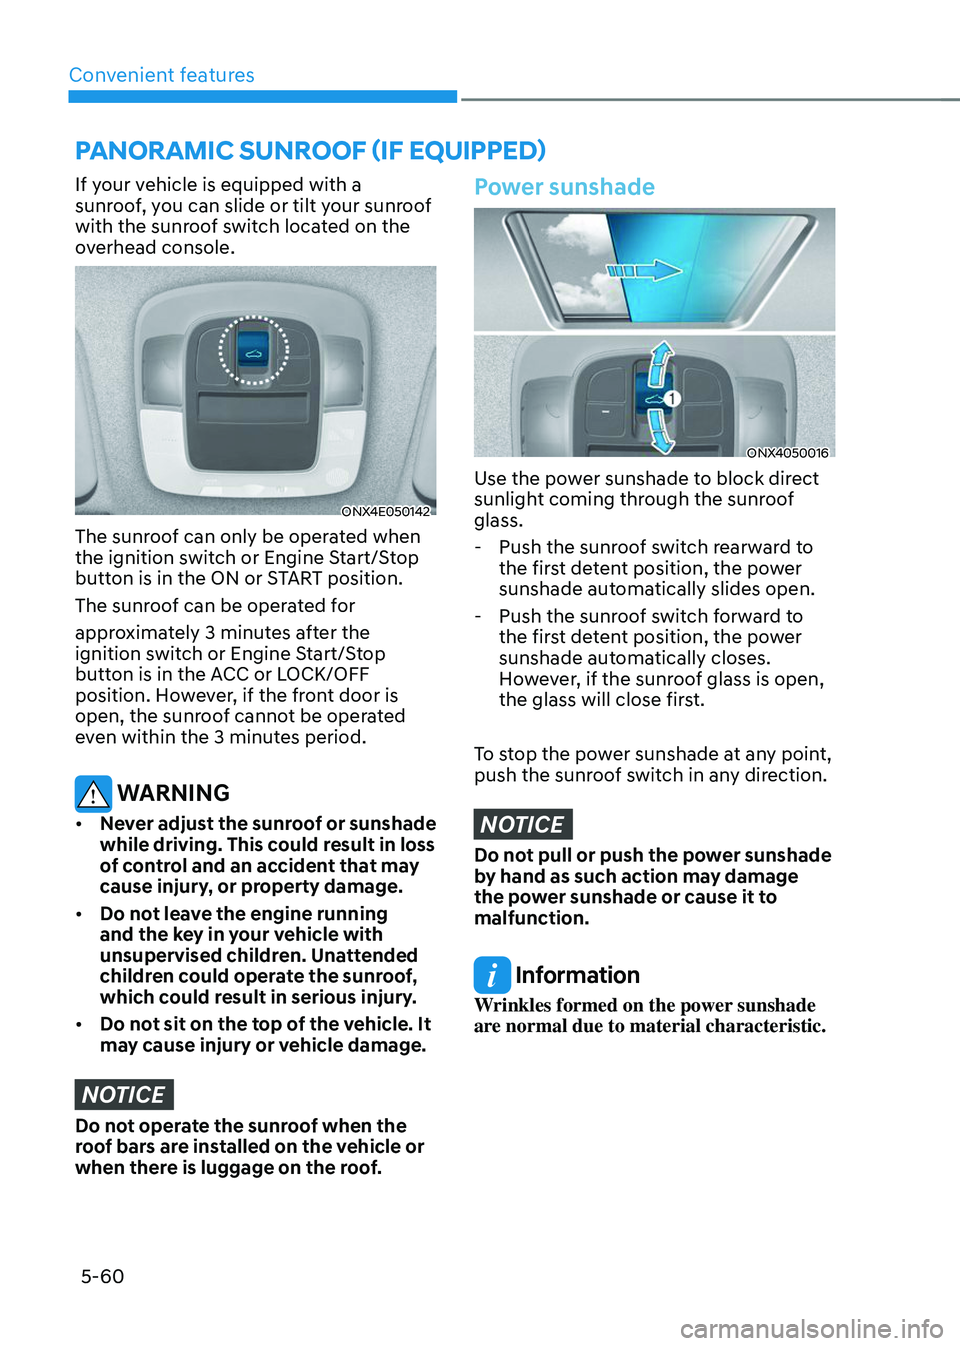
If your vehicle is equipped with a
sunroof, you can slide or tilt your sunroof
with the sunroof switch located on the
overhead console.
ONX4E050142
The sunroof can only be operated when
the ignition switch or Engine Start/Stop
button is in the ON or START position.
The sunroof can be operated for
approximately 3 minutes after the
ignition switch or Engine Start/Stop
button is in the ACC or LOCK/OFF
position. However, if the front door is
open, the sunroof cannot be operated
even within the 3 minutes period.
WARNING
• Never adjust the sunroof or sunshade
while driving. This could result in loss
of control and an accident that may
cause injury, or property damage.
• Do not leave the engine running
and the key in your vehicle with
unsupervised children. Unattended
children could operate the sunroof,
which could result in serious injury.
• Do not sit on the top of the vehicle. It
may cause injury or vehicle damage.
NOTICE
Do not operate the sunroof when the
roof bars are installed on the vehicle or
when there is luggage on the roof.
Power sunshade
ONX4050016
Use the power sunshade to block direct
sunlight coming through the sunroof
glass.
-Push the sunroof switch rearward to
the first detent position, the power
sunshade automatically slides open.
-Push the sunroof switch forward to
the first detent position, the power
sunshade automatically closes.
However, if the sunroof glass is open,
the glass will close first.
To stop the power sunshade at any point,
push the sunroof switch in any direction.
NOTICE
Do not pull or push the power sunshade
by hand as such action may damage
the power sunshade or cause it to
malfunction.
Information
Wrinkles formed on the power sunshade
are normal due to material characteristic.
PANORAMIC SUNROOF (IF EQUIPPED)
Page 224 of 638
Convenient features
5-80
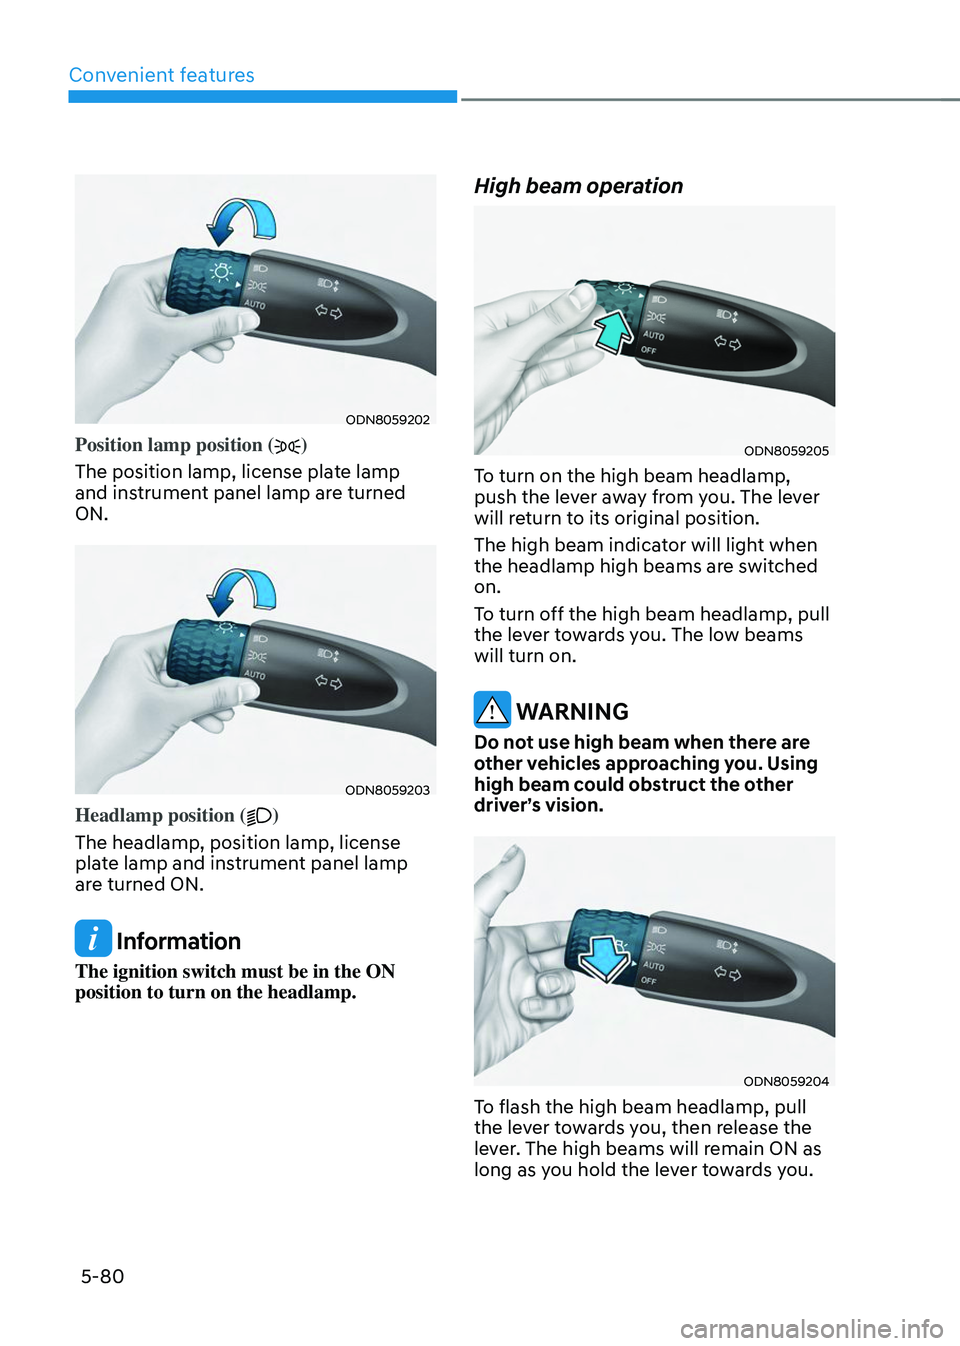
ODN8059202
Position lamp position ()
The position lamp, license plate lamp
and instrument panel lamp are turned
ON.
ODN8059203
Headlamp position ()
The headlamp, position lamp, license
plate lamp and instrument panel lamp
are turned ON.
Information
The ignition switch must be in the ON
position to turn on the headlamp.
High beam operation
ODN8059205
To turn on the high beam headlamp,
push the lever away from you. The lever
will return to its original position.
The high beam indicator will light when
the headlamp high beams are switched
on.
To turn off the high beam headlamp, pull
the lever towards you. The low beams
will turn on.
WARNING
Do not use high beam when there are
other vehicles approaching you. Using
high beam could obstruct the other
driver’s vision.
ODN8059204
To flash the high beam headlamp, pull
the lever towards you, then release the
lever. The high beams will remain ON as
long as you hold the lever towards you.
Page 226 of 638
Convenient features
5-82
Headlamp delay function
If you place the ignition switch to the
ACC position or the OFF position with
the headlamps ON, the headlamps (and/
or position lamps) remain on for about
5 minutes. However, if the driver’s door
is opened and closed, the headlamps
are turned off after 15 seconds. Also,
with the vehicle off if the driver’s door is
opened and closed, the headlamps (and/
or position lamps) are turned off after 15
seconds.
The headlamps (and/or position lamps)
can be turned off by pressing the lock
button on the remote key or smart key
twice or turning the headlamp switch to
the OFF or AUTO position.
You can enable the headlamp delay
function by selecting ‘Setup → User Settings → Lights → Headlight Delay.
NOTICE
If the driver exits the vehicle through
another door besides the driver
door, the battery saver function
does not operate and the headlamp
delay function does not turn OFF
automatically.
This may cause the battery to
discharge. To avoid battery discharge,
turn OFF the headlamps manually from
the headlamp switch before exiting the
vehicle.
Page 230 of 638
Convenient features5-86
INTERIOR LIGHTS
WARNING
Do not use the interior lights when
driving in the dark. The interior lights
may obscure your view and cause an
accident.
NOTICE
Do not use the interior lights for
extended periods when the vehicle is
turned off or the battery will discharge.
Interior Lamp AUTO OFF
The interior lamps will automatically go
off approximately 10 minutes after the
vehicle is turned off and the doors are
closed. If a door is opened, the lamp
will go off 40 minutes after the vehicle
is turned off. If the doors are locked by
the smart key and the vehicle enters the
armed stage of the theft alarm system,
the lamps will go off five seconds later.
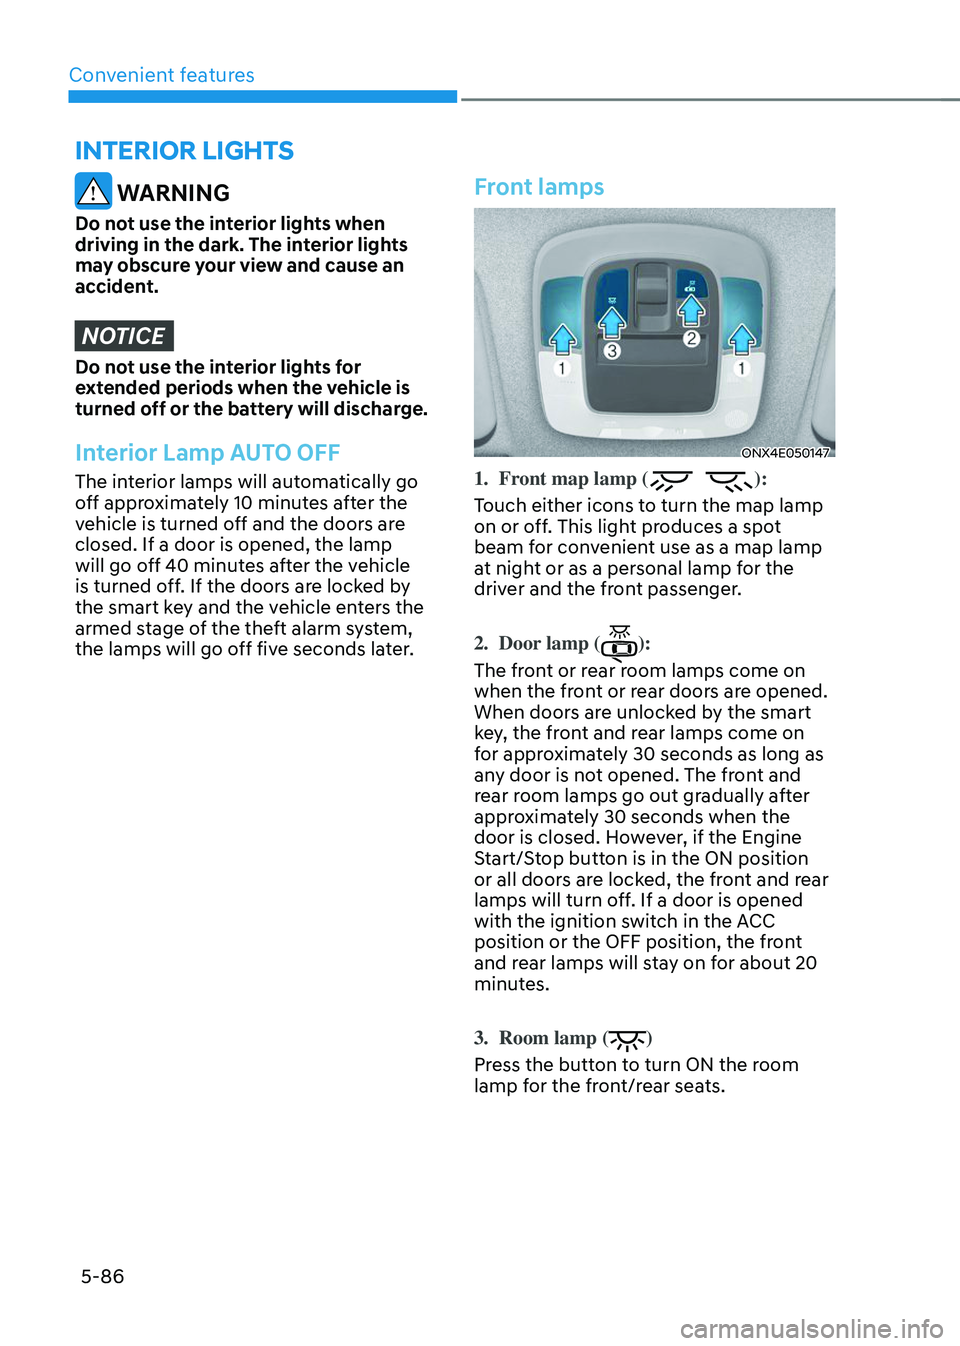
Front lamps
ONX4E050147
1. Front map lamp ():
Touch either icons to turn the map lamp
on or off. This light produces a spot
beam for convenient use as a map lamp
at night or as a personal lamp for the
driver and the front passenger.
2. Door lamp ():
The front or rear room lamps come on
when the front or rear doors are opened.
When doors are unlocked by the smart
key, the front and rear lamps come on
for approximately 30 seconds as long as
any door is not opened. The front and
rear room lamps go out gradually after
approximately 30 seconds when the
door is closed. However, if the Engine
Start/Stop button is in the ON position
or all doors are locked, the front and rear
lamps will turn off. If a door is opened
with the ignition switch in the ACC
position or the OFF position, the front
and rear lamps will stay on for about 20
minutes.
3. Room lamp ()
Press the button to turn ON the room
lamp for the front/rear seats.