2023 HYUNDAI TUCSON light
[x] Cancel search: lightPage 569 of 638
09
9-19
Information
When the oil pressure is low due to
insufficient engine oil, the Engine
Oil Pressure (
) warning light will
illuminate. In addition, the enhanced
engine protection system, which limits
the engine’s power is activated and the
Malfunction Indicator Lamp (
) will
illuminate when the vehicle is driven in
this state continuously. When oil pressure
is restored, the Engine Oil Pressure
warning light will turn off and the engine
power will no longer be limited.
CAUTION
The engine oil is very hot immediately
after the vehicle has been driven and
can cause burns during replacement.
Replace the engine oil after the engine
oil has cooled down.
WARNING
CALIFORNIA PROPOSITION 65
WARNING
Engine oil contains chemicals known to
the State of California to cause cancer,
birth defects and reproductive harm.
Used engine oil may cause irritation or
cancer of the skin if left in contact with
the skin for prolonged periods of time.
Always protect your skin by washing
your hands thoroughly with soap and
warm water as soon as possible after
handling used oil.
Page 580 of 638
Maintenance
9-30
ONX4090040
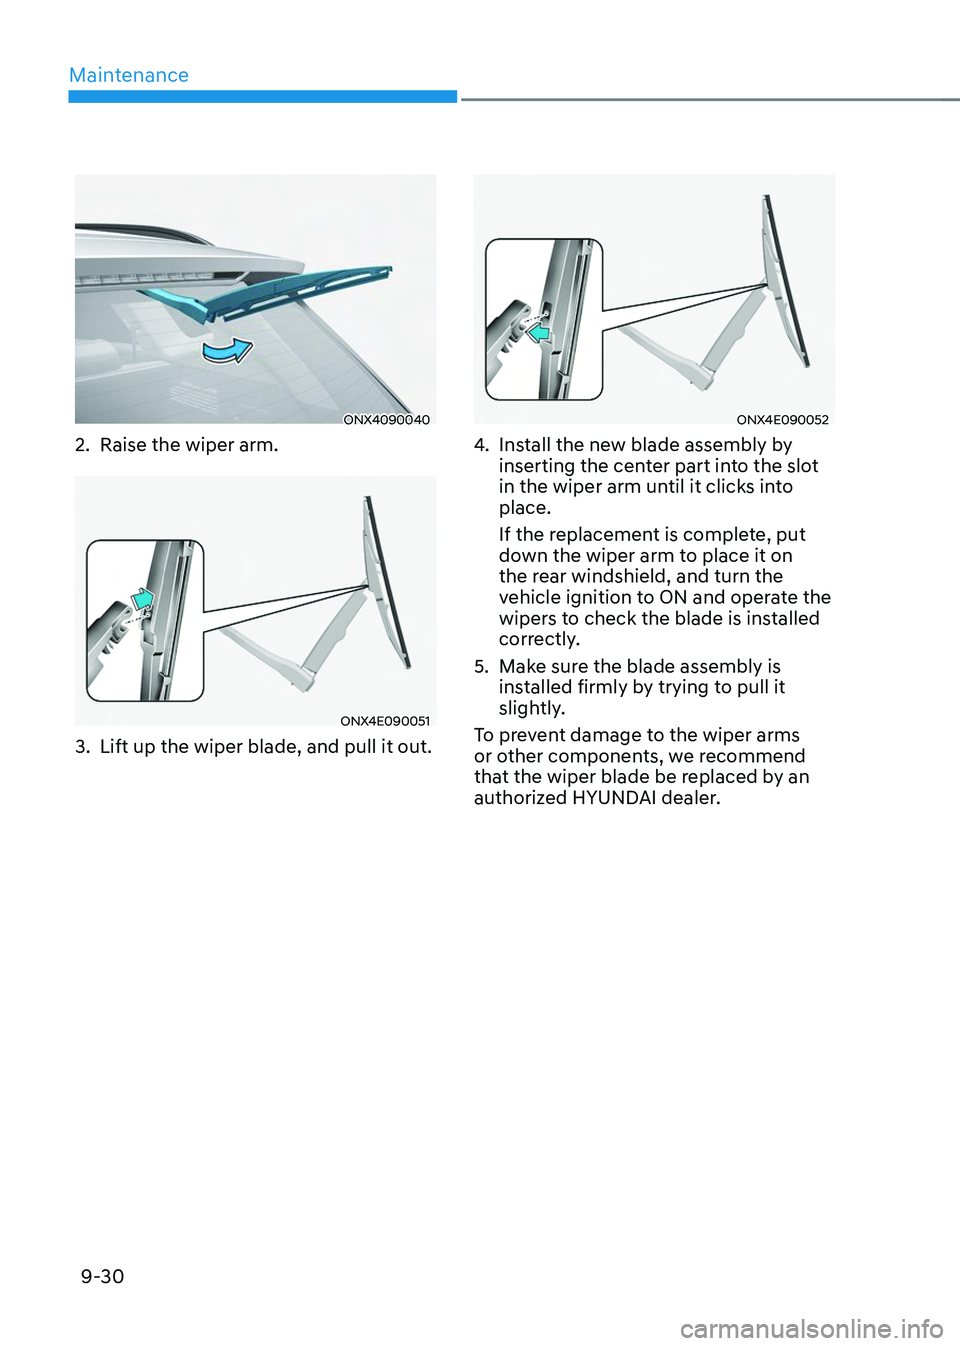
2. Raise the wiper arm.
ONX4E090051
3. Lift up the wiper blade, and pull it out.
ONX4E090052
4. Install the new blade assembly by
inserting the center part into the slot
in the wiper arm until it clicks into
place.
If the replacement is complete, put
down the wiper arm to place it on
the rear windshield, and turn the
vehicle ignition to ON and operate the
wipers to check the blade is installed
correctly.
5. Make sure the blade assembly is
installed firmly by trying to pull it
slightly.
To prevent damage to the wiper arms
or other components, we recommend
that the wiper blade be replaced by an
authorized HYUNDAI dealer.
Page 584 of 638
Maintenance
9-34
Battery recharging
By battery charger
Your vehicle has a maintenance-free,
calcium-based battery.
• If the battery becomes discharged
over a short time (because, for
example, the headlamps or interior
lights were left on while the vehicle
was not in use), recharge it by slow
charging (trickle) for 10 hours.
• If the battery gradually discharges
because of high electrical load while
the vehicle is being used, recharge it
at 20-30A for two hours.
WARNING
Always follow these instructions when
recharging your vehicle’s battery to
avoid the risk of SERIOUS INJURY or
DEATH from explosions or acid burns:
• Before performing maintenance or
recharging the battery, turn off all
accessories and stop the engine.
• Keep all flames, sparks, or smoking
materials away from the battery.
• Always work outdoors or in an area
with plenty of ventilation.
• Wear eye protection when checking
the battery during charging.
• The battery must be removed from
the vehicle and placed in a well
ventilated area.
• Watch the battery during charging,
and stop or reduce the charging
rate if the battery cells begin boiling
violently.
• The negative battery cable must
be removed first and installed last
when the battery is disconnected.
Disconnect the battery charger in the
following order:
1. Turn off the battery charger main
switch.
2. Unhook the negative clamp from
the negative battery terminal.
3. Unhook the positive clamp from
the positive battery terminal.
• We recommend that you use
batteries for replacement from an
authorized HYUNDAI dealer.
NOTICE
AGM battery (if equipped)
• Absorbent Glass Matt (AGM)
batteries are maintenance-free
and we recommend that the AGM
battery be serviced by an authorized
HYUNDAI dealer. For charging
your AGM battery, use only fully
automatic battery chargers that
are specially developed for AGM
batteries.
• When replacing the AGM battery,
we recommend that you use parts
for replacement from an authorized
HYUNDAI dealer.
• Do not open or remove the cap on
top of the battery. This may cause
leaks of internal electrolyte that
could result in severe injury.
Page 594 of 638
Maintenance
9-44
WARNING
The temperature grade for this
tire is established for a tire that
is properly inflated and not
overloaded. Excessive speed,
under-inflation, over-inflation, or
excessive loading, either separately
or in combination, can cause heat
build-up and possible sudden
tire failure. This may cause loss
of vehicle control resulting in an
accident.
Low aspect ratio tires
(if equipped)
The aspect ratio is lower than 50 on
low aspect ratio tires.
Because low aspect ratio tires are
optimized for handling and braking,
their sidewall is a little stiffer than
a standard tire. Also low aspect
ratio tires tend to be wider and
consequently have a greater contact
patch with the road surface. In some
instances they may generate more
road noise compared with standard
tires.
CAUTION
The side wall of a low aspect ratio
tire is shorter than the normal one.
Thus, the low-aspect wheel and
tire are easily damaged. Follow the
below instructions.
• When driving on a rough road or
driving off a road, be careful not
to damage the tires and wheels.
After driving, inspect the tires
and wheels.
• When passing over a pothole,
speed bump, manhole, or curb
stone, drive the vehicle slowly so
as not to damage the tires and
wheels.
• When there is an impact on a tire,
inspect the tire condition. Or,
you can contact an authorized
HYUNDAI dealer.
• Inspect the tire condition and
pressure every 8,000 miles
(13,000 km) to prevent tire
damage.
• It is difficult to recognize a tire
damage only with your eyes.
When there is a slight hint of a
tire damage, check and replace
the tire to prevent the damage
caused by air leakage.
• When a tire is damaged while
driving on a rough road, off a
road, or over obstacles, such as a
pothole, manhole, or curb stone,
your warranty does not cover the
damage.
• The tire information is specified
on the tire side wall.
Page 595 of 638
09
9-45
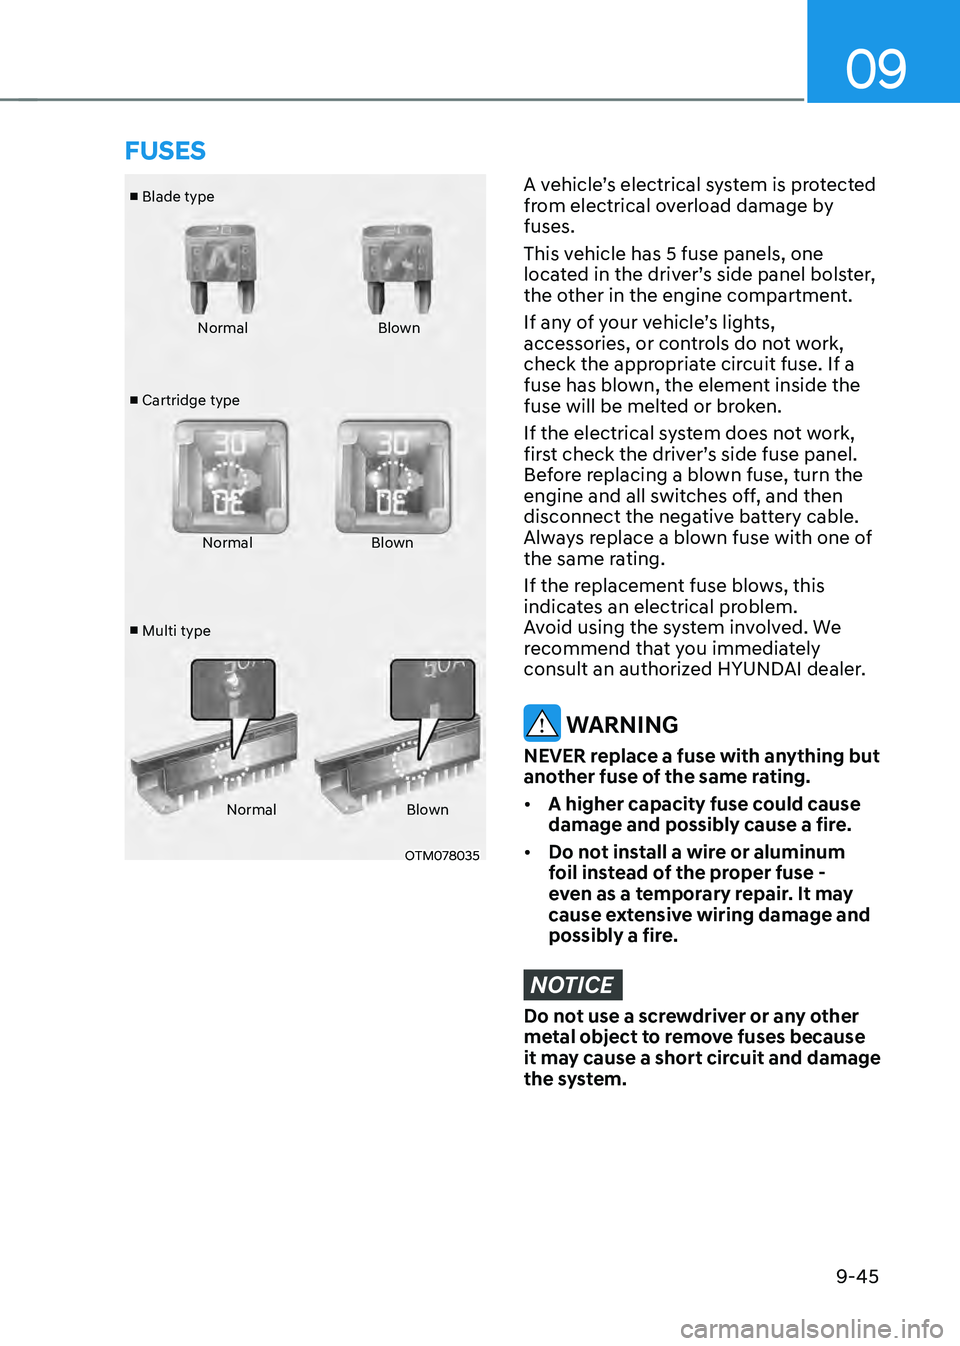
■ Blade type
■ Cartridge type
■ Multi type Normal
Blown
Normal Blown
Normal Blown
OTM078035
A vehicle’s electrical system is protected
from electrical overload damage by
fuses.
This vehicle has 5 fuse panels, one
located in the driver’s side panel bolster,
the other in the engine compartment.
If any of your vehicle’s lights,
accessories, or controls do not work,
check the appropriate circuit fuse. If a
fuse has blown, the element inside the
fuse will be melted or broken.
If the electrical system does not work,
first check the driver’s side fuse panel.
Before replacing a blown fuse, turn the
engine and all switches off, and then
disconnect the negative battery cable.
Always replace a blown fuse with one of
the same rating.
If the replacement fuse blows, this
indicates an electrical problem.
Avoid using the system involved. We
recommend that you immediately
consult an authorized HYUNDAI dealer.
WARNING
NEVER replace a fuse with anything but
another fuse of the same rating.
• A higher capacity fuse could cause
damage and possibly cause a fire.
• Do not install a wire or aluminum
foil instead of the proper fuse -
even as a temporary repair. It may
cause extensive wiring damage and
possibly a fire.
NOTICE
Do not use a screwdriver or any other
metal object to remove fuses because
it may cause a short circuit and damage
the system.
FUSES
Page 596 of 638
Maintenance
9-46
Instrument panel fuse
replacement
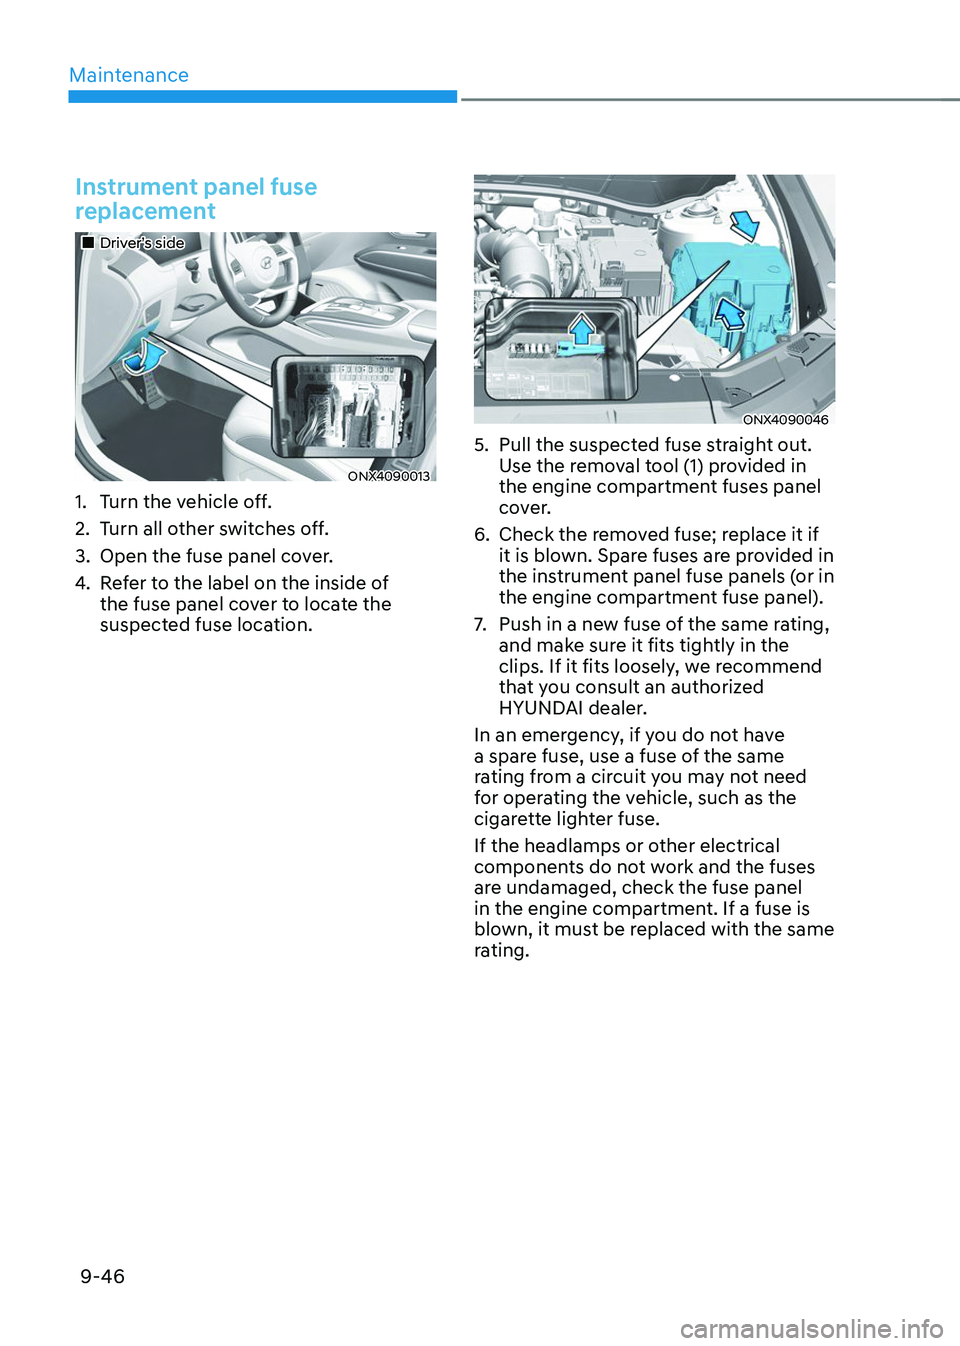
„„Driver’s side
ONX4090013
1. Turn the vehicle off.
2. Turn all other switches off.
3. Open the fuse panel cover.
4. Refer to the label on the inside of
the fuse panel cover to locate the
suspected fuse location.
ONX4090046
5. Pull the suspected fuse straight out.
Use the removal tool (1) provided in
the engine compartment fuses panel
cover.
6. Check the removed fuse; replace it if
it is blown. Spare fuses are provided in
the instrument panel fuse panels (or in
the engine compartment fuse panel).
7. Push in a new fuse of the same rating,
and make sure it fits tightly in the
clips. If it fits loosely, we recommend
that you consult an authorized
HYUNDAI dealer.
In an emergency, if you do not have
a spare fuse, use a fuse of the same
rating from a circuit you may not need
for operating the vehicle, such as the
cigarette lighter fuse.
If the headlamps or other electrical
components do not work and the fuses
are undamaged, check the fuse panel
in the engine compartment. If a fuse is
blown, it must be replaced with the same
rating.
Page 604 of 638
Maintenance
9-54
We recommend that you consult an
authorized HYUNDAI dealer to replace
most vehicle light bulbs. It is difficult
to replace vehicle light bulbs because
other parts of the vehicle must be
removed before you can get to the bulb.
This is especially true for removing the
headlamp assembly to get to the bulb(s).
Removing/installing the headlamp
assembly can result in damage to the
vehicle.
WARNING
• Prior to working on a light, depress
the foot brake, shift to P (Park), apply
the parking brake, press the Engine
Start/Stop button to the OFF position
and take the key with you when
leaving the vehicle to avoid sudden
movement of the vehicle and to
prevent possible electric shock.
• Be aware the bulbs may be hot and
may burn your fingers.
NOTICE
Be sure to replace the burned-out bulb
with one of the same wattage rating.
Otherwise, it may cause damage to the
fuse or electrical wiring system.
NOTICE
To prevent damage, do not clean the
headlamp lens with chemical solvents
or strong detergents.
Information - Headlamp
desiccant (if equipped)
This vehicle is equipped with desiccant to
reduce fogging inside the headlamp due
to moisture. The desiccant is consumable
and its performance may change based on
the used period or environment. If fogging
inside the headlamp due to moisture
continues for a long time, we recommend
that you consult an authorized HYUNDAI
dealer.
Information
The headlamp and tail lamp lenses could
appear frosty if the vehicle is washed after
driving or the vehicle is driven at night
in wet weather. This condition is caused
by temperature difference between the
lamp inside and outside and, it does not
indicate a problem with your vehicle.
When moisture condenses in the lamp,
it will be removed after driving with the
headlamp on. The removable level may
differ depending on lamp size, lamp
position and environmental condition.
However, if moisture is not removed, we
recommend that your vehicle is inspected
by an authorized HYUNDAI dealer.
LIGHT BULBS
Page 605 of 638
09
9-55
Information
• A normally functioning lamp may
flicker momentarily to stabilize the
vehicle’s electrical control system.
However, if the lamp goes out after
flickering momentarily, or continues to
flicker, we recommend the system be
checked by an authorized HYUNDAI
dealer.
• The position lamp may not turn on
when the position lamp switch is turned
on, but the position lamp and headlamp
switch may turn on when the headlamp
switch is turned on. This may be caused
by network failure or vehicle electrical
control system malfunction. If this
occurs, we recommend the system be
checked by an authorized HYUNDAI
dealer.
Information
The headlamp aiming should be adjusted
after an accident or after the headlamp
assembly is reinstalled.
Headlamp, position lamp, turn
signal lamp, Daytime Running
Light (DRL) replacement
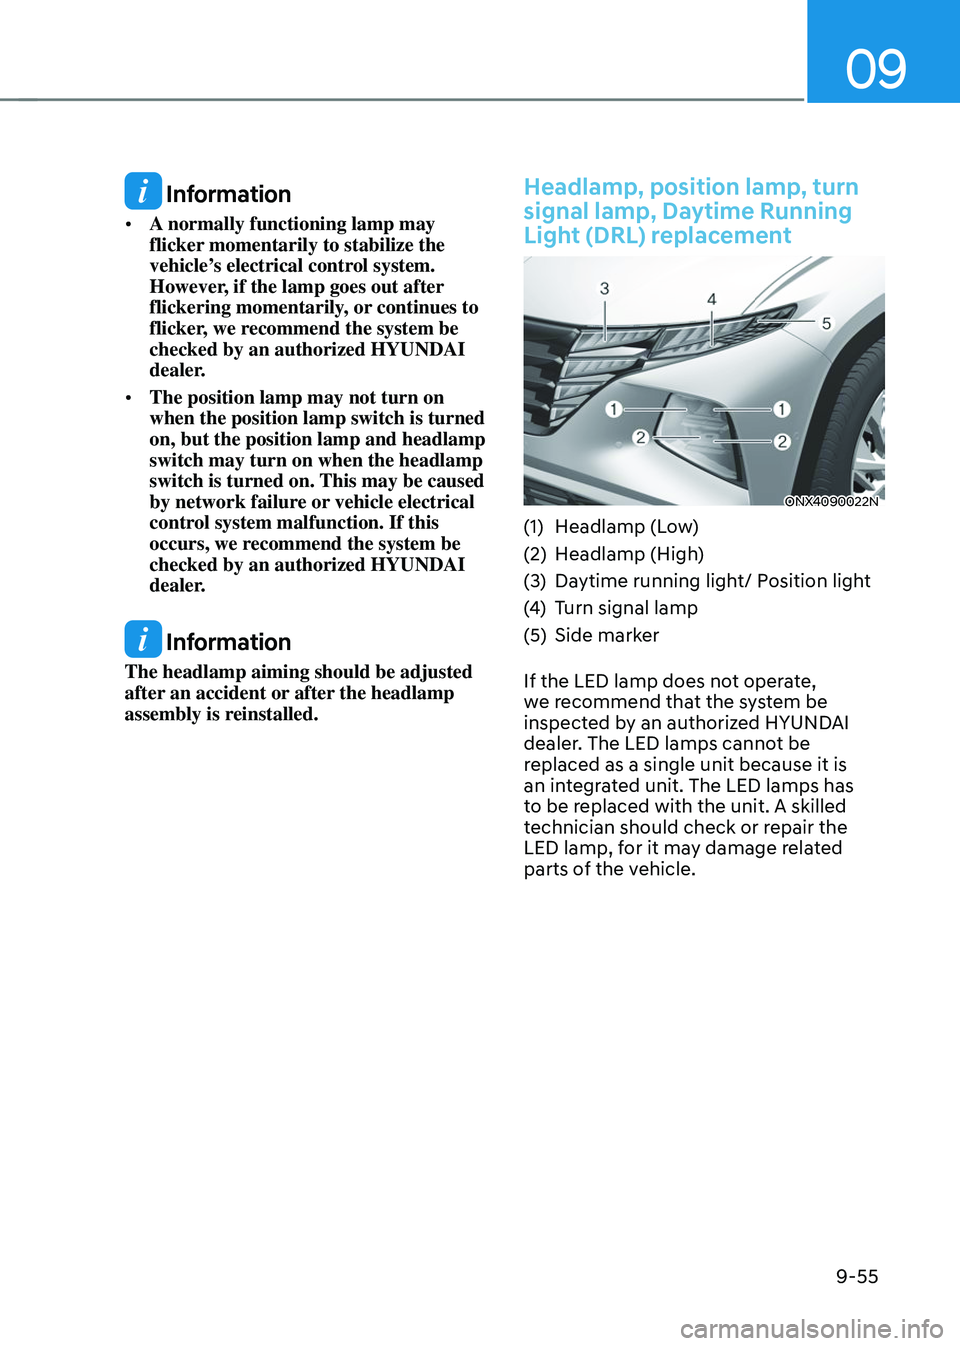
ONX4090022N
(1) Headlamp (Low)
(2) Headlamp (High)
(3) Daytime running light/ Position light
(4) Turn signal lamp
(5) Side marker
If the LED lamp does not operate,
we recommend that the system be
inspected by an authorized HYUNDAI
dealer. The LED lamps cannot be
replaced as a single unit because it is
an integrated unit. The LED lamps has
to be replaced with the unit. A skilled
technician should check or repair the
LED lamp, for it may damage related
parts of the vehicle.