2023 HYUNDAI SONATA brake light
[x] Cancel search: brake lightPage 438 of 555
06
6-151
Smooth Cornering
Avoid braking or gear changing in
corners, especially when roads are wet.
Ideally, corners should always be taken
under gentle acceleration.
Driving at Night
Night driving presents more hazards than
driving in the daylight. Here are some
important tips to remember: • Slow down and keep more distance
between you and other vehicles, as it
may be more difficult to see at night,
especially in areas where there may
not be any street lights.
• Adjust your mirrors to reduce the glare
from other driver's headlamps.
• Keep your headlamps clean and
properly aimed. Dirty or improperly
aimed headlamps will make it much
more difficult to see at night.
• Avoid staring directly at the
headlamps of oncoming vehicles. You
could be temporarily blinded, and it
will take several seconds for your eyes
to readjust to the darkness.
Driving in the Rain
Rain and wet roads can make driving
dangerous. Here are a few things to
consider when driving in the rain or on
slick pavement: • Slow down and allow extra following
distance. A heavy rainfall makes
it harder to see and increases the
distance needed to stop your vehicle.
• Turn OFF your Cruise Control.
• Replace your windshield wiper blades
when they show signs of streaking or
missing areas on the windshield.
• Tires should be properly maintained
with at least 1.6mm (2/32nds of an
inch) of tread depth. If your tires
do not have enough tread, making
a quick stop on wet pavement can
cause a skid and possibly lead to an
accident. See "Tire replacement" in
chapter 8.
• Turn on your headlamps to make it
easier for others to see you.
• Driving too fast through large puddles
can affect your brakes. If you must go
through puddles, try to drive through
them slowly.
• If you believe your brakes may be wet,
apply them lightly while driving until
normal braking operation returns.
Hydroplaning
If the road is wet enough and you are
going fast enough, your vehicle may
have little or no contact with the road
surface and actually ride on the water.
The best advice is SLOW DOWN when
the road is wet.
The risk of hydroplaning increases as
the depth of tire tread decreases, refer
to “Tire replacement” in chapter 8.
Page 440 of 555

06
6-153
The severe weather conditions of winter
quickly wear out tires and cause other
problems. To minimize winter driving
problems, you should take the following
suggestions:
Snow or Icy Conditions
You need to keep sufficient distance
between your vehicle and the vehicle in
front of you.
Apply the brakes gently. Speeding, rapid
acceleration, sudden brake applications,
and sharp turns are potentially
very hazardous practices. During
deceleration, use engine braking to the
fullest extent. Sudden brake applications
on snowy or icy roads may cause the
vehicle to skid.
To drive your vehicle in deep snow, it
may be necessary to use snow tires.
Always carry emergency equipment.
Some of the items you may want to carry
include tow straps or chains, a flashlight,
emergency flares, sand, a shovel, jumper
cables, a window scraper, gloves, ground
cloth, coveralls, a blanket, etc.
Snow tires
WARNING
Snow tires should be equivalent in size
and type to the vehicle’s standard tires.
Otherwise, the safety and handling of
your vehicle may be adversely affected.
If you mount snow tires on your vehicle,
make sure to use radial tires of the same
size and load range as the original tires.
Mount snow tires on all four wheels
to balance your vehicle’s handling in
all weather conditions. The traction
provided by snow tires on dry roads
may not be as high as your vehicle's
original equipment tires. Check with
the tire dealer for maximum speed
recommendations.
Information
Do not install studded tires without first checking local, country and municipal
regulations for possible restrictions against
their use.
winter Driving
Page 451 of 555
07
7-3
If you Have a Flat Tire While Driving
If a tire goes flat while you are driving: • Take your foot off the accelerator
pedal and let the vehicle slow down
while driving straight ahead. Do not
apply the brakes immediately or
attempt to pull off the road as this
may cause loss of vehicle control
resulting in an accident. When the
vehicle has slowed to such a speed
that it is safe to do so, brake carefully
and pull off the road. Drive off the
road as far as possible and park on
firm, level ground. If you are on a
divided highway, do not park in the
median area between the two traffic lanes.
• When the vehicle is stopped, press the
hazard warning flasher button, move
the shift button into P (Park), and
apply the parking brake, and place
the ignition switch in the LOCK/OFF position.
• Have all passengers get out of the
vehicle. Be sure they all get out on the
side of the vehicle that is away from
traffic.
• When changing a flat tire, follow the
instructions provided later in this
chapter.
If the engIne WIll not
s ta rt
If the Engine Doesn’t Turn Over
or Turns Over Slowly
• Be sure the shift button is in N
(Neutral) or P (Park). The engine starts
only when the shift button is in N
(Neutral) or P (Park).
• Check the battery connections to be
sure they are clean and tight.
• Turn on the interior light. If the light
dims or goes out when you operate
the starter, the battery is drained.
Do not push or pull the vehicle to start it.
This could cause damage to your vehicle.
See instructions for “Jump Starting”
provided in this chapter.
CAUTION
Push or pull starting the vehicle may
cause the catalytic converter to
overload which can lead to damage to
the emission control system.
If the Engine Turns Over
Normally but Doesn’t Start
Check the fuel level and add fuel if
necessary.
If the engine still does not start, have
your vehicle checked by an authorized
HYUNDAI dealer.
Page 453 of 555
07
7-5
Jump starting procedure
1. Position the vehicles close enough
that the jumper cables will reach, but
do not allow the vehicles to touch.
2. Avoid fans or any moving parts in the engine compartment at all times, even
when the vehicles are turned off.
3. Turn off all electrical devices such as radios, lights, air conditioning, etc.
Put the vehicles in P (Park) and set
the parking brakes. Turn both vehicles
OFF.
ODN8A079022
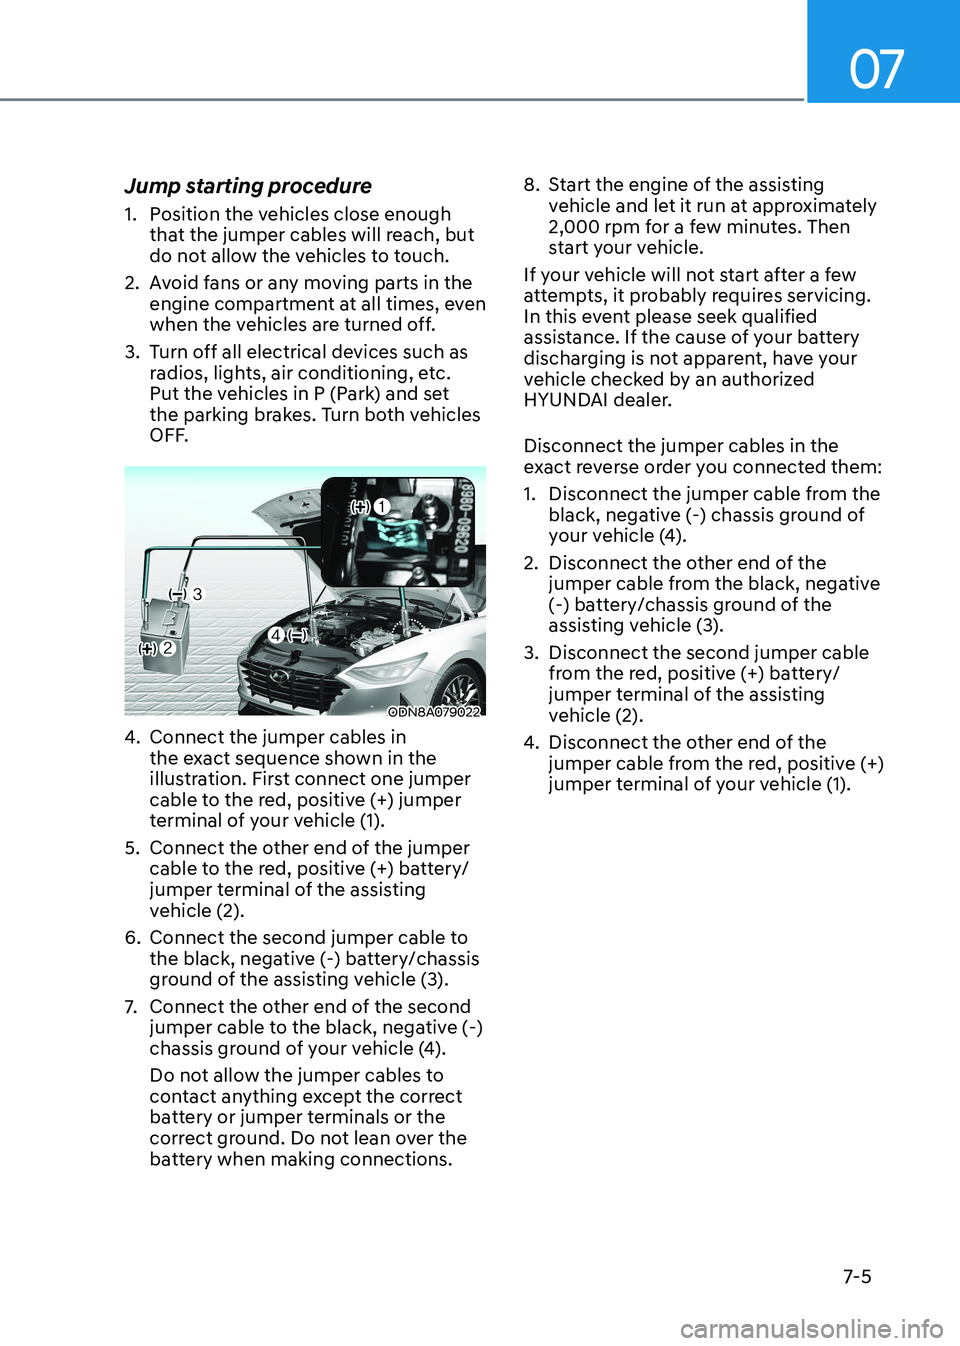
4. Connect the jumper cables in
the exact sequence shown in the
illustration. First connect one jumper
cable to the red, positive (+) jumper
terminal of your vehicle (1).
5. Connect the other end of the jumper cable to the red, positive (+) battery/
jumper terminal of the assisting
vehicle (2).
6. Connect the second jumper cable to the black, negative (-) battery/chassis
ground of the assisting vehicle (3).
7. Connect the other end of the second
jumper cable to the black, negative (-)
chassis ground of your vehicle (4).
Do not allow the jumper cables to
contact anything except the correct
battery or jumper terminals or the
correct ground. Do not lean over the
battery when making connections. 8. Start the engine of the assisting
vehicle and let it run at approximately
2,000 rpm for a few minutes. Then
start your vehicle.
If your vehicle will not start after a few
attempts, it probably requires servicing.
In this event please seek qualified
assistance. If the cause of your battery
discharging is not apparent, have your
vehicle checked by an authorized
HYUNDAI dealer. Disconnect the jumper cables in the
exact reverse order you connected them:
1. Disconnect the jumper cable from the black, negative (-) chassis ground of
your vehicle (4).
2. Disconnect the other end of the jumper cable from the black, negative
(-) battery/chassis ground of the
assisting vehicle (3).
3. Disconnect the second jumper cable from the red, positive (+) battery/
jumper terminal of the assisting
vehicle (2).
4. Disconnect the other end of the
jumper cable from the red, positive (+)
jumper terminal of your vehicle (1).
Page 460 of 555
Emergency Situations
7-12
Each wheel is equipped with a tire
pressure sensor mounted inside the tire
behind the valve stem (except for the
spare tire). You must use TPMS specific
wheels. It is recommended that you
always have your tires serviced by an
authorized HYUNDAI dealer.
You may not be able to identify a tire
with low pressure by simply looking at it.
Always use a good quality tire pressure
gauge to measure the tire’s inflation
pressure. Please note that a tire that is
hot (from being driven) will have a higher
pressure measurement than a tire that is cold.
A cold tire means the vehicle has been
sitting for 3 hours and driven for less
Than 1.6 km (1 mile) in that 3 hour period.
Allow the tire to cool before measuring
the inflation pressure. Always be sure
the tire is cold before inflating to the
recommended pressure.
WARNING
• The TPMS cannot alert you to severe
and sudden tire damage caused by
external factors such as nails or road debris.
• If you feel any vehicle instability,
immediately take your foot off
the accelerator, apply the brakes
gradually with light force, and slowly
move to a safe position off the road.
WARNING
Tampering with, modifying, or disabling
the Tire Pressure Monitoring System
(TPMS) components may interfere
with the system’s ability to warn the
driver of low tire pressure conditions
and/or TPMS malfunctions. Tampering
with, modifying, or disabling the Tire
Pressure Monitoring System (TPMS)
components may void the warranty for
that portion of the vehicle.
Information
This device complies with Industry Canada RSS-210 standard.
Operation is subject to the following three conditions: 1. This device may not cause harmful
interference.
2. This device must accept any
interference received, including
interference that may cause undesired operation.
3. Changes or modifications not expressly
approved by the party responsible
for compliance could void the user’s authority to operate the device.
Page 469 of 555
07
7-21
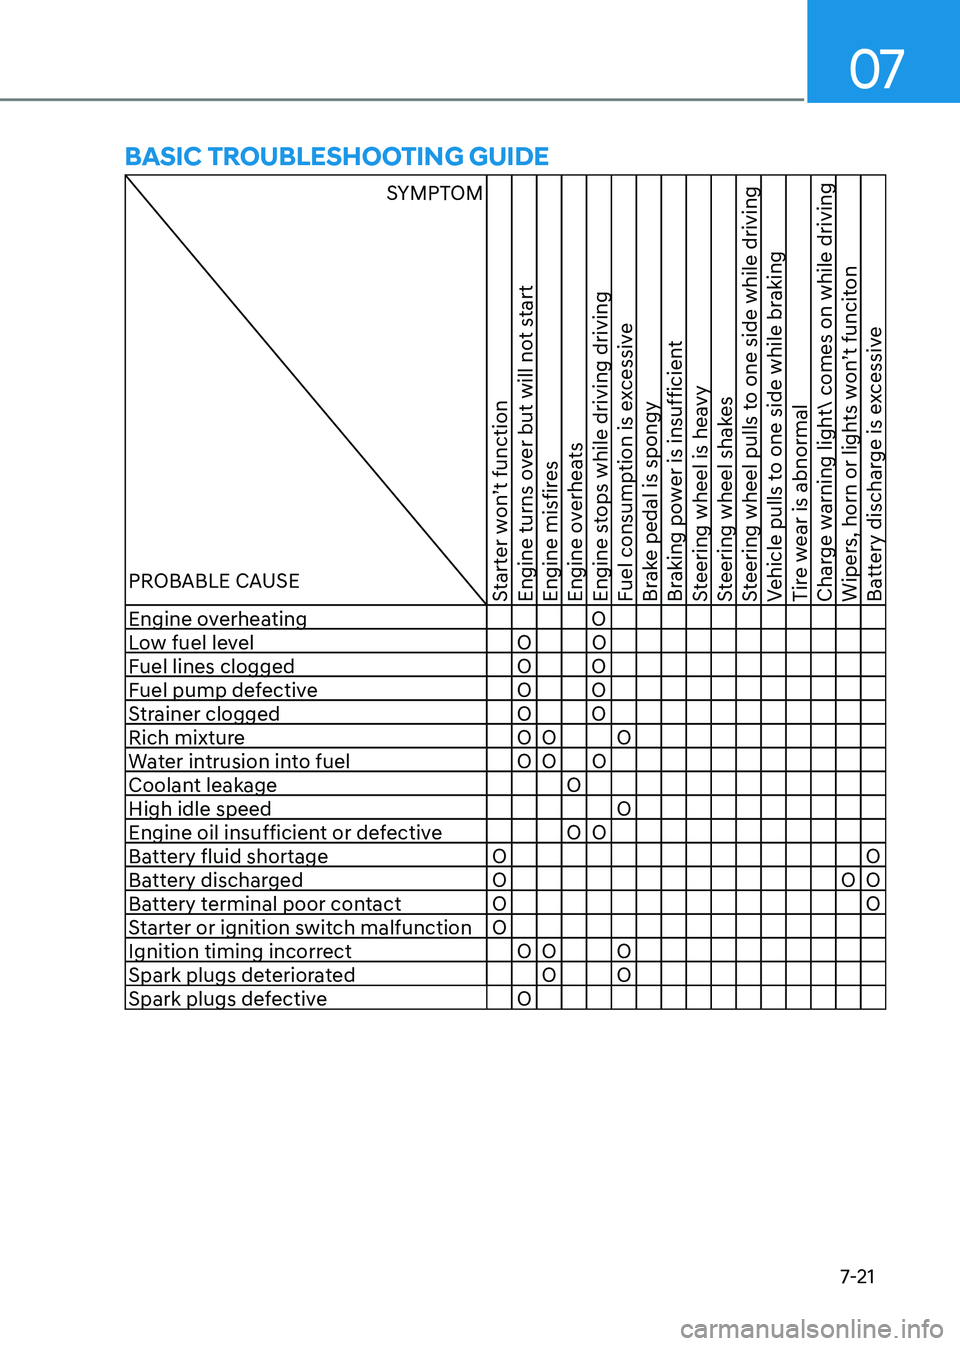
BasIC trouBleshootIng guIDe
SYMPTOM
PROBABLE CAUSE
Starter won’t function
Engine turns over but will not start
Engine misfires
Engine overheats
Engine stops while driving driving
Fuel consumption is excessive
Brake pedal is spongy
Braking power is insufficient
Steering wheel is heavy
Steering wheel shakes
Steering wheel pulls to one side while driving
Vehicle pulls to one side while braking
Tire wear is abnormal
Charge warning light comes on while driving
Wipers, horn or lights won’t funciton
Battery discharge is excessive
Engine overheating O
Low fuel level O O
Fuel lines clogged O O
Fuel pump defective O O
Strainer clogged O O
Rich mixture O O O Water intrusion into fuel O O O
Coolant leakage OHigh idle speed O
Engine oil insufficient or defective O O
Battery fluid shortage O O
Battery discharged O O O
Battery terminal poor contact O O
Starter or ignition switch malfunction O
Ignition timing incorrect O O O Spark plugs deteriorated O O Spark plugs defective O
Page 470 of 555
Emergency Situations
7-22
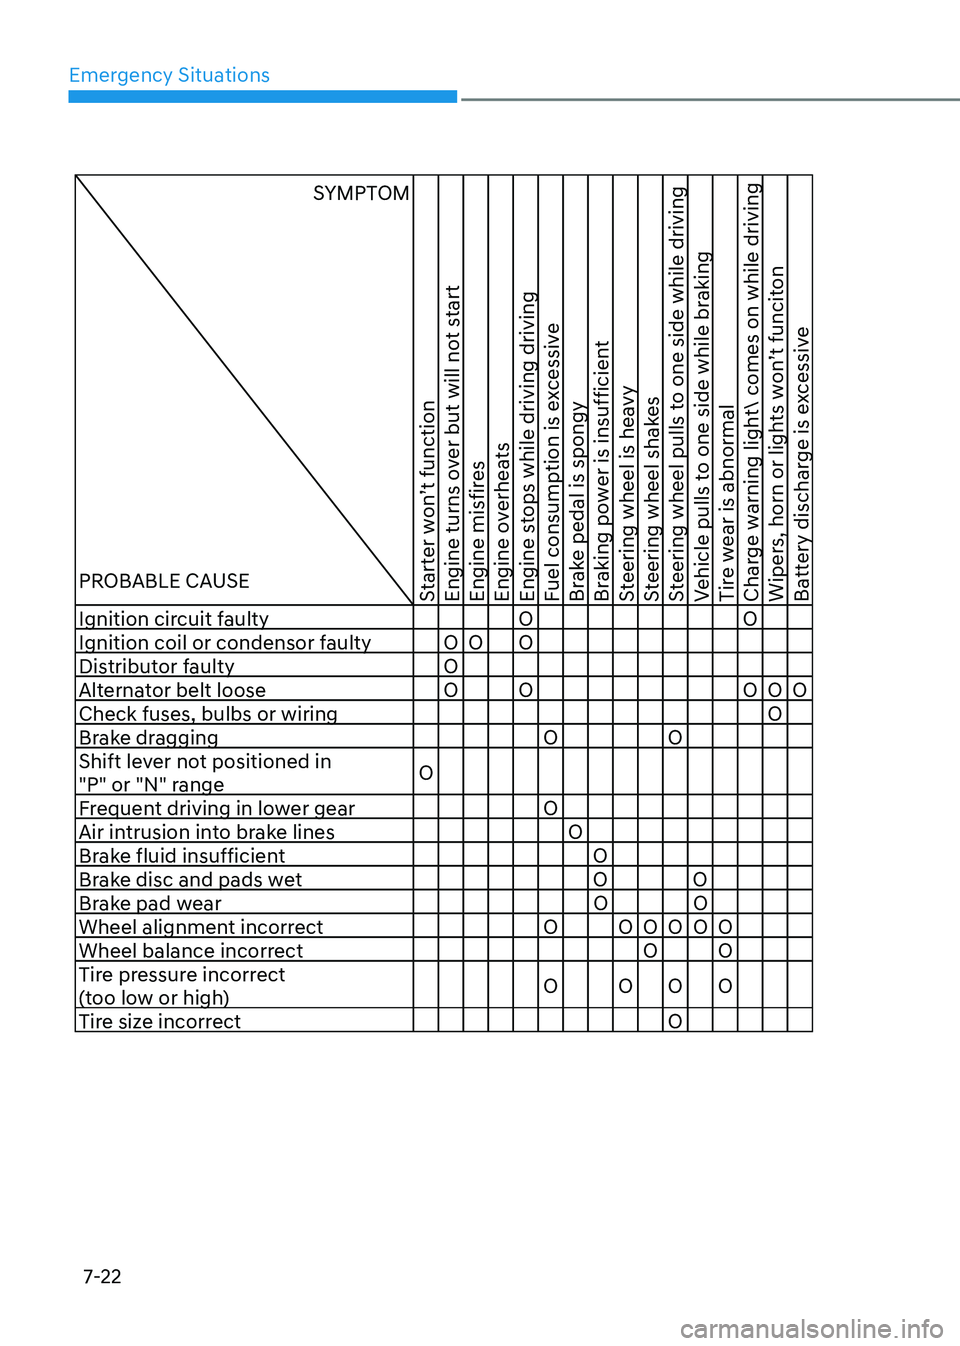
SYMPTOM
PROBABLE CAUSE
Starter won’t function
Engine turns over but will not start
Engine misfires
Engine overheats
Engine stops while driving driving
Fuel consumption is excessive
Brake pedal is spongy
Braking power is insufficient
Steering wheel is heavy
Steering wheel shakes
Steering wheel pulls to one side while driving
Vehicle pulls to one side while braking
Tire wear is abnormal
Charge warning light comes on while driving
Wipers, horn or lights won’t funciton
Battery discharge is excessive
Ignition circuit faulty O O Ignition coil or condensor faulty O O O
Distributor faulty O
Alternator belt loose O O O O O Check fuses, bulbs or wiring O
Brake dragging O O
Shift lever not positioned in
"P" or "N" range O
Frequent driving in lower gear O
Air intrusion into brake lines O
Brake fluid insufficient O
Brake disc and pads wet O O
Brake pad wear O O
Wheel alignment incorrect O O O O O O Wheel balance incorrect O O
Tire pressure incorrect
(too low or high) O O O O
Tire size incorrect O
Page 477 of 555
08
8 -7
While operating your vehicle: •
Note any changes in the sound of the
exhaust or any smell of exhaust fumes
in the vehicle.
• Check for vibrations in the steering
wheel. Notice if there is any increased
steering effort or looseness in the
steering wheel, or change in its
straight-ahead position.
• Notice if your vehicle constantly turns
slightly or “pulls” to one side when
traveling on smooth, level road.
• When stopping, listen and check for
unusual sounds, pulling to one side,
increased brake pedal travel or “hard-
to-push” brake pedal.
• If any slipping or changes in the
operation of your transmission occurs,
check the transmission fluid level.
• Check the automatic transmission P
(Park) function.
• Check the parking brake.
• Check for fluid leaks under your
vehicle (water dripping from the air
conditioning system during or after use is normal).
At least monthly: • Check coolant level in the engine
coolant reservoir.
• Check the operation of all exterior
lights, including the brake lights, turn
signals and hazard warning flashers.
• Check the inflation pressures of all
tires including the spare for tires that
are worn, show uneven wear, or are damaged.
• Check for loose wheel lug nuts. At least twice a year:
(i.e., every Spring and Autumn) •
Check radiator, heater and air
conditioning hoses for leaks or damage.
• Check windshield washer spray and
wiper operation. Clean wiper blades
with a clean cloth dampened with
washer a fluid.
• Check headlamp alignment.
• Check muffler, exhaust pipes, shields and clamps.
• Check the seat belts for wear and function.
At least once a year: • Clean body and door drain holes.
• Lubricate door hinges and hood hinges.
• Lubricate door and hood locks and
latches.
• Lubricate door rubber weather strips.
• Lubricate door checker.
• Check the air conditioning system.
• Inspect and lubricate automatic
transmission linkage and controls.
• Clean the battery and terminals.
• Check the brake fluid level.