2023 HYUNDAI SONATA mirror
[x] Cancel search: mirrorPage 418 of 555
06
6-131
•
There is not enough distance between
you and the vehicle in front to be
able to detect the lane marker or the
vehicle ahead is driving on the lane
marker.
• Driving on a steep grade, over a hill, or
when driving on a curved road.
• The adverse road conditions cause
excessive vehicle vibrations while driving.
• The surrounding of the inside rear
view mirror temperature is high due to
direct sunlight, etc.
• The sensor recognition changes
suddenly when passing over a speed
bump or driving on a steep up/down
or right/left grade
When front visibility is poor • The windshield or the camera lens is
blocked with dirt or debris.
• The windshield glass is fogged up; a
clear view of the road is obstructed.
• Placing objects on the dashboard, etc.
• The sensor cannot detect the lane
because of fog, heavy rain or snow.
Page 426 of 555
06
6-139
WARNING
• Always be aware of road conditions
while driving and be alert for
unexpected situations even though
Rear Cross-Traffic Collision Warning
system and Rear Cross-Traffic
Collision-Avoidance Assist system
are operating.
• Rear Cross-Traffic Collision Warning
system and Rear Cross-Traffic
Collision-Avoidance Assist system
are supplemental systems to assist
you. Do not entirely rely on the
systems. Always pay attention, while
driving, for your safety.
• Rear Cross-Traffic Collision Warning
system and Rear Cross-Traffic
Collision-Avoidance Assist system
are not substitutes for proper and
safe driving. Always drive safely and use caution when backing up the
vehicle.System Setting and Activation
System setting • The driver can activate the systems
by placing the ignition switch to the
ON position and by selecting “User
Settings → Driver Assistance → Parking
Safety → Rear Cross-Traffic Safety”.
RCCW and RCCA turn on and get
ready to be activated when ‘Rear
Cross-Traffic safety’ is selected.
• When the engine is turned off then on
again, the systems are always ready to
be activated.
• When the system is initially turned
on and when the engine is turned off
then on again, the warning light will
illuminate for 3 seconds on the side
view mirror.
The driver can select the initial warning
activation time in the User Settings in
the LCD display or infotainment system
display by selecting ‘User Settings →
Driver Assistance → Warning Timing’.
Page 428 of 555
06
6-141
Warning and System Control
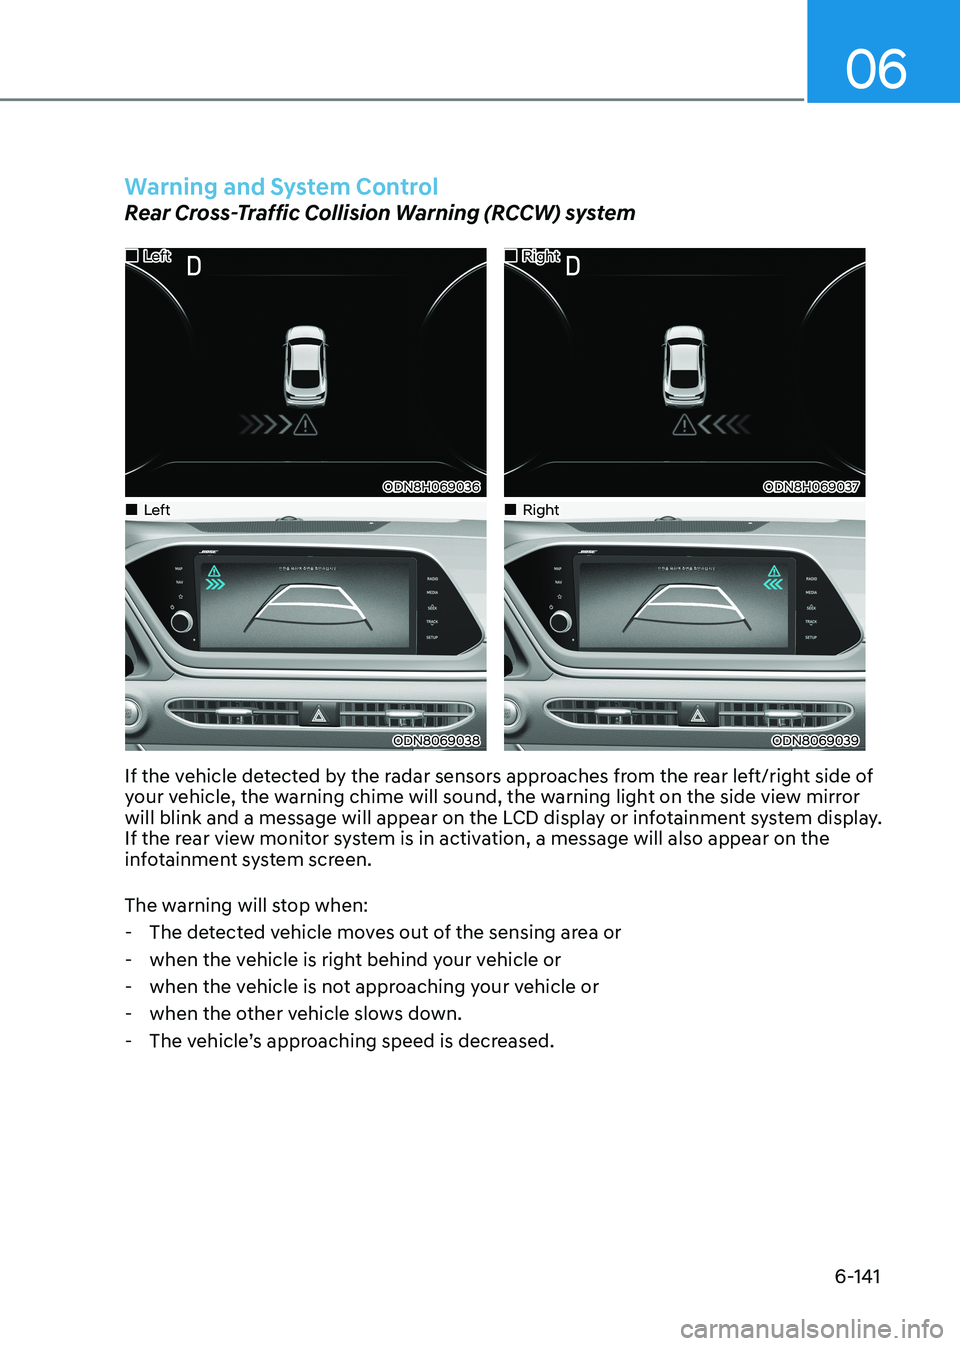
Rear Cross-Traffic Collision Warning (RCCW) system
„„Left
ODN8H069036
„„Right
ODN8H069037
„„Left
ODN8069038
„„Right
ODN8069039
If the vehicle detected by the radar sensors approaches from the rear left/right side of
your vehicle, the warning chime will sound, the warning light on the side view mirror
will blink and a message will appear on the LCD display or infotainment system display.
If the rear view monitor system is in activation, a message will also appear on the
infotainment system screen.
The warning will stop when: - The detected vehicle moves out of the sensing area or
- when the vehicle is right behind your vehicle or
- when the vehicle is not approaching your vehicle or
- when the other vehicle slows down.
- The vehicle’s approaching speed is decreased.
Page 430 of 555
06
6-143
CAUTION
• When the operation condition of
Rear Cross-Traffic Collision Warning
system is satisfied, the warning
will occur every time a vehicle
approaches the side or rear of your
stopped (0 km/h (0 mph) vehicle
speed) vehicle.
• The system’s warning or brake may
not operate properly if the left or
right of your vehicle’s rear bumper is
blocked by a vehicle or obstacle.
• The driver should always use
extreme caution while operating
the vehicle, whether or not the
warning light on the side view mirror
illuminates or there is a warning alarm.
• Playing the vehicle audio system at
high volume may offset the system’s
warning sounds.
• The warning of Rear Cross-Traffic
Collision Warning System may not
sound while other system’s warning sounds.
• If any other warning sound such as
seat belt warning chime is already
generated, Rear Cross-Traffic
Collision Warning system warning
may not sound. WARNING
• Drive safely even though the vehicle
is equipped with Rear Cross-Traffic
Collision Warning system and Rear
Cross-Traffic Collision-Avoidance
Assist system. Do not solely rely
on the system but check your
surrounding when backing the
vehicle up.
• The driver is responsible for accurate
brake control.
• Always pay extreme caution while
driving. Rear Cross-Traffic Collision
Warning system and Rear Cross-
Traffic Collision-Avoidance Assist
system may not operate properly or
unnecessarily operate in accordance
with your driving situations.
• Rear Cross-Traffic Collision-
Avoidance Assist system is not a
substitute for safe driving practices,
but a convenience function only. It
is the responsibility of the driver to
always drive cautiously to prevent
unexpected and sudden situations
from occurring. Pay attention to the
road conditions at all times.
Page 438 of 555
06
6-151
Smooth Cornering
Avoid braking or gear changing in
corners, especially when roads are wet.
Ideally, corners should always be taken
under gentle acceleration.
Driving at Night
Night driving presents more hazards than
driving in the daylight. Here are some
important tips to remember: • Slow down and keep more distance
between you and other vehicles, as it
may be more difficult to see at night,
especially in areas where there may
not be any street lights.
• Adjust your mirrors to reduce the glare
from other driver's headlamps.
• Keep your headlamps clean and
properly aimed. Dirty or improperly
aimed headlamps will make it much
more difficult to see at night.
• Avoid staring directly at the
headlamps of oncoming vehicles. You
could be temporarily blinded, and it
will take several seconds for your eyes
to readjust to the darkness.
Driving in the Rain
Rain and wet roads can make driving
dangerous. Here are a few things to
consider when driving in the rain or on
slick pavement: • Slow down and allow extra following
distance. A heavy rainfall makes
it harder to see and increases the
distance needed to stop your vehicle.
• Turn OFF your Cruise Control.
• Replace your windshield wiper blades
when they show signs of streaking or
missing areas on the windshield.
• Tires should be properly maintained
with at least 1.6mm (2/32nds of an
inch) of tread depth. If your tires
do not have enough tread, making
a quick stop on wet pavement can
cause a skid and possibly lead to an
accident. See "Tire replacement" in
chapter 8.
• Turn on your headlamps to make it
easier for others to see you.
• Driving too fast through large puddles
can affect your brakes. If you must go
through puddles, try to drive through
them slowly.
• If you believe your brakes may be wet,
apply them lightly while driving until
normal braking operation returns.
Hydroplaning
If the road is wet enough and you are
going fast enough, your vehicle may
have little or no contact with the road
surface and actually ride on the water.
The best advice is SLOW DOWN when
the road is wet.
The risk of hydroplaning increases as
the depth of tire tread decreases, refer
to “Tire replacement” in chapter 8.
Page 524 of 555
Maintenance
8-54
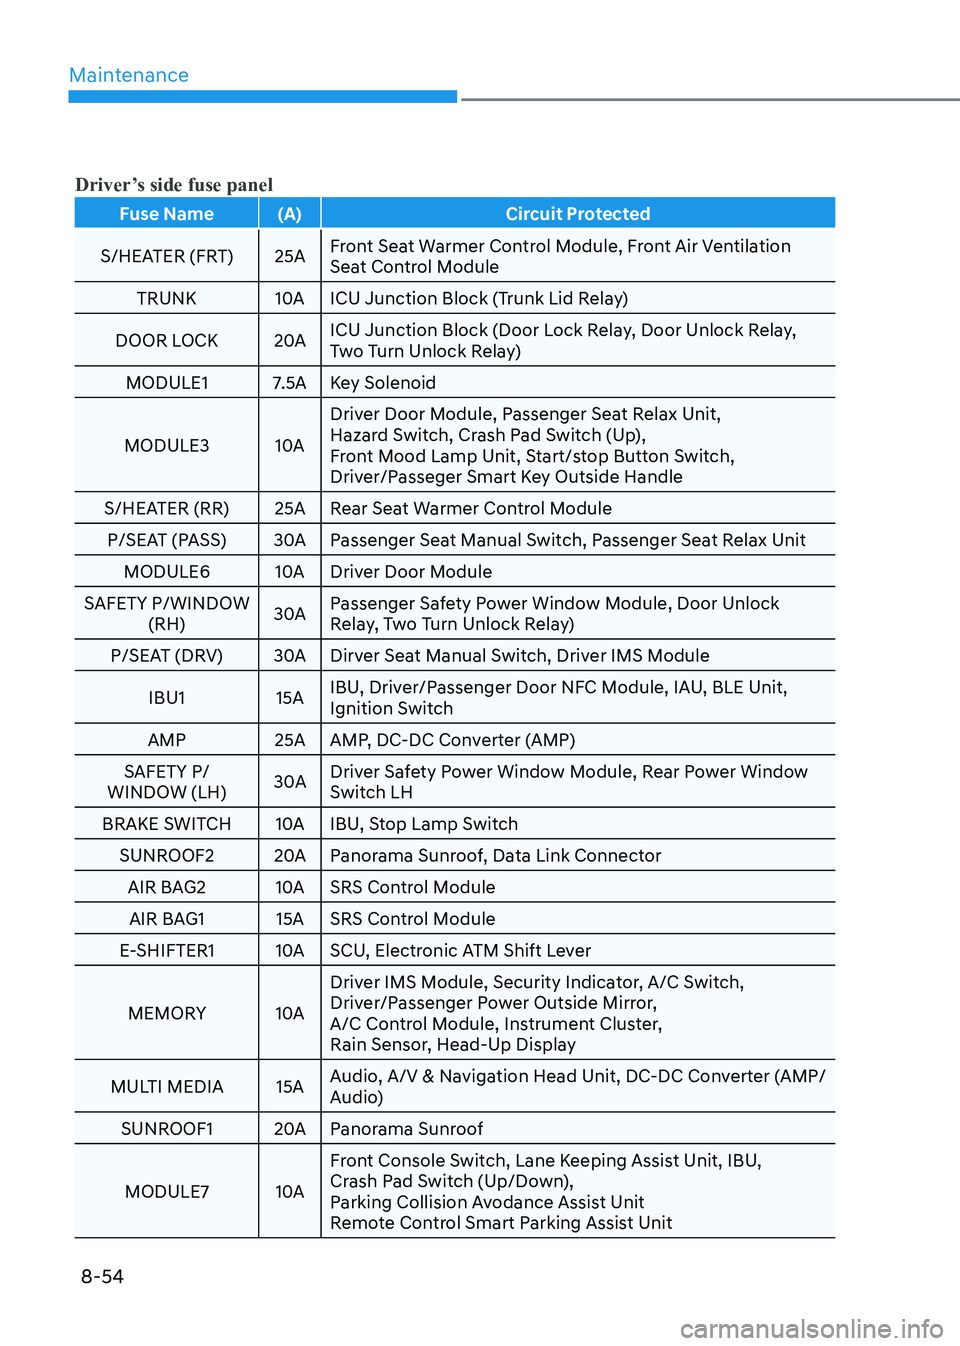
Driver’s side fuse panel
Fuse Name (A) Circuit Protected
S/HEATER (FRT) 25A Front Seat Warmer Control Module, Front Air Ventilation
Seat Control Module
TRUNK 10A ICU Junction Block (Trunk Lid Relay)
DOOR LOCK 20A ICU Junction Block (Door Lock Relay, Door Unlock Relay,
Two Turn Unlock Relay)
MODULE1 7.5A Key Solenoid
MODULE3 10A Driver Door Module, Passenger Seat Relax Unit,
Hazard Switch, Crash Pad Switch (Up),
Front Mood Lamp Unit, Start/stop Button Switch,
Driver/Passeger Smart Key Outside Handle
S/HEATER (RR) 25A Rear Seat Warmer Control Module P/SEAT (PASS) 30A Passenger Seat Manual Switch, Passenger Seat Relax Unit MODULE6 10A Driver Door Module
SAFETY P/WINDOW (RH) 30A Passenger Safety Power Window Module, Door Unlock
Relay, Two Turn Unlock Relay)
P/SEAT (DRV) 30A Dirver Seat Manual Switch, Driver IMS Module
IBU1 15A IBU, Driver/Passenger Door NFC Module, IAU, BLE Unit,
Ignition Switch
AMP 25A AMP, DC-DC Converter (AMP)
SAFETY P/
WINDOW (LH) 30A Driver Safety Power Window Module, Rear Power Window
Switch LH
BRAKE SWITCH 10A IBU, Stop Lamp Switch SUNROOF2 20A Panorama Sunroof, Data Link Connector
AIR BAG2 10A SRS Control Module AIR BAG1 15A SRS Control Module
E-SHIFTER1 10A SCU, Electronic ATM Shift Lever
MEMORY 10A Driver IMS Module, Security Indicator, A/C Switch,
Driver/Passenger Power Outside Mirror,
A/C Control Module, Instrument Cluster,
Rain Sensor, Head-Up Display
MULTI MEDIA 15A Audio, A/V & Navigation Head Unit, DC-DC Converter (AMP/
Audio)
SUNROOF1 20A Panorama Sunroof
MODULE7 10A Front Console Switch, Lane Keeping Assist Unit, IBU,
Crash Pad Switch (Up/Down),
Parking Collision Avodance Assist Unit
Remote Control Smart Parking Assist Unit
Page 527 of 555
08
8-57
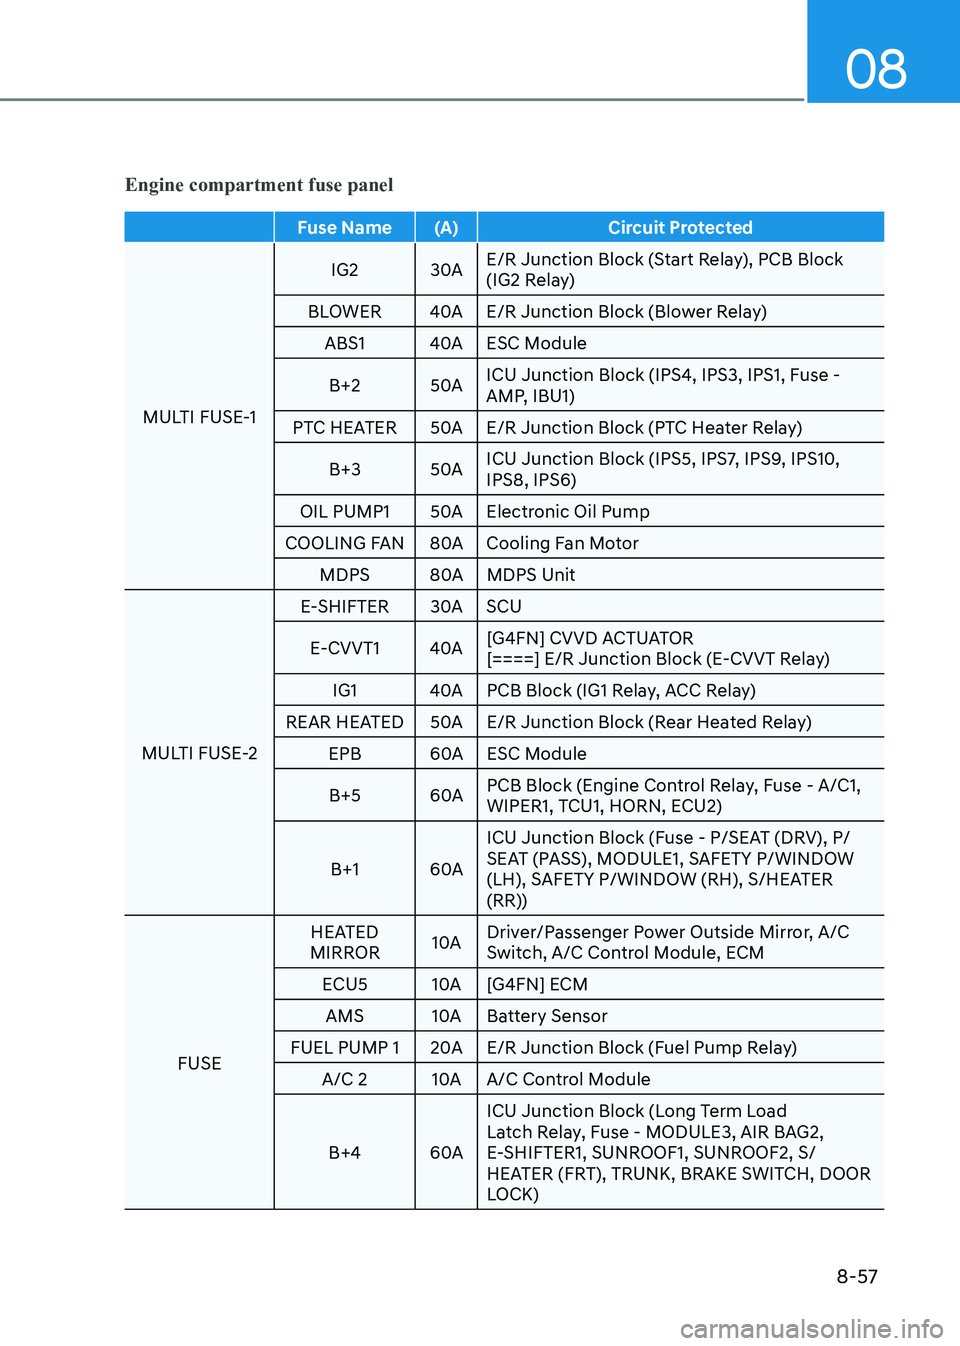
Engine compartment fuse panel
Fuse Name (A) Circuit Protected
MULTI FUSE-1 IG2 30A
E/R Junction Block (Start Relay), PCB Block
(IG2 Relay)
BLOWER 40A E/R Junction Block (Blower Relay) ABS1 40A ESC Module
B+2 50A ICU Junction Block (IPS4, IPS3, IPS1, Fuse -
AMP, IBU1)
PTC HEATER 50A E/R Junction Block (PTC Heater Relay)
B+3 50A ICU Junction Block (IPS5, IPS7, IPS9, IPS10, IPS8, IPS6)
OIL PUMP1 50A Electronic Oil Pump
COOLING FAN 80A Cooling Fan Motor MDPS 80A MDPS Unit
MULTI FUSE-2 E-SHIFTER 30A SCU
E-CVVT1 40A [G4FN] CVVD ACTUATOR
[====] E/R Junction Block (E-CVVT Relay)
IG1 40A PCB Block (IG1 Relay, ACC Relay)
REAR HEATED 50A E/R Junction Block (Rear Heated Relay)
EPB 60A ESC Module
B+5 60A PCB Block (Engine Control Relay, Fuse - A/C1,
WIPER1, TCU1, HORN, ECU2)
B+1 60A ICU Junction Block (Fuse - P/SEAT (DRV), P/
SEAT (PASS), MODULE1, SAFETY P/WINDOW
(LH), SAFETY P/WINDOW (RH), S/HEATER
(RR))
FUSE HEATED
MIRROR 10A Driver/Passenger Power Outside Mirror, A/C
Switch, A/C Control Module, ECM
ECU5 10A [G4FN] ECM AMS 10A Battery Sensor
FUEL PUMP 1 20A E/R Junction Block (Fuel Pump Relay) A/C 2 10A A/C Control Module
B+4 60A ICU Junction Block (Long Term Load
Latch Relay, Fuse - MODULE3, AIR BAG2,
E-SHIFTER1, SUNROOF1, SUNROOF2, S/
HEATER (FRT), TRUNK, BRAKE SWITCH, DOOR
LOCK)
Page 532 of 555
Maintenance
8-62
Interior Light Bulb Replacement
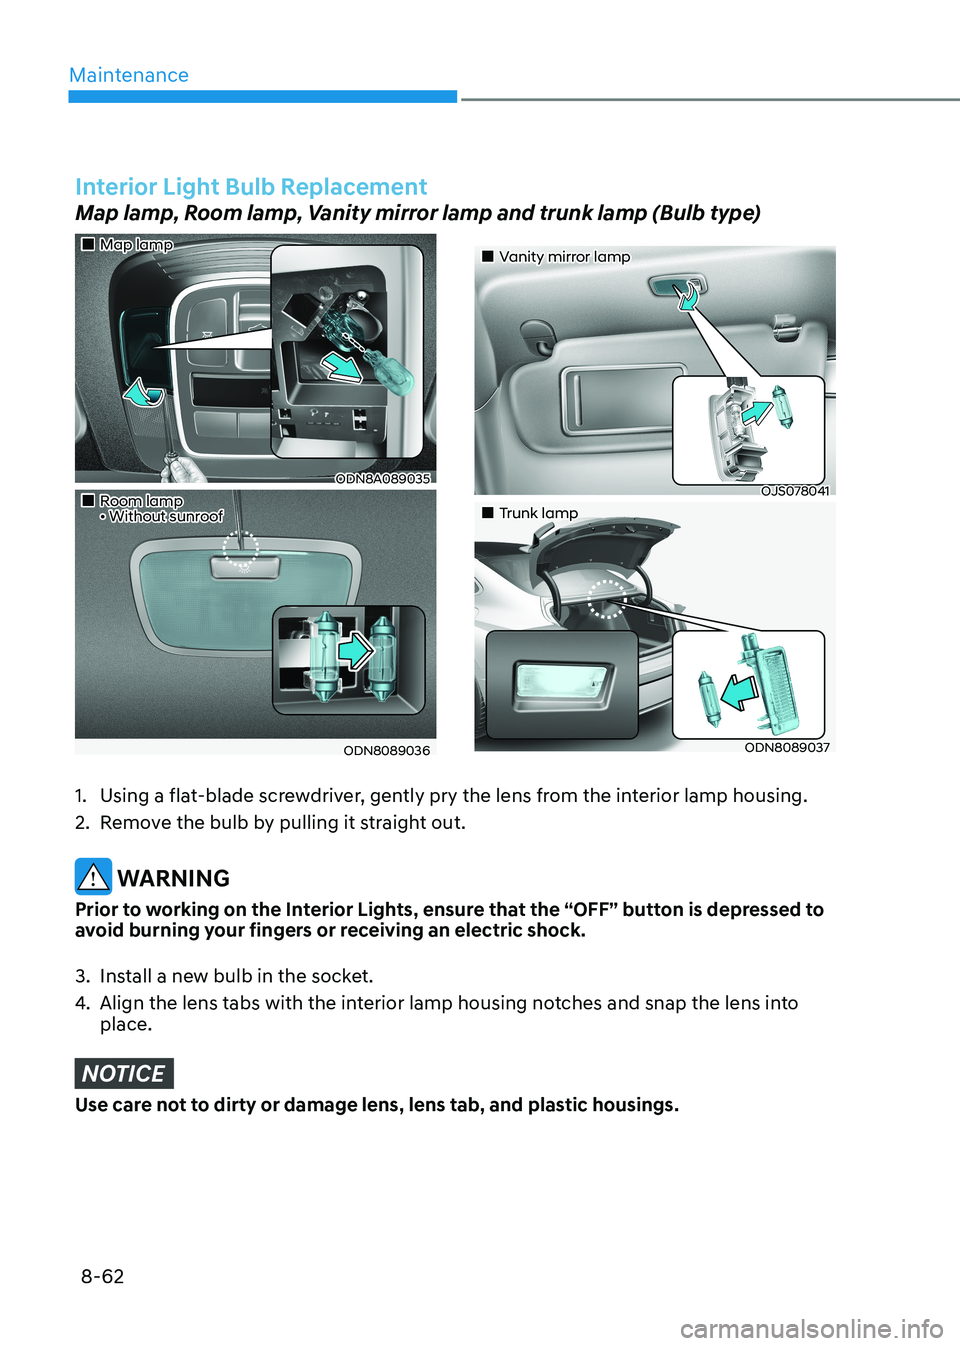
Map lamp, Room lamp, Vanity mirror lamp and trunk lamp (Bulb type)
„„Map lamp
ODN8A089035
„„Room lamp • Without sunroof
ODN8089036
„„Vanity mirror lamp
OJS078041
„„Trunk lamp
ODN8089037
1. Using a flat-blade screwdriver, gently pry the lens from the interior lamp housing.
2. Remove the bulb by pulling it straight out.
WARNING
Prior to working on the Interior Lights, ensure that the “OFF” button is depressed to
avoid burning your fingers or receiving an electric shock.
3. Install a new bulb in the socket.
4. Align the lens tabs with the interior lamp housing notches and snap the lens into place.
NOTICE
Use care not to dirty or damage lens, lens tab, and plastic housings.