2023 HYUNDAI SONATA tow
[x] Cancel search: towPage 161 of 555
05
5-15
Information
This device complies with Industry Canada RSS-210 standard.
Operation is subject to the following three conditions: 1. This device may not cause harmful
interference.
2. This device must accept any
interference received, including
interference that may cause undesired operation.
3. Changes or modifications not expressly
approved by the party responsible
for compliance could void the user’s authority to operate the device.
“Limp Home” Mode and Related
Procedures
If the immobilizer warning indicator
blinks for five seconds when the ignition
key is turned to the “ON” position,
this indicates the immobilizer system
requires service. The engine cannot be
started without using the procedure
below.
The following procedure describes
how to start the engine using the limp
home function (0, 1, 2, 3 as a sample
password).
NOTICE
You can get a limp home password
when the vehicle is first delivered to
you. If you do not have a password,
consult your authorized HYUNDAI
dealer.
1. To activate the password, turn the ignition key “ON” and “OFF“
according to the digit numbers. The
immobilizer indicator will blink along
with the operation of the ignition
key. For example, turn the ignition
key once for digit number “1”, and
twice for “2”, and so on. For the digit
number “0”, you must cycle the
ignition key 10 times.
2. Wait for 3~10 seconds.
3. You may set the remaining number of digits by following steps 1 and 2.
4. If all of the four password digits have
been successfully entered, turn the
ignition key “ON” and check that the
immobilizer indicator illuminates.
From this time, you have to start your
engine within 30 seconds. If you try
to start your engine after 30 seconds,
your engine will not start.
NOTICE
If the engine stalls while driving in the
“limp home” mode, you can start your
engine within 3 seconds without re-
entering the password.
If the immobilizer indicator blinks for
five seconds, you must re-enter the
password (steps 1~4).
After performing the limp home
activation procedure, consult with your
authorized HYUNDAI dealer as soon as possible.
CAUTION
• If the password is entered incorrectly
three consecutive times, wait for
about one hour to perform the limp
home activation procedure again.
• If you cannot start your engine using
the limp home activation procedure,
have your vehicle towed by an
authorized HYUNDAI dealer.
Page 174 of 555
Convenience Features
5-28
Tilt Steering / Telescope Steering
When adjusting the steering wheel to a
comfortable position, adjust the steering
wheel so that it points toward your chest,
not toward your face. Make sure you can
see the instrument cluster warning lights
and gauges. After locking the lever, push
the steering wheel both up and down to
be certain it is locked in position. Always
adjust the position of the steering wheel
before driving.
WARNING
NEVER adjust the steering wheel while
driving. This may cause loss of vehicle
control resulting in an accident.
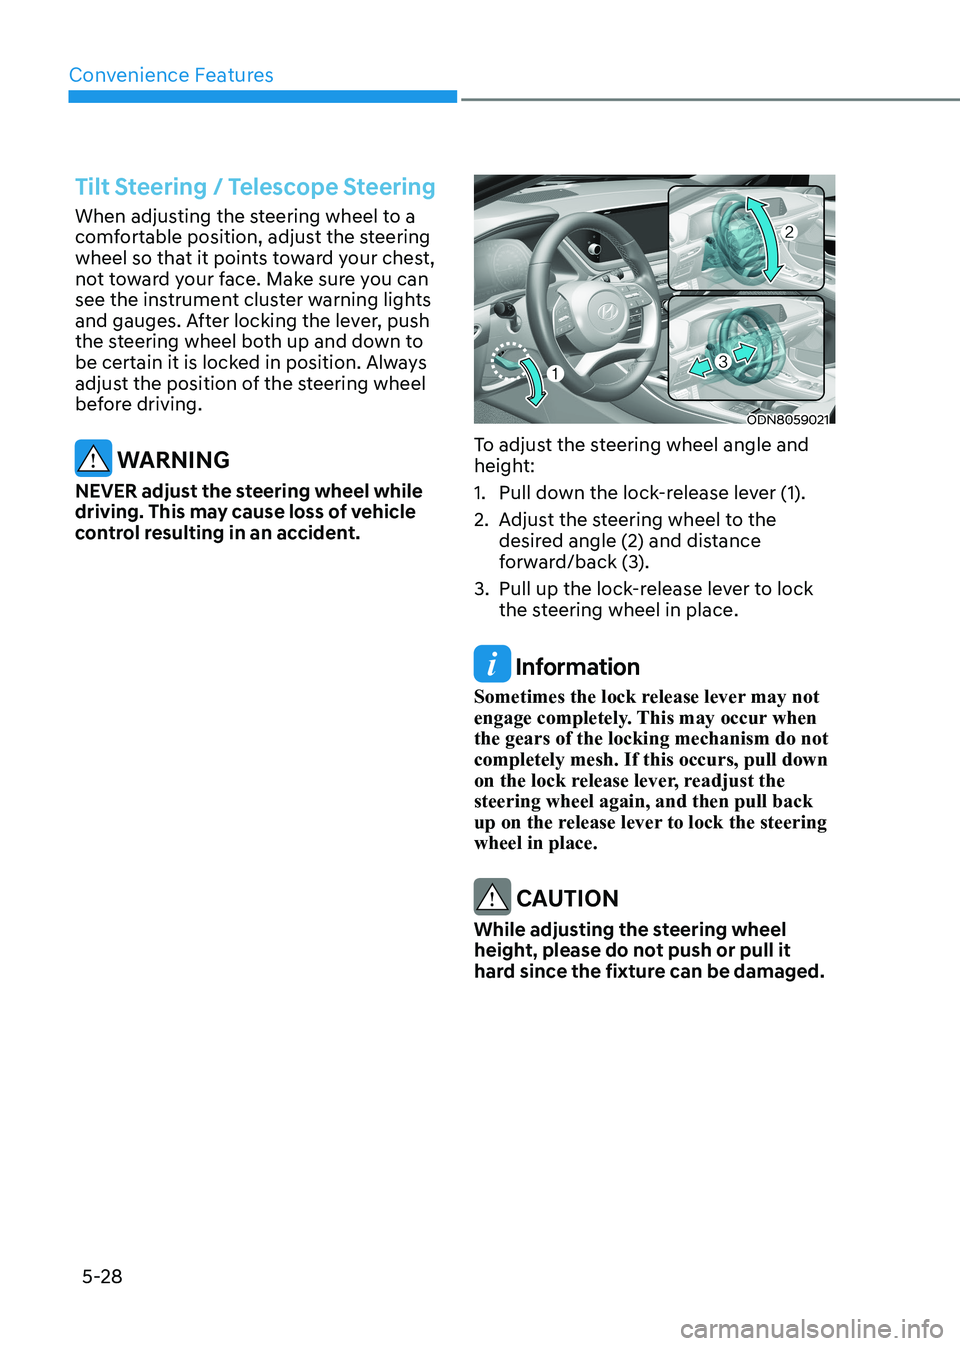
ODN8059021
To adjust the steering wheel angle and
height:
1. Pull down the lock-release lever (1).
2. Adjust the steering wheel to the desired angle (2) and distance
forward/back (3).
3. Pull up the lock-release lever to lock the steering wheel in place.
Information
Sometimes the lock release lever may not
engage completely. This may occur when the gears of the locking mechanism do not completely mesh. If this occurs, pull down
on the lock release lever, readjust the steering wheel again, and then pull back
up on the release lever to lock the steering wheel in place.
CAUTION
While adjusting the steering wheel
height, please do not push or pull it
hard since the fixture can be damaged.
Page 177 of 555
05
5-31
Inside Rearview Mirror
Before driving your vehicle, check to
see that your inside rearview mirror is
properly positioned. Adjust the rearview
mirror so that the view through the rear
window is properly centered.
WARNING
Make sure your line of sight is not
obstructed. Do not place objects in the
rear seat, cargo area, or behind the rear
head restraints which could interfere
with your vision through the rear
window.
WARNING
To prevent serious injury during an
accident or deployment of the air bag,
do not modify the rearview mirror and
do not install a wide mirror.
WARNING
NEVER adjust the mirror while driving.
This may cause loss of vehicle control
resulting in an accident.
NOTICE
When cleaning the mirror, use a paper
towel or similar material dampened
with glass cleaner. Do not spray glass
cleaner directly on the mirror as this
may cause the liquid cleaner to enter
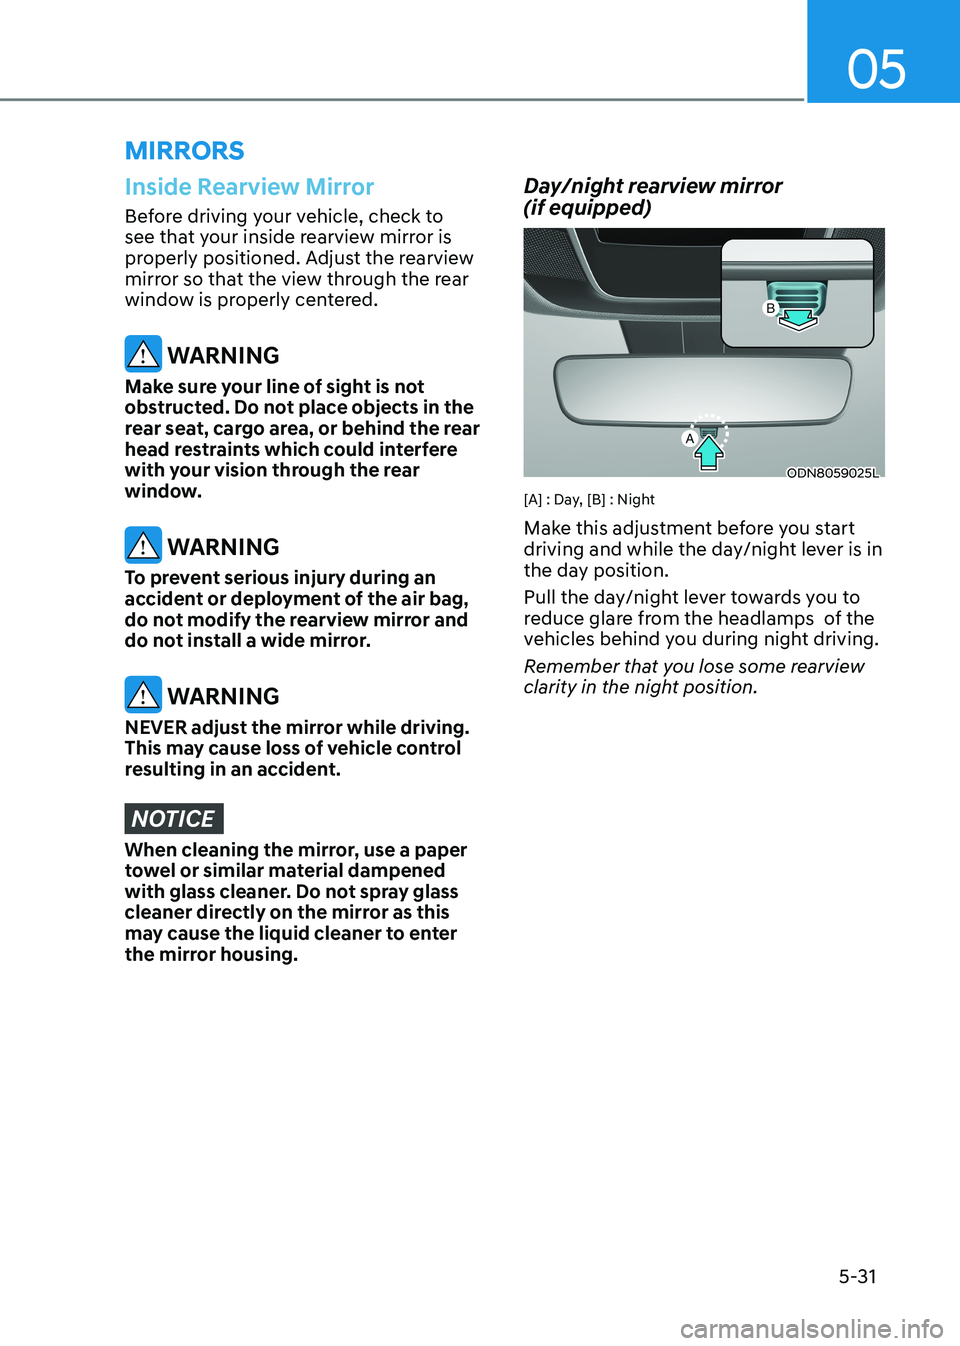
the mirror housing. Day/night rearview mirror (if equipped)
ODN8059025L
[A] : Day, [B] : Night
Make this adjustment before you start
driving and while the day/night lever is in
the day position.
Pull the day/night lever towards you to
reduce glare from the headlamps of the
vehicles behind you during night driving.
Remember that you lose some rearview
clarity in the night position.
mirrorS
Page 193 of 555
05
5-47
Sunshade
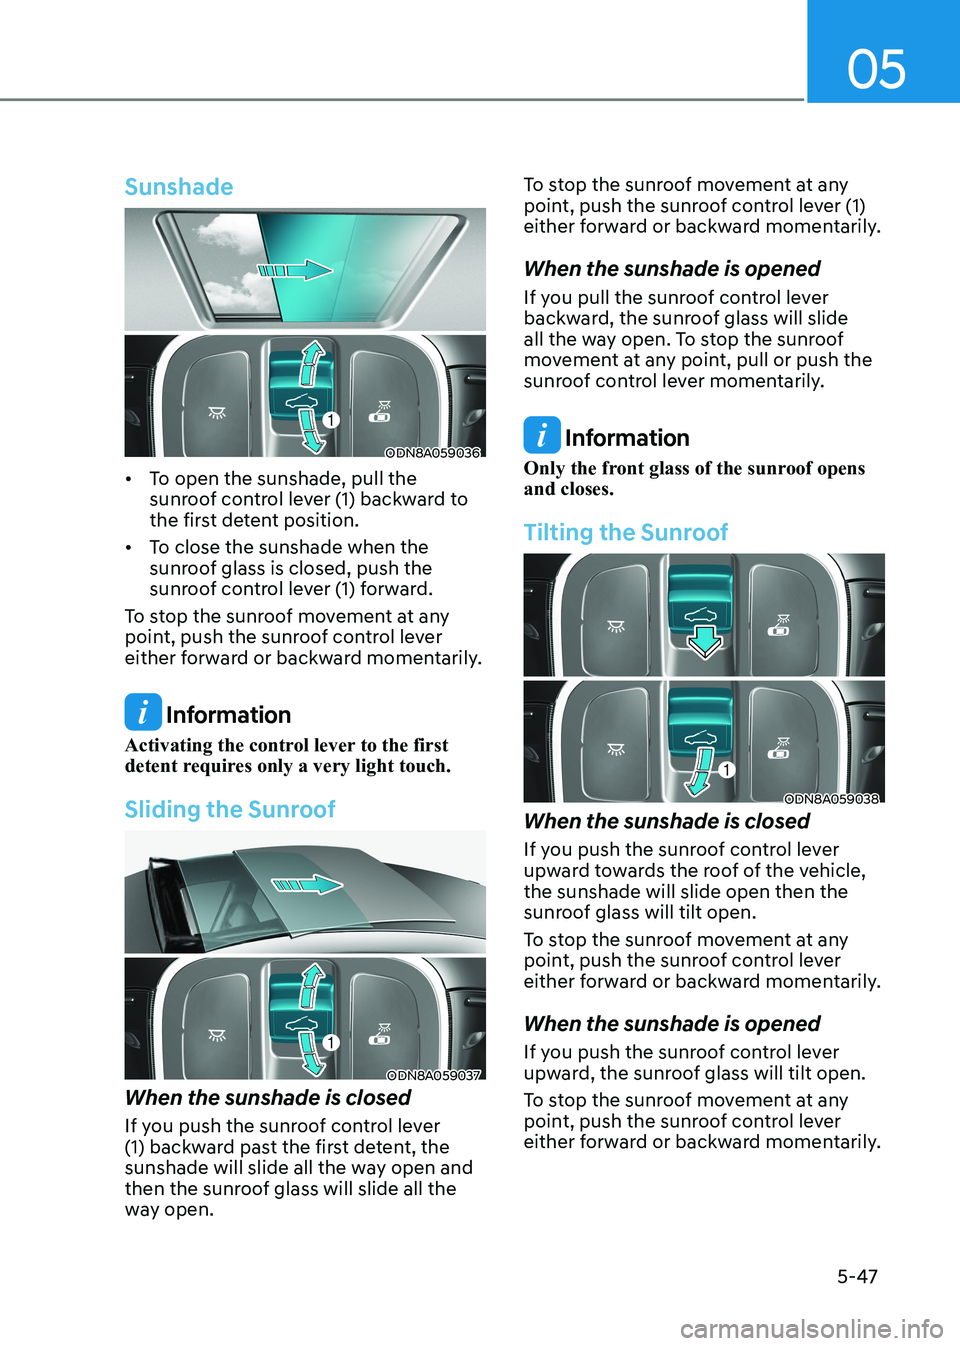
ODN8A059036
• To open the sunshade, pull the sunroof control lever (1) backward to
the first detent position.
• To close the sunshade when the sunroof glass is closed, push the
sunroof control lever (1) forward.
To stop the sunroof movement at any
point, push the sunroof control lever
either forward or backward momentarily.
Information
Activating the control lever to the first
detent requires only a very light touch.
Sliding the Sunroof
ODN8A059037
When the sunshade is closed
If you push the sunroof control lever
(1) backward past the first detent, the
sunshade will slide all the way open and
then the sunroof glass will slide all the
way open. To stop the sunroof movement at any
point, push the sunroof control lever (1)
either forward or backward momentarily.
When the sunshade is opened
If you pull the sunroof control lever
backward, the sunroof glass will slide
all the way open. To stop the sunroof
movement at any point, pull or push the
sunroof control lever momentarily.
Information
Only the front glass of the sunroof opens and closes.
Tilting the Sunroof
ODN8A059038
When the sunshade is closed
If you push the sunroof control lever
upward towards the roof of the vehicle, the sunshade will slide open then the
sunroof glass will tilt open.
To stop the sunroof movement at any
point, push the sunroof control lever
either forward or backward momentarily. When the sunshade is opened
If you push the sunroof control lever
upward, the sunroof glass will tilt open.
To stop the sunroof movement at any
point, push the sunroof control lever
either forward or backward momentarily.
Page 208 of 555
Convenience Features
5-62
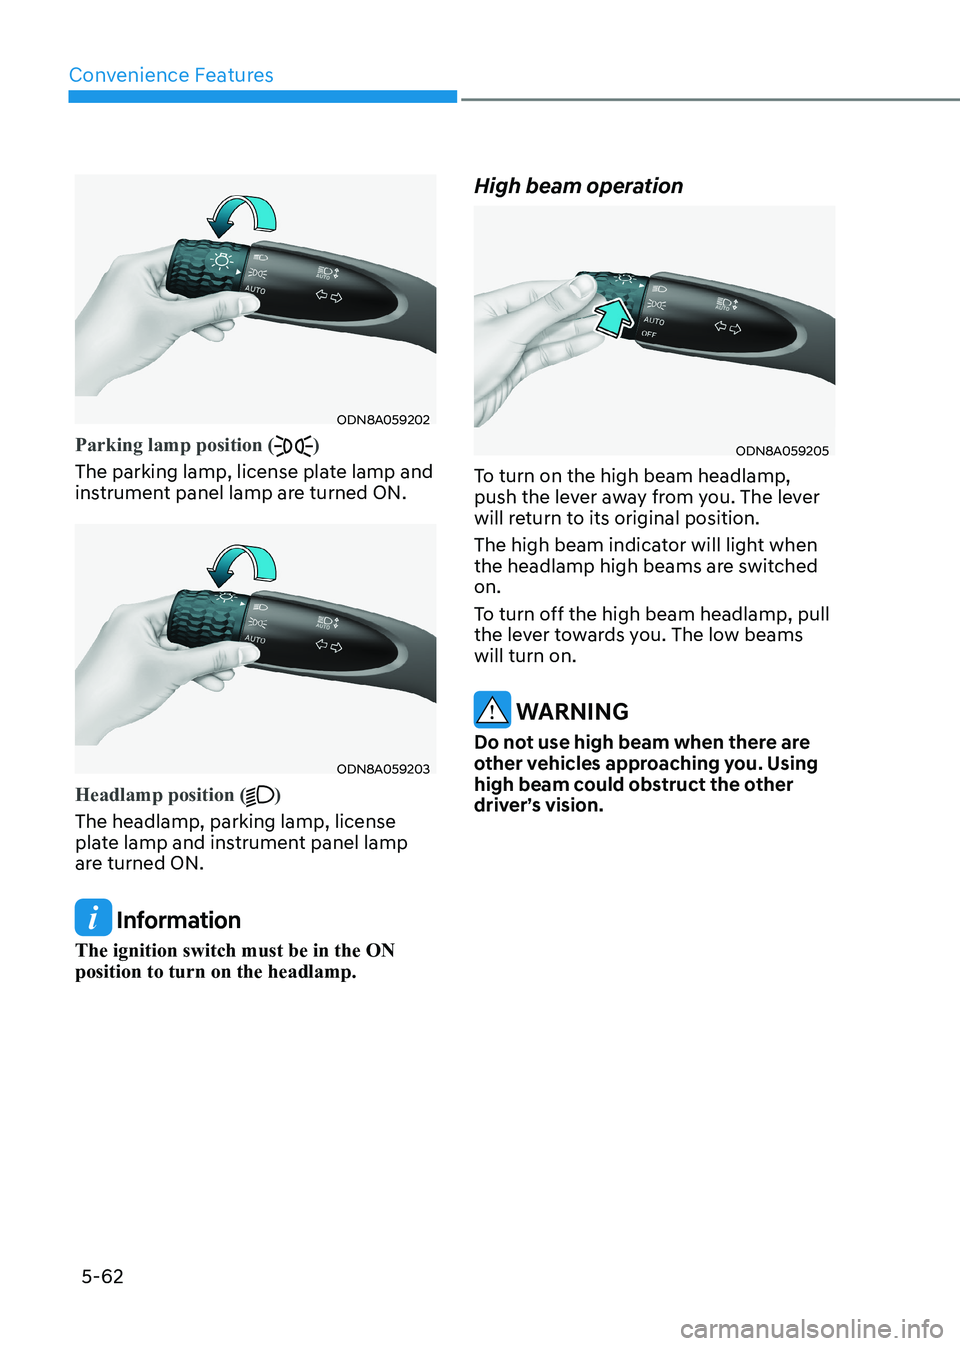
ODN8A059202
Parking lamp position ()
The parking lamp, license plate lamp and
instrument panel lamp are turned ON.
ODN8A059203
Headlamp position ()
The headlamp, parking lamp, license
plate lamp and instrument panel lamp
are turned ON.
Information
The ignition switch must be in the ON position to turn on the headlamp. High beam operation
ODN8A059205
To turn on the high beam headlamp,
push the lever away from you. The lever
will return to its original position.
The high beam indicator will light when
the headlamp high beams are switched on.
To turn off the high beam headlamp, pull
the lever towards you. The low beams will turn on.
WARNING
Do not use high beam when there are
other vehicles approaching you. Using
high beam could obstruct the other
driver’s vision.
Page 209 of 555
05
5-63
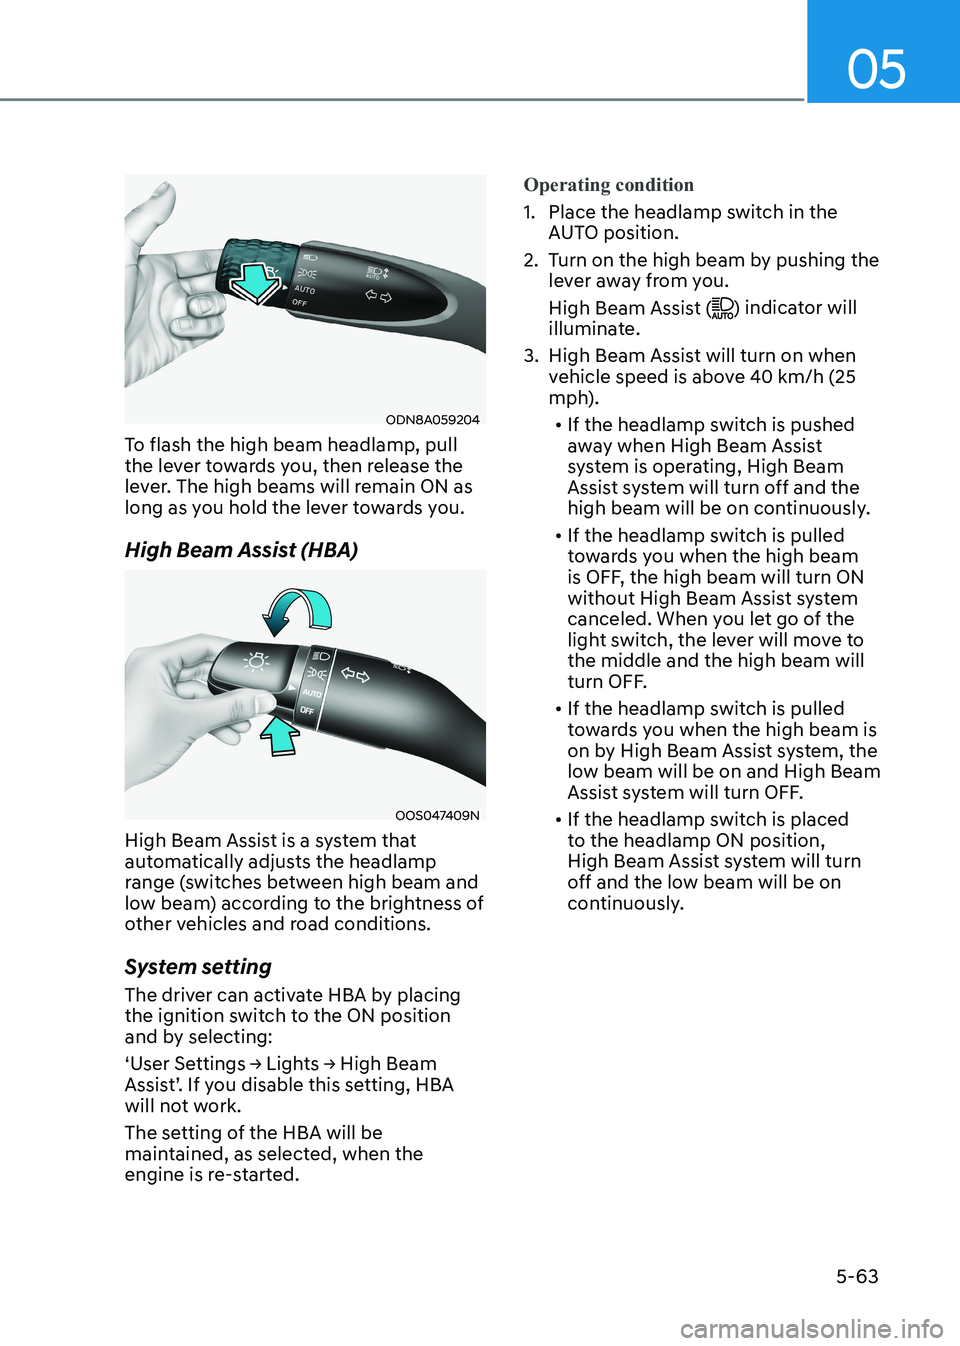
ODN8A059204
To flash the high beam headlamp, pull
the lever towards you, then release the
lever. The high beams will remain ON as
long as you hold the lever towards you.
High Beam Assist (HBA)
OOS047409N
High Beam Assist is a system that
automatically adjusts the headlamp
range (switches between high beam and
low beam) according to the brightness of
other vehicles and road conditions.
System setting
The driver can activate HBA by placing
the ignition switch to the ON position
and by selecting:
‘User Settings → Lights → High Beam
Assist’. If you disable this setting, HBA
will not work.
The setting of the HBA will be
maintained, as selected, when the
engine is re-started.
Operating condition
1. Place the headlamp switch in the AUTO position.
2. Turn on the high beam by pushing the lever away from you.
High Beam Assist (
) indicator will
illuminate.
3. High Beam Assist will turn on when vehicle speed is above 40 km/h (25
mph).
• If the headlamp switch is pushed
away when High Beam Assist
system is operating, High Beam
Assist system will turn off and the
high beam will be on continuously.
• If the headlamp switch is pulled
towards you when the high beam
is OFF, the high beam will turn ON
without High Beam Assist system
canceled. When you let go of the
light switch, the lever will move to the middle and the high beam will
turn OFF.
• If the headlamp switch is pulled
towards you when the high beam is
on by High Beam Assist system, the
low beam will be on and High Beam
Assist system will turn OFF.
• If the headlamp switch is placed
to the headlamp ON position,
High Beam Assist system will turn
off and the low beam will be on
continuously.
Page 211 of 555
05
5-65
2. When the High Beam Assist camera
is adversely affected by an external
condition. Such examples may include:
• When the vehicle’s headlamps
have been damaged or not
repaired properly.
• When the vehicle headlamps are
not aimed properly.
• When the vehicle is driven on a
narrow curved road or rough road
• When the vehicle is driven on an
uphill road or downhill road
• When only part of the vehicle in
front is visible on a crossroad or
curved road.
• When there is a traffic light,
reflecting sign, flashing sign or
mirror.
• When the road conditions are bad
such as being wet or covered with
snow.
• When a vehicle suddenly appears
from a curve.
• When the vehicle is tilted from a
flat tire or being towed.
• When Lane Keeping Assist system
warning light illuminates.
• When the light from the on-coming
or front vehicle is not detected
because of exhaust fume, smoke,
fog, snow, etc.
• When the front window is covered
with foreign matters such as ice,
dust, fog, or is damaged.
3. When the forward visibility is poor. Such examples may include:
• When the headlamps of an on-
coming vehicle or a vehicle in front
is not detected due to poor outside
visibility (smog, smoke, dust, fog,
heavy rain, snow, etc.).
• When the windshield visibility is
poor.
WARNING
• Do not attempt to disassemble
the front view camera without the
assistance of an authorized HYUNDAI
dealer technician. If the front camera
is removed for any reason, the
system may need to be re-calibrated.
Have the system inspected by an
authorized HYUNDAI dealer.
• If the windshield of your vehicle is
replaced, most likely the front view
camera will need to be re-calibrated.
If this occurs, have your vehicle
inspected and have the system re-
calibrated by an authorized HYUNDAI
dealer.
• Be careful that water doesn’t get into
High Beam Assist unit and do not
remove or damage related parts of
High Beam Assist system.
• Do not place objects on the crash
pad that reflect light such as mirrors,
white paper, etc. The system may
malfunction if sunlight is reflected.
• At times, High Beam Assist system
may not work properly. The system
is for your convenience only. It is the
responsibility of the driver for safe
driving practices and always check
the road conditions for your safety.
• When the system does not operate
normally, change the headlamp
position manually between the high
beam and low beam.
Page 217 of 555

05
5-71
Wipers AnD WAshers
ODN8059208L
A. Wiper speed control
• MIST – Single wipe
• OFF – Off
• INT / --- – Intermittent wipe
AUTO – Auto control wipe
(if equipped)
• LO– Low wiper speed
• HI – High wiper speed
B. Intermittent control wipe time
adjustment
C. Wash with brief wipes
(pull lever towards you)
Windshield Wipers
Operates as follows when the ignition
switch is in the ON position.
MIST: For a single wiping cycle, push
the lever upward and release. The
wipers will operate continuously if
the lever is held in this position.
OFF: Wiper is not in operation.
INT: Wiper operates intermittently at the same wiping intervals. To vary
the speed setting, move the speed
control lever. The top most setting
will run the wipers most frequently
(for more rain). The bottom setting
will run the wipers the least
frequently (for less rain).
AUTO : (if equipped) The rain sensor located
on the upper end of the windshield glass senses
the amount of rainfall and
controls the wiping cycle
for the proper interval. The
more it rains, the faster the
wiper operates. When the
rain stops, the wiper stops.
To vary the speed setting,
turn the speed control knob
(B).
LO: The wiper runs at a lower speed.
HI: The wiper runs at a higher speed.
Information
If there is heavy accumulation of snow
or ice on the windshield, defrost the
windshield for about 10 minutes, or until
the snow and/or ice is removed before
using the windshield wipers to ensure
proper operation.
If you do not remove the snow and/or ice
before using the wiper and washer, it may
damage the wiper and washer system.