2023 HYUNDAI SANTA CRUZ page 80
[x] Cancel search: page 80Page 6 of 598
Introduction
1-2
FOREWORD
Congratulations, and thank you for choosing HYUNDAI. We are pleased to welcome
you to the growing number of discerning people who drive a HYUNDAI vehicle. We are
very proud of the advanced engineering and quality of each HYUNDAI we build.
Your Owner’s Manual will introduce you to the features and operation of your new
HYUNDAI. To become familiar with your new HYUNDAI, so that you can fully enjoy it,
read this Owner’s Manual carefully before driving your new vehicle.
This manual contains important safety information and instructions intended to
familiarize you with your vehicle’s controls and safety features so you can safely
operate your vehicle.
This manual also contains information on maintenance designed to enhance safe
operation of the vehicle. It is recommended that all service and maintenance on your
car be performed by an authorized HYUNDAI dealer. An authorized HYUNDAI dealer is
prepared to provide high-quality service, maintenance and any other assistance that
may be required.
This Owner’s Manual should be considered a permanent part of your vehicle, and
should be kept in the vehicle so you can refer to it at any time. The manual should stay
with the vehicle if you sell it to provide the next owner with important operating, safety
and maintenance information.
HYUNDAI MOTOR AMERICA
CAUTION
Severe engine and transmission damage may result from the use of poor quality
fuels and lubricants that do not meet HYUNDAI specifications. You must always use
high quality fuels and lubricants that meet the specifications listed on Page 2-14 in
the Vehicle Specifications section of the Owner’s Manual.
Copyright 2021 HYUNDAI Motor America. All rights reserved. No part of this publication
may be reproduced, stored in any retrieval system or transmitted in any form or by any
means without the prior written permission of HYUNDAI Motor America.
Page 8 of 598
Introduction
1-4
We want to help you get the greatest possible driving pleasure from your vehicle. Your
Owner’s Manual can assist you in many ways. To gain an overview of the contents
of your Owner’s Manual, use the Table of Contents in the front of the manual. The
first page of each Chapter includes a detailed Table of Contents of the topics in that
Chapter.
To quickly locate information about your vehicle, use the Index in the back of the
manual. It is an alphabetical list of what is in this manual and the page number where it
can be found.
For your convenience, we have incorporated tabs on the right-hand page edges.
These tabs are coded with the Chapter titles to assist you with navigating through the
manual.
SAFETY MESSAGES
Your safety, and the safety of others, is very important. This Owner’s Manual provides
you with many safety precautions and operating procedures. This information alerts
you to potential hazards that may hurt you or others, as well as damage your vehicle.
Safety messages found on vehicle labels and in this manual describe these hazards
and what to do to avoid or reduce the risks.
Warnings and instructions contained in this manual are for your safety. Failure to follow
safety warnings and instructions can lead to serious injury or death.
Throughout this manual DANGER, WARNING, CAUTION, NOTICE and the SAFETY
ALERT SYMBOL will be used.
This is the safety alert symbol. It is used to alert you to potential physical injury
hazards. Obey all safety messages that follow this symbol to avoid possible
injury or death. The safety alert symbol precedes the signal words DANGER,
WARNING and CAUTION.
DANGER
DANGER indicates a hazardous
situation which, if not avoided, will
result in death or serious injury.
WARNING
WARNING indicates a hazardous
situation which, if not avoided, could
result in death or serious injury.
CAUTION
CAUTION indicates a hazardous
situation which, if not avoided, could
result in minor or moderate injury.
NOTICE
NOTICE indicates a situation which,
if not avoided, could result in vehicle
damage.
HOW TO USE THIS MANUAL
Page 70 of 598
Seats & Safety System
3-40
OHI038146OHI038146
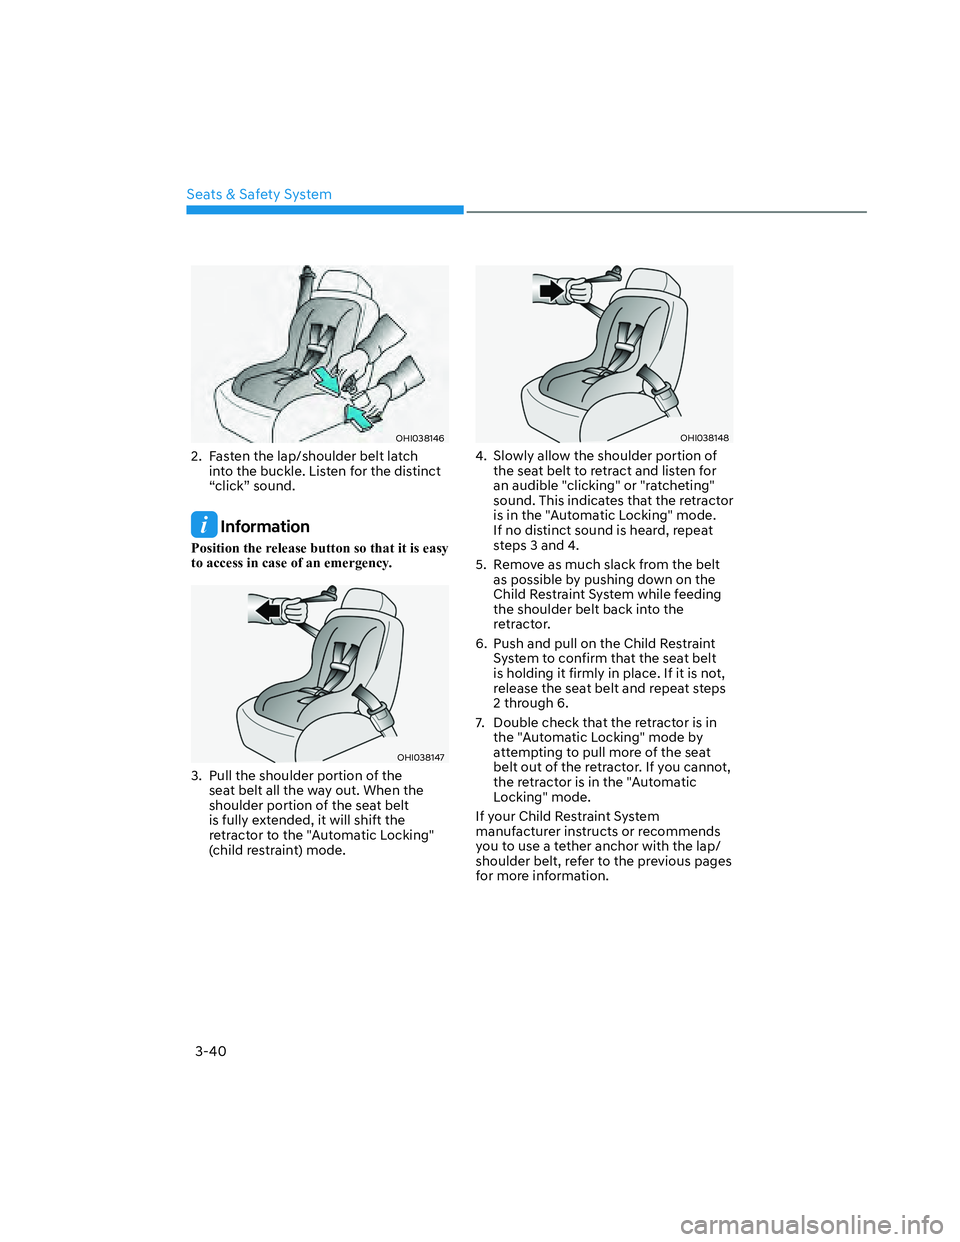
2. Fasten the lap/shoulder belt latch
into the buckle. Listen for the distinct
“click” sound.
Information
Position the release button so that it is easy
to access in case of an emergency.
OHI038147OHI038147
3. Pull the shoulder portion of the
seat belt all the way out. When the
shoulder portion of the seat belt
is fully extended, it will shift the
retractor to the "Automatic Locking"
(child restraint) mode.
OHI038148OHI038148
4. Slowly allow the shoulder portion of
the seat belt to retract and listen for
an audible "clicking" or "ratcheting"
sound. This indicates that the retractor
is in the "Automatic Locking" mode.
If no distinct sound is heard, repeat
steps 3 and 4.
5. Remove as much slack from the belt
as possible by pushing down on the
Child Restraint System while feeding
the shoulder belt back into the
retractor.
6. Push and pull on the Child Restraint
System to confirm that the seat belt
is holding it firmly in place. If it is not,
release the seat belt and repeat steps
2 through 6.
7. Double check that the retractor is in
the "Automatic Locking" mode by
attempting to pull more of the seat
belt out of the retractor. If you cannot,
the retractor is in the "Automatic
Locking" mode.
If your Child Restraint System
manufacturer instructs or recommends
you to use a tether anchor with the lap/
shoulder belt, refer to the previous pages
for more information.
Page 157 of 598
05
5-21
Remote Start with Digital Key
• Using the Hyundai Digital Key app
on your phone, press the Door Lock
button and then press the Remote
Start button (buttons must be pressed
within about 4 seconds). If all the
doors of your vehicle are closed
(including the hood and the tailgate),
the engine will be automatically
started.
Note that when the remote start
feature is activated, the hazard
warning lights will blink two times
and a chime will sound before engine
startup. Also note the following:
• The climate control system will come
on using the same settings from when
you last used the vehicle
• To turn off the engine, press the
Remote Engine Stop button within the
Hyundai Digital Key app.
• The engine will remain running for
approximately 10 minutes, and then
engine will automatically shut OFF.
• To keep the engine running, access
the vehicle and place the smartphone
on the wireless charging pad
(authentication pad) while the engine
is still in remote engine-ON mode.
For more information, refer to the Engine
Start/Stop button in chapter 6.Vehicle information Display
The digital key application displays
the vehicle information such as
driving or door conditions through the
communication with the vehicle.
• How to check : Select the vehicle
what you want to check and touch
the vehicle image, then vehicle
information display page will be
shown.
• Contents : accumulated odometer,
latest fuel economy, driving range,
fuel remaining, tire pressure, doors
lock/unlock status and last data
updated time.
�ÃNote that displayed vehicle data may
be slightly different from the current
vehicle condition
�ÃFor more information, please refer to
the ‘Tutorial’ on your Digital key app.
Page 180 of 598
Convenient Features
5-44
1. Programming HomeLink®
The following steps show how to
program HomeLink. If you have any
questions or are having difficulty
programming your HomeLink buttons,
refer to the HomeLink website or call the
HomeLink customer support toll-free
number. Do this before going back to the
dealer who sold you the car.
• Visit the HomeLink website at: www.
homelink.com. Then at the top of the
page, choose your vehicle make. Then
watch the You Tube video, and/or
access additional website information.
• If you choose to access the website
via your cell phone, scan the QR code.
• Or call HomeLink customer support
at 1-800-355-3515 (Please have the
vehicle make/model and the opener
device make/model readily available.)
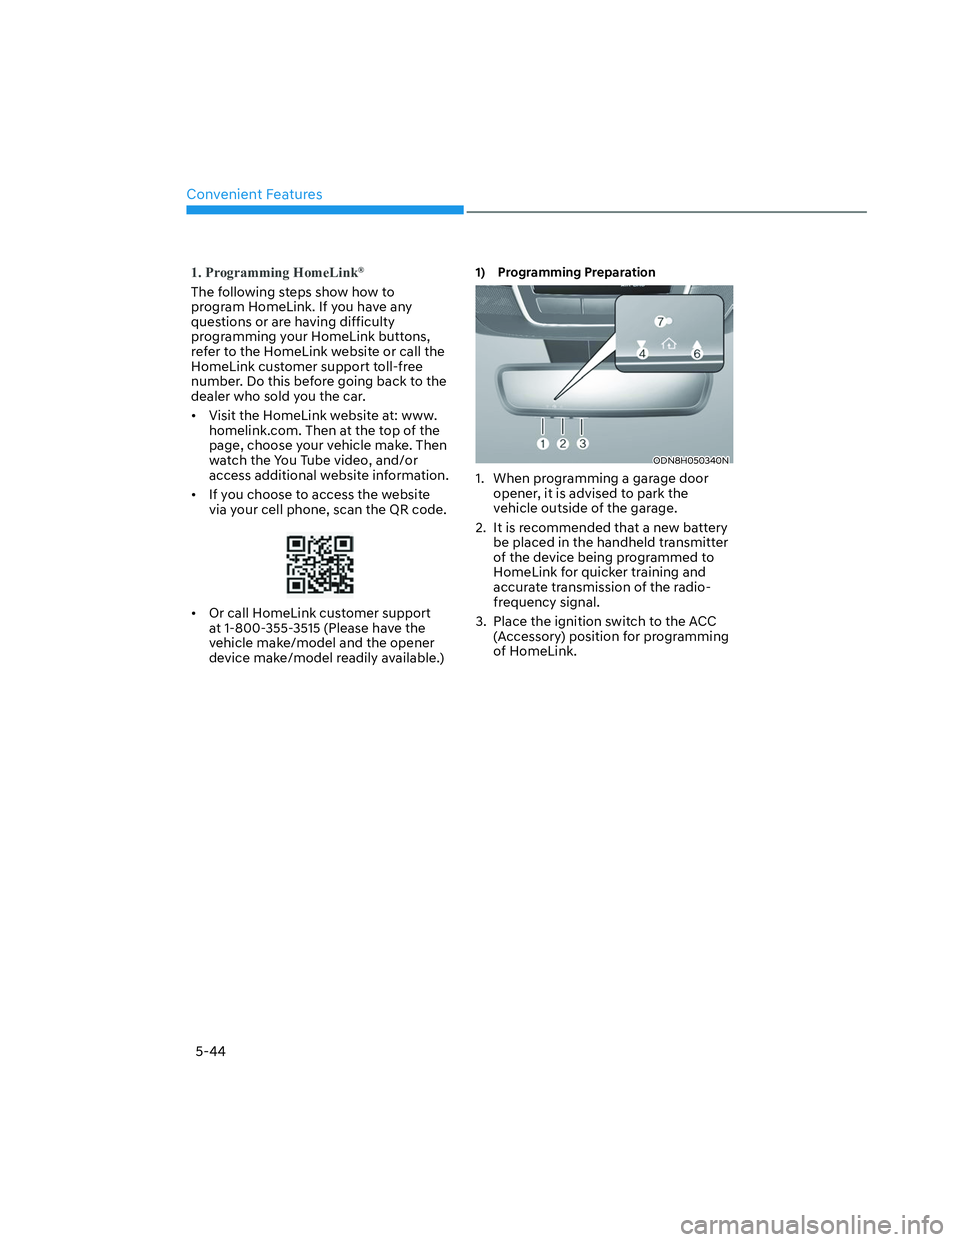
1) Programming Preparation
ODN8H050340NODN8H050340N
1. When programming a garage door
opener, it is advised to park the
vehicle outside of the garage.
2. It is recommended that a new battery
be placed in the handheld transmitter
of the device being programmed to
HomeLink for quicker training and
accurate transmission of the radio-
frequency signal.
3. Place the ignition switch to the ACC
(Accessory) position for programming
of HomeLink.
Page 339 of 598
06
6-65
Trailer Towing - Important
Information
Here are some important points if you
decide to pull a trailer:
• Consider using a trailer hitch that
incorporates sway control through the
use of anti-sway bars. Consult your
trailer hitch dealer about the different
types of sway control trailer hitches
for your vehicle and trailer.
• Do not do any towing with your
vehicle during its first 1,200 miles
(2,000 km) in order to allow the
engine to properly break in. Failure to
heed this caution may result in serious
engine or transmission damage.
• When towing a trailer, consult an
authorized HYUNDAI dealer for
further information on additional
requirements such as a towing kit, etc.
• Always drive your vehicle at a
moderate speed (less than 60 mph
(100 km/h)) or posted towing speed
limit.
• On a long uphill grade, do not exceed
45 mph (70 km/h) or the posted
towing speed limit, whichever is
lower.
• Carefully observe the weight and load
limits provided in the following pages.
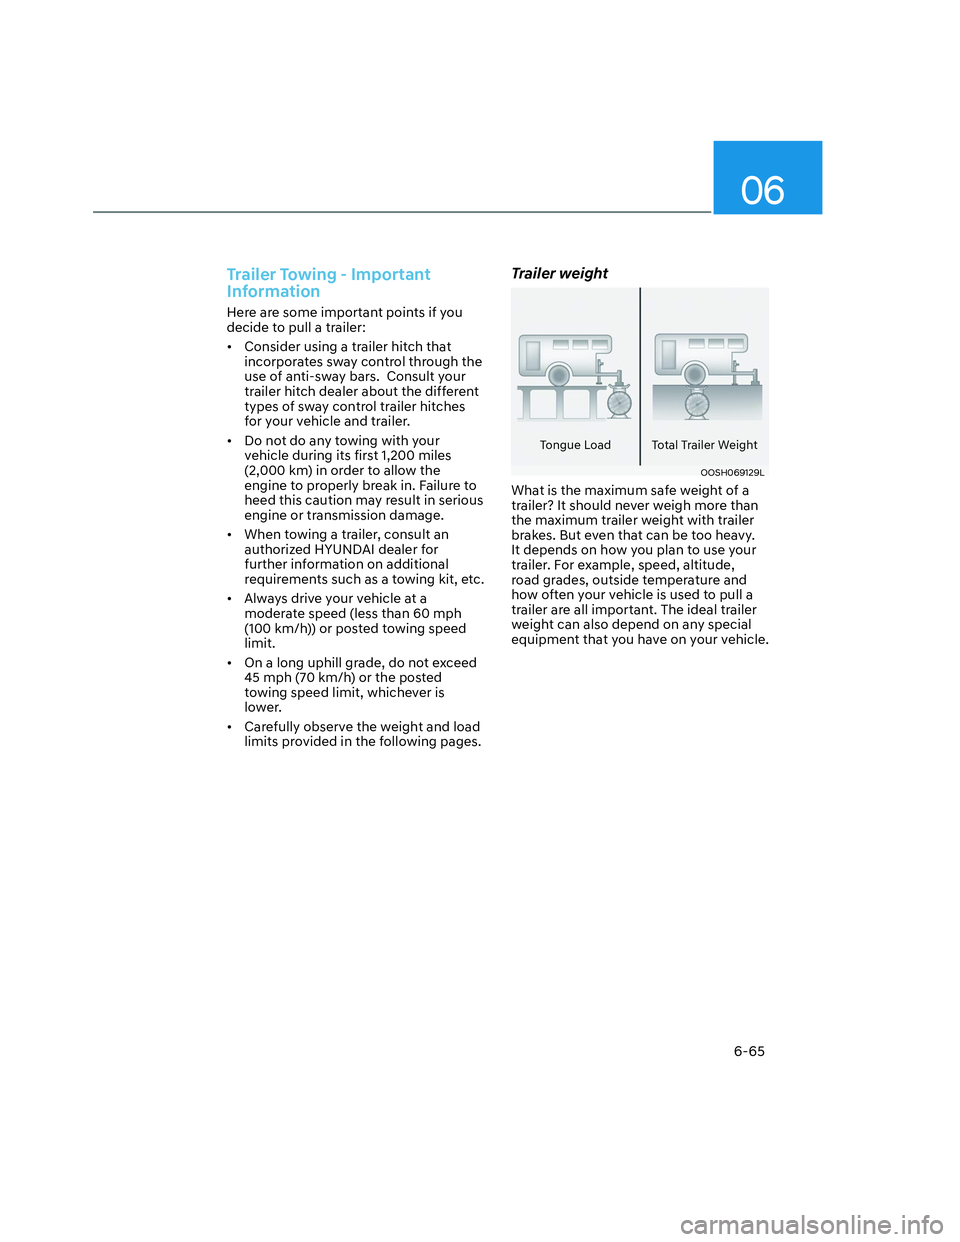
Trailer weight
Tongue Load Total Trailer Weight
OOSH069129LOOSH069129L
What is the maximum safe weight of a
trailer? It should never weigh more than
the maximum trailer weight with trailer
brakes. But even that can be too heavy.
It depends on how you plan to use your
trailer. For example, speed, altitude,
road grades, outside temperature and
how often your vehicle is used to pull a
trailer are all important. The ideal trailer
weight can also depend on any special
equipment that you have on your vehicle.
Page 502 of 598
Emergency Situations
8-18
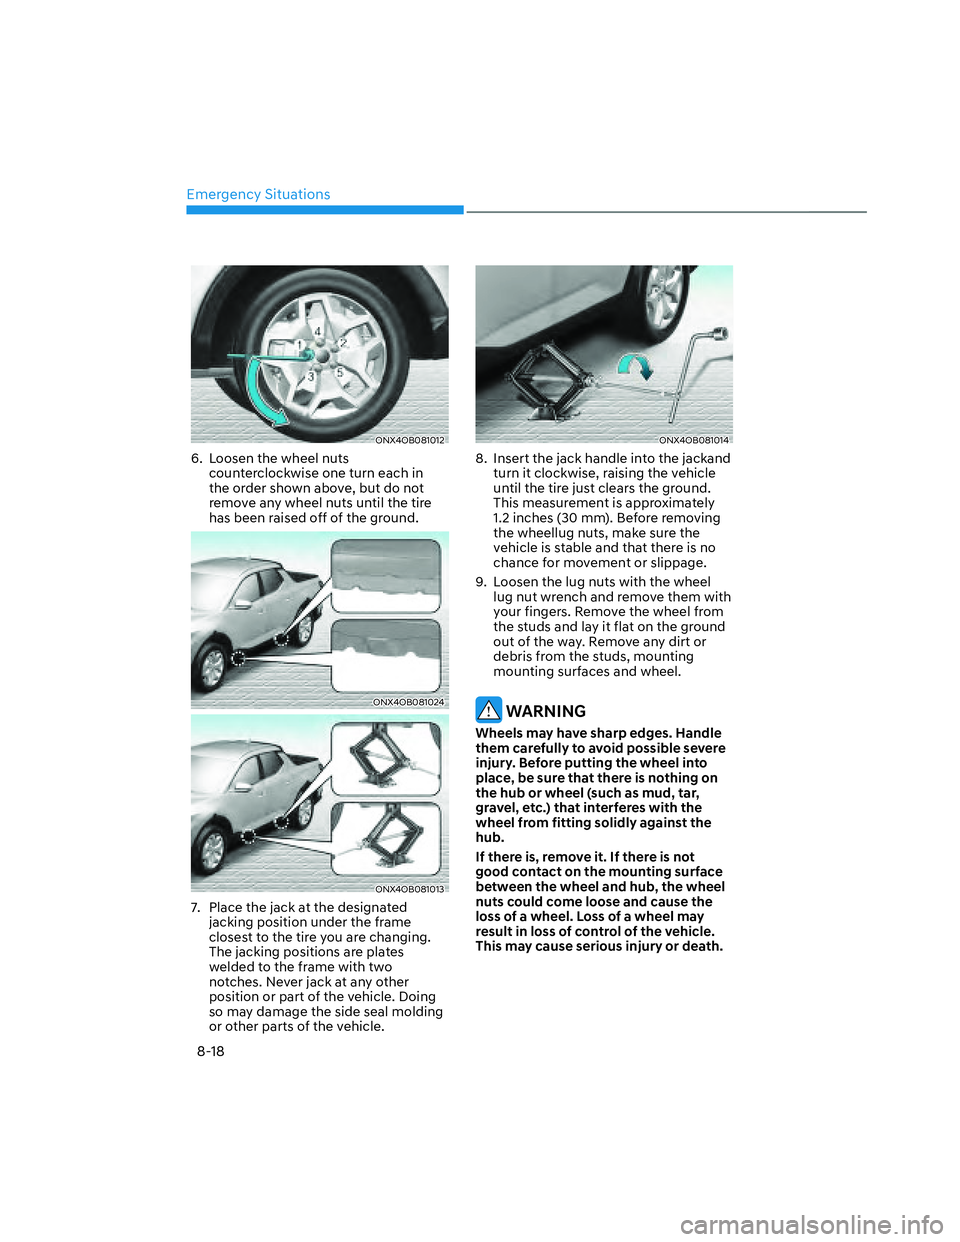
ONX4OB081012ONX4OB081012
6. Loosen the wheel nuts
counterclockwise one turn each in
the order shown above, but do not
remove any wheel nuts until the tire
has been raised off of the ground.
ONX4OB081024ONX4OB081024
ONX4OB081013ONX4OB081013
7. Place the jack at the designated
jacking position under the frame
closest to the tire you are changing.
The jacking positions are plates
welded to the frame with two
notches. Never jack at any other
position or part of the vehicle. Doing
so may damage the side seal molding
or other parts of the vehicle.
ONX4OB081014ONX4OB081014
8. Insert the jack handle into the jackand
turn it clockwise, raising the vehicle
until the tire just clears the ground.
This measurement is approximately
1.2 inches (30 mm). Before removing
the wheellug nuts, make sure the
vehicle is stable and that there is no
chance for movement or slippage.
9. Loosen the lug nuts with the wheel
lug nut wrench and remove them with
your fingers. Remove the wheel from
the studs and lay it flat on the ground
out of the way. Remove any dirt or
debris from the studs, mounting
mounting surfaces and wheel.
WARNING
Wheels may have sharp edges. Handle
them carefully to avoid possible severe
injury. Before putting the wheel into
place, be sure that there is nothing on
the hub or wheel (such as mud, tar,
gravel, etc.) that interferes with the
wheel from fitting solidly against the
hub.
If there is, remove it. If there is not
good contact on the mounting surface
between the wheel and hub, the wheel
nuts could come loose and cause the
loss of a wheel. Loss of a wheel may
result in loss of control of the vehicle.
This may cause serious injury or death.
Page 512 of 598
Maintenance
9-4
You should exercise the utmost care
to prevent damage to your vehicle and
injury to yourself whenever performing
any maintenance or inspection
procedures.
We recommend you have your
vehicle maintained and repaired by
an authorized HYUNDAI dealer. An
authorized HYUNDAI dealer meets
HYUNDAI’s high service quality
standards and receives technical support
from HYUNDAI in order to provide you
with a high level of service satisfaction.
Owner’s Responsibility
Maintenance service and record
retention are the owner’s responsibility.
You should retain documents that show
proper maintenance has been performed
on your vehicle in accordance with
the scheduled maintenance service
charts shown on the following pages.
You need this information to establish
your compliance with the servicing
and maintenance requirements of your
vehicle warranties.
Detailed warranty information is
provided in your Owner’s Handbook &
Warranty Information booklet.
Repairs and adjustments required as a
result of improper maintenance or a lack
of required maintenance are not covered.
Owner Maintenance Precautions
Inadequate, incomplete or insufficient
servicing may result in operational
problems with your vehicle that could
lead to vehicle damage, an accident, or
personal injury. This chapter provides
instructions only for the maintenance
items that are easy to perform.
Your vehicle should not be modified
in any way. Such modifications may
adversely affect the performance, safety
or durability of your vehicle and may, in
addition, violate conditions of the limited
warranties covering the vehicle.
NOTICE
Improper owner maintenance during
the warranty period may affect
warranty coverage. For details, read
the separate Service Passport provided
with the vehicle. If you’re unsure
about any servicing or maintenance
procedure, have it done by an
authorized HYUNDAI dealer.
MAINTENANCE SERVICES