2023 HYUNDAI SANTA CRUZ clock
[x] Cancel search: clockPage 265 of 598
05
5-129
• When charging some smart phones
with a self-protection feature,
the wireless charging speed may
decrease and the wireless charging
may stop.
• If the smart phone has a thick cover,
the wireless charging may not be
possible.
• If the smart phone is not completely
contacting the charging pad,
wireless charging may not operate
properly.
• Some magnetic items like credit
cards, phone cards or rail tickets may
be damaged if left with the smart
phone during the charging process.
• When any smart phone without
a wireless charging function or a
metallic object is placed on the
charging pad, a small noise may
sound. This small sound is due to the
vehicle discerning compatibility of
the object placed on the charging
pad. It does not affect your vehicle or
the smart phone in any way. Information
If the Ignition switch is in the OFF
position, the charging also stops.
Information
This device complies with Part 15 of the
FCC rules. Operation is subject to the
following three conditions:
1. This device may not cause harmful
interference, and
2. This device must accept any
interference received, including
interference that may cause undesired
operation.
3. Changes or modifications not expressly
approved by the party responsible
for compliance could void the user’s
authority to operate the device.
Clock
The clock can be set from the
infotainment system.
For detailed information, refer to the
separately supplied infotainment
system manual.
WARNING
Do not attempt to adjust the clock
while driving. Doing so may result in
distracted driving which may lead to
an accident involving personal injury or
death.
Page 491 of 598
08
8-7
If your temperature gauge indicates
overheating, you experience a loss of
power, or hear loud pinging or knocking,
the engine may be overheating. If this
happens, you should:
1. Pull off the road and stop as soon as it
is safe to do so.
2. Shift the gear to P (Park) and set the
parking brake. If the air conditioning is
ON, turn it OFF.
3. If engine coolant is running out under
the vehicle or steam is coming out
from the hood, stop the engine. Do
not open the hood until the coolant
has stopped running or the steaming
has stopped. If there is no visible
loss of engine coolant and no steam,
leave the engine running and check
to be sure the engine cooling fan is
operating. If the fan is not running,
turn the engine off.
WARNING
While the engine is running,
keep hands, clothing and tools
away from the moving parts
such as the cooling fan and
drive belt to prevent serious
injury.4. Check for coolant leaking from the
radiator, hoses or under the vehicle. (If
the air conditioning had been in use, it
is normal for cold water to be draining
from it when you stop.)
5. If engine coolant is leaking out, stop
the engine immediately and call the
nearest authorized HYUNDAI dealer
for assistance.
WARNING
Never remove the engine
coolant cap and/or water-
cooled intercooler coolant
cap or the drain plug while the
engine and radiator are hot.
Hot coolant and steam may blow out
under pressure, causing serious injury.
Turn the engine off and wait until the
engine cools down. Use extreme care
when removing the coolant cap. Wrap
a thick towel around it, and turn it
counterclockwise slowly to the first
stop. Step back while the pressure is
released from the cooling system. When
you are sure all the pressure has been
released, press down on the cap, using
a thick towel, and continue turning
counterclockwise to remove it.
IF THE ENGINE OVERHEATS
Page 499 of 598
08
8-15
Removing and Storing the Spare
Tire
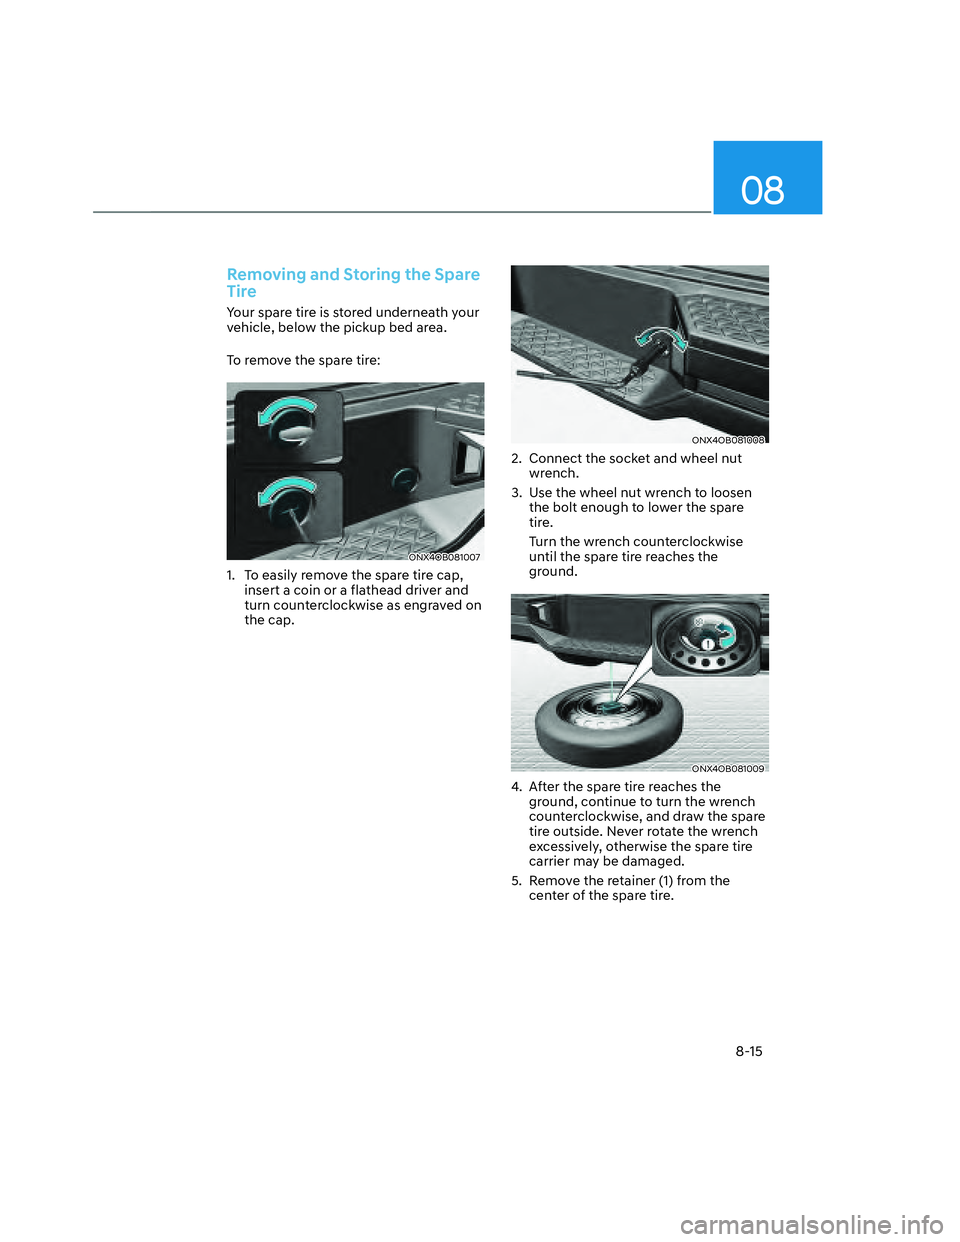
Your spare tire is stored underneath your
vehicle, below the pickup bed area.
To remove the spare tire:
ONX4OB081007ONX4OB081007
1. To easily remove the spare tire cap,
insert a coin or a flathead driver and
turn counterclockwise as engraved on
the cap.
ONX4OB081008ONX4OB081008
2. Connect the socket and wheel nut
wrench.
3. Use the wheel nut wrench to loosen
the bolt enough to lower the spare
tire.
Turn the wrench counterclockwise
until the spare tire reaches the
ground.
ONX4OB081009ONX4OB081009
4. After the spare tire reaches the
ground, continue to turn the wrench
counterclockwise, and draw the spare
tire outside. Never rotate the wrench
excessively, otherwise the spare tire
carrier may be damaged.
5. Remove the retainer (1) from the
center of the spare tire.
Page 500 of 598
Emergency Situations
8-16
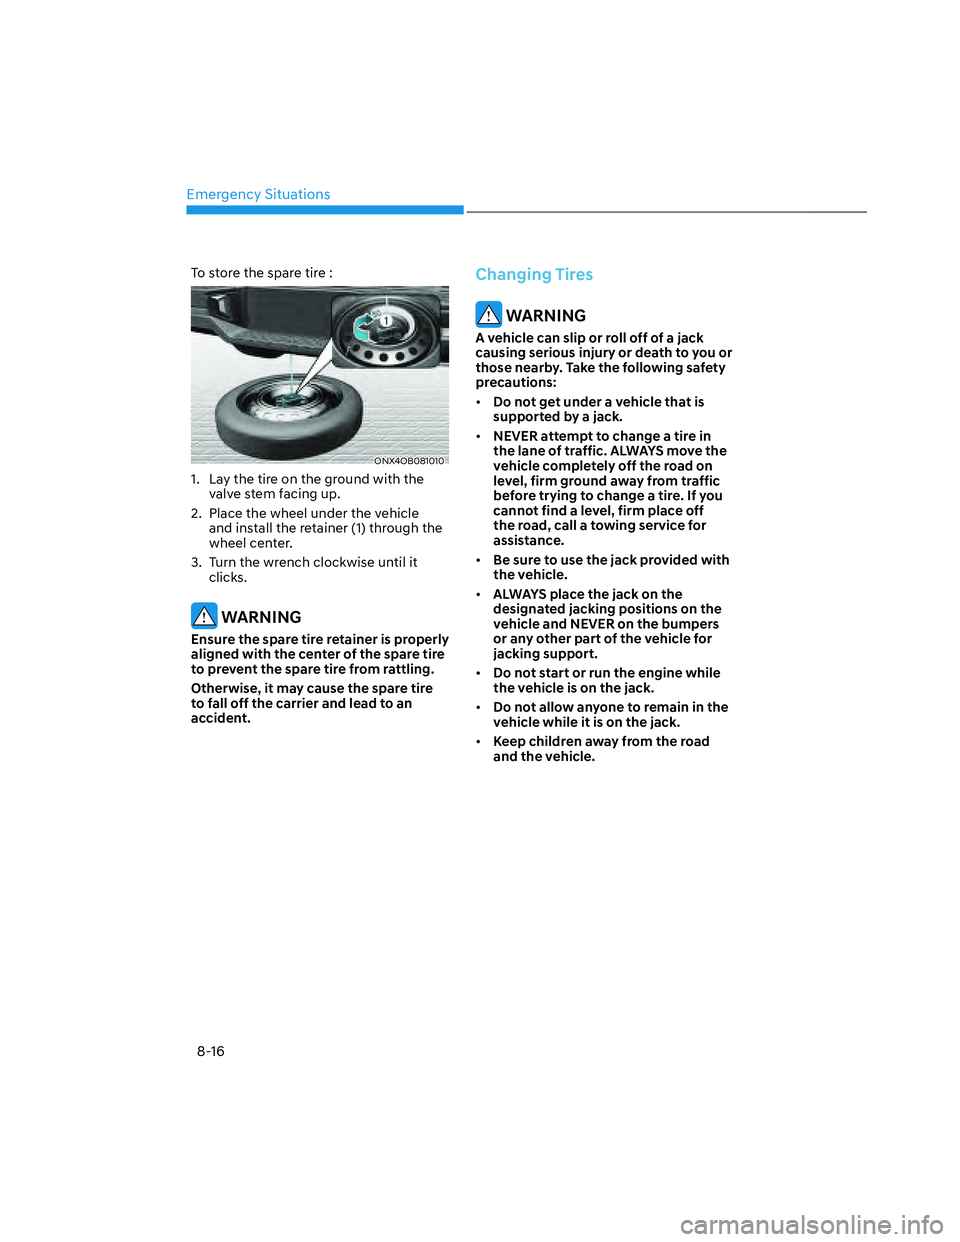
To store the spare tire :
ONX4OB081010ONX4OB081010
1. Lay the tire on the ground with the
valve stem facing up.
2. Place the wheel under the vehicle
and install the retainer (1) through the
wheel center.
3. Turn the wrench clockwise until it
clicks.
WARNING
Ensure the spare tire retainer is properly
aligned with the center of the spare tire
to prevent the spare tire from rattling.
Otherwise, it may cause the spare tire
to fall off the carrier and lead to an
accident.
Changing Tires
WARNING
A vehicle can slip or roll off of a jack
causing serious injury or death to you or
those nearby. Take the following safety
precautions:
• Do not get under a vehicle that is
supported by a jack.
• NEVER attempt to change a tire in
the lane of traffic. ALWAYS move the
vehicle completely off the road on
level, firm ground away from traffic
before trying to change a tire. If you
cannot find a level, firm place off
the road, call a towing service for
assistance.
• Be sure to use the jack provided with
the vehicle.
• ALWAYS place the jack on the
designated jacking positions on the
vehicle and NEVER on the bumpers
or any other part of the vehicle for
jacking support.
• Do not start or run the engine while
the vehicle is on the jack.
• Do not allow anyone to remain in the
vehicle while it is on the jack.
• Keep children away from the road
and the vehicle.
Page 502 of 598
Emergency Situations
8-18
ONX4OB081012ONX4OB081012
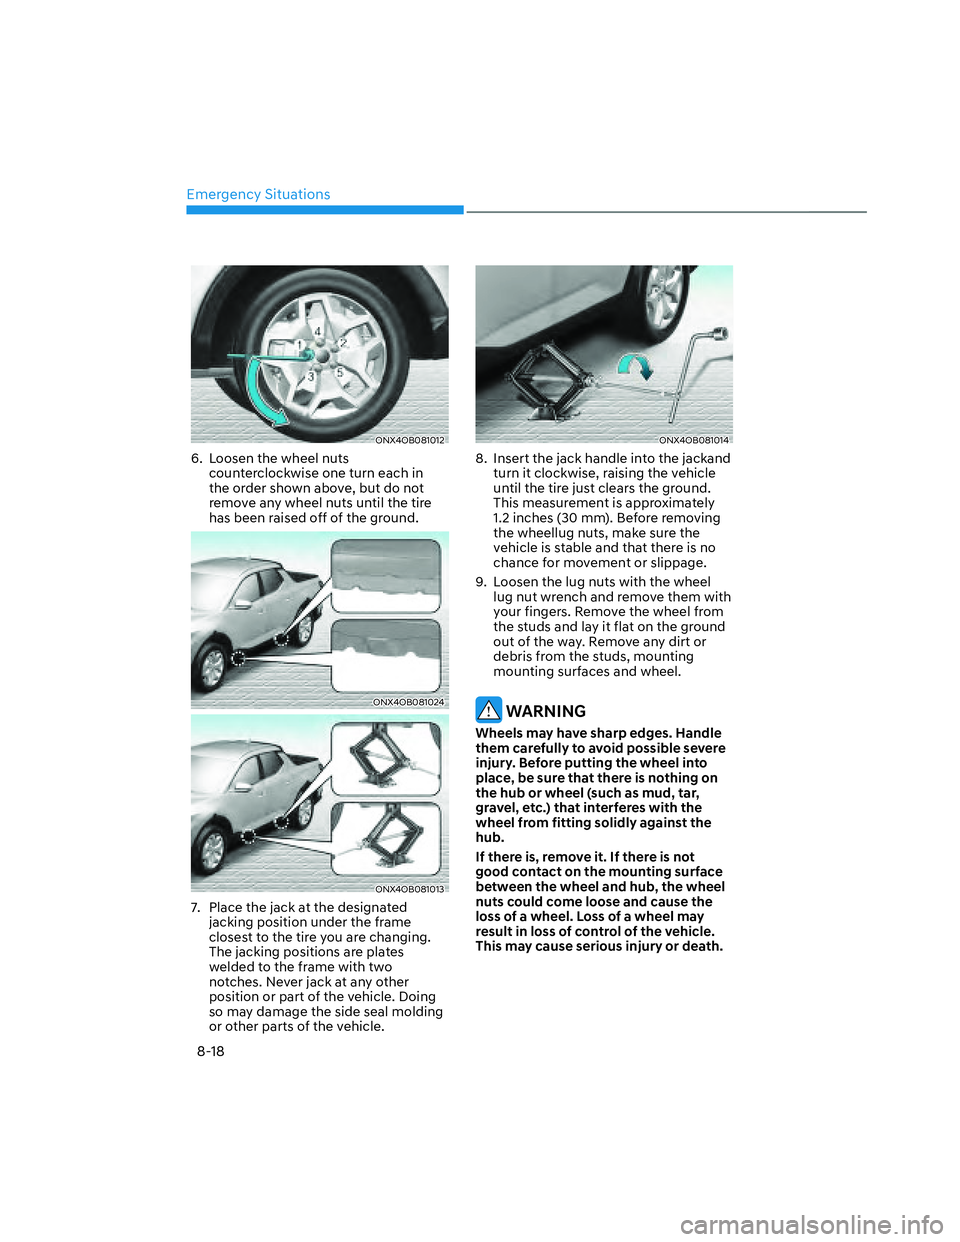
6. Loosen the wheel nuts
counterclockwise one turn each in
the order shown above, but do not
remove any wheel nuts until the tire
has been raised off of the ground.
ONX4OB081024ONX4OB081024
ONX4OB081013ONX4OB081013
7. Place the jack at the designated
jacking position under the frame
closest to the tire you are changing.
The jacking positions are plates
welded to the frame with two
notches. Never jack at any other
position or part of the vehicle. Doing
so may damage the side seal molding
or other parts of the vehicle.
ONX4OB081014ONX4OB081014
8. Insert the jack handle into the jackand
turn it clockwise, raising the vehicle
until the tire just clears the ground.
This measurement is approximately
1.2 inches (30 mm). Before removing
the wheellug nuts, make sure the
vehicle is stable and that there is no
chance for movement or slippage.
9. Loosen the lug nuts with the wheel
lug nut wrench and remove them with
your fingers. Remove the wheel from
the studs and lay it flat on the ground
out of the way. Remove any dirt or
debris from the studs, mounting
mounting surfaces and wheel.
WARNING
Wheels may have sharp edges. Handle
them carefully to avoid possible severe
injury. Before putting the wheel into
place, be sure that there is nothing on
the hub or wheel (such as mud, tar,
gravel, etc.) that interferes with the
wheel from fitting solidly against the
hub.
If there is, remove it. If there is not
good contact on the mounting surface
between the wheel and hub, the wheel
nuts could come loose and cause the
loss of a wheel. Loss of a wheel may
result in loss of control of the vehicle.
This may cause serious injury or death.
Page 503 of 598
08
8-19
10. Install the spare tire onto the studs of
the hub.
11. Tighten the lug nuts with your fingers
onto the studs with the smaller end of
the lug nuts closest to the wheel.
12. Lower the vehicle to the ground
by turning the jack handle
counterclockwise.
OTL065007OTL065007
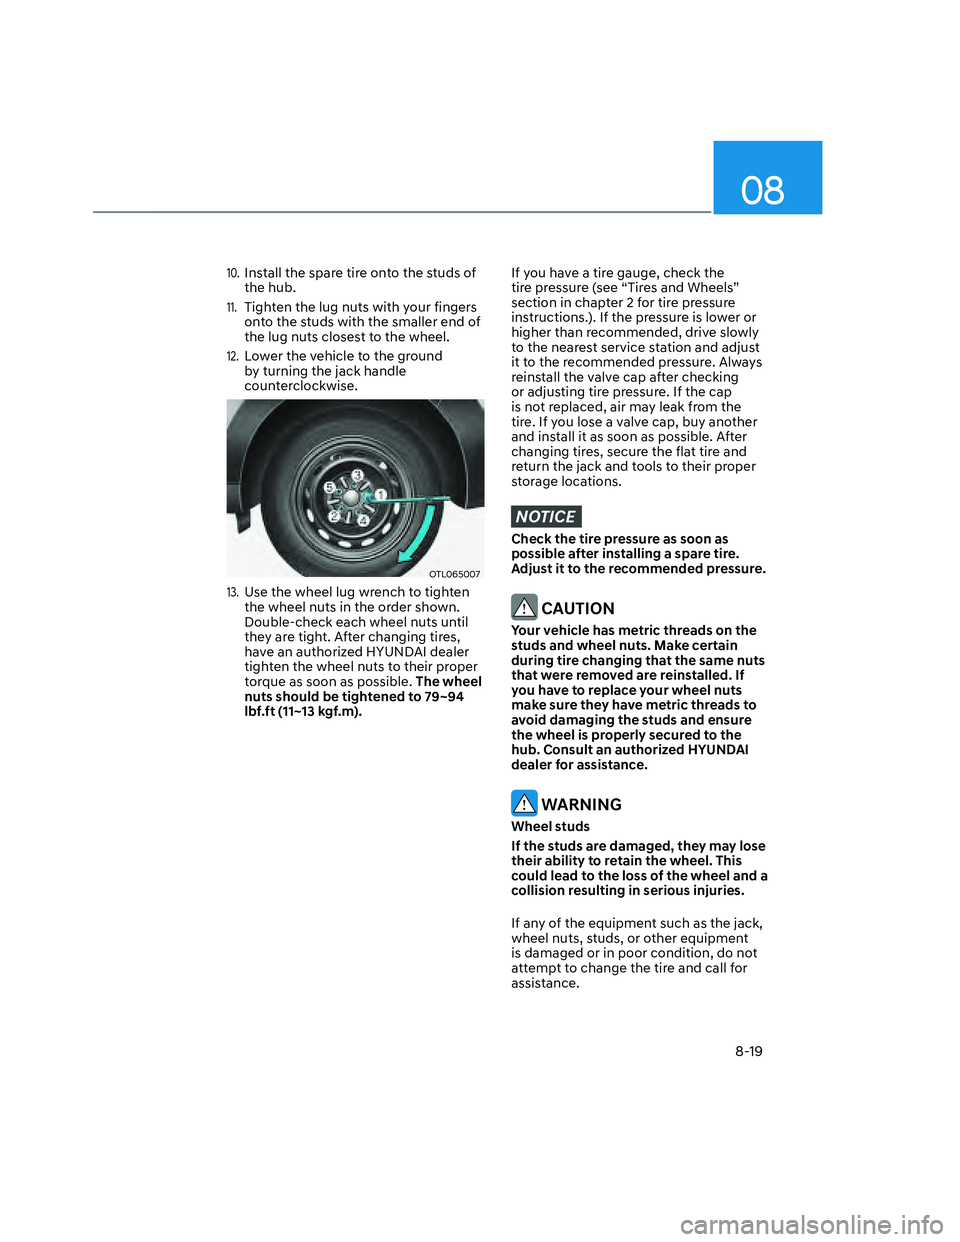
13. Use the wheel lug wrench to tighten
the wheel nuts in the order shown.
Double-check each wheel nuts until
they are tight. After changing tires,
have an authorized HYUNDAI dealer
tighten the wheel nuts to their proper
torque as soon as possible. The wheel
nuts should be tightened to 79~94
lbf.ft (11~13 kgf.m).
If you have a tire gauge, check the
tire pressure (see “Tires and Wheels”
section in chapter 2 for tire pressure
instructions.). If the pressure is lower or
higher than recommended, drive slowly
to the nearest service station and adjust
it to the recommended pressure. Always
reinstall the valve cap after checking
or adjusting tire pressure. If the cap
is not replaced, air may leak from the
tire. If you lose a valve cap, buy another
and install it as soon as possible. After
changing tires, secure the flat tire and
return the jack and tools to their proper
storage locations.
NOTICE
Check the tire pressure as soon as
possible after installing a spare tire.
Adjust it to the recommended pressure.
CAUTION
Your vehicle has metric threads on the
studs and wheel nuts. Make certain
during tire changing that the same nuts
that were removed are reinstalled. If
you have to replace your wheel nuts
make sure they have metric threads to
avoid damaging the studs and ensure
the wheel is properly secured to the
hub. Consult an authorized HYUNDAI
dealer for assistance.
WARNING
Wheel studs
If the studs are damaged, they may lose
their ability to retain the wheel. This
could lead to the loss of the wheel and a
collision resulting in serious injuries.
If any of the equipment such as the jack,
wheel nuts, studs, or other equipment
is damaged or in poor condition, do not
attempt to change the tire and call for
assistance.
Page 528 of 598
Maintenance
9-20
ENGINE COOLANT
The high-pressure cooling system has a
reservoir filled with year-round antifreeze
coolant. The reservoir is filled at the
factory.
Check the antifreeze protection and
coolant level at least once a year, at
the beginning of the winter season and
before traveling to a colder climate.
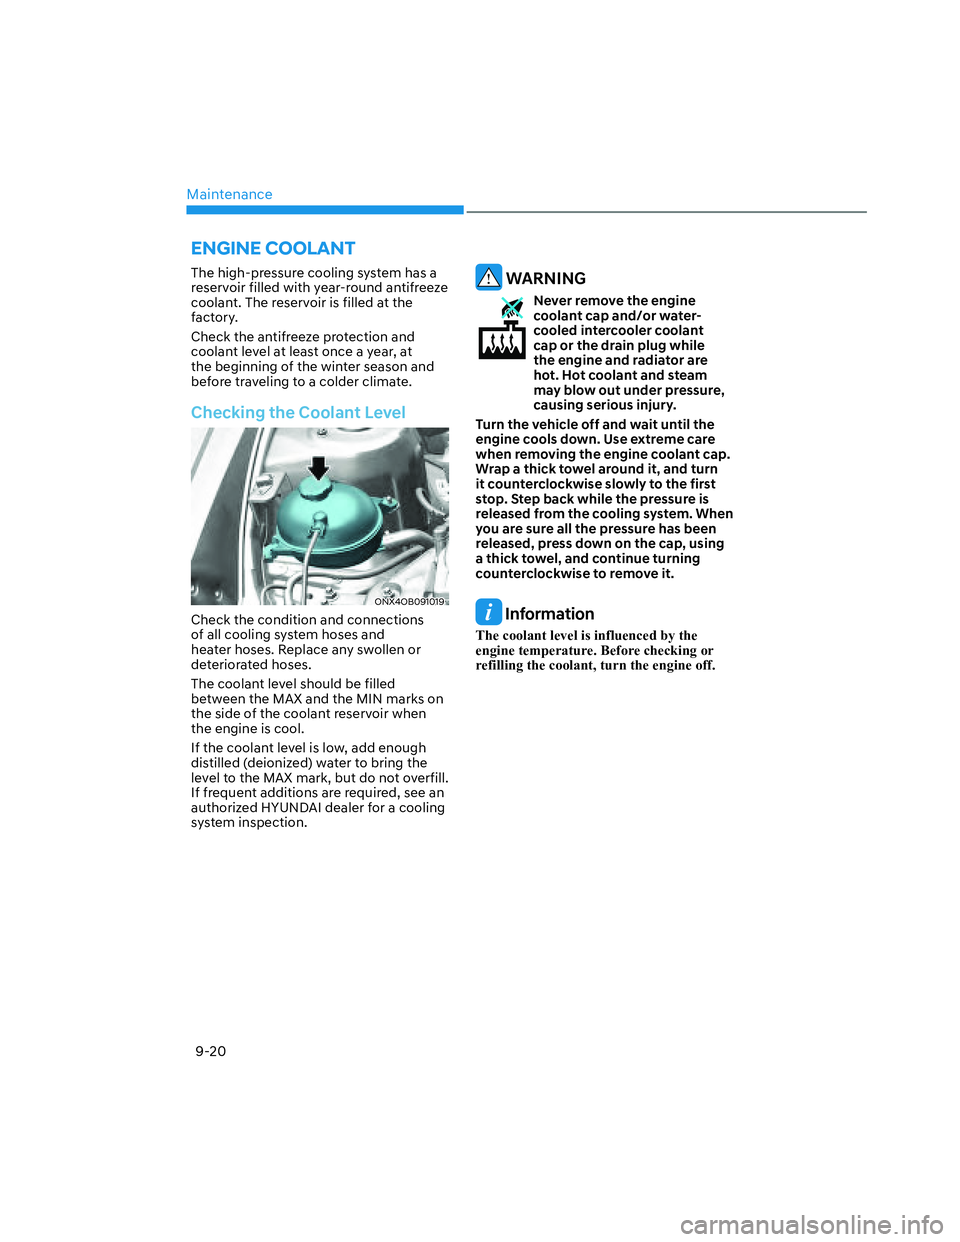
Checking the Coolant Level
ONX4OB091019ONX4OB091019
Check the condition and connections
of all cooling system hoses and
heater hoses. Replace any swollen or
deteriorated hoses.
The coolant level should be filled
between the MAX and the MIN marks on
the side of the coolant reservoir when
the engine is cool.
If the coolant level is low, add enough
distilled (deionized) water to bring the
level to the MAX mark, but do not overfill.
If frequent additions are required, see an
authorized HYUNDAI dealer for a cooling
system inspection.
WARNING
Never remove the engine
coolant cap and/or water-
cooled intercooler coolant
cap or the drain plug while
the engine and radiator are
hot. Hot coolant and steam
may blow out under pressure,
causing serious injury.
Turn the vehicle off and wait until the
engine cools down. Use extreme care
when removing the engine coolant cap.
Wrap a thick towel around it, and turn
it counterclockwise slowly to the first
stop. Step back while the pressure is
released from the cooling system. When
you are sure all the pressure has been
released, press down on the cap, using
a thick towel, and continue turning
counterclockwise to remove it.
Information
The coolant level is influenced by the
engine temperature. Before checking or
refilling the coolant, turn the engine off.
Page 567 of 598
09
9-59
ONX4OB091014ONX4OB091014
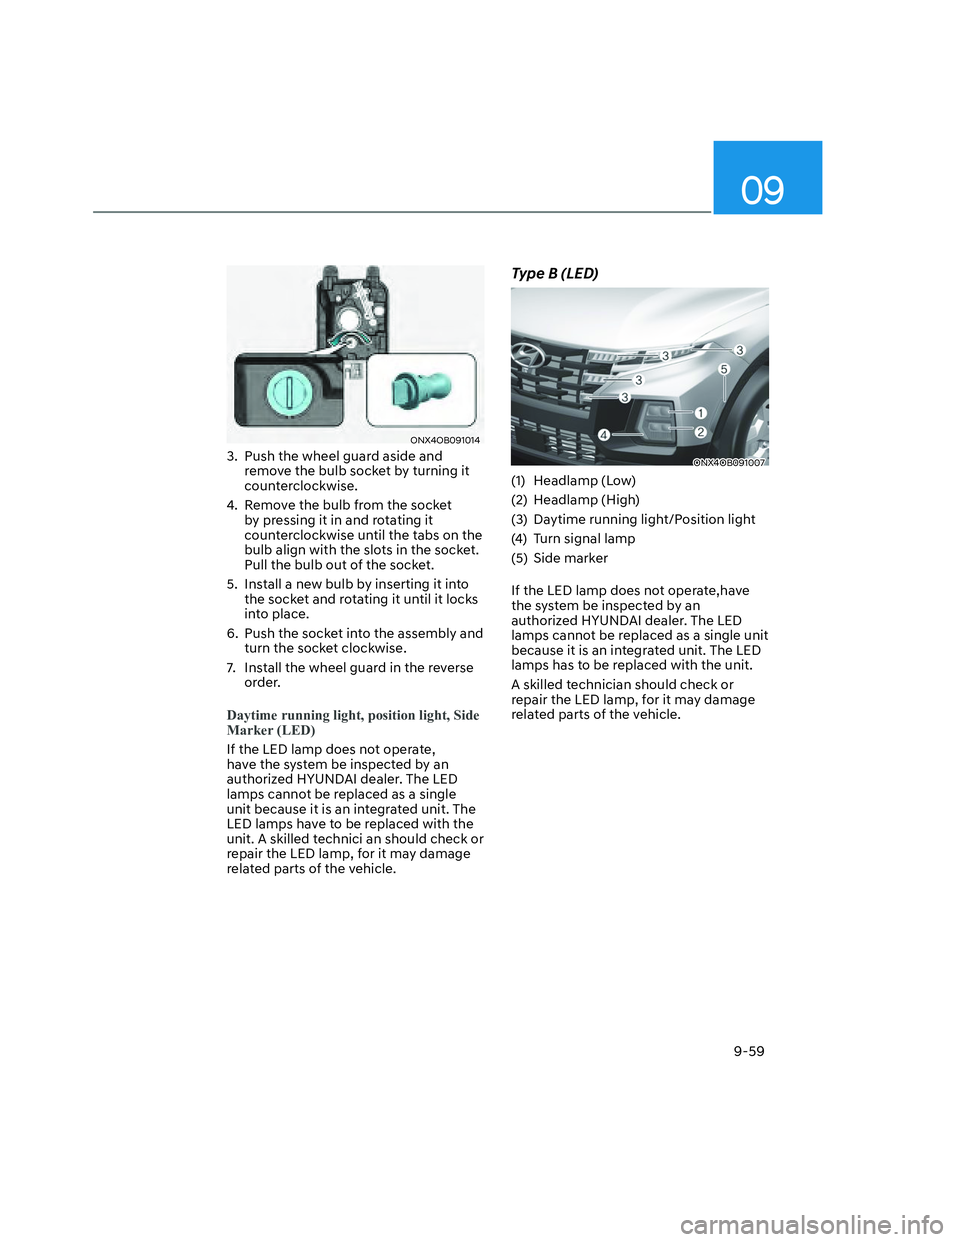
3. Push the wheel guard aside and
remove the bulb socket by turning it
counterclockwise.
4. Remove the bulb from the socket
by pressing it in and rotating it
counterclockwise until the tabs on the
bulb align with the slots in the socket.
Pull the bulb out of the socket.
5. Install a new bulb by inserting it into
the socket and rotating it until it locks
into place.
6. Push the socket into the assembly and
turn the socket clockwise.
7. Install the wheel guard in the reverse
order.
Daytime running light, position light, Side
Marker (LED)
If the LED lamp does not operate,
have the system be inspected by an
authorized HYUNDAI dealer. The LED
lamps cannot be replaced as a single
unit because it is an integrated unit. The
LED lamps have to be replaced with the
unit. A skilled technici an should check or
repair the LED lamp, for it may damage
related parts of the vehicle.
Type B (LED)
ONX4OB091007ONX4OB091007
(1) Headlamp (Low)
(2) Headlamp (High)
(3) Daytime running light/Position light
(4) Turn signal lamp
(5) Side marker
If the LED lamp does not operate,have
the system be inspected by an
authorized HYUNDAI dealer. The LED
lamps cannot be replaced as a single unit
because it is an integrated unit. The LED
lamps has to be replaced with the unit.
A skilled technician should check or
repair the LED lamp, for it may damage
related parts of the vehicle.