2023 HYUNDAI SANTA CRUZ automatic transmission
[x] Cancel search: automatic transmissionPage 296 of 598
Driving Your Vehicle
6-22
• The advanced wet-clutch dual clutch
transmission in your vehicle can be
thought of as an automatically shifting
manual transmission. It gives the
driving feel of a manual transmission,
yet provides the ease of a fully
automatic transmission.
• When D (Drive) is selected, the
transmission will automatically
shift through the gears similar to a
conventional automatic transmission.
With a wet-type dual clutch
transmission, however, the engine
torque that is transmitted directly
from the engine to the transmission
is transferred by a clutch pack that
is lubricated in oil. The oil's primary
purpose is to cool the clutch, and
because of lubricating properties of
the oil and this cooling effect, gear
shifts are smooth as well as direct.
• The wet-type dual clutch transmission
allows for better acceleration
performance and increased fuel
efficiency while driving. But it differs
from a conventional automatic
transmission because it does not
incorporate a torque converter.
Instead, the transition from one gear
to the next is managed by clutch slip,
especially at lower speeds.
As a result, shifts are sometimes more
noticeable, and a light vibration can
be felt as the transmission shaft speed
is matched with the engine shaft
speed. This is a normal condition of
the dual clutch transmission.
• The wet-type clutch transfers torque
more directly and provides a direct
drive feeling which may feel different
from a conventional automatic
transmission. This may be more
noticeable when launching the vehicle
from a stop or when traveling at low,
stop-and-go vehicle speeds. • When rapidly accelerating from a
lower vehicle speed, the engine
rpm may increase dramatically as a
result of clutch slip as the dual clutch
transmission selects the correct gear.
This is a normal condition.
• When accelerating from a stop on
an incline, press the accelerator
smoothly and gradually to avoid any
shudder feeling or jerkiness.
• When traveling at a lower vehicle
speed, if you release the accelerator
pedal quickly, you may feel engine
braking before the transmission
changes gears. This engine braking
feeling is similar to operating a
manual transmission at low speed.
• When driving downhill, you may
wish to move the gear shift lever to
Manual Shift mode and downshift to
a lower gear in order to control your
speed without using the brake pedal
excessively.
• When you turn the engine on and off,
you may hear clicking sounds as the
system goes through a self-test. This
is a normal sound for the dual clutch
transmission.
• During the first 1000 miles (1,500km),
you may feel that the vehicle may not
be smooth when accelerating at low
speed. During this break-in period, the
shift quality and performance of your
new vehicle is continuously optimized.
Page 300 of 598
Driving Your Vehicle
6-26
D (Drive)
This is the normal driving position. The
transmission will automatically shift
through a 8-gear sequence, providing
the best fuel economy and power.
For extra power when passing another
vehicle or driving uphill, depress the
accelerator fully. The transmission will
automatically downshift to the next
lower gear (or gears, as appropriate).
The DRIVE MODE switch, located on the
shift lever console, allows the driver to
switch from NORMAL mode to SPORT
mode.
For more details, refer to “Drive Mode
Integrated Control System” later in this
chapter.
ONX4OB061004ONX4OB061004
Manual shift mode
Whether the vehicle is stationary or in
motion, manual shift mode is selected by
pushing the shift lever from the D (Drive)
position into the manual gate. To return
to D (Drive) range operation, push the
shift lever back into the main gate.
In Manual Shift mode, moving the shift
lever backwards (B) and forwards (A) will
allow you to select the desired range of
gears for the current driving conditions.
+ (Up) : Push the lever forward (A) once
to shift up one gear.
- (Down) : Pull the lever backwards (B)
once to shift down one gear.
Information
• Only the eight forward gears can be
selected in Manual Shift Mode. To
reverse or park the vehicle, move the
shift lever to the R (Reverse) or P
(Park) position as required.
• Downshifts are made automatically
when the vehicle slows down. When the
vehicle stops, 1st gear is automatically
selected.
• When the engine rpm approaches the
red zone the transmission will upshift
automatically.
• If the driver presses the lever to
+ (Up) or - (Down) position, the
transmission may not make the
requested gear change if the next gear
is outside of the allowable engine rpm
range. The driver must execute upshifts
in accordance with road conditions,
taking care to keep the engine rpms
below the red zone.
Shift-lock system
For your safety, the dual clutch
transmission has a shift-lock system
which prevents shifting the transmission
from P (Park) to R (Reverse) unless the
brake pedal is depressed.
To shift the transmission from P (Park)
into R (Reverse):
1. Depress and hold the brake pedal.
2. Start the engine or place the ignition
switch in the ON position.
3. Move the shift lever to R (Reverse).
Page 324 of 598
Driving Your Vehicle
6-50
Various driving situations, which you may
encounter in SMART mode
• The driving mode automatically
changes to SMART SPORT, when you
abruptly accelerate the vehicle or
repetitively operate the steering
wheel (Your driving is categorized
to be sporty.). In this mode, your
vehicle drives in a lower gear for
abrupt accelerating/decelerating
and increases the engine brake
performance.
• You may still sense the engine
braking performance, even when
you release the accelerator pedal in
SMART SPORT mode. It is because
your vehicle remains in lower gear
over a certain period of time for next
acceleration. Thus, it is a normal
driving situation, not indicating any
malfunction.
• The driving mode automatically
changes to SMART SPORT mode only
in harsh driving situations. In most
of the normal driving situations, the
driving mode sets to be in SMART
NORMAL mode.
Limitation of SMART mode
The SMART mode may be limited in
following situations. (The OFF indicator
illuminates in those situations.)
• The driver manually moves the shift
lever : It deactivates SMART mode.
The vehicle drives, as the driver
manually moves the shift lever.
• The vehicle is driven using the paddle
shifter (manual shift mode) : SMART
mode is deactivated determining that
the driver wants to drive the vehicle
manually
• Cruise Control or Smart Cruise Control
is activated : Cruise Control or Smart
Cruise Control may deactivate the
SMART mode. When a higher system
is set by Cruise Control or Smart
Cruise Control, it starts to control
vehicle speed and deactivates
SMART mode. (SMART mode is not
deactivated just by activing Cruise
Control or Smart Cruise Control.)
• The transmission oil temperature is either
extremely low or extremely high : The
SMART mode can be active in most of
the normal driving situations. However,
an extremely high/ low transmission oil
temperature may temporarily deactivate
the SMART mode, because the
transmission condition is out of normal
operation condition.
Page 331 of 598
06
6-57
SPECIAL DRIVING CONDITIONS
Hazardous Driving Conditions
When hazardous driving elements
are encountered such as water, snow,
ice, mud and sand, take the following
precautions:
• Drive cautiously and maintain a longer
braking distance.
• Avoid abrupt braking or steering.
• When your vehicle is stuck in
snow, mud, or sand, use second
gear. Accelerate slowly to avoid
unnecessary wheel spin.
• Put sand, rock salt, tire chains or other
non-slip materials under the wheels to
provide additional traction while the
vehicle becomes stuck in ice, snow,
or mud.
WARNING
Downshifting with an automatic
transmission while driving on slippery
surfaces can cause an accident. The
sudden change in tire speed could
cause the tires to skid. Be careful when
downshifting on slippery surfaces.
Rocking the Vehicle
If it is necessary to rock the vehicle to
free it from snow, sand, or mud, first turn
the steering wheel right and left to clear
the area around your front wheels. Then,
shift back and forth between R (Reverse)
and a forward gear.
Try to avoid spinning the wheels, and do
not race the engine.
To prevent transmission wear, wait until
the wheels stop spinning before shifting
gears. Release the accelerator pedal
while shifting, and press lightly on the
accelerator pedal while the transmission
is in gear. Slowly spinning the wheels in
forward and reverse directions causes a
rocking motion that may free the vehicle.
WARNING
If the vehicle is stuck and excessive
wheel spin occurs, the temperature
in the tires can increase very quickly.
If the tires become damaged, a tire
blow out or tire explosion can occur.
This condition is dangerous - you and
others may be injured. Do not attempt
this procedure if people or objects are
anywhere near the vehicle.
If you attempt to free the vehicle, the
vehicle can overheat quickly, possibly
causing an engine compartment fire
or other damage. Try to avoid spinning
the wheels as much as possible to
prevent overheating of either the tires
or the engine. DO NOT allow the vehicle
to spin the wheels above 35 mph (56
km/h).
Information
The ESC system must be turned OFF
before rocking the vehicle.
Page 344 of 598
Driving Your Vehicle
6-70
Backing up
Hold the bottom of the steering wheel
with one hand. Then, to move the trailer
to the left, move your hand to the left. To
move the trailer to the right, move your
hand to the right. Always back up slowly
and, if possible, have someone guide
you.
Making turns
When you’re turning with a trailer, make
wider turns than normal. Do this so your
trailer won’t strike soft shoulders, curbs,
road signs, trees, or other objects. Avoid
jerky or sudden maneuvers. Signal well in
advance.
Turn signals
When you tow a trailer, your vehicle has
to have a different turn signal flasher and
extra wiring. The green arrows on your
instrument panel will flash whenever you
signal a turn or lane change. Properly
connected, the trailer lights will also flash
to alert other drivers you’re about to turn,
change lanes, or stop.
When towing a trailer, the green arrows
on your instrument panel will flash for
turns even if the bulbs on the trailer
are burned out. Thus, you may think
drivers behind you are seeing your
signals when, in fact, they are not. It’s
important to check occasionally to be
sure the trailer bulbs are still working.
You must also check the lights every time
you disconnect and then reconnect the
wires.
WARNING
Do not connect a trailer lighting system
directly to your vehicle’s lighting
system. Use an approved trailer wiring
harness. Failure to do so could result
in damage to the vehicle electrical
system and/or personal injury. Consult
an authorized HYUNDAI dealer for
assistance.
Driving on hills
Reduce speed and shift to a lower gear
before you start down a long or steep
downgrade. If you don’t shift down, you
might have to use your brakes so much
that they would get overheated and may
not operate efficiently.
On a long uphill grade, shift down and
reduce your speed to around 45 mph (70
km/h) to reduce the possibility of engine
and transmission overheating.
If your trailer weighs more than the
maximum trailer weight without trailer
brakes and you have a automatic
transmission, you should drive in D
(Drive) when towing a trailer.
Operating your vehicle in D (Drive)
when towing a trailer will minimize heat
build-up and extend the life of your
transmission.
Page 506 of 598
Emergency Situations
8-22
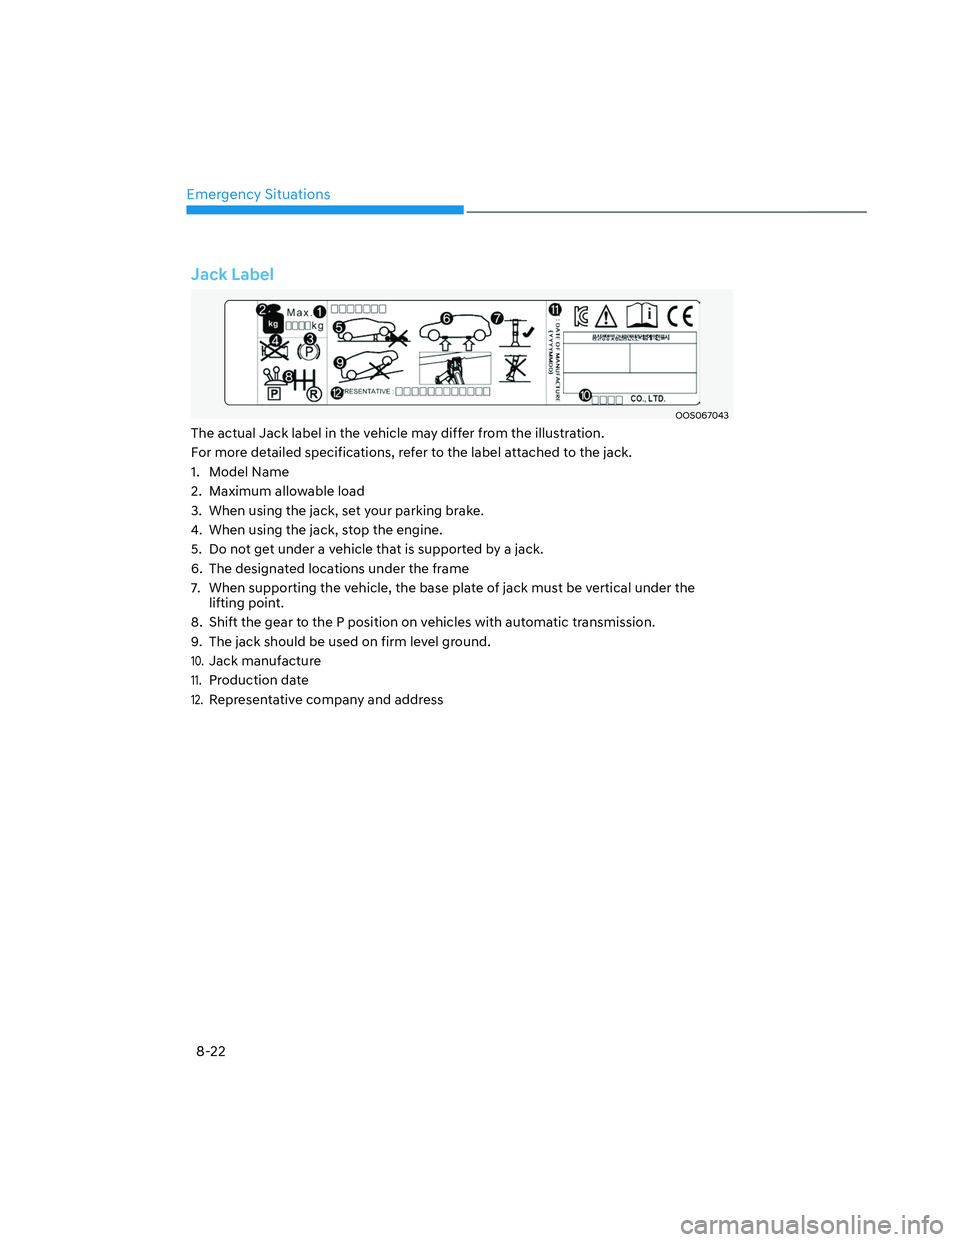
Jack Label
OOS067043OOS067043
The actual Jack label in the vehicle may differ from the illustration.
For more detailed specifications, refer to the label attached to the jack.
1. Model Name
2. Maximum allowable load
3. When using the jack, set your parking brake.
4. When using the jack, stop the engine.
5. Do not get under a vehicle that is supported by a jack.
6. The designated locations under the frame
7. When supporting the vehicle, the base plate of jack must be vertical under the
lifting point.
8. Shift the gear to the P position on vehicles with automatic transmission.
9. The jack should be used on firm level ground.
10. Jack manufacture
11. Production date
12. Representative company and address
Page 514 of 598
Maintenance
9-6
Owner Maintenance Schedule
When you stop for fuel:
• Check the coolant level in the engine
coolant reservoir.
• Check the windshield washer fluid
level.
• Check for low or under-inflated tires.
WARNING
Be careful when checking your coolant
level when the engine is hot. This may
result in coolant being blown out of the
opening and cause serious burns and
other injuries.
While operating your vehicle:
• Note any changes in the sound of the
exhaust or any smell of exhaust fumes
in the vehicle.
• Check for vibrations in the steering
wheel. Notice if there is any increased
steering effort or looseness in the
steering wheel, or change in its
straight-ahead position.
• Notice if your vehicle constantly turns
slightly or “pulls” to one side when
traveling on smooth, level road.
• When stopping, listen and check for
unusual sounds, pulling to one side,
increased brake pedal travel or “hard-
to-push” brake pedal.
• Check the automatic transmission
or dual clutch transmission P (Park)
function.
• Check the parking brake.
• Check for fluid leaks under your
vehicle (water dripping from the air
conditioning system during or after
use is normal).
At least monthly:
• Check coolant level in the engine
coolant reservoir.
• Check the operation of all exterior
lights, including the stoplights, turn
signals and hazard warning flashers.
• Check the inflation pressures of all
tires including the spare for tires that
are worn, show uneven wear, or are
damaged.
• Check for loose wheel lug nuts.
At least twice a year:
• Check radiator, heater and air
conditioning hoses for leaks or
damage.
• Check windshield washer spray and
wiper operation. Clean wiper blades
with a clean cloth dampened with
washer fluid.
• Check headlamp alignment.
• Check muffler, exhaust pipes, shields
and clamps.
• Check the seat belts for wear and
function.
At least once a year:
• Clean body and door drain holes.
• Lubricate door hinges and hood
hinges.
• Lubricate door and hood locks and
latches.
• Lubricate door rubber weather strips.
• Check the air conditioning system.
• Inspect and lubricate automatic
transmission linkage and controls.
• Clean the battery and terminals.
• Check the brake fluid level.
Page 519 of 598
09
9-11
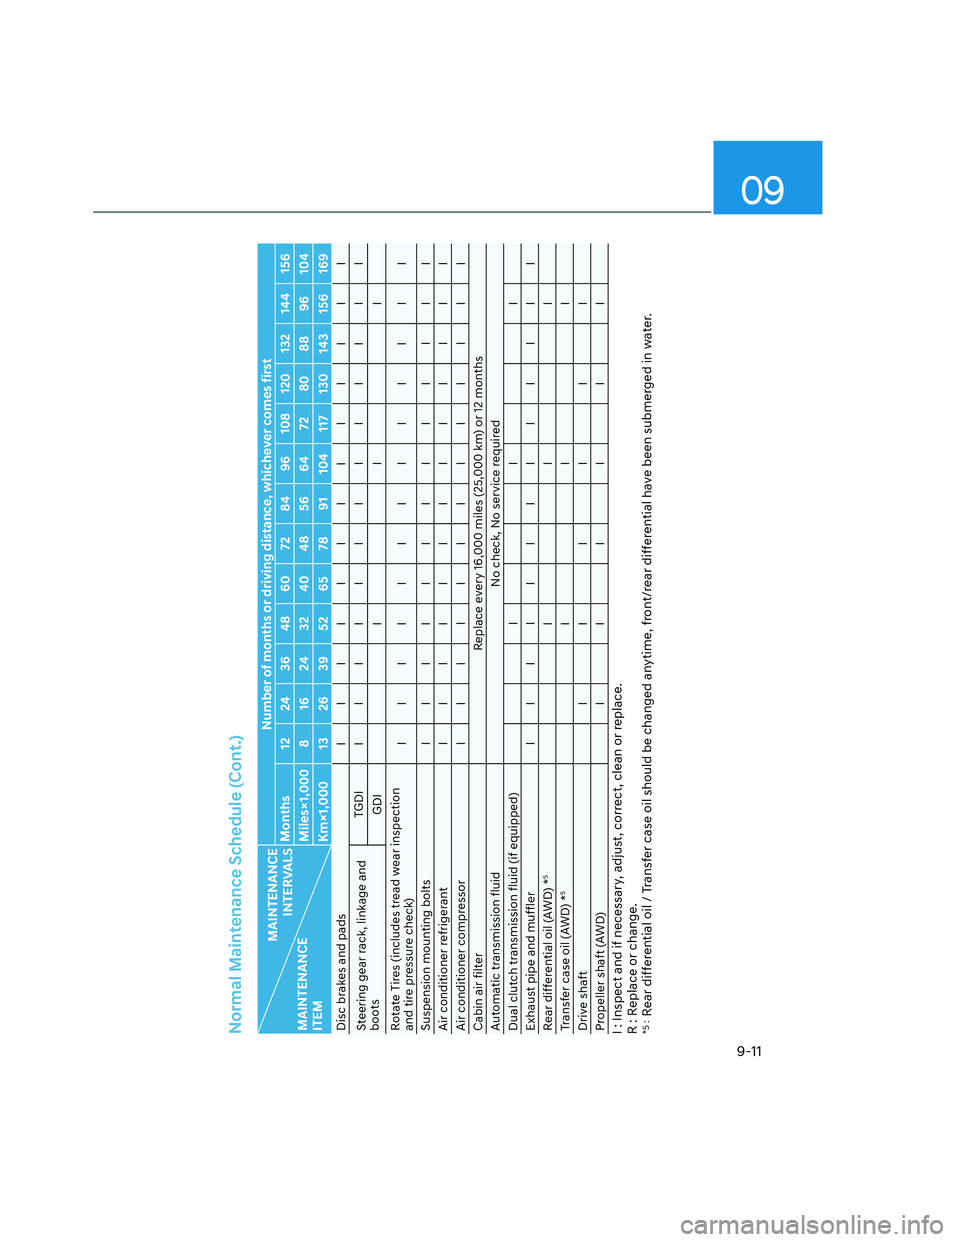
Normal Maintenance Schedule (Cont.)
MAINTENANCE
INTERVALS
MAINTENANCE
ITEMNumber of months or driving distance, whichever comes first
Months 12 24 36 48 60 72 84 96 108 120 132 144 156
Miles×1,000 8 16 24 32 40 48 56 64 72 80 88 96 104
Km×1,000 13 26 39 52 65 78 91 104 117 130 143 156 169
Disc brakes and padsIIIIIIIIIIIII
Steering gear rack, linkage and
bootsTGDI IIIIIIIIIIIII
GDI I I I
Rotate Tires (includes tread wear inspection
and tire pressure check)IIIIIIIIIIIII
Suspension mounting boltsIIIIIIIIIIIII
Air conditioner refrigerantIIIIIIIIIIIII
Air conditioner compressorIIIIIIIIIIIII
Cabin air filter Replace every 16,000 miles (25,000 km) or 12 months
Automatic transmission fluid No check, No service required
Dual clutch transmission fluid (if equipped) I I I
Exhaust pipe and mufflerIIIIIIIIIIIII
Rear differential oil (AWD) *
5
III
Transfer case oil (AWD) *
5
III
Drive shaft IIIIII
Propeller shaft (AWD)IIIIII
I : Inspect and if necessary, adjust, correct, clean or replace.
R : Replace or change.*5 :
Rear differential oil / Transfer case oil should be changed anytime, front/rear differential have been submerged in water.