2023 HYUNDAI PALISADE cooling
[x] Cancel search: coolingPage 569 of 661
08
8-7
If your temperature gauge indicates
overheating, you experience a loss of
power, or hear loud pinging or knocking,
the engine may be overheating. If this
happens, you should:
1. Pull off the road and stop as soon as it is safe to do so.
2. Shift the gear to P (Park) and set the parking brake. If the air conditioning is
ON, turn it OFF.
3. If engine coolant is running out under the vehicle or steam is coming out
from the hood, stop the engine. Do
not open the hood until the coolant
has stopped running or the steaming
has stopped. If there is no visible
loss of engine coolant and no steam,
leave the engine running and check
to be sure the engine cooling fan is
operating. If the fan is not running,
turn the engine off.
WARNING
While the engine is running,
keep hands, clothing and tools
away from the moving parts
such as the cooling fan and
drive belt to prevent serious
injury. 4. Check for coolant leaking from the
radiator, hoses or under the vehicle. (If
the air conditioning has been in use, it
is normal for cold water to be draining
from it when you stop.)
5. If engine coolant is leaking out, stop the engine immediately and call the
nearest authorized HYUNDAI dealer
for assistance.
WARNING
Your vehicle is equipped with
a pressurized coolant reserve
tank. NEVER remove the
radiator cap or the drain plug
while the engine and radiator
are HOT.
Hot coolant and steam may blow out
under pressure, causing serious injury.
Turn the engine off and wait until
the engine cools down. Use extreme
care when removing the radiator cap.
Wrap a towel or thick rag around it,
and turn it counterclockwise slowly to
release some of the pressure from the
system. Step back while the pressure is
released.
When you are sure all the pressure has
been released, continue turning the cap
counter-clockwise to remove it.
IF THE ENGINE OVERHEATS
Page 600 of 661
09
9-13
Engine Oil and Filter
The engine oil and filter should be
changed at the intervals specified in the
maintenance schedule. If the vehicle
is being driven in severe conditions,
more frequent oil and filter changes are
required.
Drive Belts
Inspect all drive belts for evidence
of cuts, cracks, excessive wear or oil
saturation and replace if necessary.
Drive belts should be checked
periodically for proper tension and
adjusted as necessary.
Information
When you are inspecting the belt, turn the
engine off.
Fuel Lines, Fuel Hoses and
Connections
Check the fuel lines, fuel hoses and
connections for leakage and damage.
Have an authorized HYUNDAI dealer
replace any damaged or leaking parts
immediately.
Vapor Hose and Fuel Filler Cap
The vapor hose and fuel filler cap should
be inspected at those intervals specified
in the maintenance schedule. Make sure
a new vapor hose or fuel filler cap is
correctly replaced.
Air Cleaner Filter
Have the air cleaner filter replaced by an
authorized HYUNDA dealer.
Spark Plugs
Make sure to install new spark plugs of
the correct heat range.
When assembling parts, be sure to
wipe out foreign substances inside
and outside of the boot bottom of the
ignition coil and the insulator of the
spark plug with a soft cloth to prevent
contamination of the spark plug
insulator.
Cooling System
Check cooling system components, such
as radiator, coolant reservoir, hoses and
connections for leakage and damage.
Replace any damaged parts.
Engine Coolant
The coolant should be changed at the
intervals specified in the maintenance
schedule.
Automatic Transmission Fluid
The automatic transmission fluid level
does not need to be checked under
normal usage conditions.
Have the automatic transmission fluid
changed by an authorized HYUNDAI
dealer according to the maintenance
schedule.
Information
Automatic transmission fluid color is red
when new.
As the vehicle is driven, the automatic
transmission fluid will begin to look
darker.
This is a normal condition. It does not
need to be replaced based on the color
change.
EXPLANATION OF SCHEDULED MAINTENANCE ITEMS
Page 602 of 661
09
9-15
Checking the Engine Oil Level
Engine oil is used for lubricating,
cooling, and operating various hydraulic
components in the engine. Engine oil
consumption while driving is normal,
and it is necessary to check and refill the
engine oil regularly. Also, check and refill
the oil level within the recommended
maintenance schedule to prevent
deterioration of oil performance.
Check the engine oil following the below
procedure.
1. Follow all of the oil manufacturer’s precautions.
2. Be sure the vehicle is on the level ground in P (Park) with the parking
brake set and the wheels blocked.
3. Turn the engine on and warm the engine up until the coolant
temperature reaches a constant
normal temperature.
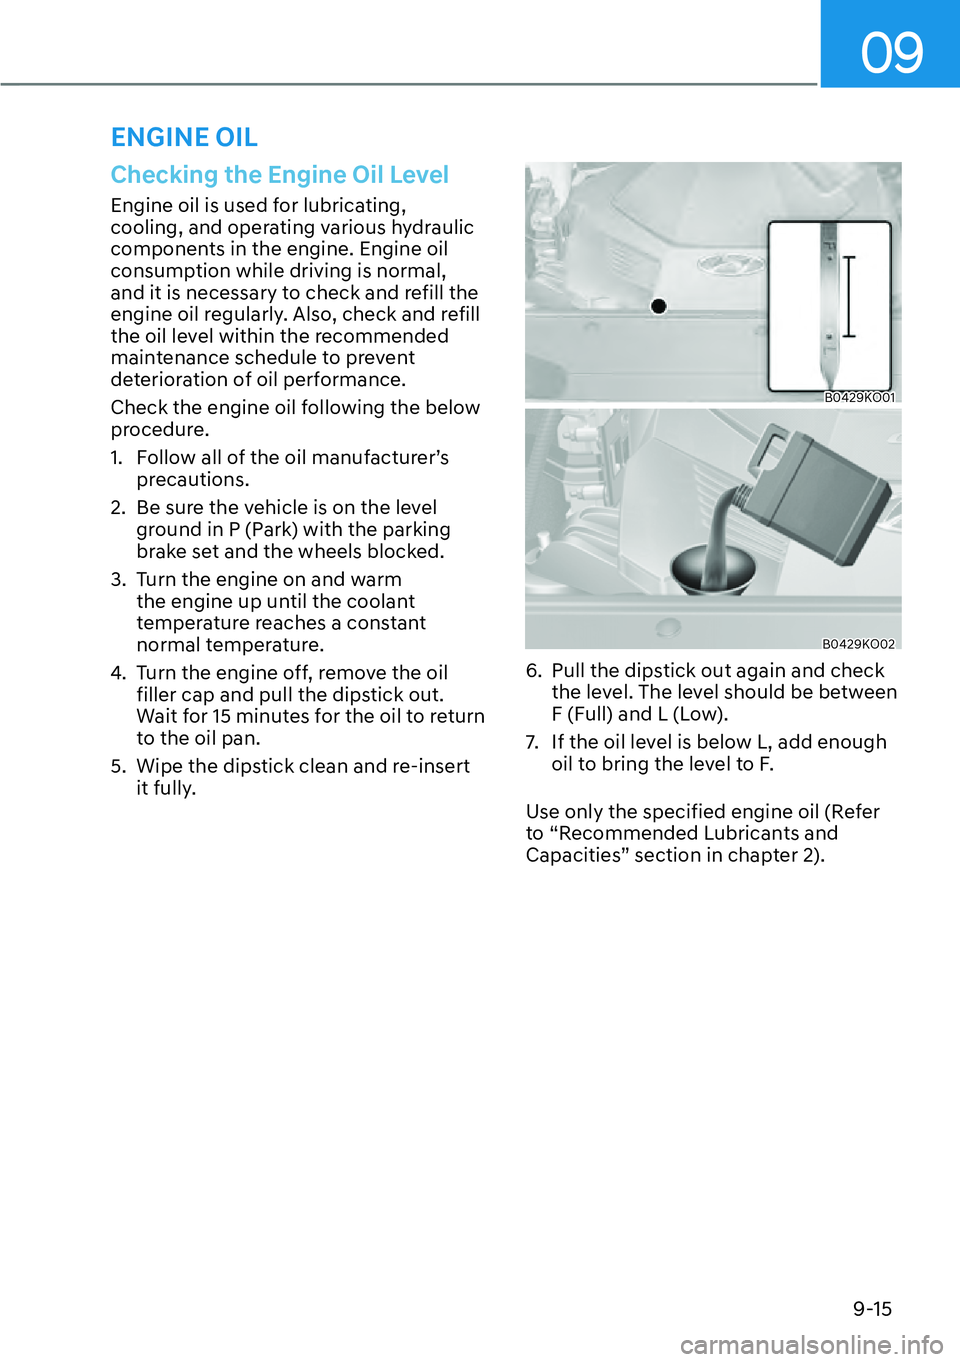
4. Turn the engine off, remove the oil filler cap and pull the dipstick out.
Wait for 15 minutes for the oil to return
to the oil pan.
5. Wipe the dipstick clean and re-insert it fully.
B0429KO01
B0429KO02
6. Pull the dipstick out again and check the level. The level should be between
F (Full) and L (Low).
7. If the oil level is below L, add enough oil to bring the level to F.
Use only the specified engine oil (Refer
to “Recommended Lubricants and
Capacities” section in chapter 2).
ENGINE OIL
Page 605 of 661
Maintenance9-18
ENGINE COOLANT
The high-pressure cooling system has a
reservoir filled with year-round antifreeze
coolant. The reservoir is filled at the
factory.
Check the antifreeze protection and
coolant level at least once a year, at
the beginning of the winter season and
before traveling to a colder climate.
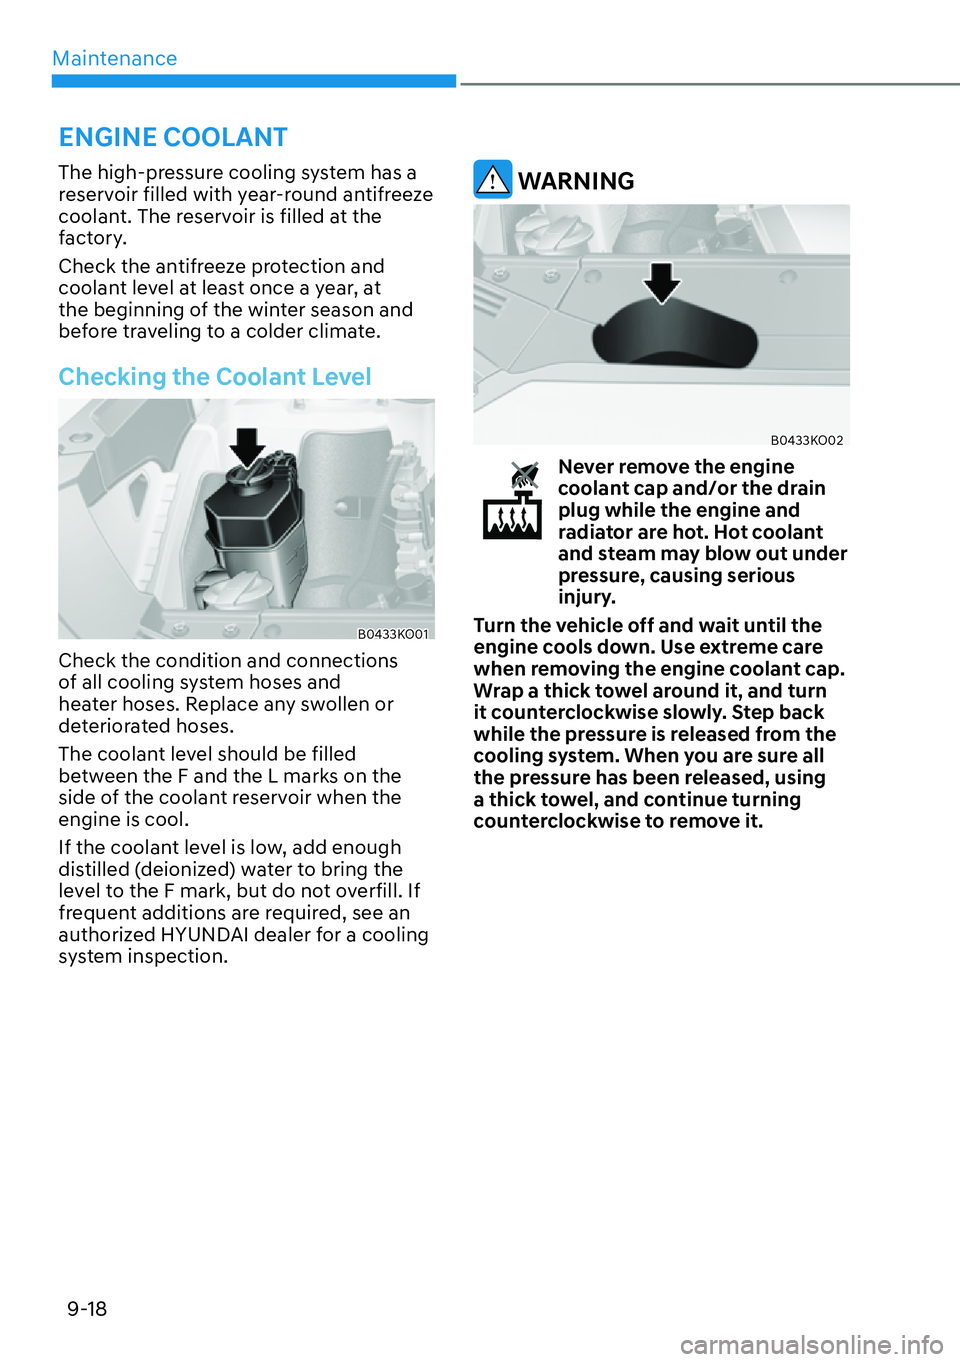
Checking the Coolant Level
B0433KO01
Check the condition and connections
of all cooling system hoses and
heater hoses. Replace any swollen or
deteriorated hoses.
The coolant level should be filled
between the F and the L marks on the
side of the coolant reservoir when the
engine is cool.
If the coolant level is low, add enough
distilled (deionized) water to bring the
level to the F mark, but do not overfill. If
frequent additions are required, see an
authorized HYUNDAI dealer for a cooling
system inspection.
WARNING
B0433KO02
Never remove the engine
coolant cap and/or the drain
plug while the engine and
radiator are hot. Hot coolant
and steam may blow out under
pressure, causing serious
injury.
Turn the vehicle off and wait until the
engine cools down. Use extreme care
when removing the engine coolant cap.
Wrap a thick towel around it, and turn
it counterclockwise slowly. Step back
while the pressure is released from the
cooling system. When you are sure all
the pressure has been released, using
a thick towel, and continue turning
counterclockwise to remove it.
Page 606 of 661
09
9-19
Information
The coolant level is influenced by the
engine temperature. Before checking or
refilling the coolant, turn the engine off.
WARNING
The electric motor for the
cooling fan may continue to
operate or start up when the
engine is not running and can
cause serious injury. Keep
hands, clothing and tools away
from the rotating fan blades of
the cooling fan.
Always turn off the vehicle unless the
vehicle has to be inspected with the
engine on. Be cautious as the cooling
fan may operate if the negative (-)
battery terminal is not disconnected.
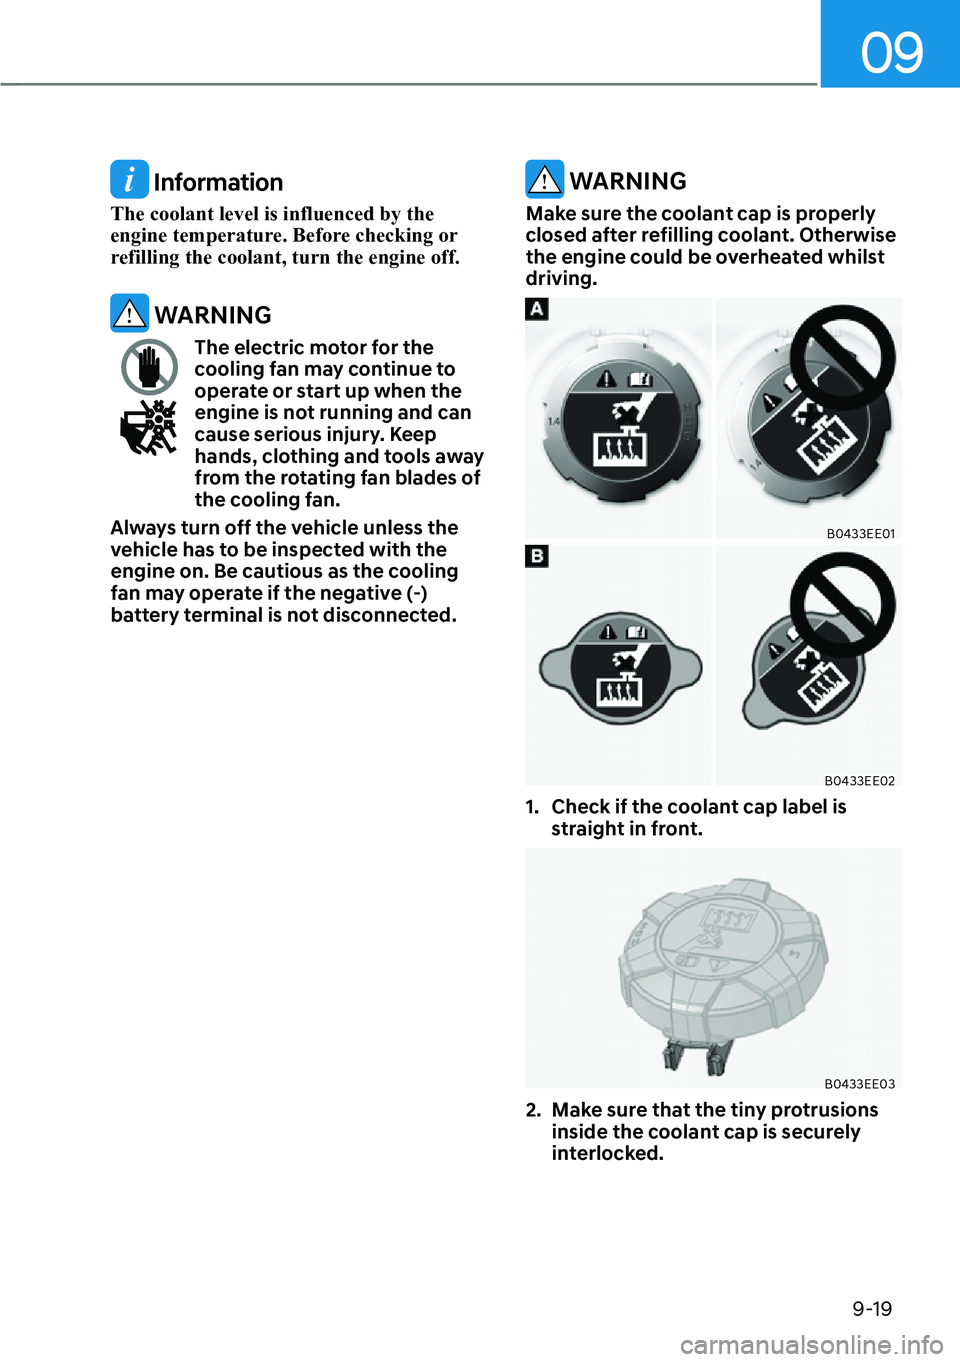
WARNING
Make sure the coolant cap is properly
closed after refilling coolant. Otherwise
the engine could be overheated whilst
driving.
B0433EE01
B0433EE02
1. Check if the coolant cap label is straight in front.
B0433EE03
2. Make sure that the tiny protrusions inside the coolant cap is securely
interlocked.
Page 640 of 661
09
9-53
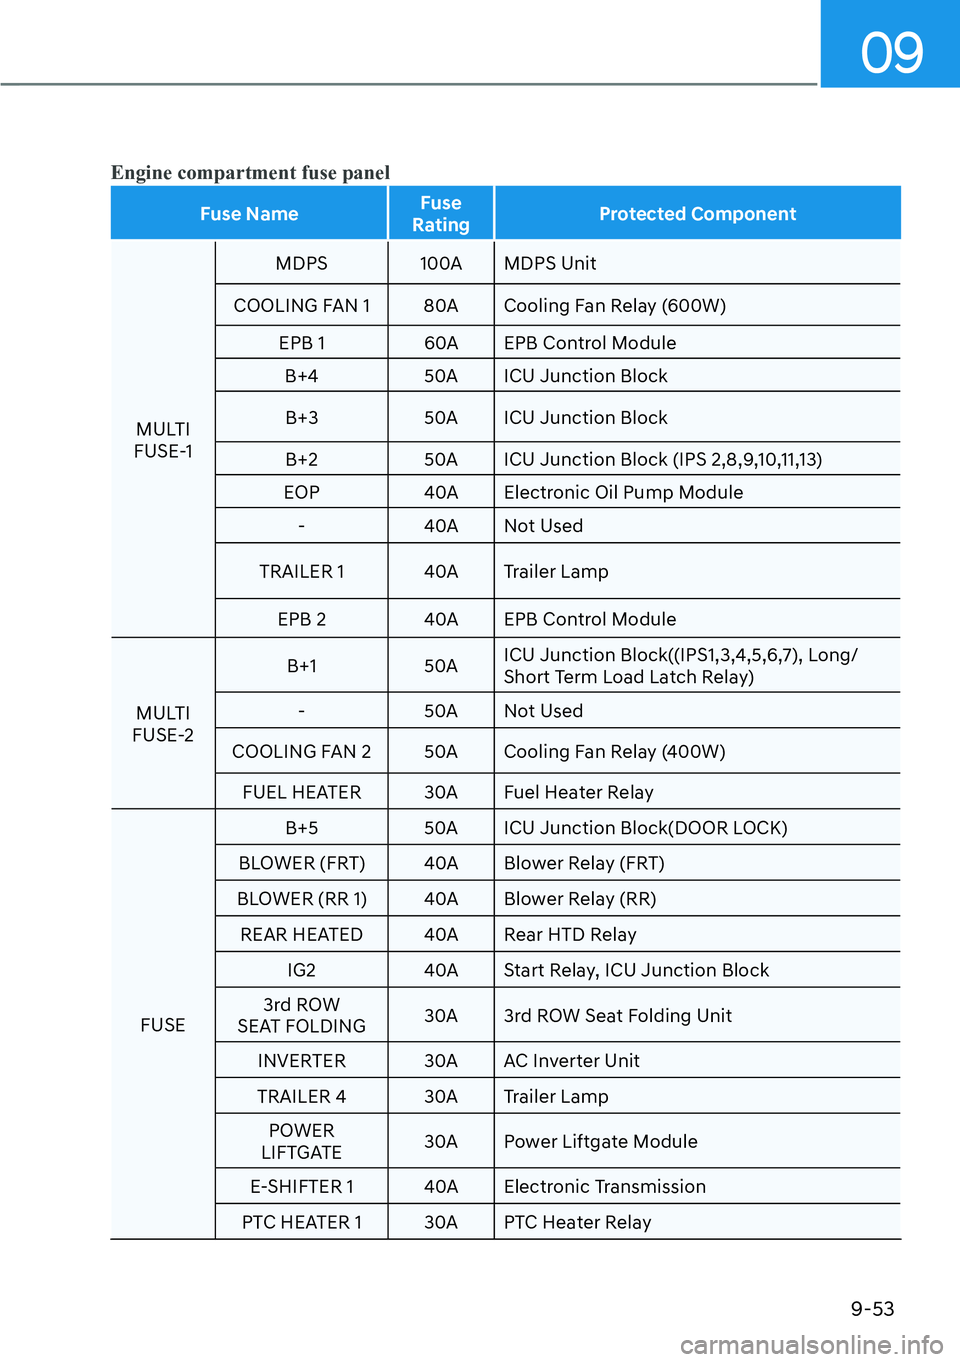
Engine compartment fuse panel
Fuse NameFuse
Rating Protected Component
MULTI
FUSE
-1 MDPS 100A MDPS Unit
COOLING FAN 1 80A Cooling Fan Relay (600W) EPB 1 60A EPB Control ModuleB+4 50A ICU Junction Block
B+3 50A ICU Junction BlockB+2 50A ICU Junction Block (IPS 2,8,9,10,11,13)
EOP 40A Electronic Oil Pump Module
- 40A Not Used
TRAILER 1 40A Trailer Lamp
EPB 2 40A EPB Control Module
MULTI
FUSE-2 B+1 50A
ICU Junction Block((IPS1,3,4,5,6,7), Long/
Short Term Load Latch Relay)
- 50A Not Used
COOLING FAN 2 50A Cooling Fan Relay (400W) FUEL HEATER 30A Fuel Heater Relay
FUSE B+5
50A ICU Junction Block(DOOR LOCK)
BLOWER (FRT) 40A Blower Relay (FRT)
BLOWER (RR 1) 40A Blower Relay (RR) REAR HEATED 40A Rear HTD Relay IG2 40A Start Relay, ICU Junction Block
3rd ROW
SEAT FOLDING 30A 3rd ROW Seat Folding Unit
INVERTER 30A AC Inverter Unit
TRAILER 4 30A Trailer Lamp POWER
LIFTGATE 30A Power Liftgate Module
E-SHIFTER 1 40A Electronic Transmission
PTC HEATER 1 30A PTC Heater Relay
Page 642 of 661

09
9-55
Fuse NameFuse
Rating Protected Component
PCB POWER
OUTLET 2 20
A 2ND POWER OUTLET#2
POWER
OUTLET 1 20A 2ND POWER OUTLET#1
ICU 10A PCB Block (ACC FUSE - AMP, ETC)
SENSOR 1 10A Fuel Pump Relay
SENSOR 2 10A [L3.8 GDI] A/C Comp Relay, Variable Intake
Solenoid Valve #1/#2, Oil Pump Solenoid
Valve, Oxygen Sensor Down #1/#2, Oil
Control Valve #1/#2(Intake/Exhaust),
Electronic Thermostat Heater, Purge Control
Solenoid Valve
SENSOR 5 10A Oxygen Sensor Up #1/#2, CCV
DCU 1 20A Doosing Control Unit
DCU 2 20A Doosing Control Unit
DUC 3 15A Doosing Control Unit
TCU 2 10A TCM, Electronic Transmission
POWER
OUTLET 3 20A LUGGAGE POWER OUTLET
POWER
OUTLET 4 20A 1ST POWER OUTLET
SENSOR 4 15A [L3.8 GDI] Cooling Fan Controller ECU 1 20A ECM
PCB ECU 2 20A [L3.8 GDI] ECM
ECU 3 20A [L3.8 GDI] ECM
IGN COIL 20A [L3.8 GDI] Ignition Coil #1/#2/#3/#4/#5/#6 EPB 3 10A EPB Control Module
SENSOR 6 10A Electronic Oil Pump ECU 4 10A ECM