Page 576 of 661

Emergency Situations8-14
Jack and Tools
B0413EU01
B0413EU02
�M Jack handle
�N Jack
�O Wheel lug nut wrench
�P Socket
�Q Screwdriver
�R Towing hook
The jack, jack handle, wheel lug nut
wrench and socket are stored in the
luggage compartment under the lug-
gage box cover.
The jack is provided for emergency tire
changing only.
Removing and Storing the Spare
Tire
B0413EU04
Your spare tire is stored underneath your
vehicle, directly below the cargo area.
To remove the spare tire:
1. Open the liftgate.
2. Find the plastic hex bolt cover and remove the cover with a coin or flat-
blade screwdriver.
B0413EU05
3. Connect the socket A and wheel lug
nut wrench B.
4. Loosen the bolt enough to lower the spare tire.
Turn the wrench counterclockwise
until the spare tire reaches the
ground.
5. After the spare tire reaches the ground, continue to turn the wrench
counterclockwise, and draw the spare
tire outside. Never rotate the wrench
excessively, otherwise the spare tire
carrier may be damaged.
Page 577 of 661

08
8-15
B0413EU06
6. Draw out the retainer guide �M through
the center hole of the spare tire.
To store the spare tire:
1. Lay the tire on the ground with the valve stem facing up.
2. Place the wheel under the vehicle and install the retainer guide and chain
through the wheel center.
3. Turn the wrench clockwise until it clicks.
CAUTION
Ensure the spare tire retainer guide is
properly aligned with the center of the
spare tire to prevent the spare tire from
“rattling”.
Otherwise, it may cause the spare tire
to fall off the carrier and lead to an
accident.
Changing Tires
WARNING
A vehicle can slip or roll off of a jack
causing serious injury or death to you or
those nearby. Take the following safety
precautions:
�[��Never place any portion of your body
under a vehicle that is supported by
a jack.
�[�� NEVER attempt to change a tire in
the lane of traffic. ALWAYS move the
vehicle completely off the road on
level, firm ground away from traffic
before trying to change a tire. If you
cannot find a level, firm place off
the road, call a towing service for
assistance.
�[�� Be sure to use the jack provided with
the vehicle.
�[�� ALWAYS place the jack on the
designated jacking positions on the
vehicle and NEVER on the bumpers
or any other part of the vehicle for
jacking support.
�[�� Do not start or run the engine while
the vehicle is on the jack.
�[�� Do not allow anyone to remain in the
vehicle while it is on the jack.
�[�� Keep children away from the road
and the vehicle.
Page 578 of 661
, apply the parking brake, and place the
ignit")
Emergency Situations8-16
Follow these steps to change your
vehicle’s tire:
1. Park on a level, firm surface.
2. Move the shift button into P (Park), apply the parking brake, and place the
ignition switch or press Engine Start/
Stop button in the LOCK/OFF position.
3. Press the hazard warning flasher button.
4. Remove the wheel lug nut wrench, jack, jack handle and spare tire from
the vehicle.
5. Block both the front and rear of the tire diagonally opposite of the tire you
are changing.
B0413EU11
6. Loosen the wheel lug nuts counterclockwise one turn each in
the order shown above, but do not
remove any lug nuts until the tire has
been raised off of the ground.
B0413EU12
A: Rear, B: Front
7. Place the jack at the designated
jacking position under the frame
closest to the tire you are changing.
The jacking positions are plates
welded to the frame with two
notches. Never jack at any other
position or part of the vehicle. Doing
so may damage the side seal molding
or other parts of the vehicle.
Page 579 of 661

08
8-17
B0413EU13
8. Insert the jack handle into the jack and turn it clockwise, raising the
vehicle until the tire clears the ground.
Make sure the vehicle is stable on the
jack.
9. Loosen the lug nuts with the wheel lug nut wrench and remove them with
your fingers. Remove the wheel from
the studs and lay it flat on the ground
out of the way. Remove any dirt or
debris from the studs, mounting
surfaces, and wheel.
10. Install the spare tire onto the studs of the hub.
11. Tighten the lug nuts with your fingers onto the studs with the smaller end of
the lug nuts closest to the wheel.
12. Lower the vehicle to the ground by turning the jack handle
counterclockwise.
B0413EU10
13. Use the wheel lug nut wrench to tighten the lug nuts in the order
shown. Double-check each lug nut
until they are tight. After changing
tires, have an authorized HYUNDAI
dealer tighten the lug nuts to their
proper torque as soon as possible. The
wheel lug nut should be tightened to
11~13 kgf·m (79~94 lbf·ft).
If you have a tire gauge, check the
tire pressure (see “Tires and Wheels”
section in chapter 2 for tire pressure
instructions.). If the pressure is lower or
higher than recommended, drive slowly
to the nearest service station and adjust
it to the recommended pressure. Always
reinstall the valve cap after checking
or adjusting tire pressure. If the cap
is not replaced, air may leak from the
tire. If you lose a valve cap, buy another
and install it as soon as possible. After
changing tires, secure the flat tire and
return the jack and tools to their proper
storage locations.
Page 585 of 661
08
8-23
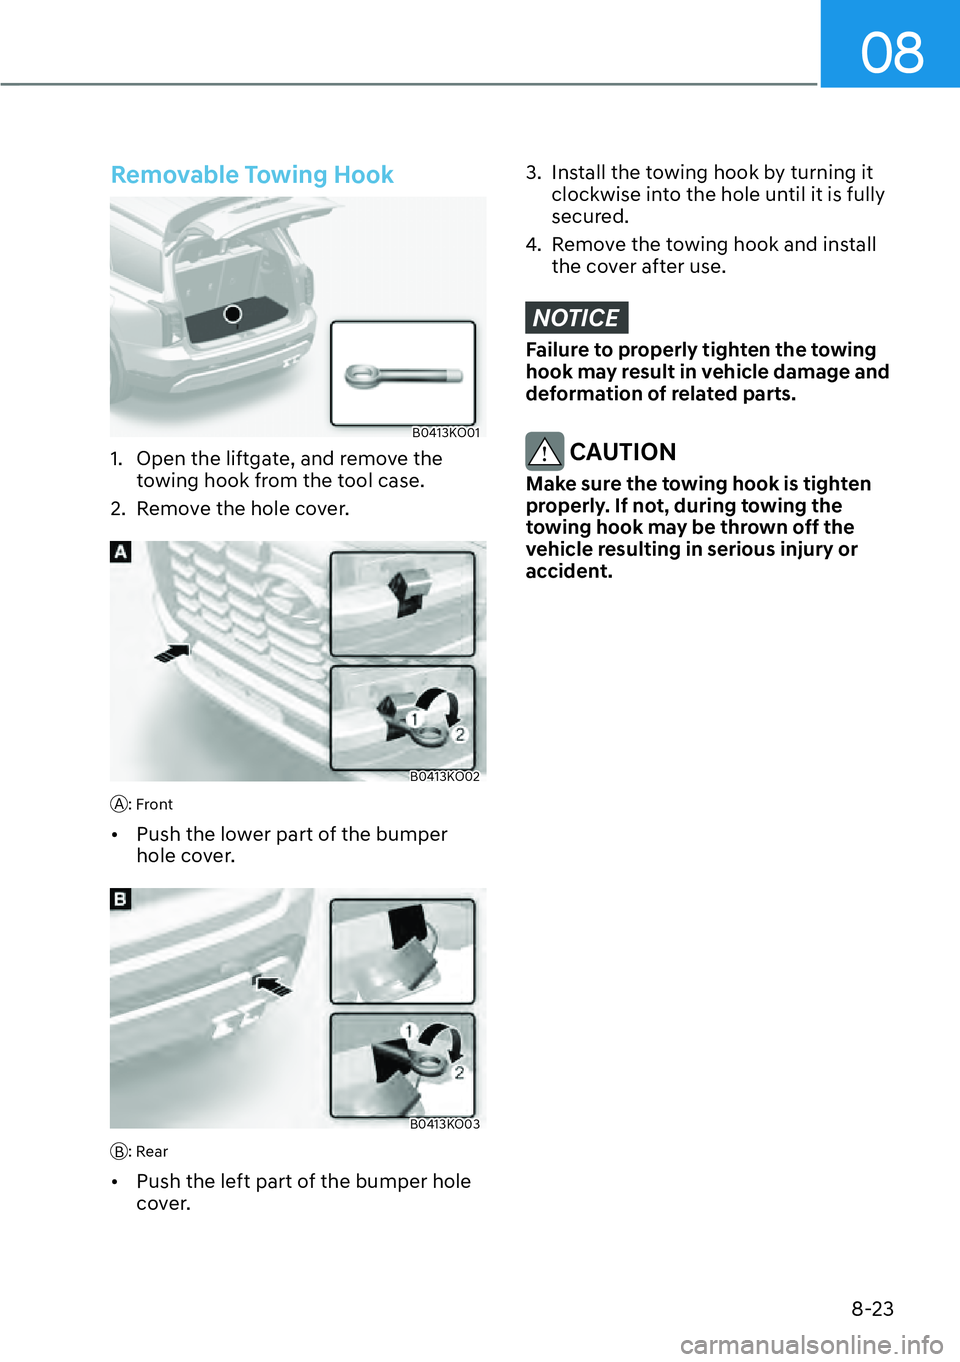
Removable Towing Hook
B0413KO01
1. Open the liftgate, and remove the towing hook from the tool case.
2. Remove the hole cover.
B0413KO02
A: Front
�[�� Push the lower part of the bumper
hole cover.
B0413KO03
B: Rear
�[��Push the left part of the bumper hole
cover.
3. Install the towing hook by turning it
clockwise into the hole until it is fully
secured.
4. Remove the towing hook and install the cover after use.
NOTICE
Failure to properly tighten the towing
hook may result in vehicle damage and
deformation of related parts.
CAUTION
Make sure the towing hook is tighten
properly. If not, during towing the
towing hook may be thrown off the
vehicle resulting in serious injury or
accident.
Page 605 of 661

Maintenance9-18
ENGINE COOLANT
The high-pressure cooling system has a
reservoir filled with year-round antifreeze
coolant. The reservoir is filled at the
factory.
Check the antifreeze protection and
coolant level at least once a year, at
the beginning of the winter season and
before traveling to a colder climate.
Checking the Coolant Level
B0433KO01
Check the condition and connections
of all cooling system hoses and
heater hoses. Replace any swollen or
deteriorated hoses.
The coolant level should be filled
between the F and the L marks on the
side of the coolant reservoir when the
engine is cool.
If the coolant level is low, add enough
distilled (deionized) water to bring the
level to the F mark, but do not overfill. If
frequent additions are required, see an
authorized HYUNDAI dealer for a cooling
system inspection.
WARNING
B0433KO02
Never remove the engine
coolant cap and/or the drain
plug while the engine and
radiator are hot. Hot coolant
and steam may blow out under
pressure, causing serious
injury.
Turn the vehicle off and wait until the
engine cools down. Use extreme care
when removing the engine coolant cap.
Wrap a thick towel around it, and turn
it counterclockwise slowly. Step back
while the pressure is released from the
cooling system. When you are sure all
the pressure has been released, using
a thick towel, and continue turning
counterclockwise to remove it.
Page 617 of 661

�[�� Absorbent Glass Matt (AGM)
batteries are maintenance-free and
have the AGM battery be serviced
by an authorized HYUNDAI dealer.
For charging y")
Maintenance9-30
NOTICE
AGM battery (if equipped)
�[�� Absorbent Glass Matt (AGM)
batteries are maintenance-free and
have the AGM battery be serviced
by an authorized HYUNDAI dealer.
For charging your AGM battery, use
only fully automatic battery chargers
that are specially developed for AGM
batteries.
�[�� When replacing the AGM battery,
have you use parts for replacement
from an authorized HYUNDAI dealer.
�[�� Do not open or remove the cap on
top of the battery. This may cause
leaks of internal electrolyte that
could result in severe injury.
By jump starting
After a jump start from a good battery,
drive the vehicle for 20-30 minutes
before it is shutoff. The vehicle may
not restart if you shut it off before the
battery had a chance to adequately
recharge. See “Jump Starting” in chapter
8 for more information on jump starting
procedures.
Information
An inappropriately disposed
battery can be harmful to the
environment and human health.
Dispose of the battery according
to your local law(s) or regulation.
Reset Items
The following items may need to be reset
after the battery has been discharged or
the battery has been disconnected.
�[��Driving info/Since refueling/
Accumulated info (see chapter 4)
�[�� Integrated memory system (see
chapter 5)
�[�� Power window (see chapter 5)
�[�� Sunroof (see chapter 5)
�[�� Climate control system (see chapter 5)
�[�� Clock (see Infotainment system
manual)
Page 646 of 661

B0474EU01
1. Turn off the engine.
2. Open the liftgate.
3. Loosen the lamp assembly retaining screws with a cross-tip screwdriver.
4. Remove t")
09
9-59
Tail/Stop lamp and turn signal lamp
(Type A)
B0474EU01
1. Turn off the engine.
2. Open the liftgate.
3. Loosen the lamp assembly retaining screws with a cross-tip screwdriver.
4. Remove the rear combination lamp assembly from the body of the
vehicle.
5. Remove the socket from the assembly by turning the socket
counterclockwise until the tabs on
the socket align with the slots on the
assembly.
B0474EU02
6. Remove the bulb from the socket by pressing it in and rotating it
counterclockwise until the tabs on the
bulb align with the slots in the socket.
Pull the bulb out of the socket.
7. Insert a new bulb by inserting it into the socket and rotating it until it locks
into place. 8. Install the socket into the assembly by
aligning the tabs on the socket with
the slots in the assembly. Push the
socket into the assembly and turn the
socket clockwise.
9. Reinstall the lamp assembly to the body of the vehicle.
Tail lamp, stop lamp, turn signal
lamp and garnish lamp (Type B)
If the LED lamp does not operate, have
the system checked by an authorized
HYUNDAI dealer.
The LED lamps cannot replaced as a
single unit because it is an integrated
unit. The LED lamps has to be replaced
with the unit.
A skilled technician should check or
repair the LED lamp, for it may damage
related parts of the vehicle.
Side maker lamp
If the LED lamp does not operate, have
the system checked by an authorized
HYUNDAI dealer.
The LED lamps cannot replaced as a
single unit because it is an integrated
unit. The LED lamps has to be replaced
with the unit.
A skilled technician should check or
repair the LED lamp, for it may damage
related parts of the vehicle.
Reverse lamp
If the light bulb does not operate, have
the vehicle checked by an authorized
HYUNDI dealer.