2023 HYUNDAI KONA EV oil
[x] Cancel search: oilPage 495 of 548
09
9-19
• Wear eye protection when checking
the battery during charging.
• The battery must be removed from
the vehicle and placed in a well
ventilated area.
• Watch the battery during charging,
and stop or reduce the charging
rate if the battery cells begin boiling
violently.
• The negative battery cable must
be removed first and installed last
when the battery is disconnected.
Disconnect the battery charger in the
following order:
(1) Turn off the battery charger main
switch.
(2) Unhook the negative clamp from the negative battery terminal.
(3) Unhook the positive clamp from the positive battery terminal.
• Always use a genuine HYUNDAI
approved battery or the equivalent
specified for your vehicle when you
replace the battery. By jump starting
After a jump start from a good battery,
drive the vehicle for 20-30 minutes
before it is shutoff. The vehicle may
not restart if you shut it off before the
battery had a chance to adequately
recharge. See “Jump Starting” in chapter
8 for more information on jump starting
procedures.
Information
An inappropriately disposed of battery can be harmful to the
environment and human health.
Dispose of the battery according to your
local law(s) or regulations.
Reset items
The following items may need to be reset
after the battery has been discharged or
the battery has been disconnected. • Auto up/down window
• Sunroof
• Trip computer
• Climate control system
• Clock
• Audio system
Page 504 of 548
Maintenance
9-28
Curb weight
This means the weight of a motor
vehicle with standard and optional
equipment including the maximum
capacity of fuel, oil and coolant, but
without passengers and cargo.
DOT markings
The DOT code includes the Tire
Identification Number (TIN), an
alphanumeric designator which can
also identify the tire manufacturer,
production plant, brand and date of
production.
GVWR
Gross Vehicle Weight Rating
GAWR FRT
Gross Axle Weight Rating for the
Front Axle.
GAWR RR
Gross Axle Weight Rating for the
Rear axle.
Intended outboard sidewall
The side of an asymmetrical tire,
that must always face outward when
mounted on a vehicle.
Kilopascal (kPa)
The metric unit for air pressure.
Light Truck (LT) tire
A tire designated by its manufacturer
as primarily intended for use on
lightweight trucks or multipurpose
passenger vehicles.
Load ratings
The maximum load that a tire is rated
to carry for a given inflation pressure.
Load index
An assigned number ranging from 1
to 279 that corresponds to the load
carrying capacity of a tire.
Maximum inflation pressure
The maximum air pressure to which
a cold tire may be inflated. The
maximum air pressure is molded
onto the sidewall.
Maximum load rating
The load rating for a tire at the
maximum permissible inflation
pressure for that tire.
Maximum loaded vehicle weight
The sum of curb weight; accessory
weight; vehicle capacity weight; and
production options weight.
Normal occupant weight
The number of occupants a vehicle
is designed to seat multiplied by 150
pounds (68 kg).
Occupant distribution
Designated seating positions.
Outward facing sidewall
An asymmetrical tire has a particular
side that faces outward when
mounted on a vehicle. The outward
facing sidewall bears white lettering
or bears manufacturer, brand, and/or
model name molding that is higher or deeper than the same moldings
on the inner facing sidewall.
Passenger (P-Metric) tire
A tire used on passenger cars
and some light duty trucks and
multipurpose vehicles.
Page 508 of 548
![HYUNDAI KONA EV 2023 Owners Manual Maintenance
9-32
FUSES
„„Blade type
AB
„
„Cartridge type
„
„Multi fuse
OTM078035
AB
AB
[A] : Normal, [B] : Blown
A vehicle’s electrical system is protected
from elect HYUNDAI KONA EV 2023 Owners Manual Maintenance
9-32
FUSES
„„Blade type
AB
„
„Cartridge type
„
„Multi fuse
OTM078035
AB
AB
[A] : Normal, [B] : Blown
A vehicle’s electrical system is protected
from elect](/manual-img/35/56170/w960_56170-507.png)
Maintenance
9-32
FUSES
„„Blade type
AB
„
„Cartridge type
„
„Multi fuse
OTM078035
AB
AB
[A] : Normal, [B] : Blown
A vehicle’s electrical system is protected
from electrical overload damage by fuses.
This vehicle has 2 (or 3) fuse panels, one
located in the driver’s side panel bolster,
the other in the motor compartment.
If any of your vehicle’s lights,
accessories, or controls do not work,
check the appropriate circuit fuse. If a
fuse has blown, the element inside the
fuse will be melted or broken.
If the electrical system does not work,
first check the driver’s side fuse panel.
Before replacing a blown fuse, turn the
vehicle and all switches off, and then
disconnect the negative battery cable.
Always replace a blown fuse with one of
the same rating.
If the replacement fuse blows, this
indicates an electrical problem.
Avoid using the system involved and it is
recommended to consult an authorized
dealer.
Information
Three kinds of fuses are used: blade type
for lower amperage rating, cartridge
type, and multi fuse for higher amperage ratings.
WARNING
NEVER replace a fuse with anything but
another fuse of the same rating. • A higher capacity fuse could cause
damage and possibly cause a fire.
• Do not install a wire or aluminum
foil instead of the proper fuse -
even as a temporary repair. It may
cause extensive wiring damage and
possibly a fire.
NOTICE
Do not use a screwdriver or any other
metal object to remove fuses because
it may cause a short circuit and damage
the system.
Page 521 of 548
09
9-45
Headlamp, position lamp, turn
signal lamp and daytime running
light bulb replacement
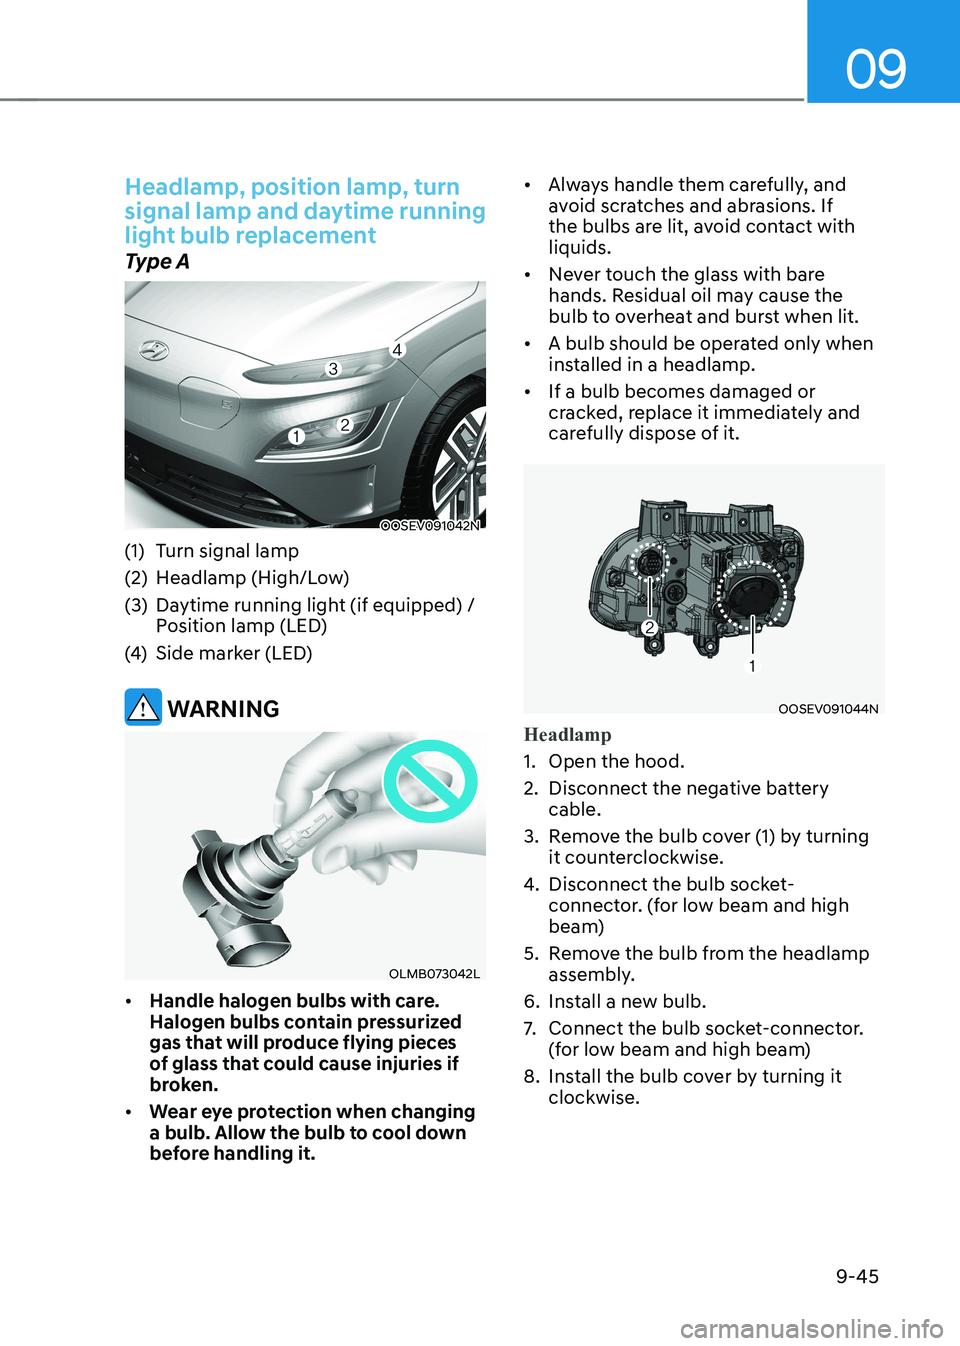
Type A
OOSEV091042N
(1) Turn signal lamp
(2) Headlamp (High/Low)
(3) Daytime running light (if equipped) / position lamp (LED)
(4) Side marker (LED)
WARNING
OLMB073042L
• Handle halogen bulbs with care.
Halogen bulbs contain pressurized
gas that will produce flying pieces
of glass that could cause injuries if
broken.
• Wear eye protection when changing
a bulb. Allow the bulb to cool down
before handling it. •
Always handle them carefully, and
avoid scratches and abrasions. If
the bulbs are lit, avoid contact with liquids.
• Never touch the glass with bare
hands. Residual oil may cause the
bulb to overheat and burst when lit.
• A bulb should be operated only when
installed in a headlamp.
• If a bulb becomes damaged or
cracked, replace it immediately and
carefully dispose of it.
OOSEV091044N
Headlamp
1. Open the hood.
2. Disconnect the negative battery
cable.
3. Remove the bulb cover (1) by turning it counterclockwise.
4. Disconnect the bulb socket-
connector. (for low beam and high
beam)
5. Remove the bulb from the headlamp assembly.
6. Install a new bulb.
7. Connect the bulb socket-connector.
(for low beam and high beam)
8. Install the bulb cover by turning it clockwise.
Page 523 of 548
09
9-47
•
Always handle them carefully, and
avoid scratches and abrasions. If
the bulbs are lit, avoid contact with liquids.
• Never touch the glass with bare
hands. Residual oil may cause the
bulb to overheat and burst when lit.
• A bulb should be operated only when
installed in a headlamp.
• If a bulb becomes damaged or
cracked, replace it immediately and
carefully dispose of it.
Daytime running light, position lamp, turn signal lamp, and head lamp
If the LED lamp does not operate, we
recommend that you have the vehicle
checked by an authorized HYUNDAI
dealer.
Side repeater lamp replacement
OOSEV078024
If the light bulb does not operate, we
recommend that you have the vehicle
checked by an authorized HYUNDAI
dealer.
Rear combination lamp bulb
replacement
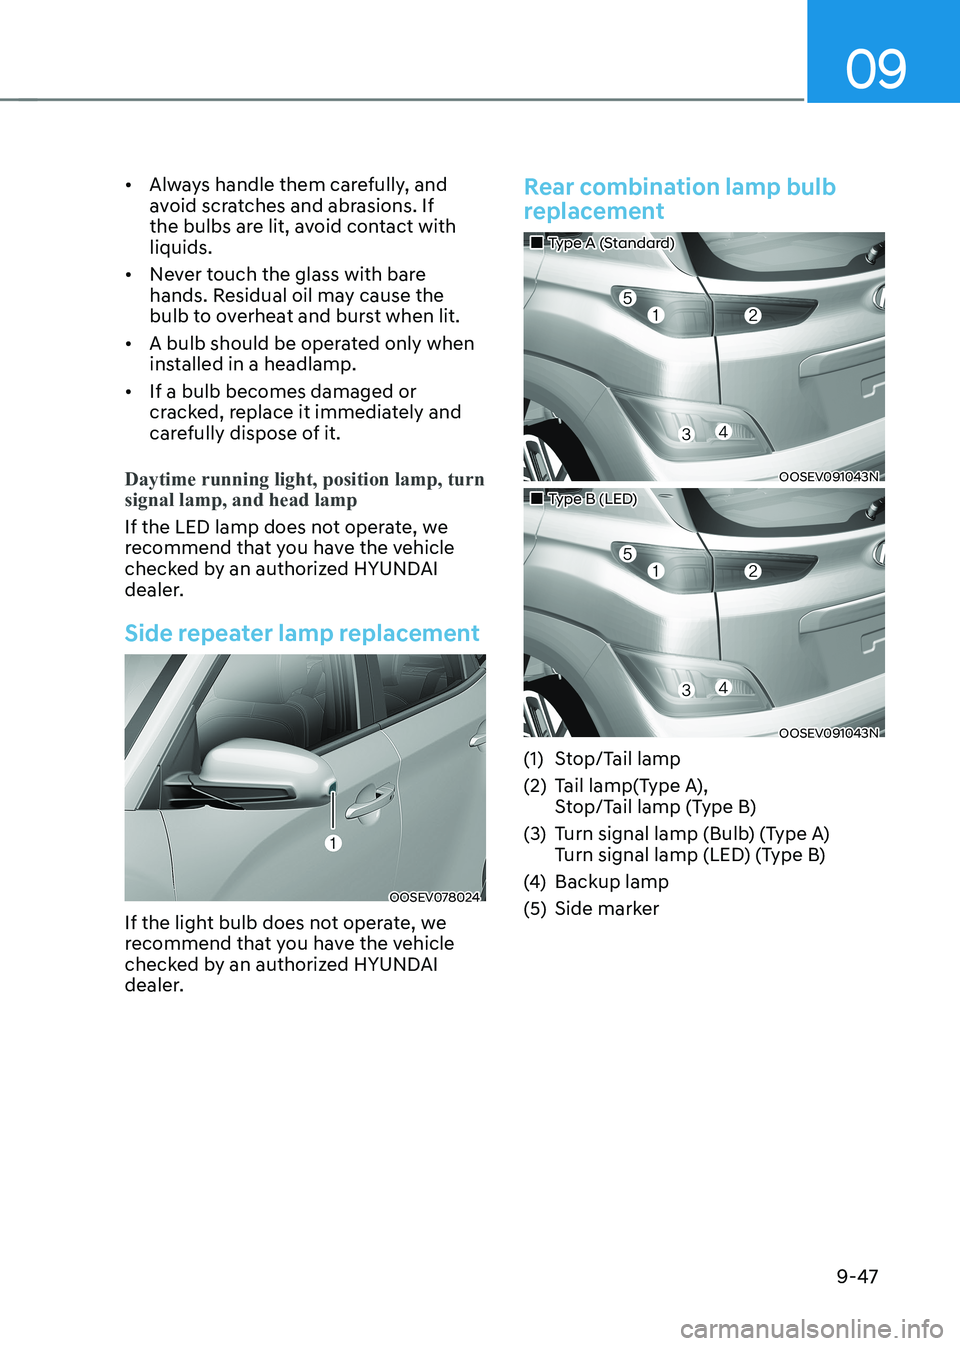
„„Type A (Standard)
OOSEV091043N
„„Type B (LED)
OOSEV091043N
(1) Stop/Tail lamp
(2) Tail lamp(Type A), Stop/Tail lamp (Type B)
(3) Turn signal lamp (Bulb) (Type A) Turn signal lamp (LED) (Type B)
(4) Backup lamp
(5) Side marker
Page 528 of 548
Maintenance
9-52
APPEARANCE CARE
Exterior care
NOTICE
If you park your vehicle near a stainless
steel sign or glass facade building, the
vehicle’s exterior plastic parts such
as a bumper, spoiler, garnish, lamp
or outside rearview mirror might be
damaged due to sunlight reflected from
the sign or building. To prevent damage
of the exterior plastic parts, you should
avoid parking in areas where light may
be reflected or use a car cover. (The
exterior plastic parts applied to your
vehicle may vary.)
Exterior general caution
It is very important to follow the label
directions when using any chemical
cleaner or polish. Read all warning and
caution statements that appear on the label.
Finish maintenance
Washing
To help protect your vehicle’s finish from
rust and deterioration, wash it thoroughly
and frequently at least once a month
with lukewarm or cold water.
If you use your vehicle for off-road
driving, you should wash it after each
off-road trip. pay special attention to the
removal of any accumulation of salt, dirt,
mud, and other foreign materials. Make
sure the drain holes in the lower edges
of the doors and rocker panels are kept clear and clean.
Insects, tar, tree sap, bird droppings,
industrial pollution and similar deposits
can damage your vehicle’s finish if not
removed immediately.
Even prompt washing with plain water
may not completely remove all these deposits.
A mild soap, safe for use on painted
surfaces, may be used. After washing, rinse the vehicle
thoroughly with lukewarm or cold water.
Do not allow soap to dry on the finish.
High-pressure washing
•
When using high-pressure washers,
make sure to maintain sufficient
distance from the vehicle.
Insufficient clearance or excessive
pressure can lead to component
damage or water penetration.
• Do not spray the camera, sensors or
its surrounding area directly with a
high pressure washer. Shock applied
from high pressure water may cause
the device to not operate normally.
• Do not bring the nozzle tip close to
boots (rubber or plastic covers) or
connectors as they may be damaged
if they come into contact with high
pressure water.
WARNING
After washing the vehicle, test the
brakes while driving slowly to see
if they have been affected by water
before getting on the road. If braking
performance is impaired, dry the
brakes by applying them lightly while
maintaining a slow forward speed.
Page 529 of 548
09
9-53
NOTICE
• Do not use strong soap, chemical
detergents or hot water, and do not
wash the vehicle in direct sunlight
or when the body of the vehicle is
warm.
• Be careful when washing the side
windows of your vehicle.
Especially, with high-pressure water,
water may leak through the windows
and wet the interior.
• To prevent damage to the plastic
parts and lamps, do not clean
with chemical solvents or strong
detergents.
WARNING
Wet brakes
After washing the vehicle, test the
brakes while driving slowly to see if
they have been affected by water. If
braking performance is impaired, dry
the brakes by applying them lightly
while maintaining a slow forward speed.
NOTICE
• Do not use strong soap, chemical
detergents or hot water, and do not
wash the vehicle in direct sunlight
or when the body of the vehicle is
warm.
• Be careful when washing the side
windows of your vehicle.
• Especially, with high-pressure water,
water may leak through the windows
and wet the interior.
• To prevent damage to the plastic
parts, do not clean with chemical
solvents or strong detergents.
OOSEV070041L
NOTICE
• Water washing in the motor
compartment including high
pressure water washing may cause
the failure of electrical circuits
located in the motor compartment.
• Never allow water or other liquids
to come in contact with electrical/
electronic components inside the
vehicle as this may damage them.
NOTICE
Matte paint finish vehicle (if equipped)
Automatic car wash which uses rotating
brushes should not be used as this can
damage the surface of your vehicle. A
steam cleaner which washes the vehicle
surface at high temperature may result
the oil to adhere and leave stains that is
difficult to remove.
Use a soft cloth (e.g. microfiber towel
or sponge) when washing your vehicle
and dry with a microfiber towel. When
you hand wash your vehicle, you should
not use a cleaner that finishes with wax.
If the vehicle surface is too dirty (sand,
dirt, dust, contaminant, etc.), clean the
surface with water before washing the
car.
Page 530 of 548
Maintenance
9-54
Waxing
A good coat of wax is a barrier between
your paint and contaminate. Keeping
a good coat of wax on your vehicle will
help protect it.
Wax the vehicle when water will no
longer bead on the paint.
Always wash and dry the vehicle before
waxing. Use a good quality liquid or
paste wax, and follow the manufacturer’s
instructions. Wax all metal trim to protect
it and to maintain its luster.
Removing oil, tar, and similar materials
with a spot remover will usually strip the
wax from the finish. Be sure to re-wax
these areas even if the rest of the vehicle
does not yet need waxing.
NOTICE
• Wiping dust or dirt off the body with
a dry cloth will scratch the finish.
• Do not use steel wool, abrasive
cleaners, or strong detergents
containing highly alkaline or
caustic agents on chrome-plated or
anodized aluminum parts. This may
result in damage to the protective
coating and cause discoloration or
paint deterioration.
NOTICE
Matte paint finish vehicle (if equipped)
Do not use any polish protector such as
a detergent, an abrasive and a polish.
In case wax is applied, remove the wax
immediately using a silicon remover
and if any tar or tar contaminant is on
the surface use a tar remover to clean.
However, be careful not to apply too
much pressure on the painted area.
Finish damage repair
Deep scratches or stone chips in the
painted surface must be repaired
promptly. Exposed metal will quickly
rust and may develop into a major repair
expense.
NOTICE
If your vehicle is damaged and requires
any metal repair or replacement,
be sure the body shop applies anti-
corrosion materials to the parts
repaired or replaced.
NOTICE
Matte paint finish vehicle (if equipped)
In case of matte paint finish vehicles,
it is impossible to modify only the
damaged area and repair of the whole
part is necessary. If the vehicle is
damaged and painting is required,
we recommend that you have your
vehicle maintained and repaired by
an authorized HYUNDAI dealer. Take
extreme care, as it is difficult to restore
the quality after the repair.
Bright-metal maintenance • To remove road tar and insects, use
a tar remover, not a scraper or other sharp object.
• To protect the surfaces of bright-
metal parts from corrosion, apply a
coating of wax or chrome preservative
and rub to a high luster.
• During winter weather or in coastal
areas, cover the bright metal parts
with a heavier coating of wax or
preservative. If necessary, coat the
parts with non-corrosive petroleum
jelly or other protective compound.