2023 HYUNDAI KONA EV inflation pressure
[x] Cancel search: inflation pressurePage 470 of 548
08
8-15
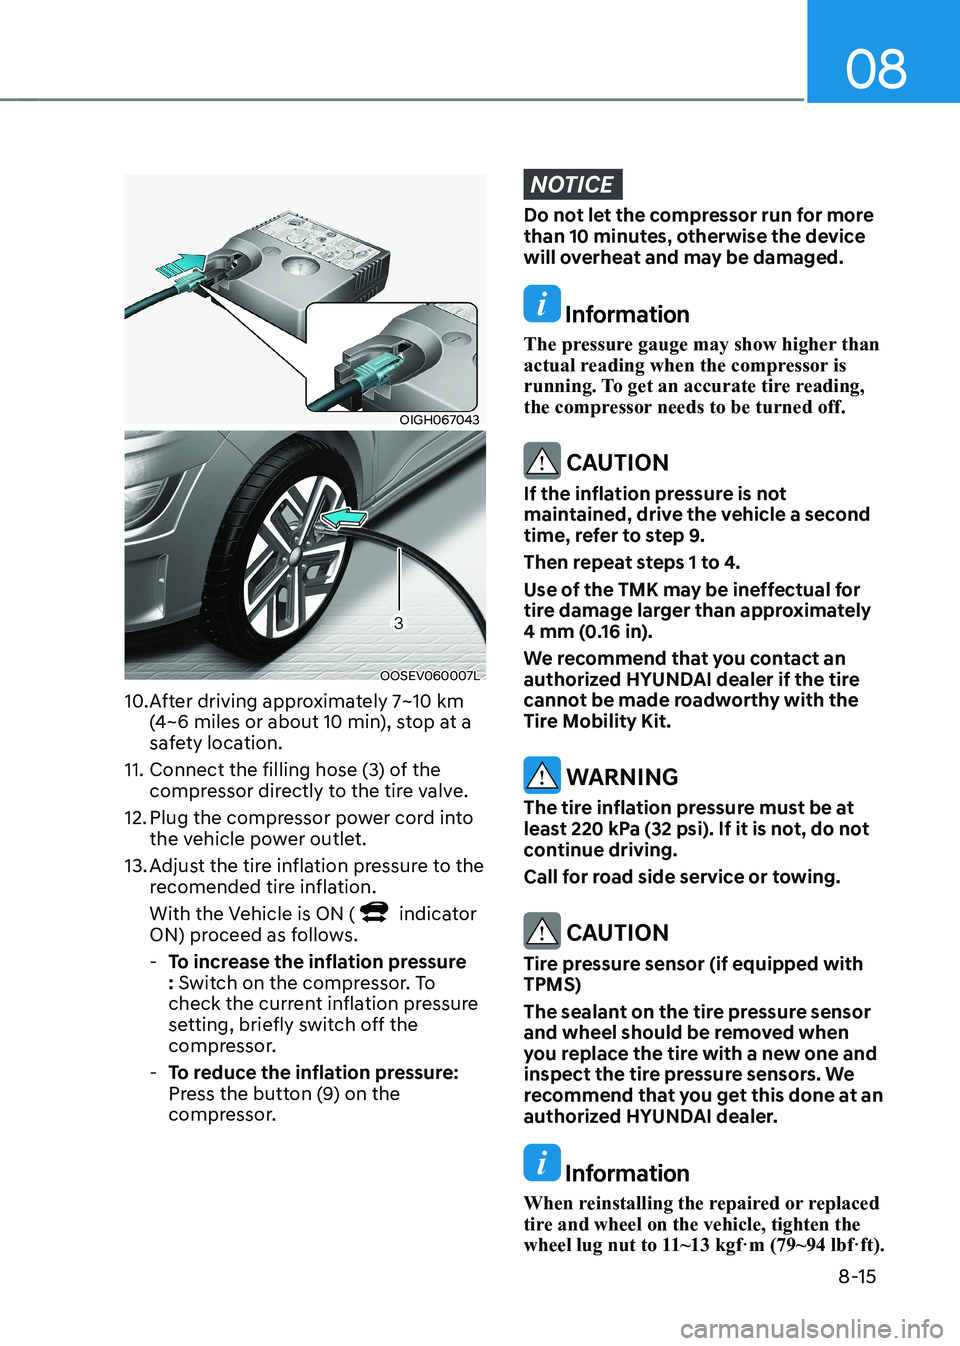
OIGH067043
OOSEV060007L
10. After driving approximately 7~10 km (4~6 miles or about 10 min), stop at a
safety location.
11. Connect the filling hose (3) of the compressor directly to the tire valve.
12. Plug the compressor power cord into the vehicle power outlet.
13. Adjust the tire inflation pressure to the recomended tire inflation.
With the Vehicle is ON (
indicator
ON) proceed as follows.
- To increase the inflation pressure : Switch on the compressor. To
check the current inflation pressure
setting, briefly switch off the
compressor.
- To reduce the inflation pressure:
Press the button (9) on the
compressor.
NOTICE
Do not let the compressor run for more
than 10 minutes, otherwise the device
will overheat and may be damaged.
Information
The pressure gauge may show higher than
actual reading when the compressor is
running. To get an accurate tire reading,
the compressor needs to be turned off.
CAUTION
If the inflation pressure is not
maintained, drive the vehicle a second
time, refer to step 9.
Then repeat steps 1 to 4.
Use of the TMK may be ineffectual for
tire damage larger than approximately
4 mm (0.16 in).
We recommend that you contact an
authorized HYUNDAI dealer if the tire
cannot be made roadworthy with the
Tire Mobility Kit.
WARNING
The tire inflation pressure must be at
least 220 kPa (32 psi). If it is not, do not
continue driving.
Call for road side service or towing.
CAUTION
Tire pressure sensor (if equipped with TPMS)
The sealant on the tire pressure sensor
and wheel should be removed when
you replace the tire with a new one and
inspect the tire pressure sensors. We
recommend that you get this done at an
authorized HYUNDAI dealer.
Information
When reinstalling the repaired or replaced
tire and wheel on the vehicle, tighten the
wheel lug nut to 11~13 kgf·m (79~94 lbf·ft).
Page 471 of 548
Emergency situations
8-16
How to adjust tire pressure
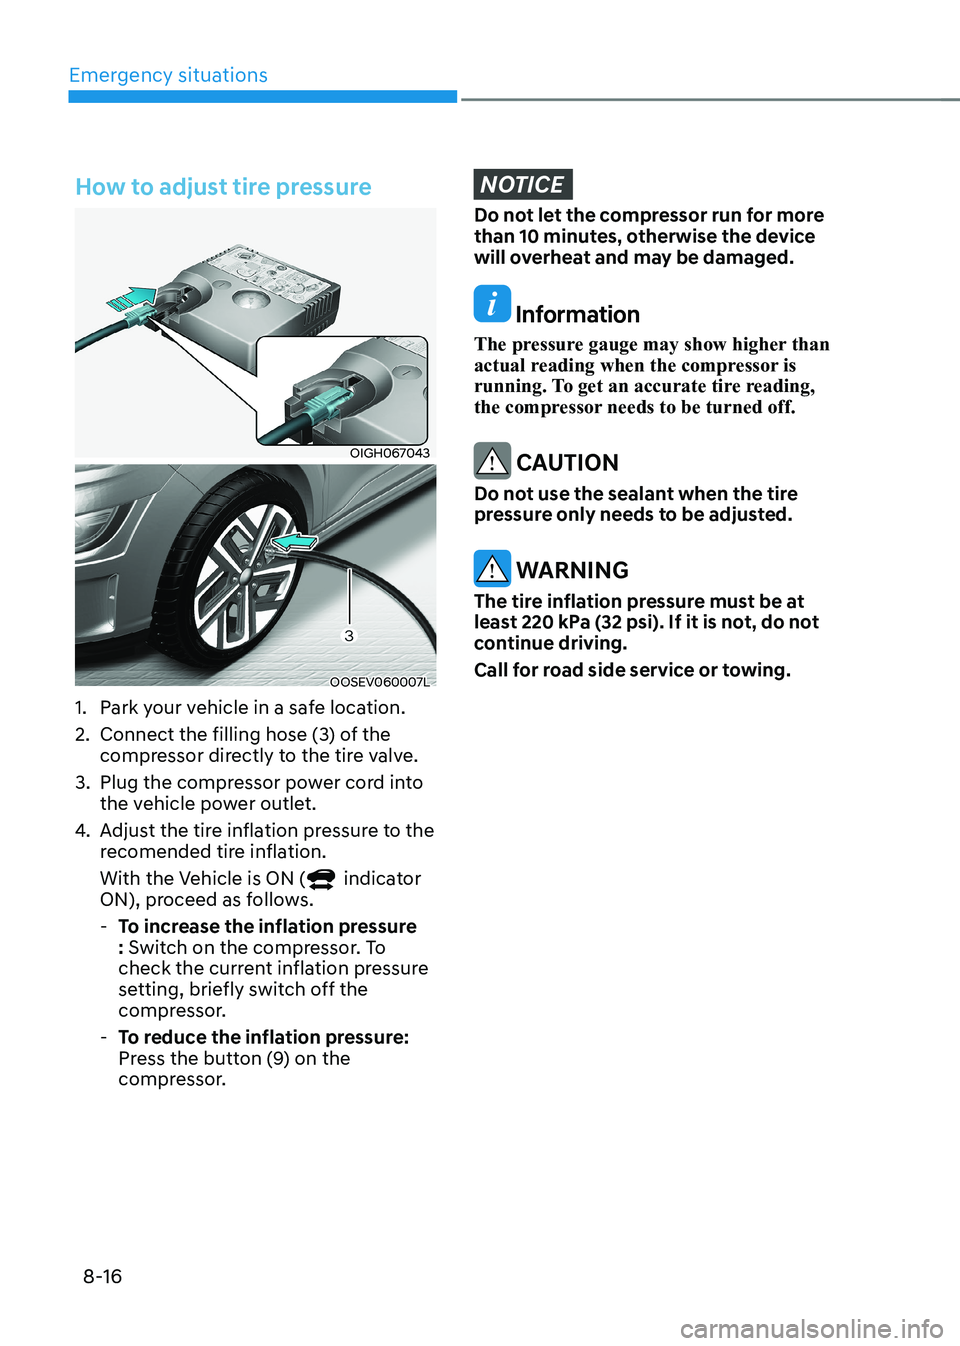
OIGH067043
OOSEV060007L
1. Park your vehicle in a safe location.
2. Connect the filling hose (3) of the compressor directly to the tire valve.
3. Plug the compressor power cord into the vehicle power outlet.
4. Adjust the tire inflation pressure to the
recomended tire inflation.
With the Vehicle is ON (
indicator
ON), proceed as follows.
- To increase the inflation pressure : Switch on the compressor. To
check the current inflation pressure
setting, briefly switch off the
compressor.
- To reduce the inflation pressure:
Press the button (9) on the
compressor.
NOTICE
Do not let the compressor run for more
than 10 minutes, otherwise the device
will overheat and may be damaged.
Information
The pressure gauge may show higher than
actual reading when the compressor is
running. To get an accurate tire reading,
the compressor needs to be turned off.
CAUTION
Do not use the sealant when the tire
pressure only needs to be adjusted.
WARNING
The tire inflation pressure must be at
least 220 kPa (32 psi). If it is not, do not
continue driving.
Call for road side service or towing.
Page 472 of 548
08
8-17
Notes on the safe use of the Tire
Mobility Kit
• Park your car at the side of the road
so that you can work with the Tire
Mobility Kit away from moving traffic.
• To be sure your vehicle will not move,
even when you’re on fairly level
ground, always set your parking brake.
• Only use the Tire Mobility Kit for
sealing/inflation passenger car tires.
Only punctured areas located within
the tread region of the tire can be
sealed using the tire mobility kit.
• Do not use on motorcycles, bicycles
or any other type of tires.
• When the tire and wheel are
damaged, do not use Tire Mobility Kit
for your safety.
• Use of the Tire Mobility Kit may not be
effective for tire damage larger than
approximately 6 mm (0.24 in).
• If the tire cannot be made roadworthy
with the Tire Mobility Kit, we
recommend that you contact an
authorized HYUNDAI dealer.
• Do not use the Tire Mobility Kit if a tire
is severely damaged by driving run flat
or with insufficient air pressure.
• Do not remove any foreign objects
such as nails or screws that have
penetrated the tire.
• Provided the car is outdoors, leave
the Vehicle is ON (
indicator ON).
Otherwise operating the compressor
may eventually drain the car battery. •
Never leave the Tire Mobility Kit
unattended while it is being used.
• Do not leave the compressor running
for more than 10 min. at a time or it
may overheat.
• Do not use the Tire Mobility Kit if the
ambient temperature is below -30°C
(-22°F).
• In case of skin contact with the
sealant, wash the area thoroughly
with plenty of water. If the irritation
persists, seek medical attention.
• In case of eye contact with the
sealant, flush your eyes for at least 15
minutes. If the irritation persists, seek
medical attention.
• In case of swallowing the sealant,
rinse the mouth and drink plenty of
water. However, never give anything
to an unconscious person and seek
medical attention immediately.
• Long time exposure to the sealant
may cause damage to bodily tissue
such as kidney, etc.
Page 478 of 548
9
Tire and wheels ............................................................................................... 9-20
Tire care ..................................................................................................................... 9-20
Recommended cold tire inflation pressures ..........................................................9-20
Check tire inflation pressure ..................................................................................... 9-21
Tire rotation ................................................................................................................ 9-22
Wheel alignment and tire balance ............................................................................ 9-22
Tire replacement ........................................................................................................ 9-23
Wheel replacement .................................................................................................... 9-24
Tire traction ................................................................................................................ 9-24
Tire maintenance ....................................................................................................... 9-24
Tire sidewall labeling .................................................................................................. 9-24
Tire Terminology and Definitions .............................................................................. 9-27
All season tires ........................................................................................................... 9-30
Summer tires ............................................................................................................. 9-30
Snow Tires.................................................................................................................. 9-30 Radial-ply Tires .......................................................................................................... 9-30
Low Aspect Ratio Tires ............................................................................................... 9-31
Fuses ................................................................................................................ 9-32
Instrument panel fuse replacement ........................................................................ 9-33
Motor compartment panel fuse replacement ..........................................................9-35
Light bulbs ....................................................................................................... 9-44
Headlamp, position lamp, turn signal lamp and
daytime running light bulb replacement .................................................................9-45
Side repeater lamp replacement .............................................................................. 9-47
Rear combination lamp bulb replacement ..............................................................9-47
High mounted stop lamp replacement ................................................................... 9-49
License plate light bulb replacement ...................................................................... 9-50
Interior light bulb replacement ................................................................................ 9-50
Appearance care ............................................................................................. 9-52
Exterior care ............................................................................................................... 9-52
Interior care ................................................................................................................ 9-57
Page 482 of 548
Maintenance
9-6
While operating your vehicle: •
Check for vibrations in the steering
wheel. Notice if there is any increased
steering effort or looseness in the
steering wheel, or change in its
straight-ahead position.
• Notice if your vehicle constantly turns
slightly or “pulls” to one side when
traveling on smooth, level road.
• When stopping, listen and check for
unusual sounds, pulling to one side,
increased brake pedal travel or “hard-
to-push” brake pedal.
• If any slipping or changes in the
operation of your reduction gear
occurs, check the reduction gear fluid
level.
• Check the reduction gear p (park) function.
• Check the parking brake.
• Check for fluid leaks under your
vehicle (water dripping from the air
conditioning system during or after use is normal).
At least monthly: • Check coolant level in the coolant
reservoir.
• Check the operation of all exterior
lights, including the stoplights, turn
signals and hazard warning flashers.
• Check the inflation pressures of all
tires including the spare for tires that
are worn, show uneven wear, or are damaged.
• Check for loose wheel lug nuts.
• Do not add regular green coolant. •
At least twice a year:
(i.e., every Spring and Autumn)
• Check radiator, heater and air
conditioning hoses for leaks or damage.
• Check windshield washer spray and
wiper operation. Clean wiper blades
with a clean cloth dampened with
washer fluid.
• Check headlamp alignment.
• Check the seat belts for wear and function.
At least once a year: • Clean body and door drain holes.
• Lubricate door hinges and hood hinges.
• Lubricate door and hood locks and
latches.
• Lubricate door rubber weather strips.
• Check the air conditioning system.
• Inspect and lubricate reduction gear
linkage and controls.
• Clean the battery and terminals.
• Check the brake fluid level.
Page 496 of 548
Maintenance
9-20
TIRE AND WHEELS
WARNING
Tire failure may cause loss of vehicle
control resulting in an accident. To
reduce risk of SERIOUS INJURY or
DEATH, take the following precautions: • Inspect your tires monthly for proper
inflation as well as wear and damage.
• The recommended cold tire pressure
for your vehicle can be found in this
manual and on the tire label located
on the driver’s side center pillar.
Always use a tire pressure gauge to
measure tire pressure. Tires with
too much or too little pressure wear
unevenly causing poor handling.
• Check the pressure of the spare
every time you check the pressure of
the other tires on your vehicle.
• Replace tires that are worn, show
uneven wear, or are damaged.
Worn tires can cause loss of braking
effectiveness, steering control, or
traction.
• ALWAYS replace tires with the same
size as each tire that was originally
supplied with this vehicle. Using
tires and wheels other than the
recommended sizes could cause
unusual handling characteristics,
poor vehicle control, or negatively
affect your vehicle’s Anti-Lock Brake
System (ABS) resulting in a serious
accident.Tire care
For proper maintenance, safety, and
maximum electric energy economy, you
must always maintain recommended
tire inflation pressures and stay within
the load limits and weight distribution
recommended for your vehicle.
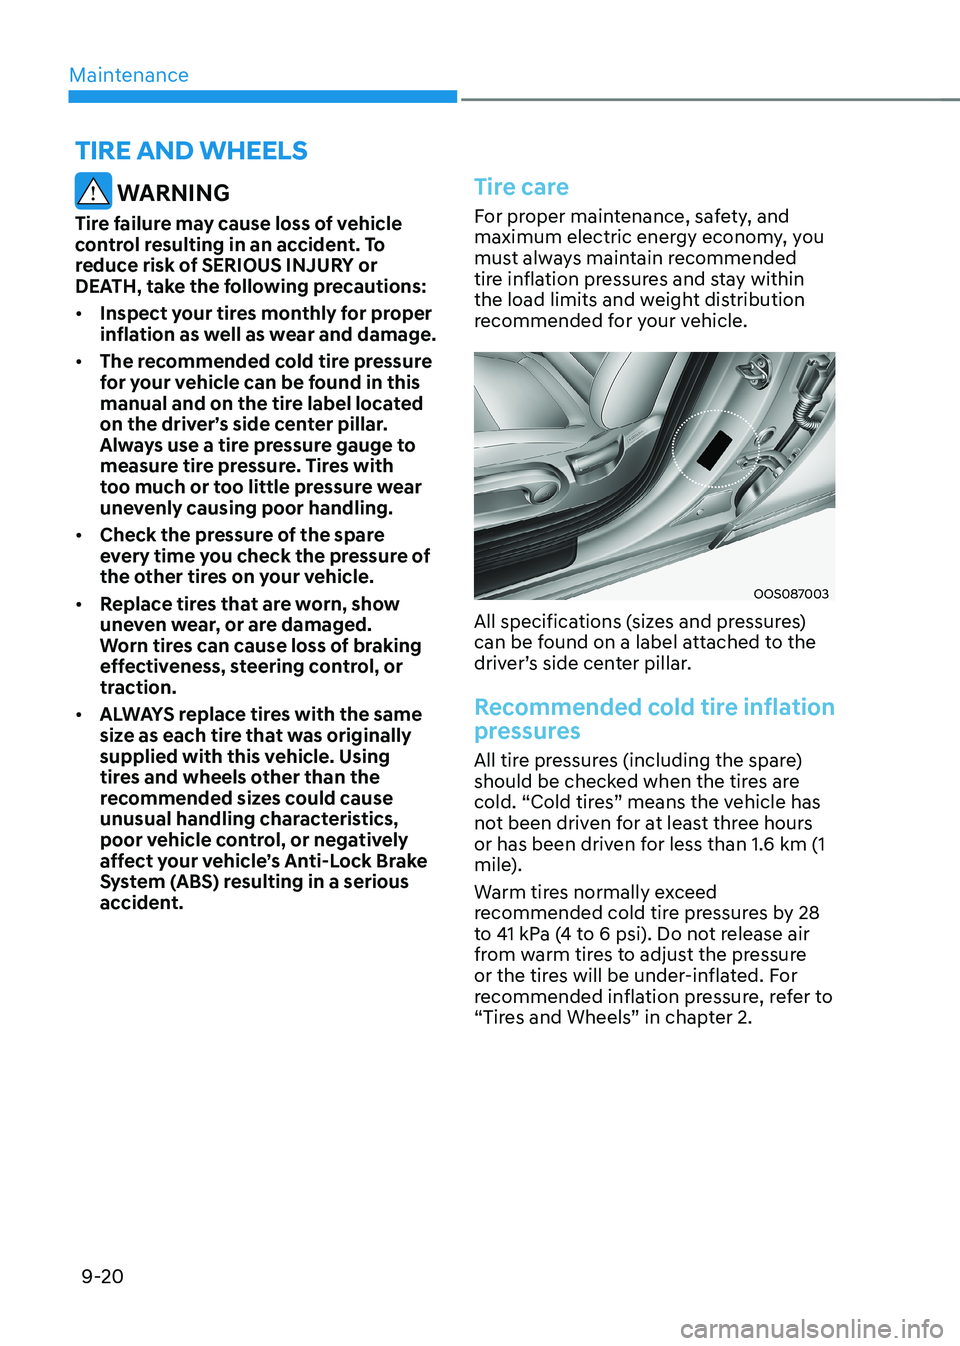
OOS087003
All specifications (sizes and pressures)
can be found on a label attached to the
driver’s side center pillar.
Recommended cold tire inflation
pressures
All tire pressures (including the spare)
should be checked when the tires are
cold. “Cold tires” means the vehicle has
not been driven for at least three hours
or has been driven for less than 1.6 km (1
mile).
Warm tires normally exceed
recommended cold tire pressures by 28
to 41 kpa (4 to 6 psi). Do not release air
from warm tires to adjust the pressure
or the tires will be under-inflated. For
recommended inflation pressure, refer to
“Tires and Wheels” in chapter 2.
Page 497 of 548
09
9-21
WARNING
Recommended pressures must be
maintained for the best ride, vehicle
handling, and minimum tire wear.
Over-inflation or under-inflation can
reduce tire life, adversely affect vehicle
handling, and lead to sudden tire failure
that could result in loss of vehicle
control resulting in an accident.
Severe under-inflation can lead to
severe heat build-up, causing blowouts,
tread separation and other tire failures
that can result in the loss of vehicle
control resulting in an accident. This
risk is much higher on hot days and
when driving for long periods at high speeds.
CAUTION
• Under-inflation results in excessive
wear, poor handling and reduced
electric energy economy. Wheel
deformation is also possible. Keep
your tire pressures at the proper
levels. If a tire frequently needs
refilling, we recommend it be
checked by an authorized HYUNDAI
dealer.
• Over-inflation produces a harsh ride,
excessive wear at the center of the
tire tread, and a greater possibility of
damage from road hazards.
Check tire inflation pressure
Check your tires, including the spare tire,
once a month or more.
How to check
Use a good quality tire pressure gauge
to check tire pressure. You can not tell
if your tires are properly inflated simply
by looking at them. Radial tires may look
properly inflated when they are under-
inflated.
Remove the valve cap from the tire valve
stem. press the tire gauge firmly onto the
valve to get a pressure measurement. If
the cold tire inflation pressure matches
the recommended pressure on the
tire and loading information label, no
further adjustment is necessary. If the
pressure is low, add air until you reach
the recommended pressure. Make sure
to put the valve caps back on the valve
stems. Without the valve cap, dirt or
moisture could get into the valve core
and cause air leakage. If a valve cap is
missing, install a new one as soon as possible.
If you overfill the tire, release air by
pushing on the metal stem in the
center of the tire valve. Recheck the tire
pressure with the tire gauge. Be sure
to put the valve caps back on the valve
stems. Without the valve cap, dirt or
moisture could get into the valve core
and cause air leakage. If a valve cap is
missing, install a new one as soon as possible.
Page 502 of 548
Maintenance
9-26
5. Maximum permissible inflation
pressure
This number is the greatest amount
of air pressure that should be put in
the tire. Do not exceed the maximum
permissible inflation pressure. Refer to
the Tire and Loading Information label
for recommended inflation pressure.
6. Maximum load rating
This number indicates the maximum
load in kilograms and pounds that can be
carried by the tire. When replacing the
tires on the vehicle, always use a tire that
has the same load rating as the factory
installed tire.
7. Uniform tire quality grading
Quality grades can be found where
applicable on the tire sidewall between
tread shoulder and maximum section width.
For example: TREAD WEAR 200
TRACTION AA
TEMpERATURE A
Tread wear
The tread wear grade is a comparative
rating based on the wear rate of the tire
when tested under controlled conditions
on a specified government test course.
For example, a tire graded 150 would
wear one-and-a-half times (1½) as well
on the government course as a tire
graded 100.
The relative performance of tires depends upon the actual conditions
of their use, however, and may depart
significantly from the norm due to
variations in driving habits, service
practices and differences in road
characteristics and climate.
These grades are molded on the
sidewalls of passenger vehicle tires. The
tires available as standard or optional
equipment on your vehicle may vary with
respect to grade.
Traction - AA, A, B & C
The traction grades, from highest to
lowest, are AA, A, B and C. Those grades
represent the tire’s ability to stop on wet
pavement as measured under controlled
conditions on specified government
test surfaces of asphalt and concrete.
A tire marked C may have poor traction
performance.
WARNING
The traction grade assigned to this tire
is based on straight-ahead braking
traction tests, and does not include
acceleration, cornering, hydroplaning,
or peak traction characteristics.