Page 105 of 680

Seats & Safety System
3-18
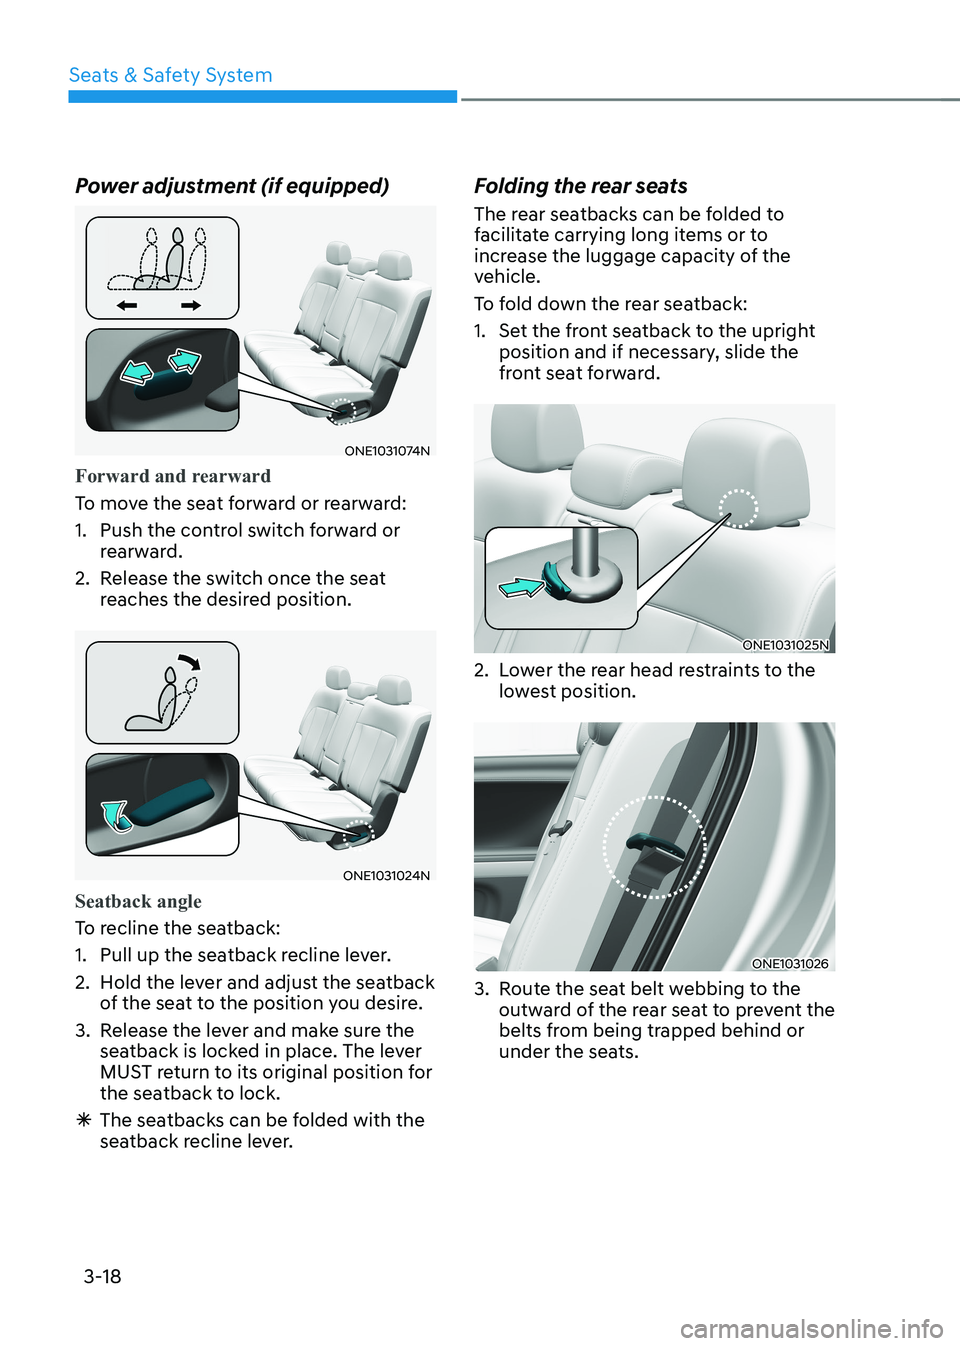
Power adjustment (if equipped)
ONE1031074N
Forward and rearward
To move the seat forward or rearward:
1. Push the control switch forward or
rearward.
2. Release the switch once the seat reaches the desired position.
ONE1031024N
Seatback angle
To recline the seatback:
1. Pull up the seatback recline lever.
2. Hold the lever and adjust the seatback
of the seat to the position you desire.
3. Release the lever and make sure the seatback is locked in place. The lever
MUST return to its original position for
the seatback to lock.
à The seatbacks can be folded with the
seatback recline lever. Folding the rear seats
The rear seatbacks can be folded to
facilitate carrying long items or to
increase the luggage capacity of the
vehicle.
To fold down the rear seatback:
1. Set the front seatback to the upright
position and if necessary, slide the
front seat forward.
ONE1031025N
2. Lower the rear head restraints to the lowest position.
ONE1031026
3. Route the seat belt webbing to the outward of the rear seat to prevent the
belts from being trapped behind or
under the seats.
Page 119 of 680
Seats & Safety System
3-32
Height adjustment
You can adjust the height of the shoulder
belt anchor to one of the four different
positions for maximum comfort and
safety.
The shoulder portion should be adjusted
so it lies across your chest and midway
over your shoulder nearest the door, not
over your neck.
„„Front seat
ONE1031035
To adjust the height of the seat belt
anchor, lower or raise the height adjuster
into an appropriate position.
To raise the height adjuster, pull it up
(1). To lower it, push it down (3) while
pressing the height adjuster button (2).
Release the button to lock the anchor
into position. Try sliding the height
adjuster to make sure that it has locked
into position.
OHI038142
To release your seat belt:
Press the release button (1) in the locking buckle.
Once released, the belt should
automatically draw back into the
retractor. If this does not happen, check
the belt to be sure it is not twisted, then try again.
Page 221 of 680

05
5-29
Vehicle personalization with digital key
The available personalization function in the vehicle is as follows.
SystemPersonalization Item
USMHUD
Display mode, Display control, AR matching
adjustment, Content selection
Lamp Blink number of one-touch signal lamps
Cluster Information display on the cluster, Voice volume,
Welcome sound, Theme selection
Seat/Mirror -
Door Automatic door lock/unlock, Two Press Unlock
Air conditioning Temperature unit, shut off outside air (interlocked
with washer fluid), Automatic ventilation, Auto
defogging on/off
Convenience Wireless charging system on/off (all seats)
NFC Digital key on/off, Smartphone Key Paring/Deletion,
Card key Save/Delete
AVN Navigation
Preferred volume of the navigation system, Recent
destination
User preset Radio preset Phone
connectivity Bluetooth preferential connect CarPlay/Android
Auto/MirrorLink On/Off
Air conditioning Operating
condition Latest operation setup of the following functions:
Temperature, AUTO, air flow direction, air volume,
air conditioner, air intake control, SYNC, Front
windshield defroster, OFF
Driving Smart mode -
For more information of personalization, refer to the infotainment system manual.
CAUTION
If you leave the digital key after locking or unlocking the doors or starting up the
vehicle with the smart key, the doors can be locked by the central door lock. Please
carry around the digital key all the time.
Page 232 of 680

Convenience Features
5-40
InTegraTed memory sysTem (If eQUIPPed)
ONE1051023
Integrated Memory System for the
driver’s seat is provided to store and
recall the following memory settings with
a simple button operation. • Driver’s seat position
• Outside rearview mirror position
• Head-Up Display (HUD) : display
mode, position, AR matching
adjustment (if equipped)
WARNING
Never attempt to operate the
integrated memory system while the
vehicle is moving.
This could result in loss of control, and
an accident causing death, serious
injury, or property damage.
Information
• If the battery is disconnected, the memory settings will be erased.
• If integrated memory system does not
operate normally, have the system inspected by an authorized HYUNDAI
dealer.
Storing Memory Positions
1. Shift to P (Park) while the Start/Stop
button is in the ON position.
2. Adjust the driver’s seat position, outside rearview mirror position, and
head-up display height to the desired position.
3. Hold the button (1 or 2). The system will beep once and notify you ‘Driver
1 (or 2) settings saved’ will appear on
the infotainment screen.
Recalling Memory Positions
1. Shift to P (Park) while the Start/Stop button is in the ON position.
2. Press the desired memory button (1 or 2). The system will beep once, and
then the driver’s seat position, outside
rearview mirror position, and head-
up display height will automatically
adjust to the stored positions.
3. ‘Driver 1 (or 2) settings applied’ will appear on the infotainment screen.
Information
• In order to adjust the memory button (2) while adjusting the memory button
(1), press the memory button (1) to
pause the adjustment of (1), then press memory button (2).
• If you adjust the seat, rearview mirror,
head-up display while recalling the
stored positions, the manually adjusted settings will be applied.
Page 233 of 680

05
5-41
Resetting the System
Take the following procedures to reset
integrated memory system, when it does
not operate properly.
Resetting integrated memory
system
1. Stop the vehicle and open the driver’s door with the Start/Stop button in the
ON position and the vehicle shifted to
P (Park).
2. Adjust the driver’s seat and seatback to the foremost position.
3. Press the memory button 1 (or 2) and push forward the driver’s seat
movement switch over 2 seconds
simultaneously.
While resetting integrated memory
system
1. Resetting starts with a notification sound.
2. The driver’s seat and seatback is adjusted to the rearward position with
the notification sound.
3. The driver’s seat and seatback is re-adjusted to the default position
(central position) with the notification sound.
However, in the following cases, the
resetting procedure and the notification
sound may stop. • The memory button is pressed.
• The seat control switch is operated.
• The gear is shifted out of P (Park).
• The driving speed exceeds 3 km/h
(2 mph).
• The driver’s door is closed.
NOTICE
• While integrated memory system
is being reset, if the resetting
and notification sound stops
incompletely, restart the resetting
procedure again.
• Make sure that there is no objects
around the driver’s seat in advance
of resetting the integrated memory
system.
• After resetting the integrated
memory system, the adjustment for
the driver seat must be stored again
to recall the memory position.
Page 240 of 680

Convenience Features
5-48
mIrrors
Inside Rearview Mirror
Before driving your vehicle, check to
see that your inside rearview mirror is
properly positioned. Adjust the rearview
mirror so that the view through the rear
window is properly centered.
WARNING
Make sure your line of sight is not
obstructed. Do not place objects in the
rear seat, cargo area, or behind the rear
head restraints which could interfere
with your vision through the rear
window.
WARNING
To prevent serious injury during an
accident or deployment of the air bag,
do not modify the rearview mirror and
do not install a wide mirror.
WARNING
NEVER adjust the mirror while driving.
This may cause loss of vehicle control
resulting in an accident.
NOTICE
When cleaning the mirror, use a paper
towel or similar material dampened
with glass cleaner. Do not spray glass
cleaner directly on the mirror as this
may cause the liquid cleaner to enter
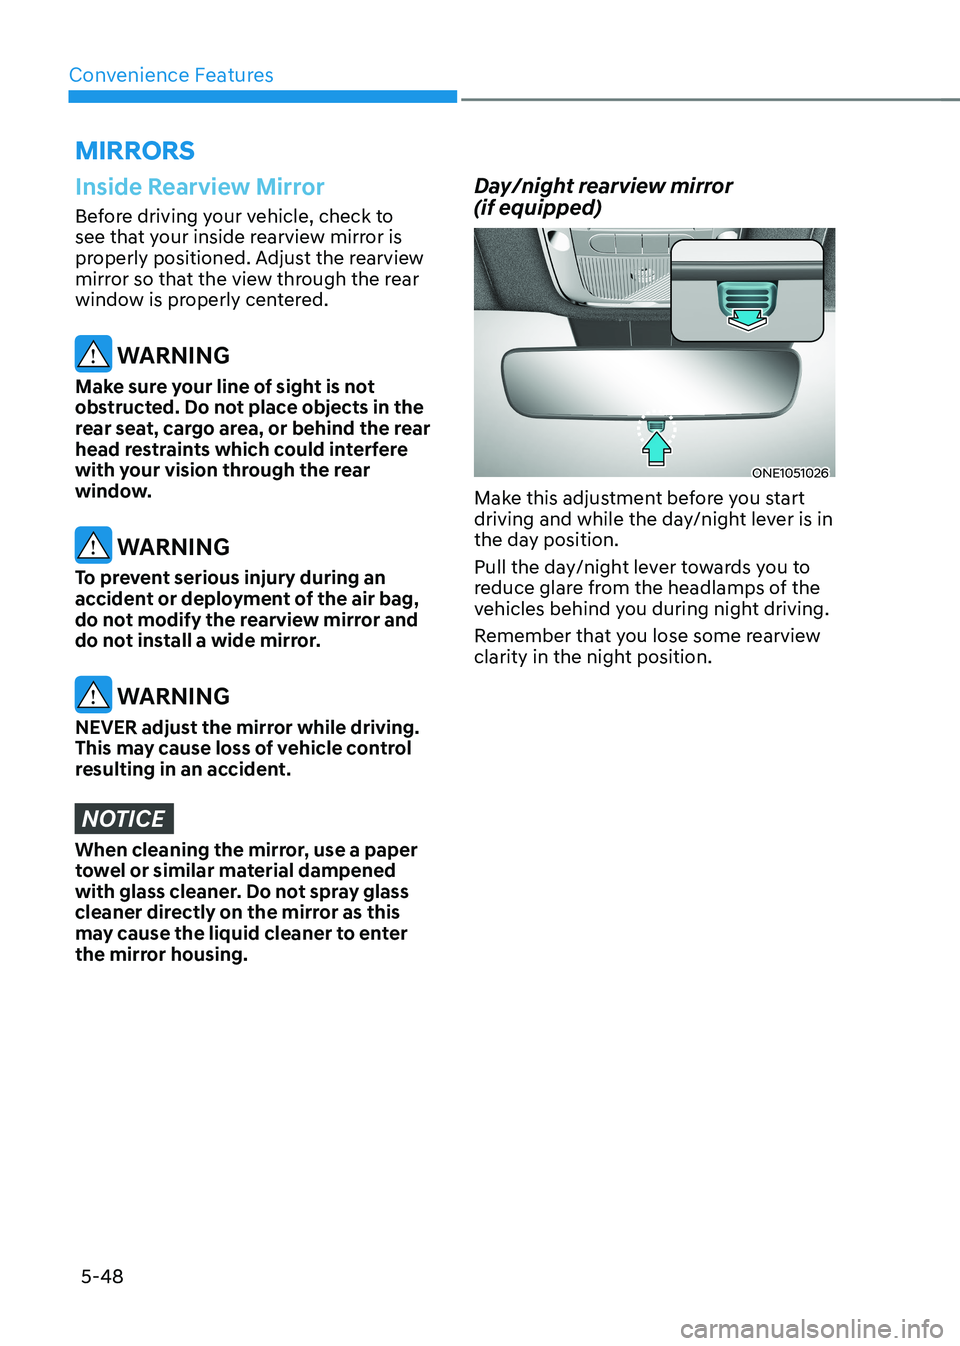
the mirror housing. Day/night rearview mirror (if equipped)
ONE1051026
Make this adjustment before you start
driving and while the day/night lever is in
the day position.
Pull the day/night lever towards you to
reduce glare from the headlamps of the
vehicles behind you during night driving.
Remember that you lose some rearview
clarity in the night position.
Page 297 of 680

05
5-105
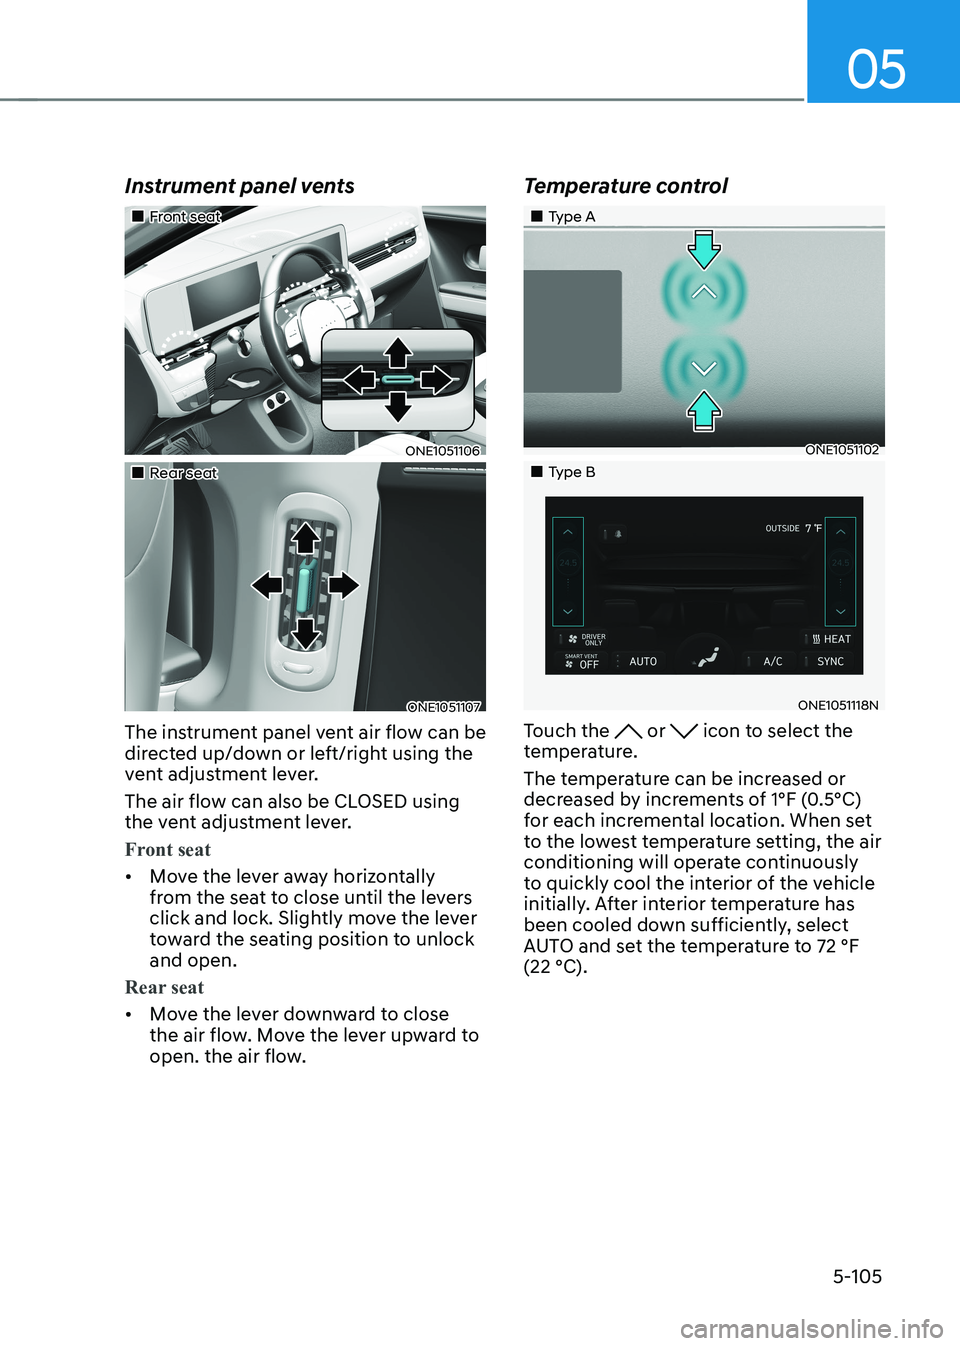
Instrument panel vents
„„Front seat
ONE1051106
„„Rear seat
ONE1051107
The instrument panel vent air flow can be
directed up/down or left/right using the
vent adjustment lever.
The air flow can also be CLOSED using
the vent adjustment lever.
Front seat
• Move the lever away horizontally
from the seat to close until the levers
click and lock. Slightly move the lever
toward the seating position to unlock and open.
Rear seat
• Move the lever downward to close
the air flow. Move the lever upward to
open. the air flow. Temperature control
„„Type A
ONE1051102
„„Type B
ONE1051118N
Touch the
or icon to select the
temperature.
The temperature can be increased or
decreased by increments of 1°F (0.5°C)
for each incremental location. When set
to the lowest temperature setting, the air
conditioning will operate continuously
to quickly cool the interior of the vehicle
initially. After interior temperature has
been cooled down sufficiently, select
AUTO and set the temperature to 72 °F (22 °C).