2023 HYUNDAI I30 battery replacement
[x] Cancel search: battery replacementPage 11 of 533

Biodiesel (for New Zealand)
Commercially supplied Diesel blends
of no more than 7% biodiesel, com-
monly known as "B7 Diesel" may be
used in your vehicle if the Biodiesel
meets EN 14214 or equivalent spec-
ifications. (EN stands for "European
Norm"). The use of biofuels exceed-
ing 7%, made from rapeseed methyl
ester (RME), vegetable oil methyl
ester (VME) etc. or mixing diesel
exceeding 7% with biodiesel will
cause increased wear or damage to
the engine and fuel system. Repair
or replacement of worn or damaged
components due to the use of non
approved fuels will not be covered by
the manufacturer's warranty. Never use any fuel, whether
diesel, B7 biodiesel or other-
wise, that fails to meet the latest
petroleum industry specifica-
tion.
Never use any fuel additives or
treatments that are not recom-
mended or approved by the
vehicle manufacturer. This vehicle should not be modi-
fied. Modification of your vehicle
could affect its performance, safety
or durability and may even violate
governmental safety and emis-
sions regulations.
In addition, damage or perform-
ance problems resulting from any
modification may not be covered
under warranty.
If you use unauthorised electronic
devices, it may cause the vehicle to
operate abnormally, wire damage,
battery discharge and fire. For your
safety, do not use unauthorised
electronic devices.
NOTICE
F11
Introduction
V VE
EH
HI
IC
CL
LE
E
M
MO
OD
DI
IF
FI
IC
CA
AT
TI
IO
ON
NS
S
Page 88 of 533

3-5
Convenient features of your vehicle
3
Remote key precautions
The remote key will not work if any of
the following occur:
The key is in the ignition switch.
You exceed the operating distance
limit (about 30 m).
The remote key battery is weak.
Other vehicles or objects may be
blocking the signal.
The weather is extremely cold.
The remote key is close to a radio
transmitter such as a radio station
or an airport which can interfere
with normal operation of the remote
key.
When the remote key does not work
correctly, open and close the door
with the mechanical key. If you have a
problem with the remote key, it is rec-
ommended that you contact an autho-
rised HYUNDAI dealer.
If the remote key is in close proximity
to your mobile phone, the signal could
be blocked by your mobile phone's
normal operational signals.This is especially important when the
phone is active such as making and
receiving calls, text messaging,
and/or sending/receiving emails.
Avoid placing the remote key and your
mobile phone in the same location
and always try to maintain an ade-
quate distance between the two
devices.
Information
Changes or modifications not express-
ly approved by the party responsible
for compliance could void the user’s
authority to operate the equipment. If
the keyless entry system is inoperative
due to changes or modifications not
expressly approved by the party
responsible for compliance, it will not
be covered by your manufacturer’s
vehicle warranty.
Keep the remote key away from
electromagnetic materials that
block electromagnetic waves to
the key surface.
Battery replacement
If the remote key is not working prop-
erly, try replacing the battery with a
new one.
Battery Type: CR2032
To replace the battery:
1. Insert a slim tool into the slot and
gently pry open the cover.
2. Using a screw driver, remove the
battery cover.
3. Remove the old battery and insert
a new battery. Make sure the bat-
tery position is correct.
4. Reinstall the battery cover and key
cover in the reverse order of
removal.
NOTICE
i
OPD046002
Page 92 of 533

3-9
Convenient features of your vehicle
3
If the smart key is in close proximity
to your mobile phone, the signal
could be blocked by your mobile
phone's normal operational signals.
This is especially important when the
phone is active such as making and
receiving calls, text messaging,
and/or sending/receiving emails.
Avoid placing the smart key and your
mobile phone in the same location
and always try to maintain an ade-
quate distance between the two
devices.Information
Changes or modifications not express-
ly approved by the party responsible
for compliance could void the user’s
authority to operate the equipment. If
the keyless entry system is inoperative
due to changes or modifications not
expressly approved by the party
responsible for compliance, it will not
be covered by your manufacturer’s
vehicle warranty.
Keep the smart key away from
electromagnetic materials that
blocks electromagnetic waves to
the key surface.
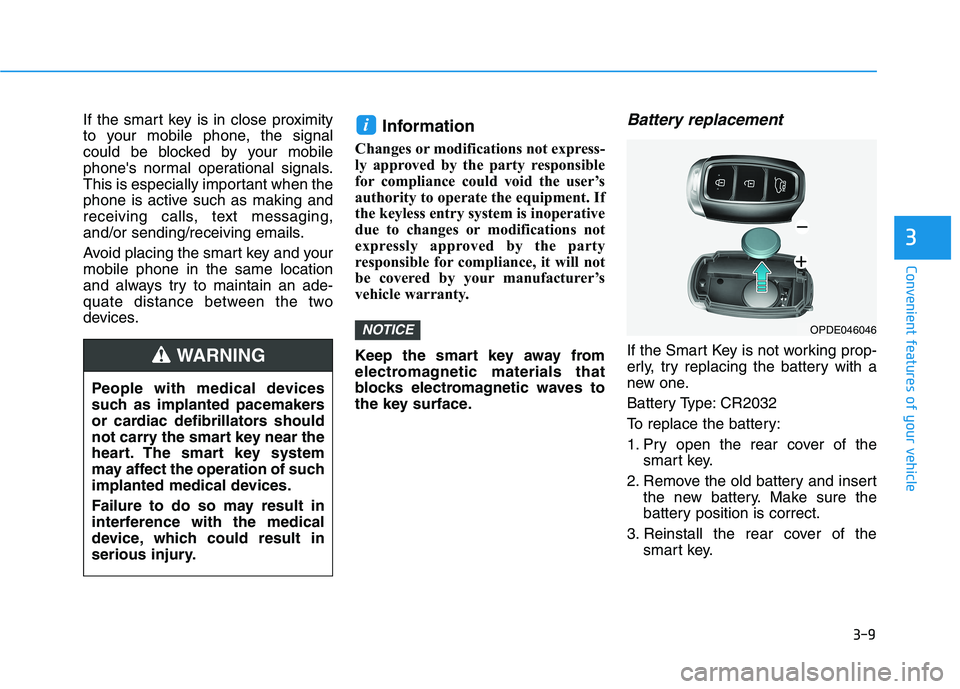
Battery replacement
If the Smart Key is not working prop-
erly, try replacing the battery with a
new one.
Battery Type: CR2032
To replace the battery:
1. Pry open the rear cover of the
smart key.
2. Remove the old battery and insert
the new battery. Make sure the
battery position is correct.
3. Reinstall the rear cover of the
smart key.
NOTICE
i
OPDE046046
People with medical devices
such as implanted pacemakers
or cardiac defibrillators should
not carry the smart key near the
heart. The smart key system
may affect the operation of such
implanted medical devices.
Failure to do so may result in
interference with the medical
device, which could result in
serious injury.
WARNING
Page 432 of 533

7
Maintenance
7
Maintenance
Engine compartment .............................................7-3
Maintenance services ...........................................7-5
Owner's responsibility ......................................................7-5
Owner maintenance precautions ..................................7-5
Owner maintenance ...............................................7-6
Owner maintenance schedule ........................................7-7
Scheduled maintenance services.........................7-9
Normal Maintenance Schedule
(Petrol Engine [1.6 T-GDI]) ..........................................7-10
Maintenance Under Severe Usage and
Low Mileage Conditions
(Petrol Engine [1.6 T-GDI]) ..........................................7-13
Normal Maintenance Schedule
(Petrol Engine [2.0 GDI])...............................................7-15
Maintenance Under Severe Usage and
Low Mileage Conditions
(Petrol Engine [2.0 GDI])...............................................7-18
Normal Maintenance Schedule (Diesel Engine) ......7-20
Maintenance Under Severe Usage and
Low Mileage Conditions (Diesel Engine) ...................7-23
Explanation of scheduled maintenance items .7-25
Engine oil ..............................................................7-28
Checking the engine oil level (Petrol engine) ..........7-28
Checking the engine oil level (Diesel Engine)..........7-29
Checking the engine oil and filter ..............................7-30
Engine coolant......................................................7-31
Checking the engine coolant level..............................7-31
Changing the engine coolant .......................................7-33
Brake/clutch fluid ................................................7-34
Checking the brake/clutch fluid level ........................7-34
Washer fluid .........................................................7-35
Checking the washer fluid level ..................................7-35
Parking brake .......................................................7-35
Checking the parking brake .........................................7-35
Fuel filter (For Diesel) ........................................7-36
Draining water from fuel filter ....................................7-36
Fuel filter cartridge replacement ................................7-36
Air cleaner ............................................................7-36
Filter replacement ...........................................................7-36
Climate control air filter .....................................7-38
Filter inspection ...............................................................7-38
Filter replacement ...........................................................7-38
Wiper blades .........................................................7-39
Blade inspection ..............................................................7-39
Blade replacement ..........................................................7-40
Battery...................................................................7-43
For best battery service................................................7-44
Battery capacity label ...................................................7-44
Battery recharging .........................................................7-44
Reset items .......................................................................7-46
7
Page 476 of 533

7-45
7
Maintenance
AGM battery (if equipped)
Absorbent Glass Matt (AGM)
batteries are maintenance-
free and we recommend that
the AGM battery be serviced
by an authorised HYUNDAI
dealer. For charging your
AGM battery, use only fully
automatic battery chargers
that are specially developed
for AGM batteries.
When replacing the AGM bat-
tery, we recommend that you
use parts for replacement
from an authorised HYUNDAI
dealer.
Do not open or remove the
cap on top of the battery. This
may cause leaks of internal
electrolyte that could result in
severe injury.
CAUTION
Always follow these instructions
when recharging your vehicle’s
battery to avoid the risk of SERI-
OUS INJURY or DEATH from
explosions or acid burns:
Before performing mainte-
nance or recharging the bat-
tery, turn off all accessories
and stop the engine.
Keep all flames, sparks, or
smoking materials away from
the battery.
Always work outdoors or in an
area with plenty of ventilation.
Wear eye protection when
checking the battery during
charging.
The battery must be removed
from the vehicle and placed in
a well ventilated area.
(Continued)
WARNING (Continued)
Watch the battery during
charging, and stop or reduce
the charging rate if the battery
cells begin boiling violently.
The negative battery cable
must be removed first and
installed last when the battery
is disconnected. Disconnect
the battery charger in the fol-
lowing order:
(1) Turn off the battery charger
main switch.
(2) Unhook the negative
clamp from the negative
battery terminal.
(3) Unhook the positive clamp
from the positive battery
terminal.
Always use a genuine HYUNDAI
approved battery when you
replace the battery.
Page 490 of 533

7-59
7
Maintenance
F FU
US
SE
ES
S
A vehicle’s electrical system is pro-
tected from electrical overload dam-
age by fuses.
This vehicle has 2 (or 3) fuse panels,
one located in the driver’s side panel
bolster, the other in the engine com-
partment.
If any of your vehicle’s lights, acces-
sories, or controls do not work, check
the appropriate circuit fuse. If a fuse
has blown, the element inside the
fuse will be melted or broken.
If the electrical system does not
work, first check the driver’s side
fuse panel. Before replacing a blown
fuse, turn the engine and all switches
off, and then disconnect the negative
battery cable. Always replace a
blown fuse with one of the same rat-
ing.
If the replacement fuse blows, this indi-
cates an electrical problem. Avoid
using the system involved and immedi-
ately consult an authorised HYUNDAI
dealer.Information
Three kinds of fuses are used: blade
type for lower amperage rating, car-
tridge type, and multi fuse for higher
amperage ratings.
Do not use a screwdriver or any
other metal object to remove
fuses because it may cause a
short circuit and damage the sys-
tem.
NOTICE
i
Normal ■Blade type
■Cartridge typeBlown
NormalBlown
NormalBlown
OLF074075
NEVER replace a fuse with
anything but another fuse of
the same rating.
A higher capacity fuse could
cause damage and possibly
cause a fire.
Do not install a wire or alu-
minium foil instead of the
proper fuse - even as a tem-
porary repair. It may cause
extensive wiring damage and
possibly a fire.
WARNING
Normal
Blown
■Multi fuse
Page 492 of 533

7-61
7
Maintenance
Fuse switch
Always, place the fuse switch to the
ON position.
If you move the switch to the OFF
position, some items such as the
audio system and digital clock must
be reset and the smart key may not
work properly.
Information
If the fuse switch is OFF, “Turn on
FUSE SWITCH” message will appear.
Always place the fuse switch in
the ON position whilst driving
the vehicle.
Place the fuse switch in the OFF
position when the vehicle is
parked more than a month to
prevent battery discharge.
Do not move the transportation
fuse switch repeatedly. The fuse
switch may be damaged.
Engine compartment panel
fuse replacement
1. Turn the vehicle off.
2. Turn all other switches OFF.
3. Remove the fuse panel cover by
pressing the tab and pulling up.
NOTICE
i
OPDE076036ROPDE046119OPD077032L
OPD077033L
■Blade type fuse
■Cartridge type fuse