2023 HYUNDAI I30 ECU
[x] Cancel search: ECUPage 429 of 533
6-23
What to do in an emergency
6
When towing your vehicle in an
emergency without wheel dollies:
1. Place the ignition switch in the
ACC position.
2. Place the shift lever in N (Neutral).
3. Release the parking brake.Removable towing hook
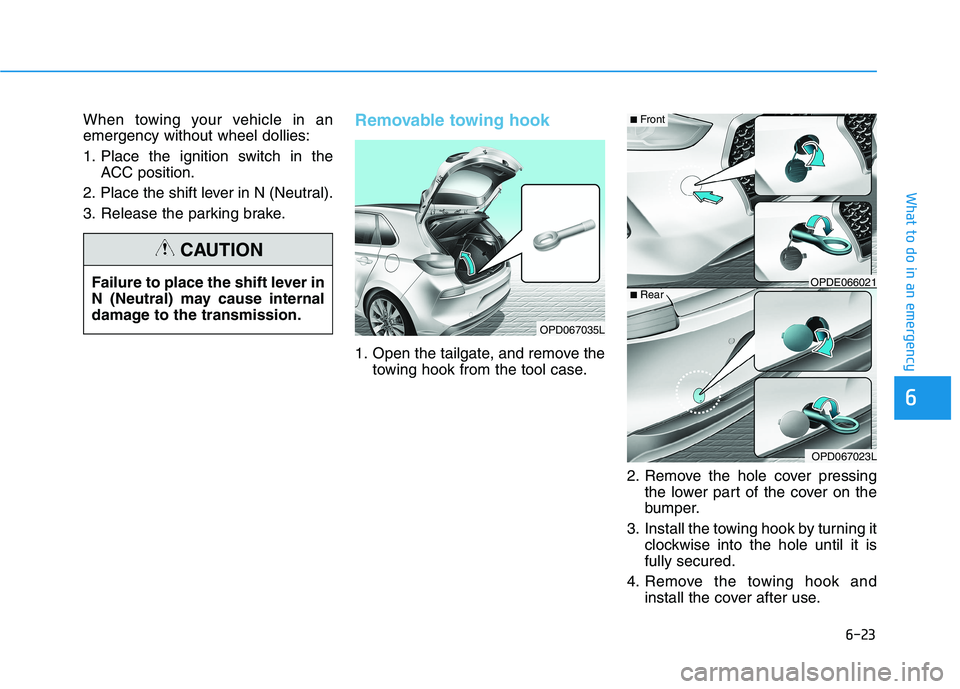
1. Open the tailgate, and remove the
towing hook from the tool case.
2. Remove the hole cover pressing
the lower part of the cover on the
bumper.
3. Install the towing hook by turning it
clockwise into the hole until it is
fully secured.
4. Remove the towing hook and
install the cover after use. Failure to place the shift lever in
N (Neutral) may cause internal
damage to the transmission.
CAUTION
OPD067035L
OPDE066021
OPD067023L
■Front
■Rear
Page 430 of 533
6-24
What to do in an emergency
Emergency towing
If towing is necessary, we recommend
you have it done by an authorised
HYUNDAI dealer or a commercial tow
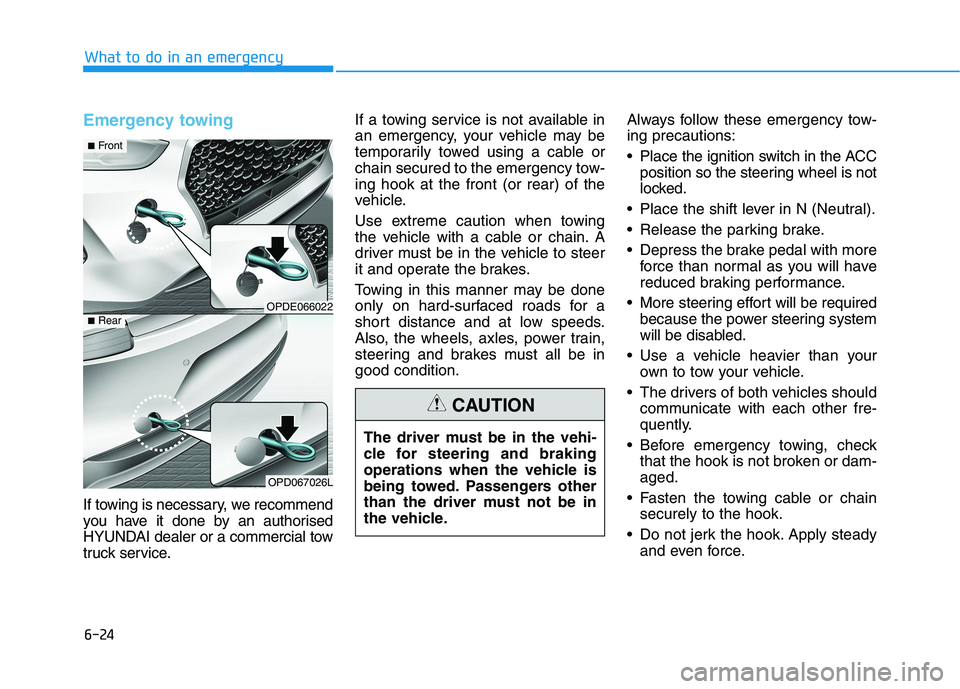
truck service.If a towing service is not available in
an emergency, your vehicle may be
temporarily towed using a cable or
chain secured to the emergency tow-
ing hook at the front (or rear) of the
vehicle.
Use extreme caution when towing
the vehicle with a cable or chain. A
driver must be in the vehicle to steer
it and operate the brakes.
Towing in this manner may be done
only on hard-surfaced roads for a
short distance and at low speeds.
Also, the wheels, axles, power train,
steering and brakes must all be in
good condition.Always follow these emergency tow-
ing precautions:
Place the ignition switch in the ACC
position so the steering wheel is not
locked.
Place the shift lever in N (Neutral).
Release the parking brake.
Depress the brake pedal with more
force than normal as you will have
reduced braking performance.
More steering effort will be required
because the power steering system
will be disabled.
Use a vehicle heavier than your
own to tow your vehicle.
The drivers of both vehicles should
communicate with each other fre-
quently.
Before emergency towing, check
that the hook is not broken or dam-
aged.
Fasten the towing cable or chain
securely to the hook.
Do not jerk the hook. Apply steady
and even force.
OPDE066022
OPD067026L
■Front
■Rear
The driver must be in the vehi-
cle for steering and braking
operations when the vehicle is
being towed. Passengers other
than the driver must not be in
the vehicle.
CAUTION
Page 438 of 533

7-7
7
Maintenance
Owner maintenance schedule
When you stop for fuel:
Check the engine oil level.
Check the coolant level in the
engine coolant reservoir.
Check the windscreen washer fluid
level.
Check for low or under-inflated
tyres.
Whilst operating your vehicle:
Note any changes in the sound of
the exhaust or any smell of exhaust
fumes in the vehicle.
Check for vibrations in the steering
wheel. Notice if there is any
increased steering effort or loose-
ness in the steering wheel, or
change in its straight-ahead position.
Notice if your vehicle constantly turns
slightly or “pulls” to one side when
travelling on smooth, level road.
When stopping, listen and check for
unusual sounds, pulling to one side,
increased brake pedal travel or
“hard-to-push” brake pedal.
If any slipping or changes in the
operation of your transmissiom
occurs, check the transmissiom fluid
level.
Check the automatic transmission/
dual clutch transmission P (Park)
function.
Check the parking brake.
Check for fluid leaks under your
vehicle (water dripping from the air
conditioning system during or after
use is normal). Be careful when checking your
engine coolant level when the
engine is hot. This may result in
coolant being blown out of the
opening and cause serious
burns and other injuries.
WARNING
Diesel Engine
Never manipulate or modify the
injection system whilst running
the diesel engine or within 30
seconds after turning OFF the
diesel engine. The high-pressure
pump, high-pressure pipes, rail,
and injectors are still subject to
high pressure immediately after
stopping the diesel engine.
When the fuel leakage vents out,
it may cause serious body injury.
Any people, who are implanted
with the artificial cardiac pace-
maker, should remain away from
the ECU or the wiring harness by
at least 30 cm, whilst running the
diesel engine. The high currents
of the electronic engine control
system produce a considerable
amount of magnetic fields.
WARNING
Page 456 of 533
7-25
7
Maintenance
E EX
XP
PL
LA
AN
NA
AT
TI
IO
ON
N
O
OF
F
S
SC
CH
HE
ED
DU
UL
LE
ED
D
M
MA
AI
IN
NT
TE
EN
NA
AN
NC
CE
E
I
IT
TE
EM
MS
S
Engine oil and filter
The engine oil and filter should be
changed at the intervals specified in
the maintenance schedule. If the
vehicle is being driven in severe con-
ditions, more frequent oil and filter
changes are required.
Drive belts
Inspect all drive belts for evidence of
cuts, cracks, excessive wear or oil
saturation and replace if necessary.
Drive belts should be checked peri-
odically for proper tension and
adjusted as necessary.
Fuel filter (cartridge)
A clogged filter can limit the speed at
which the vehicle may be driven,
damage the emission system and
cause multiple issues such as hard
starting.
If an excessive amount of foreign
matter accumulates in the fuel tank,
the filter may require replacement
more frequently.
After installing a new filter, run the
engine for several minutes, and
check for leaks at the connections.
We recommend that the fuel filter be
replaced by an authorised HYUNDAI
dealer.
Fuel lines, fuel hoses and con-
nections
Check the fuel lines, fuel hoses and
connections for leakage and dam-
age. We recommend that the fuel
lines, fuel hoses and connections be
replaced by an authorised HYUNDAI
dealer.
Vapour hose and fuel filler cap
The vapour hose and fuel filler cap
should be inspected at those inter-
vals specified in the maintenance
schedule. Make sure that a new
vapour hose or fuel filler cap is cor-
rectly replaced.
Vacuum crankcase ventilation
hoses (if equipped)
Inspect the surface of hoses for evi-
dence of heat and/or mechanical
damage. Hard and brittle rubber,
cracking, tears, cuts, abrasions, and
excessive swelling indicate deterio-
ration. Particular attention should be
paid to examine those hose surfaces
nearest to high heat sources, such
as the exhaust manifold.
Inspect the hose routing to ensure
that the hoses do not come in con-
tact with any heat source, sharp
edges or moving component which
might cause heat damage or
mechanical wear. Inspect all hose
connections, such as clamps and
couplings, to make sure they are
secure, and that no leaks are pres-
ent. Hoses should be replaced
immediately if there is any evidence
of deterioration or damage. When you are inspecting the belt,
place the ignition switch to the
LOCK/OFF or ACC position.
CAUTION
Page 466 of 533
7-35
7
Maintenance
W WA
AS
SH
HE
ER
R
F
FL
LU
UI
ID
D
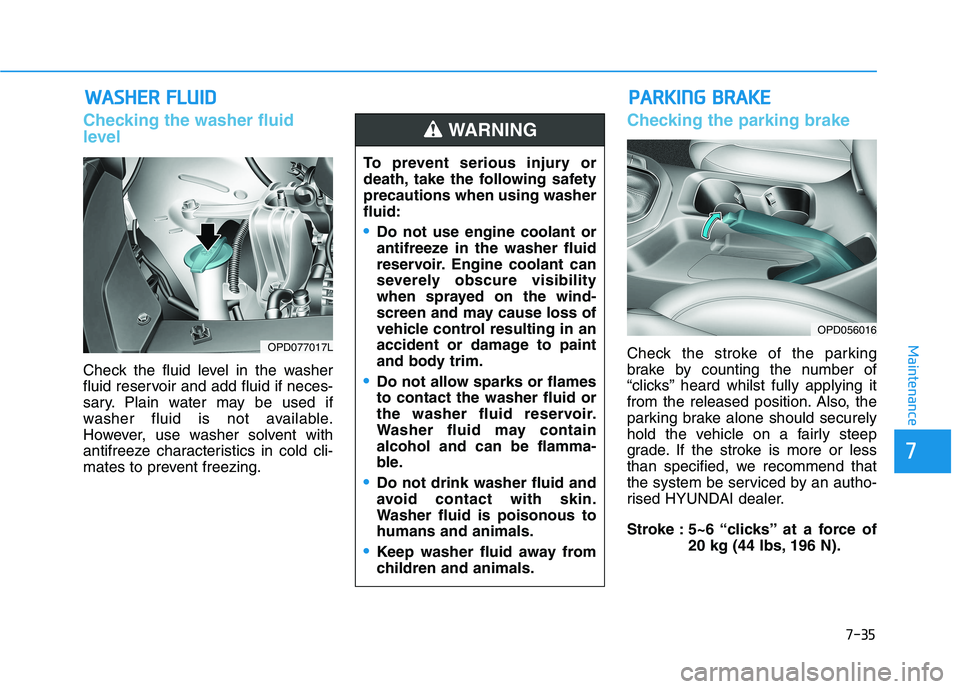
Checking the washer fluid
level
Check the fluid level in the washer
fluid reservoir and add fluid if neces-
sary. Plain water may be used if
washer fluid is not available.
However, use washer solvent with
antifreeze characteristics in cold cli-
mates to prevent freezing.
Checking the parking brake
Check the stroke of the parking
brake by counting the number of
“clicks’’ heard whilst fully applying it
from the released position. Also, the
parking brake alone should securely
hold the vehicle on a fairly steep
grade. If the stroke is more or less
than specified, we recommend that
the system be serviced by an autho-
rised HYUNDAI dealer.
Stroke : 5~6 “clicks’’ at a force of
20 kg (44 lbs, 196 N).OPD077017L
P PA
AR
RK
KI
IN
NG
G
B
BR
RA
AK
KE
E
OPD056016
To prevent serious injury or
death, take the following safety
precautions when using washer
fluid:
Do not use engine coolant or
antifreeze in the washer fluid
reservoir. Engine coolant can
severely obscure visibility
when sprayed on the wind-
screen and may cause loss of
vehicle control resulting in an
accident or damage to paint
and body trim.
Do not allow sparks or flames
to contact the washer fluid or
the washer fluid reservoir.
Washer fluid may contain
alcohol and can be flamma-
ble.
Do not drink washer fluid and
avoid contact with skin.
Washer fluid is poisonous to
humans and animals.
Keep washer fluid away from
children and animals.
WARNING
Page 475 of 533

7-44
Maintenance
For best battery service
Keep the battery securely mounted.
Keep the battery top clean and dry.
Keep the terminals and connec-
tions clean, tight, and coated with
petroleum jelly or terminal grease.
Rinse any spilled electrolyte from
the battery immediately with a
solution of water and baking soda.
If the vehicle is not going to be
used for an extended time, discon-
nect the battery cables.
Battery capacity label
The actual battery label in the vehicle
may differ from the illustration.
1. CMF60L-BCI : The HYUNDAI
model name of battery
2. 12V : The nominal voltage
3. 60Ah(20HR) : The nominal capacity
(in Ampere hours)
4. 92RC : The nominal reserve capac-
ity (in min.)
5. 550CCA : The cold-test current in
amperes by SAE
6. 440A : The cold-test current in
amperes by EN
Battery recharging
By battery charger
Your vehicle has a maintenance-free,
calcium-based battery.
If the battery becomes discharged
over a short time (because, for
example, the headlamps or interior
lights were left on whilst the vehicle
was not in use), recharge it by slow
charging (trickle) for 10 hours.
If the battery gradually discharges
because of high electrical load
whilst the vehicle is being used,
recharge it at 20-30A for two hours.
OPD077028LOLMB073072 ■Example
Page 493 of 533
7-62
Maintenance
4. Check the removed fuse; replace it
if it is blown. To remove or insert
the fuse, use the fuse puller in the
engine compartment fuse panel.
5. Push in a new fuse of the same
rating, and make sure it fits tightly
in the clips. If it fits loosely, we rec-
ommend that you consult an
authorised HYUNDAI dealer.
After checking the fuse panel in
the engine compartment, securely
install the fuse panel cover. You
may hear a clicking sound if the
cover is securely latched. If it is
not securely latched, electrical
failure may occur from water con-
tact.
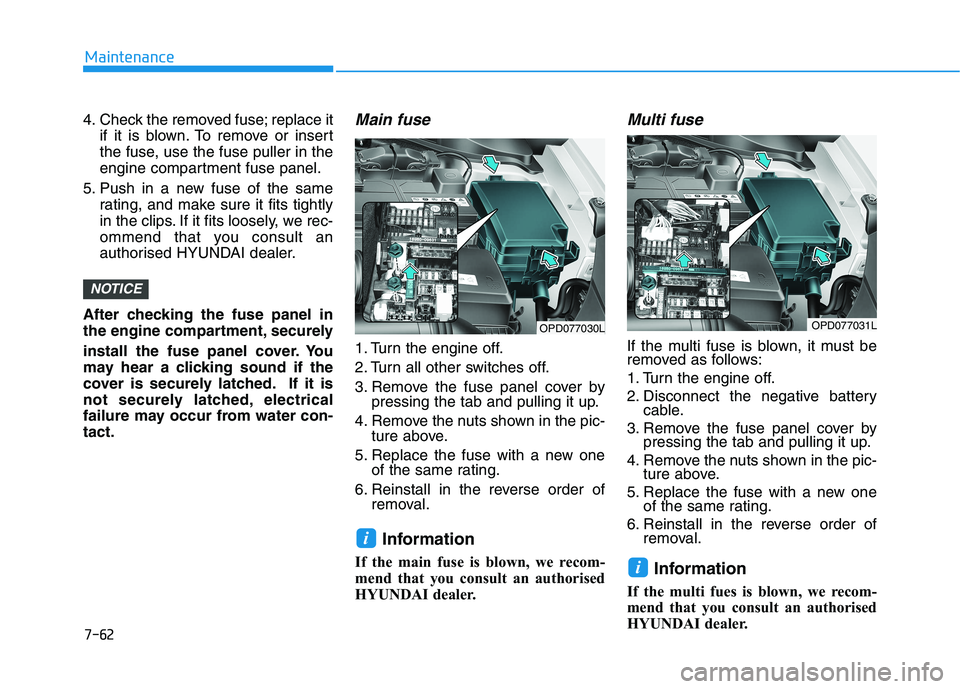
Main fuse
1. Turn the engine off.
2. Turn all other switches off.
3. Remove the fuse panel cover by
pressing the tab and pulling it up.
4. Remove the nuts shown in the pic-
ture above.
5. Replace the fuse with a new one
of the same rating.
6. Reinstall in the reverse order of
removal.
Information
If the main fuse is blown, we recom-
mend that you consult an authorised
HYUNDAI dealer.
Multi fuse
If the multi fuse is blown, it must be
removed as follows:
1. Turn the engine off.
2. Disconnect the negative battery
cable.
3. Remove the fuse panel cover by
pressing the tab and pulling it up.
4. Remove the nuts shown in the pic-
ture above.
5. Replace the fuse with a new one
of the same rating.
6. Reinstall in the reverse order of
removal.
Information
If the multi fues is blown, we recom-
mend that you consult an authorised
HYUNDAI dealer.
i
i
NOTICE
OPD077030LOPD077031L
Page 496 of 533

7-65
7
Maintenance
Engine compartment fuse panel
(Battery terminal cover)
Inside the fuse/relay box cover, you
can find the fuse/relay label describ-
ing fuse/relay names and ratings.
Information
Not all fuse panel descriptions in this
manual may be applicable to your
vehicle; the information is accurate at
the time of printing. When you inspect
the fuse panel in your vehicle, refer to
the fuse panel label.
i
OPD076066
OPD076065
After checking the fuse panel in the engine compartment, securely
install the cover. If it is not securely latched, electrical failure may occur
from water contact.
NOTICE