2023 HONDA CRV Multi view
[x] Cancel search: Multi viewPage 7 of 719

Contents
This owner’s manual should be considered a permanent part of the
vehicle and should remain with the vehicle when it is sold.
The Navigation Manual is available online at owners.honda.com
(U.S.) or honda.ca (Canada). If you are the first registered owner
of your vehicle, you may request a complimentary printed
copy of the Navigation Manual within the first six months of
vehicle purchase. To request a copy, visit owners.honda.com. In
Canada, please request a copy from your Honda dealer.
This owner’s manual covers all models of your vehicle. You may find
descriptions of equipment and features that are not on your
particular model.
Images throughout this owner’s ma nual (including the front cover)
represent features and equipment that are available on some, but
not all, models. Your particular mo del may not have some of these
features.
This owner’s manual is for vehicles sold in the United States and
Canada.
The information and specifications in cluded in this publication were
in effect at the time of approval for printing. Honda Motor Co., Ltd.
reserves the right, however, to discontinue or change specifications
or design at any time without notice and without incurring any
obligation.2 Safe Driving P. 43
For Safe Driving P. 44 Seat Belts P. 49 Airbags P. 59
2Instrument Panel P. 95
Indicators P. 96 Gauges and Driver Information Interface P. 114
2Controls P. 145
Clock P. 146 Locking and Unlocking the Doors P. 148
Moonroof P. 183
Seats P. 205 Interior Convenience Items P. 216
2Features P. 237
Audio System P. 238 Audio System Basic Operation P. 246, 271
Customized Features P. 368, 376
2 Driving P. 441
Before Driving P. 442 Towing a Trailer P. 447Parking Your Vehicle P. 582 Multi-View Rear Camera P. 593
2Maintenance P. 599
Before Performing Maintenance P. 600 Maintenance MinderTM P. 603
Checking and Maintaining Wiper Blades P. 627
Climate Control System Maintenance P. 643
2Handling the Unexpected P. 651
Tools P. 652 If a Tire Goes Flat P. 653
Shift Lever Does Not Move P. 673 Overheating P. 674
If You Cannot Unlock the Fuel Fill Door P. 690
2 Information P. 693
Specifications P. 694 Identification Numbers P. 696
Emissions Testing P. 699 Warranty Coverages P. 701
Page 13 of 719

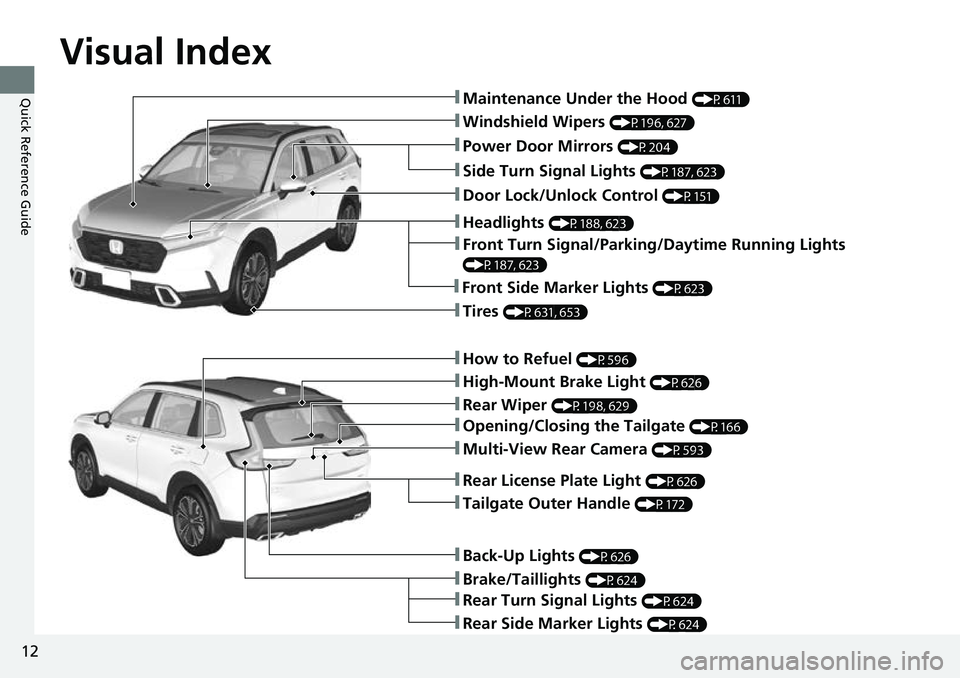
Visual Index
12
Quick Reference Guide
❚Windshield Wipers (P196, 627)
❚How to Refuel (P596)
❚High-Mount Brake Light (P626)
❚Rear Wiper (P198, 629)
❚Brake/Taillights (P624)
❚Power Door Mirrors (P204)
❚Maintenance Under the Hood (P611)
❚Multi-View Rear Camera (P593)
❚Front Turn Signal/Parking/Daytime Running Lights
(P187, 623)
❚Tires (P631, 653)
❚Opening/Closing the Tailgate (P166)
❚Side Turn Signal Lights (P187, 623)
❚Headlights (P188, 623)
❚Rear Turn Signal Lights (P624)
❚Rear Side Marker Lights (P624)
❚Back-Up Lights (P626)
❚Front Side Marker Lights (P623)
❚Tailgate Outer Handle (P172)
❚Rear License Plate Light (P626)
❚Door Lock/Unlock Control (P151)
Page 278 of 719

Continued277
uuAudio System Basic Operation uAudio/Information Screen
Features
■Select wallpaper
1. Press the button.
2. Select Clock.
3. Select Settings .
4. Select Clock Faces .
5. Select a desired picture to set.
u The preview is displayed on the screen.
6. Select Save.
u The clock screen which the wallpa per has been set is displayed.
■To view wallpaper once it is set
1. Press the button.
2. Select Clock.
■Delete wallpaper
1. Press the button.
2. Select Clock.
3. Select Settings .
4. Select Clock Faces .
5. Select Delete Photos .
6. Select a desired picture to delete.
u Multiple pictures can be selected at the same time.
7. Select OK.
u The selected pictures are displayed.
8. Select Delete .
u It will return to the cloc k wallpaper setting screen.
1Wallpaper Setup
You cannot delete the initial imported wallpapers.
Page 374 of 719

373
uuCustomized Features u
Continued
Features
*1:Default Setting
Customizable FeaturesDescriptionSelectable Settings
Display Adjustment Brightness
Changes the brightness of the audio/
information screen.
—
Contrast
Changes the contrast of the audio/
information screen.
Black Level Changes the black level of the audio/
information screen.
Day Changes between the daytime mode,
nighttime mode and display off mode.
Night
Display OFF
Touch Panel SensitivitySets the sensitivity of the touch panel screen.Normal*1/
High
Rear Camera Setting Fixed Guideline
Shows the guideline that
does not move with
the steering wheel.
2 Multi-View Rear Camera P. 593
ON*1/OFF
Dynamic Guideline Shows the guideline th
at moves with the
steering wheel.
2 Multi-View Rear Camera P. 593
ON*1/OFF
Cross Traffic Monitor
Shows arrows on the rear camera image to
indicate vehicles approaching from the sides.
2 Cross Traffic Monitor P. 589
ON*1/OFF
Language Changes the display language.English
*1/Español /Français
LicenseShows the legal information.—
Factory Data Reset Resets all the settings to their factory default.
2
Defaulting All the Settings P. 375—
Page 388 of 719

387
uuCustomized Features u
Continued
Features
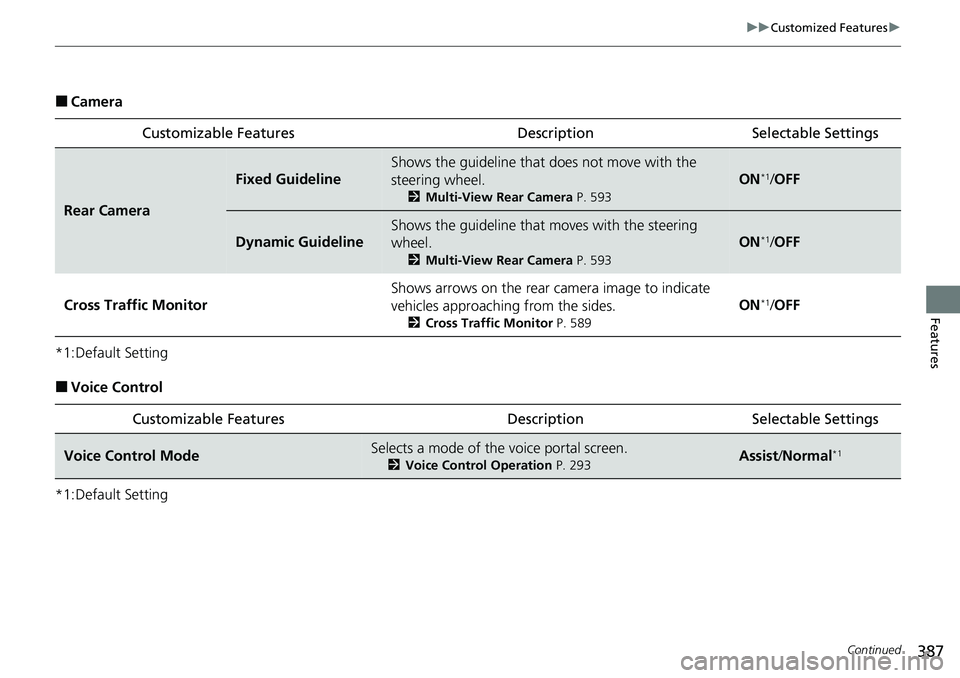
■Camera
*1:Default Setting
■Voice Control
*1:Default Setting Customizable Features Desc
ription Selectable Settings
Rear Camera
Fixed Guideline
Shows the guideline that does not move with the
steering wheel.
2Multi-View Rear Camera P. 593
ON*1/OFF
Dynamic Guideline
Shows the guideline that moves with the steering
wheel.
2 Multi-View Rear Camera P. 593
ON*1/OFF
Cross Traffic Monitor
Shows arrows on the rear ca mera image to indicate
vehicles approaching from the sides.
2 Cross Traffic Monitor P. 589
ON*1/OFF
Customizable Features Descri ption Selectable Settings
Voice Control ModeSelects a mode of the voice portal screen.
2Voice Control Operation P. 293Assist/Normal*1
Page 442 of 719

441
Driving
This chapter discusses driving and refueling.
Before Driving................................... 442
Towing a Trailer ................................ 447
Off-Highway Driving Guidelines ..... 453
When Driving Turning on the Power ...................... 455
Precautions While Driving................. 462
Transmission........................................ 463Shifting ............................................ 464
Deceleration Paddle Selector ............ 466
Acoustic Vehicle Al erting System ...... 469
Drive Mode Switch ........................... 470
Hill Descent Control System ............. 474
Vehicle Stability AssistTM (VSA®), aka Electronic
Stability Control (ESC), System .............. 476
Agile Handling Assist ....................... 478
Real Time AWD with Intelligent Control System
TM*...................................... 479Tire Pressure Monitoring System (TPMS) .... 480Tire Pressure Monitoring System (TPMS) - Required Federal Explanation ......... 485
Blind Spot Information System ......... 487
High Voltage Battery ........................ 491
Honda Sensing ®................................ 492
Collision Mitigati on Braking System
TM
(CMBSTM) ....................................... 495 Low Speed Braking Control
*............ 507
Adaptive Cruise Control (ACC) with Low Speed Follow ................................. 513
Lane Keeping Assist System (LKAS).... 533
Traffic Jam Assist ............................. 545
Road Departure Miti gation System... 554
Traffic Sign Recognition System ....... 562
Front Sensor Camera ....................... 568
Radar Sensor ................................... 570
Sonar Sensors
*................................ 571
Braking .............................................. 572
Parking Your Vehicle ........................ 582
Multi-View Rear Camera .................. 593
Refueling ........................................... 595
Fuel Economy and CO
2 Emissions .... 598
* Not available on all models
Page 594 of 719

593Continued
Driving
Multi-View Rear Camera
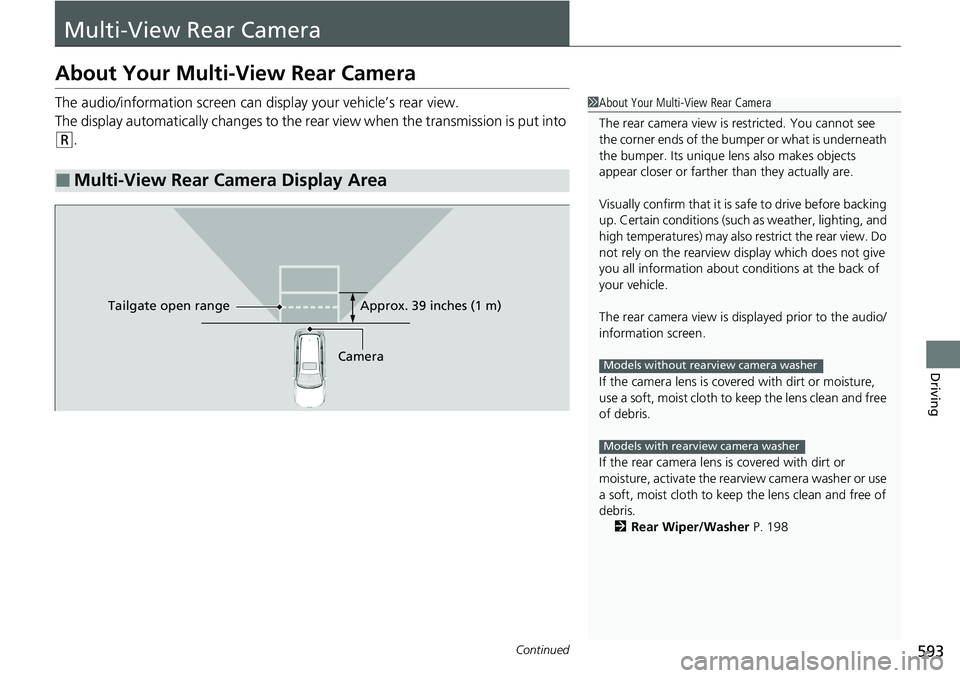
About Your Multi-View Rear Camera
The audio/information screen can display your vehicle’s rear view.
The display automatically changes to the rear view when the transmission is put into
(R.
■Multi-View Rear Camera Display Area
1About Your Multi-View Rear Camera
The rear camera view is restricted. You cannot see
the corner ends of the bumper or what is underneath
the bumper. Its unique le ns also makes objects
appear closer or farther than they actually are.
Visually confirm that it is safe to drive before backing
up. Certain conditions (such as weather, lighting, and
high temperatures) may also restrict the rear view. Do
not rely on the rearview display which does not give
you all information about conditions at the back of
your vehicle.
The rear camera view is di splayed prior to the audio/
information screen.
If the camera lens is cove red with dirt or moisture,
use a soft, moist cloth to keep the lens clean and free
of debris.
If the rear camera lens is covered with dirt or
moisture, activate the rearview camera washer or use
a soft, moist cloth to keep the lens clean and free of
debris.
2 Rear Wiper/Washer P. 198
Models without rearview camera washer
Models with rearview camera washer
CameraApprox. 39 inches (1 m)
Ta ilgate o
pen range
Page 595 of 719

uuMulti-View Rear Camera uAbout Your Multi-View Rear Camera
594
Driving
You can view three different camera modes on the audio/information screen.
Touch the appropriate icon to switch the mode.
• If you were last using Wide view mode or Normal view mode, the same view
mode will be activated the next time you put the transmission into
(R.
• If you were using Top down view mode be fore you turned the power system off,
Wide view mode will be activated the ne xt time you set the power mode to ON
and put the transmission into
(R.
• If you were using Top down view mode and 10 seconds elapsed after you took
the transmission out of
(R, Wide view mode will be activated the next time you
put the transmission into
(R.
• If you were using Top down view mode and put the transmission back into
(R
within 10 seconds after you took it out of
(R, Top down view mode will be
activated.
1 About Your Multi-View Rear Camera
You can change the Fixed Guideline and Dynamic
Guideline settings. 2 Customized Features P. 368, 376
Fixed Guideline
ON: Guidelines appear when you put the
transmission into
( R.
OFF: Guidelines do not appear.
Dynamic Guideline
ON: Guidelines move according to the steering
wheel direction.
OFF: Guidelines do not move.
Bumper
Wide view mode
Normal view mode Top down view mode
Bumper
Bumper