Page 264 of 719

263
uuAudio System Basic Operation uApple CarPlay
Continued
Features
Apple CarPlay
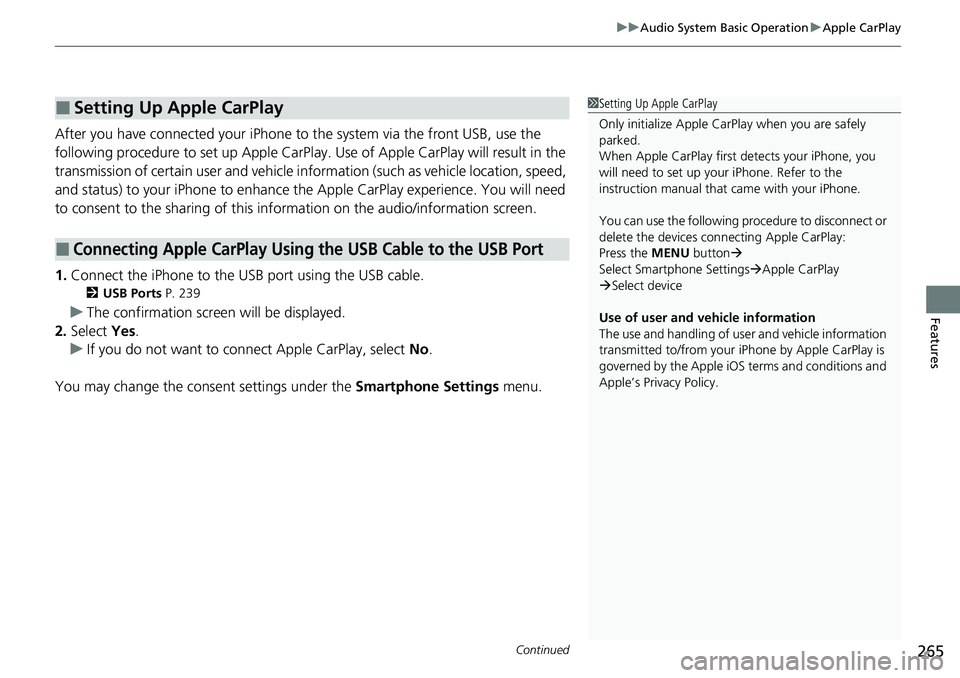
If you connect an Apple CarPlay-compatible iPhone to the system via the front USB,
you can use the audio/information screen, in stead of the iPhone display, to make a
phone call, listen to music, view maps (navigation), and access messages.
2USB Ports P. 239
■Apple CarPlay Menu
1Apple CarPlay
The images shown here (designs, specifications, etc.)
may differ from what is displayed on your screen.
Only iPhone 5 or newer versi ons with iOS 8.4 or later
are compatible with Apple CarPlay.
We recommend using the latest OS.
Park in a safe place before connecting your iPhone to
Apple CarPlay and when launching any compatible
apps.
To directly access the Appl e CarPlay phone function,
press the PHONE button. While connected to Apple
CarPlay, calls are only made through Apple CarPlay. If
you want to make a call with HandsFreeLink, turn
Apple CarPlay OFF or detach the USB cable from your
iPhone. 2 Setting Up Apple CarPlay P. 265
When your iPhone is connected to Apple CarPlay, it is
not possible to use the Bluetooth® Audio or
Bluetooth ® HandsFreeLink ®. However, other
previously paired phones can stream audio via
Bluetooth ® while Apple CarPlay is connected.
2 Phone Setup P. 405
Apple CarPlay and Android Auto cannot run at the
same time.
For details on c ountries and regions where Apple
CarPlay is available, as well as information pertaining
to function, refer to the Apple homepage.
Go back to the
audio screen
CONNECT Button
Press t o
display Apple CarPlay screen
Apple CarPlay menu screen
: Go back to the
Apple CarPlay
Dashboard screen
: Go back to the
Apple CarPlay menu
screen
Page 266 of 719

Continued265
uuAudio System Basic Operation uApple CarPlay
Features
After you have connected your iPhone to the system via the front USB, use the
following procedure to set up Apple CarPlay. Use of Apple CarPlay will result in the
transmission of certain user and vehicle information (such as vehicle location, speed,
and status) to your iPhone to enhance the Apple CarPlay experience. You will need
to consent to the sharing of this in formation on the audio/information screen.
1. Connect the iPhone to the USB port using the USB cable.
2 USB Ports P. 239
uThe confirmation screen will be displayed.
2. Select Yes.
u If you do not want to connect Apple CarPlay, select No.
You may change the consent settings under the Smartphone Settings menu.
■Setting Up Apple CarPlay
■Connecting Apple CarPlay Using the USB Cable to the USB Port
1Setting Up Apple CarPlay
Only initialize Apple CarPlay when you are safely
parked.
When Apple CarPlay first detects your iPhone, you
will need to set up your iPhone. Refer to the
instruction manual that came with your iPhone.
You can use the following procedure to disconnect or
delete the devices conn ecting Apple CarPlay:
Press the MENU button
Select Smartphone Settings Apple CarPlay
Select device
Use of user and vehicle information
The use and handling of user and vehicle information
transmitted to/from your iP hone by Apple CarPlay is
governed by the Apple iOS terms and conditions and
Apple’s Privacy Policy.
Page 268 of 719

267
uuAudio System Basic Operation uAndroid AutoTM
Continued
Features
Android AutoTM
When you connect an Android phone to the audio system via the USB port, Android
Auto is automatically initiated. When connected via Android Auto, you can use the
audio/information screen to access the Phone, Google Maps (Navigation), and
Google Now functions. When you first use Android Auto, a tutorial will appear on
the screen.
We recommend that you complete this tuto rial while safely parked before using
Android Auto.
2 USB Ports P. 239
2 Auto Pairing Connection P. 269
1Android AutoTM
The images shown here (designs, specifications, etc.)
may differ from what is displayed on your screen.
We recommend that you upda te Android OS to the
latest version when using Android Auto.
Bluetooth A2DP cannot be used while your phone is
connected to Android Auto.
To use Android Auto on a smartphone with Android
9.0 (Pie) or earl ier, you need to download the
Android Auto app from Google Play to your
smartphone.
Park in a safe place befo re connecting your Android
phone to Android Auto and when launching any
compatible apps.
When your Android phone is connected to Android
Auto, it is not possible to use the Bluetooth® Audio.
However, other previously paired phones can stream
audio via Bluetooth ® while Android Auto is
connected. 2 Phone Setup P. 405
Apple CarPlay and Android Auto cannot run at the
same time.
Android Auto is a trademark of Google LLC.
Page 270 of 719

Continued269
uuAudio System Basic Operation uAndroid AutoTM
Features
•
You can check Android notifications.
• (Android Auto Home)
Display useful information organized by Android Auto into simple cards that
appear just when they’re needed.
When you connect an Android phone to the unit via the USB port, Android Auto is
automatically initiated.
To enable Android Auto after connecting an Android phone to the system, select
Yes on the screen.
You may change the consent settings under the Smartphone Settings menu.
■Auto Pairing Connection
■Connecting Android Auto Using the USB Cable to the USB Port1Connecting Android Auto Using the USB Cable to the USB Port
Only initialize Android Auto when you are safely
parked. When Android Auto first detects your phone,
you will need to set up your phone so that auto
pairing is possibl e. Refer to the instruction manual
that came with your phone.
You can use the following procedure to disconnect or
delete the devices connecting Android Auto after you
have completed the initial setup:
Press the MENU button
Select Smartphone Settings Android Auto
Select device
Use of user and vehicle information
The use and handling of user and vehicle information
transmitted to/from your phone by Android Auto is
governed by the Google’s Privacy Policy.
Page 275 of 719
274
uuAudio System Basic Operation uAudio/Information Screen
Features
■FM/AM/SiriusXM/USB /Bluetooth Audio
Displays the audio information for each.
■Power Flow
Displays the powe r flow screen.
2Power Flow P. 342
■General Settings
Enters the customiz ing menu screen.
2Customized Features P. 376
■HondaLink®
Displays the H ondaLink screen.
2HondaLink® P. 320
■Apple CarPlay/Android Auto
Displays the Apple CarPlay or Android Auto.
2 Apple CarPlay P. 329
2 Android AutoTM P. 336
■Vehicle Settings
Displays the vehicle settings screen.
2 Customized Features P. 376
Page 277 of 719

uuAudio System Basic Operation uAudio/Information Screen
276
Features
You can change, store, and delete the wallpaper on the audio/information screen.
■Import wallpaper
You can import up to 11 images, one at a time, for wallpaper from a USB flash drive.
1.Connect the USB flash drive to the USB
port.
2 USB Ports P. 239
2.Press the button.
3. Select Clock.
4. Select Settings .
5. Select Clock Faces.
6. Select Add More .
u The image of the pictures stored in the
USB flash drive are displayed on the list.
7. Select a desired picture to import.
u Multiple pictures can be selected at the
same time.
8. Select OK.
u The selected pictures are displayed.
9. Select Transfer.
u It will return to the clock wallpaper
setting screen.
■Wallpaper Setup1Wallpaper Setup
The wallpaper you set up on Clock Faces cannot be
displayed on the driver information interface.
•When importing wallpaper f iles, the image must be
in the USB flash drive’s root directory.
Images in a folder cannot be imported.
•The file name must be less than 64 bytes.
•The file format of the im age that can be imported
is BMP (bmp) or JPEG (jpg).
•The individual file size limit is 10 MB.
•The maximum image size is 4,096 × 2,304 pixels. If
the image size is less than 1,280 × 720 pixels, the
image is displayed in the middle of the screen with
the extra area appearing in black.
•If the USB flash drive doe s not have any pictures,
the message appears.
Page 285 of 719

284
uuAudio System Basic Operation uSystem Updates
Features
System Updates
The audio system’s firmware can be upda ted with a Wi-Fi connection, with a USB
device, or with the telematics control unit (TCU)* through the subscription-based
service.
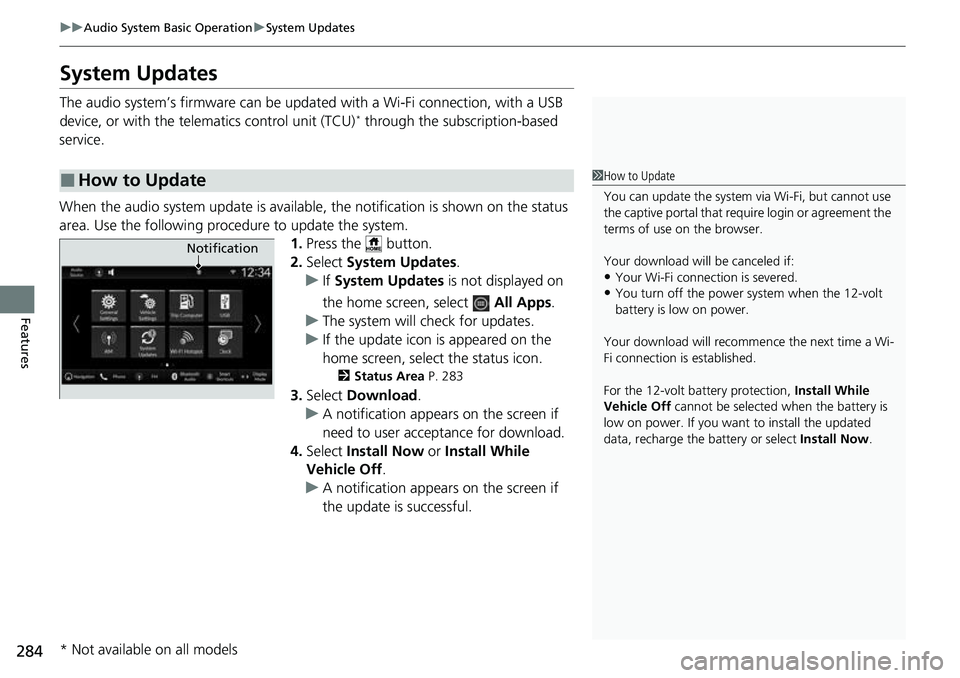
When the audio system update is available, the notification is shown on the status
area. Use the following proc edure to update the system.
1.Press the button.
2. Select System Updates .
u If System Updates is not displayed on
the home screen, select All Apps.
u The system will check for updates.
u If the update icon is appeared on the
home screen, select the status icon.
2 Status Area P. 283
3.Select Download .
u A notification appears on the screen if
need to user acceptance for download.
4. Select Install Now or Install While
Vehicle Off .
u A notification appears on the screen if
the update is successful.
■How to Update1How to Update
You can update the system vi a Wi-Fi, but cannot use
the captive portal that require login or agreement the
terms of use on the browser.
Your download will be canceled if:
•Your Wi-Fi connection is severed.•You turn off the power system when the 12-volt
battery is low on power.
Your download will recomme nce the next time a Wi-
Fi connection is established.
For the 12-volt battery protection, Install While
Vehicle Off cannot be selected when the battery is
low on power. If you want to install the updated
data, recharge the battery or select Install Now.
Notification
* Not available on all models
Page 290 of 719

289
uuAudio System Basic Operation uSystem Updates
Features
■Download the up date files from the server
1. Press the button.
2. Select System Updates .
u If System Updates is not displayed on the home screen, select All Apps.
3. Select Other Methods.
4. Select Via USB .
u A notification appears on the screen.
5. Connect a USB device into the USB port.
u The inventory data is copied into the USB device.
2 USB Ports P. 239
6.Remove the USB device from the USB port.
7. Connect the USB device into your computer, and then download the update files.
u Follow the link to download the required software update files. Refer to
https://usb.honda.com for instructions.
■Update the audio system
1. Press the button.
2. Select System Updates .
3. Select Other Methods.
4. Select Via USB .
u A notification appears on the screen.
5. Connect the USB device with the update files into the USB port.
u A notification appears on the screen.
2 USB Ports P. 239
6.Select Install Now .
u A notification appears on the screen if the update is successful.
■How to Update with a USB Device1How to Update with a USB Device
A USB device with a minimum of 8 GB of free space
or more is recommended.
Be sure to delete any pr evious inventory or update
files from the USB before starting the USB update
process.