Page 277 of 719

uuAudio System Basic Operation uAudio/Information Screen
276
Features
You can change, store, and delete the wallpaper on the audio/information screen.
■Import wallpaper
You can import up to 11 images, one at a time, for wallpaper from a USB flash drive.
1.Connect the USB flash drive to the USB
port.
2 USB Ports P. 239
2.Press the button.
3. Select Clock.
4. Select Settings .
5. Select Clock Faces.
6. Select Add More .
u The image of the pictures stored in the
USB flash drive are displayed on the list.
7. Select a desired picture to import.
u Multiple pictures can be selected at the
same time.
8. Select OK.
u The selected pictures are displayed.
9. Select Transfer.
u It will return to the clock wallpaper
setting screen.
■Wallpaper Setup1Wallpaper Setup
The wallpaper you set up on Clock Faces cannot be
displayed on the driver information interface.
•When importing wallpaper f iles, the image must be
in the USB flash drive’s root directory.
Images in a folder cannot be imported.
•The file name must be less than 64 bytes.
•The file format of the im age that can be imported
is BMP (bmp) or JPEG (jpg).
•The individual file size limit is 10 MB.
•The maximum image size is 4,096 × 2,304 pixels. If
the image size is less than 1,280 × 720 pixels, the
image is displayed in the middle of the screen with
the extra area appearing in black.
•If the USB flash drive doe s not have any pictures,
the message appears.
Page 278 of 719
Continued277
uuAudio System Basic Operation uAudio/Information Screen
Features
■Select wallpaper
1. Press the button.
2. Select Clock.
3. Select Settings .
4. Select Clock Faces .
5. Select a desired picture to set.
u The preview is displayed on the screen.
6. Select Save.
u The clock screen which the wallpa per has been set is displayed.
■To view wallpaper once it is set
1. Press the button.
2. Select Clock.
■Delete wallpaper
1. Press the button.
2. Select Clock.
3. Select Settings .
4. Select Clock Faces .
5. Select Delete Photos .
6. Select a desired picture to delete.
u Multiple pictures can be selected at the same time.
7. Select OK.
u The selected pictures are displayed.
8. Select Delete .
u It will return to the cloc k wallpaper setting screen.
1Wallpaper Setup
You cannot delete the initial imported wallpapers.
Page 370 of 719
369
uuCustomized Features u
Continued
Features
■Customization Flow
Press the MENU button.
Sound Settings
Bluetooth Settings
Bass / Treble
Balance / Fader
Speed Volume Compensation
Connect New Device
Change Device
Priority Device
Clock Settings
Smartphone Settings
Disconnect All Device
Delete Device
Automatic Time
Set Time
Time Zone
Apple CarPlay
Android Auto
Daylight Saving Time
Page 373 of 719

372
uuCustomized Features u
Features
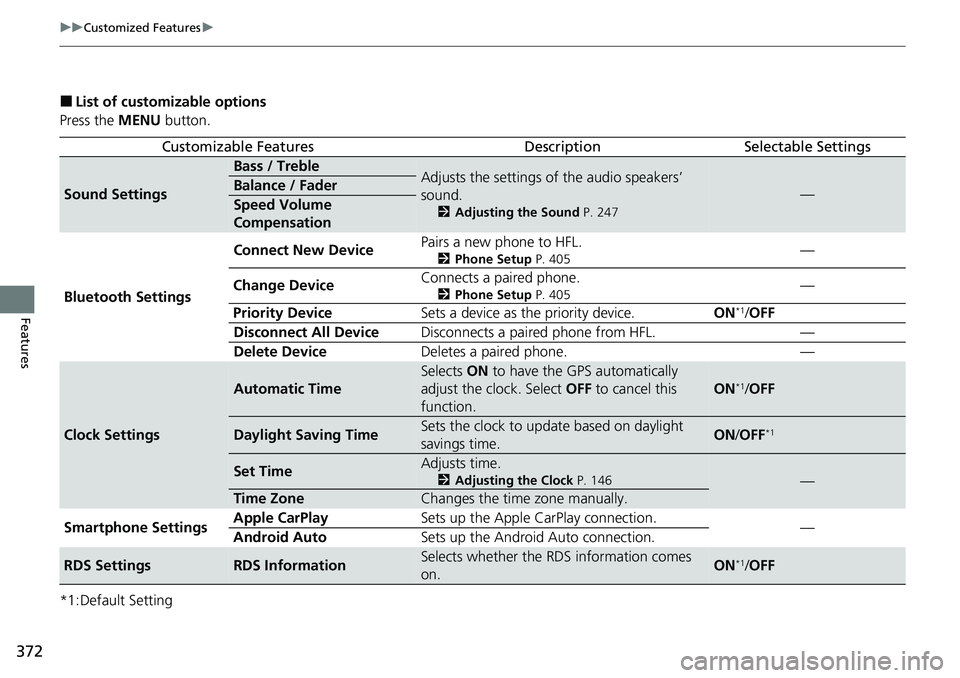
■List of customizable options
Press the MENU button.
*1:Default Setting
Customizable FeaturesDescriptionSelectable Settings
Sound Settings
Bass / TrebleAdjusts the settings of the audio speakers’
sound.
2 Adjusting the Sound P. 247
—Balance / Fader
Speed Volume
Compensation
Bluetooth Settings Connect New Device
Pairs a new phone to HFL.
2
Phone Setup P. 405—
Change Device Connects a paired phone.
2
Phone Setup P. 405—
Priority Device Sets a device as the priority device. ON
*1/OFF
Disconnect All Device Disconnects a paired phone from HFL. —
Delete Device Deletes a paired phone. —
Clock Settings
Automatic Time
Selects ON to have the GPS automatically
adjust the clock. Select OFF to cancel this
function.
ON*1/ OFF
Daylight Saving TimeSets the clock to update based on daylight
savings time.ON /OFF*1
Set TimeAdjusts time.
2 Adjusting the Clock P. 146—
Time ZoneChanges the time zone manually.
Smartphone Settings Apple CarPlay
Sets up the Apple CarPlay connection.
—
Android Auto Sets up the Android Auto connection.
RDS SettingsRDS InformationSelects whether the RDS information comes
on.ON*1/OFF
Page 382 of 719
381
uuCustomized Features u
Continued
Features
■System
*1:Default Setting
*2:Default Setting for U.S. models
*3:Default Setting for Canadian models Customizable Features Description Selectable Settings
Date & Time
Set
Date &
Time
Automatic
Date & TimeSelects
ON to have the GPS auto matically adjust the
clock. Select OFF to cancel this function.ON*1/OFF
Set DateAdjusts date.
2 Adjusting the Clock P. 146Day/Month/ Year
Set TimeAdjusts time.
2Adjusting the Clock P. 146
Hour/Minute
AM /PM
Time
Zone
Automatic
Time Zone*Sets the audio system to au tomatically adjust the clock
when driving through different time zones.ON*1/ OFF
(Select time
zone)Changes the time zone manually.—
Auto Daylig ht Saving
TimeSets the clock to update based on daylight savings time.ON*1/ OFF
Date FormatSelect a date format.
MM/DD/YYYY*2/
DD/MM/YYYY*3/
YYYY/MM/DD
Time FormatSelect a time format.12H*1/ 24H
* Not available on all models
Page 617 of 719

616
uuMaintenance Under the Hood uChanging the Engine Oil and Oil Filter
Maintenance
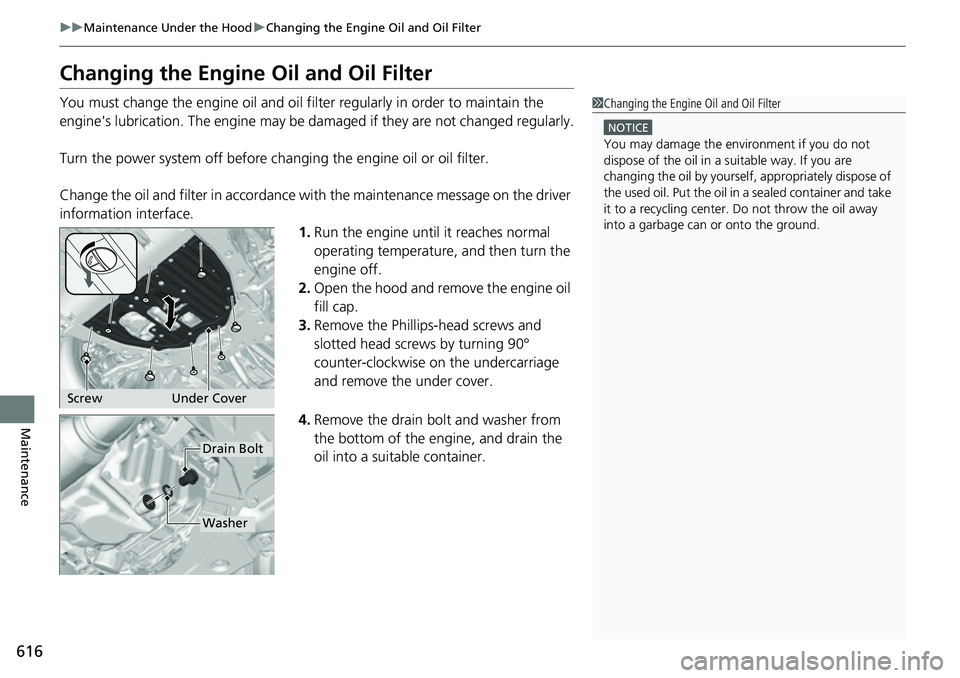
Changing the Engine Oil and Oil Filter
You must change the engine oil and oil f ilter regularly in order to maintain the
engine's lubrication. The engine may be damaged if they are not changed regularly.
Turn the power system off before changing the engine oil or oil filter.
Change the oil and filter in accordance with the maintenance message on the driver
information interface. 1.Run the engine until it reaches normal
operating temperature, and then turn the
engine off.
2. Open the hood and remove the engine oil
fill cap.
3. Remove the Phillips-head screws and
slotted head screws by turning 90°
counter-clockwise on the undercarriage
and remove the under cover.
4. Remove the drain bolt and washer from
the bottom of the engine, and drain the
oil into a suitable container.1Changing the Engine Oil and Oil Filter
NOTICE
You may damage the environment if you do not
dispose of the oil in a suitable way. If you are
changing the oil by yourself , appropriately dispose of
the used oil. Put the oil in a sealed container and take
it to a recycling center. Do not throw the oil away
into a garbage can or onto the ground.
Screw Under Cover
Drain Bolt
Washer
Page 620 of 719
619
uuMaintenance Under the Hood uCooling System
Maintenance
1. Make sure the engine and radiator are
cool.
2. Turn the radiator cap 1/8th turn counter-
clockwise and relieve any pressure in the
cooling system.
3. Push down and turn the radiator cap
counter-clockwise to remove it.
4. The coolant level should be up to the base
of the filler neck. Add coolant if it is low.
5. Put the radiator cap back on, and tighten it
fully.
■Radiator1Radiator
NOTICE
Pour the fluid slowly and ca refully so you do not spill
any. Clean up any spills immediately; they can
damage components in the engine compartment.
Radiator Cap
Page 626 of 719
625
uuReplacing Light Bulbs uBrake Light, Taillight, Rear Side Marker Light, and Rear Turn Signal Light Bulbs
Maintenance
3.Pull the light assembly out of the rear pillar.
4. Turn the socket counter-clockwise and
remove it.
5. Remove the old bulb and insert a new bulb.
6. Align the pins with the body grommets,
then push in until they fully seat.
SocketBulb