2023 HONDA CRV Side mirror
[x] Cancel search: Side mirrorPage 12 of 719

11
Quick Reference Guide
❚Moonroof Switch (P183)
❚Front Side Airbags (P70)
❚Map Lights (P217)
❚USB Ports* (P240)
❚Front Seat (P205)
❚Sun Visors (P231)
❚Vanity Mirrors
❚Rear Seat Heater Buttons*
(P231)
Canadian models
❚Sunglasses Holder (P223)
❚Center Console Box (P219)
❚Rear Seats (P209)
❚LATCH to Secure a Child Seat (P84)
❚Grab Handle
❚Coat Hook (P222)
❚Rear Side Airbags (P70)
❚Seat Belts (P49)
❚Side Curtain Airbags (P73)
❚Seat Belt with Detachable Anchor (P56)
❚Cargo Area Lights (P217)
❚Seat Belt to Secure a Child Seat (P86)
❚Seat Belt (Installing a Child Seat) (P86)
❚Accessory Power Socket (P224)
❚Ceiling Light (P216)
* Not available on all models
Page 13 of 719

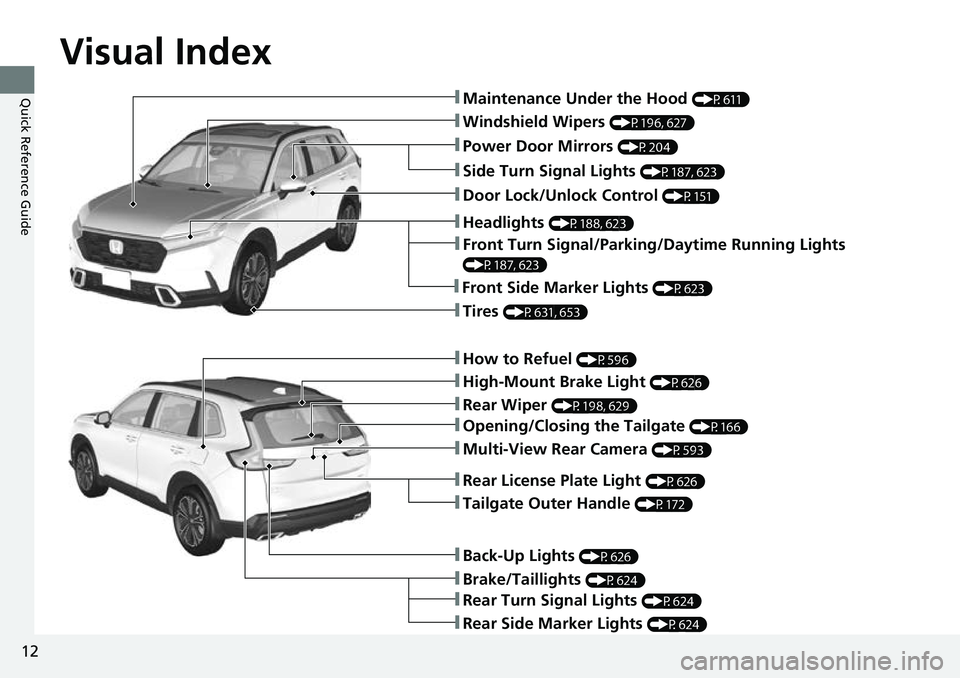
Visual Index
12
Quick Reference Guide
❚Windshield Wipers (P196, 627)
❚How to Refuel (P596)
❚High-Mount Brake Light (P626)
❚Rear Wiper (P198, 629)
❚Brake/Taillights (P624)
❚Power Door Mirrors (P204)
❚Maintenance Under the Hood (P611)
❚Multi-View Rear Camera (P593)
❚Front Turn Signal/Parking/Daytime Running Lights
(P187, 623)
❚Tires (P631, 653)
❚Opening/Closing the Tailgate (P166)
❚Side Turn Signal Lights (P187, 623)
❚Headlights (P188, 623)
❚Rear Turn Signal Lights (P624)
❚Rear Side Marker Lights (P624)
❚Back-Up Lights (P626)
❚Front Side Marker Lights (P623)
❚Tailgate Outer Handle (P172)
❚Rear License Plate Light (P626)
❚Door Lock/Unlock Control (P151)
Page 36 of 719

35
Quick Reference Guide
Honda Sensing® (P 492)
Honda Sensing ® is a driver support system
which employs the use of three distinctly
different kinds of sensors: a radar sensor
located behind the Honda emblem on the
front grille, a front sensor camera mounted
to the interior side of the windshield,
behind the rearview mirror, and the sonar
sensors located in the front and rear
bumpers.
Honda Sensing ® is a driver support system
which employs the use of two distinctly
different kinds of sensors: a radar sensor
located behind the Honda emblem on the
front grille and a front sensor camera
mounted to the interior side of the
windshield, behind the rearview mirror.
Models with Low Speed Braking Control
Models without Low Speed Braking Control
Front Sensor
Camera
Radar Sensor
All models
Models with Low Speed Braking Control
Sonar Sensors
Collision Mitigation
Braking System
TM
(CMBS
TM) (P 495)
The system can assist you when it
determines there is a possibility of your
vehicle colliding with a vehicle (including
motorcycles) ahead from behind, an
oncoming vehicle in front, a pedestrian, or
someone riding a bicycle (moving bicycle).
The CMBS
TM is designed to alert you when
the potential for a collision is determined, as
well as assist in reducing speed, avoiding
collisions, and reducing collision severity.
Low Speed Braking
Control
* (P 507)
Using sonar sensors located on the front and
rear bumpers, this system can detect if there
is danger of a potential collision with a wall
or other obstacle during normal driving or
when the accelerator pedal is depressed
with too much force. The system then assists
in avoiding collisions and reducing damage
from impact through assistive braking and/
or assistive driving power suppression.
* Not available on all models
Page 146 of 719

145
Controls
This chapter explains how to operate the various controls necessary for driving.
Clock.................................................. 146
Locking and Unlocking the Doors Key .................................................. 148
Low Keyless Remote Signal Strength ... 150
Locking/Unlocking the Doors from the Outside .......................................... 151
Locking/Unlocking the Doors from the Inside ............................................. 161
Childproof Door Locks ..................... 163
Auto Door Locking/Unlocking .......... 164
Tailgate .............................................. 165
Security System Immobilizer System .......................... 176
Security System Alarm ...................... 176Windows ............................................... 179Moonroof .......................................... 183
Operating the Switches Around the Steering Wheel
POWER Button................................. 184
Turn Signals ..................................... 187
Light Switches.................................. 188
Daytime Running Lights ................... 192
Auto High-Beam .............................. 193
Wipers and Washers ........................ 196
Rear Defogger/Heated Door Mirror Button ... 199
Heated Windshield Button ............... 199
Driving Position Memory System*.... 200
Adjusting the Steering Wheel .......... 202
Mirrors ............................................... 203
Seats .................................................. 205
Interior Convenience Items .............. 216
Climate Control System Using Automatic Climate Control .... 232
Automatic Climate Control Sensors ...... 236
Canadian models
* Not available on all models
Page 195 of 719

uuOperating the Switches Around the Steering Wheel uAuto High-Beam
194
Controls
■Automatic switching between high-beam and low-beam
When the auto high-beam indicator comes on, the headlights switch between high
beam and low beam based on the following conditions.
■Manual switching between high-beam and low-beam
If you want to manually switch the headlights between high beam and low beam,
follow either of the proced ures below. Note that when you do this, the auto high-
beam indicator will turn off and the auto high-beam will be deactivated.
Using the lever:
Pull the lever toward you for flashi ng the high beams then release it.
u To reactivate the auto high-beam, follo w either of the procedures below and
the auto high-beam indicator will come on.
• Pull the lever towards you and release it.
• Turn the light switch to and then to AUTO when the lever is in the low beam
position.
Using the light switch:
Turn the light switch to .
u To reactivate the auto high-be am, turn the light switch to AUTO when the
lever is in the low beam position, the auto high-beam indicator will come on.
1 How to Use the Auto High-Beam
In the following cases, th e auto high-beam system
may not switch the head lights properly or the
switching timing may be ch anged. In case of the
automatic switching operati on does not fit for your
driving habits, please swit ch the headlights manually.
•The brightness of the lights from the preceding or
oncoming vehicle is intense or poor.
•Visibility is poor due to the weather (rain, snow,
fog, windshield frost, etc.).
•Surrounding light sources, such as street lights,
electric billboards and traf fic lights are illuminating
the road ahead.
•The brightness level of th e road ahead constantly
changes.
•The road is bumpy or has many curves.•A vehicle suddenly appears in front of you, or a
vehicle in front of you is not in the preceding or
oncoming direction.
•Your vehicle is tilted with a heavy load in the rear.•A traffic sign, mirror, or other reflective object
ahead is reflecting strong light toward the vehicle.
•The oncoming vehicle freq uently disappears under
roadside trees or be hind median barriers.
•The preceding or oncoming vehicle is a motorcycle,
bicycle, mobility scooter, or other small vehicle.
The auto high-beam system keeps the headlight low
beam when:
•Windshield wipers are op erating at a high speed.
•The camera has detected dense fog.
High beam
All of the following conditions must
be met before the high beams turn
on.
●Your vehicle speed is 25 mph (40
km/h) or more.
●There are no preceding or
oncoming vehicle with headlights
or taillights turned on.
●There are few street lights on the
road ahead.
Low beam
One of the following conditions
must be met before the low beams
turn on.
●Your vehicle speed is 15 mph (24
km/h) or less.
●There is a preceding or oncoming
vehicle with headlights or
taillights turned on.
●There are many street lights on
the road ahead.
Page 200 of 719

199
uuOperating the Switches Around the Steering Wheel uRear Defogger/Heated Door Mirror Button
Controls
Rear Defogger/Heated Door Mirror Button
Press the rear defogger and heated door mirror button to defog the rear window
and mirrors when the power mode is in ON.
The rear defogger and heated door mirror
automatically switch off after 10-30 minutes
depending on the outside temperature.
However, if the outsid e temperature is 32°F
(0°C) or below, it does not automatically
switch off.
Heated Windshield Button
Press the heated windshield button to deice
the windshield at the wiper park area and
along the driver side edge of the windshield
when the power mode is in ON.
The heated windshield will automatically
switch off after 15 minutes.
1 Rear Defogger/Heated Door Mirror Button
This system consumes a lot of power, so turn it off
when the window has been defogged. Also, do not
use the system for a long time while the power
system is stopped. This may weaken the 12-volt
battery, making it difficult to turn the power system
on.
When the power mode is se t to ON and the outside
temperature is below 41°F (5°C), the heated door
mirror may automatically activate for 10 minutes.
Canadian models
1 Heated Windshield Button
This system consumes a lot of power, so turn it off
when the window has been deiced. Also, do not use
the system for a long period when the power system
is stopped. This may weaken the 12 volt battery,
making it difficult to turn the power system on.
Page 204 of 719

203
Controls
Mirrors
Interior Rearview Mirror
Adjust the angle of the rearview mirror when you are sitting in the correct driving
position.
Flip the tab to switch the position.
The night position will help to reduce the glare
from headlights behind you when driving
after dark.
When you are driving after dark, the
automatic dimming rearview mirror reduces
the glare from headlights behind you. Press
the AUTO button to turn this function on and
off. When activated, the AUTO indicator
comes on.
■Rearview Mirror with Day and Night Positions*
1 Mirrors
Keep the inside and out side mirrors clean and
adjusted for best visibility.
Adjust the mirrors before you start driving. 2 Front Seats P. 205
Tab
Daytime
Position Night
Position
■Automatic Dimming Rearview Mirror*
Auto Button
Sensor
1
Automatic Dimming Rearview Mirror*
The auto dimming function cancels when the
transmission is in
(R.
* Not available on all models
Page 443 of 719

442
Driving
Before Driving
Driving Preparation
Check the following items before you start driving.
• Make sure there are no obstructions on the windows, door mirrors, exterior
lights, or other parts of the vehicle.
u Remove any frost, snow, or ice.
u Remove any snow on the roof, as this can slip down and obstruct your field of
vision while driving. If frozen solid , remove ice once it has softened.
u When removing ice from around the wheels, be sure not to damage the wheel
or wheel components.
• Make sure the hood is securely closed.
u If the hood opens while driving, your front view will be blocked.
• Make sure the tires are in good condition.
u Check air pressures, and check for damage and excessive wear.
2Checking and Maintaining Tires P. 631
•Make sure there are no people or ob jects behind or around the vehicle.
u There are blind spots from the inside.
■Exterior Checks1Exterior Checks
NOTICE
When doors are frozen s hut, use warm water around
the door edges to melt any ice. Do not try to force
them open, as this can damage the rubber trim
around the doors. When done, wipe dry to avoid
further freezing.
Do not pour warm water into the key cylinder.
You will be unable to insert the key if the water
freezes in the hole.
Heat from the engine and exhaust can ignite
flammable material s left under the hood, causing a
fire. If you've parked y our vehicle for an extended
period, inspect and remove any debris that may have
collected, such as dried grass and leaves that have
fallen or have been carried in for use as a nest by a
small animal. Also, check under the hood for leftover
flammable materials after you or someone else has
performed maintenance on your vehicle.