Page 231 of 840
229
uuSeats uHead Restraints
Controls
Head restraints can be removed for cleaning or repair.
To remove a head restraint:
Pull the restraint up as far as it will go. Then, push the release button and pull the
restraint up and out.
To reinstall a head restraint:
Insert the legs back in place, then adjust the head restraint to an appropriate height
while pressing the release button. Pull up on the restraint to make sure it is locked
in position.
■Removing and Reinstalling the Front Head Restraints*1 Removing and Reinstalling the Front Head Restraints*
3WARNING
Failure to reinstall or correctly reinstall, the
head restraints can result in severe injury
during a crash.
Always replace the he ad restraints before
driving.
* Not available on all models
23 CIVIC HATCHBACK TYPE R-31T406100_03.book 229 ページ 2022年6月23日 木曜日 午後9時28分
Page 489 of 840

Continued487
uuBefore Driving uDriving Preparation
Driving
• Store or secure all items on board properly.
u Carrying too much cargo, or improperly storing it, can affect your vehicle's
handling, stability, sto pping distance, and tires, and make it unsafe.
2Maximum Load Limit P. 489
•Do not pile items higher than the seat height.
u They can block your view and may be thrown forward in the event of sudden
braking.
• Do not place anything in the front seat footwells. Make sure to secure the floor
mat.
u An object or unsecured floor mat can in terfere with your brake and accelerator
pedal operation while driving.
• If you have any animals on board, do not let them move around in the vehicle.
u They may interfere with driv ing and a crash could occur.
• Securely close and lock all doors and the hatch.
2 Locking/Unlocking the Doors from the Inside P. 188
•Adjust your seating position properly.
u Adjust the front h ead restraint, too.
2Seats P. 222
2 Adjusting the Front Head Restraints Positions
* P. 228
•Adjust the mirrors and steering wheel properly.
u Adjust them while sitting in the proper driving position.
2 Mirrors P. 220
2 Adjusting the Steering Wheel P. 219
■Interior Checks1Interior Checks
The headlight aim is set by the factory, and does not
need to be adjusted. Howeve r, if you regularly carry
heavy items in the cargo area, have the aiming
readjusted at a dealer or by a qualified technician.
Models with Auto Idle Stop
* Not available on all models
23 CIVIC HATCHBACK TYPE R-31T406100_03.book 487 ページ 2022年6月23日 木曜日 午後9時28分
Page 564 of 840

uuHonda Sensing ®u Collision Mitigation Braking SystemTM (CMBSTM)
562
Driving
■Examples of limitations on the correct detection of the camera due to the condition of
the vehicle ahead of you, oncoming vehicles, pedestrians, or moving bicycles
• The distance between your vehicle an d the vehicle ahead of you, oncoming
vehicle, pedestrian, or moving bicycle ahead of you is too short.
• The vehicle ahead of you, oncoming vehicle, pedestrian, or moving bicycle
suddenly cuts in front of or jumps out in front of you.
• The bicycle is stopped.
• The oncoming vehicle or vehicle ahead of you is sideways or facing diagonally.
• When the vehicle ahead of you, oncoming vehicle, pedestrian, or moving bicycle
blends in with the background, preventing the system from recognizing them.
• When several pedestrians are moving ahead of you in a group.
• When several bicycles are movi ng ahead of you in a group.
• When a pedestrian or moving bicycle crosses the road too quickly.
• A pedestrian or moving bicycle approaches from the opposite direction.
• The headlights of the vehicle ahead of you or oncoming vehicle are lit on one side
or not lit on either side in a dark place.
• When part of a pedestrian (heads, limbs, etc.) is hidden by load.
• When a pedestrian is bent over or squatt ing, when their hands are raised, or they
are running.
• When the pedestrian is shorter than about 3.3 feet (1 meter) or taller than about
6.6 feet (2 meters) in height.
• When the pedestrian is pu shing a stroller or bicycle.
1Collision Mitigation Braking SystemTM (CMBSTM)
Make sure that all the tires are of the same specified
size, type and brand, and that they are evenly worn.
If you use tires of different sizes, types, brands, or
degree of wear, the syst em may not work properly.
Do not modify the suspensi on. Altering the height of
the vehicle may prevent the system from working
properly.
23 CIVIC HATCHBACK TYPE R-31T406100_03.book 562 ページ 2022年6月23日 木曜日 午後9時28分
Page 712 of 840

710
uuMaintenance Under the Hood uOpening the Hood
Maintenance
Opening the Hood
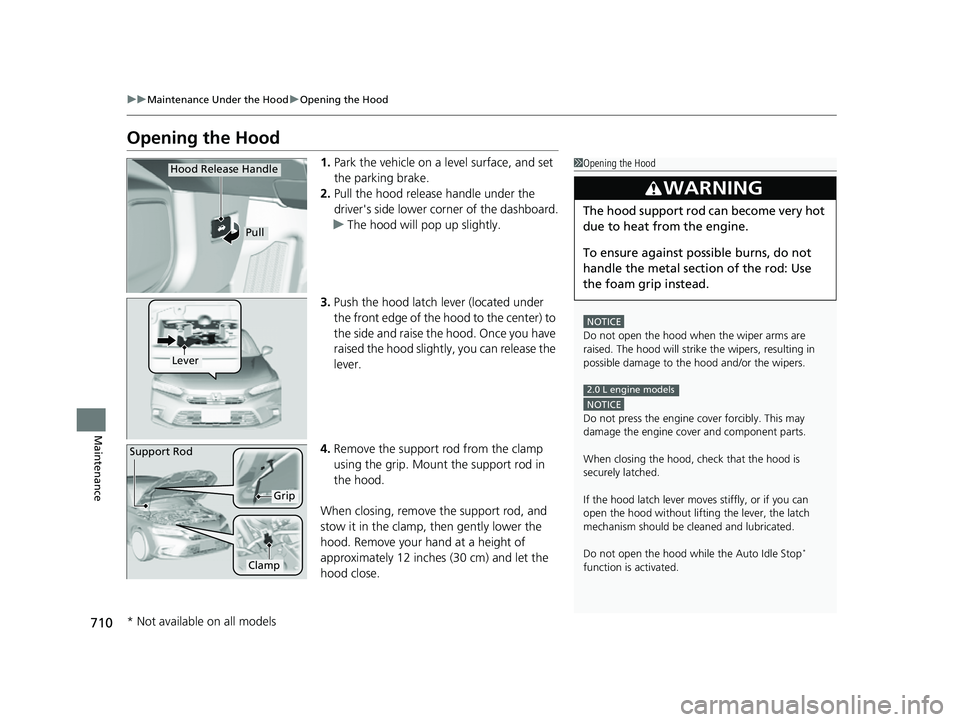
1. Park the vehicle on a level surface, and set
the parking brake.
2. Pull the hood release handle under the
driver's side lower co rner of the dashboard.
u The hood will pop up slightly.
3. Push the hood latch lever (located under
the front edge of the hood to the center) to
the side and raise the hood. Once you have
raised the hood slightly, you can release the
lever.
4. Remove the support rod from the clamp
using the grip. Mount the support rod in
the hood.
When closing, remove the support rod, and
stow it in the clamp, then gently lower the
hood. Remove your hand at a height of
approximately 12 inches (30 cm) and let the
hood close.1 Opening the Hood
NOTICE
Do not open the hood when the wiper arms are
raised. The hood will strike the wipers, resulting in
possible damage to the hood and/or the wipers.
NOTICE
Do not press the engine cover forcibly. This may
damage the engine cover and component parts.
When closing the hood, check that the hood is
securely latched.
If the hood latch lever moves stiffly, or if you can
open the hood without lifti ng the lever, the latch
mechanism should be cl eaned and lubricated.
Do not open the hood while the Auto Idle Stop
*
function is activated.
3WARNING
The hood support rod can become very hot
due to heat from the engine.
To ensure against po ssible burns, do not
handle the metal section of the rod: Use
the foam grip instead.
2.0 L engine models
Hood Release Handle
Pull
Lever
Support Rod
Grip
Clamp
* Not available on all models
23 CIVIC HATCHBACK TYPE R-31T406100_03.book 710 ページ 2022年6月23日 木曜日 午後9時28分
Page 739 of 840

737
uuChecking and Maintaining Tires uTire and Loading Information Label
Continued
Maintenance
Tire and Loading Information Label
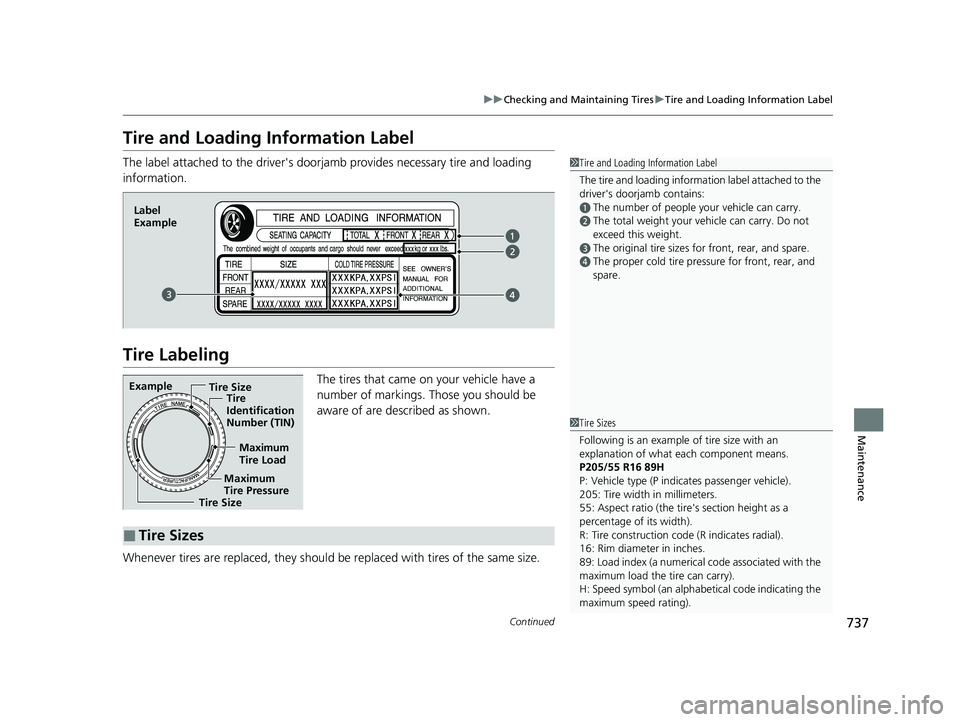
The label attached to the dr iver's doorjamb provides necessary tire and loading
information.
Tire Labeling
The tires that came on your vehicle have a
number of markings. Those you should be
aware of are described as shown.
Whenever tires are replaced, they should be replaced with tires of the same size.
1Tire and Loading Information Label
The tire and loading informat ion label attached to the
driver's doorjamb contains:
aThe number of people your vehicle can carry.bThe total weight your vehicle can carry. Do not
exceed this weight.
cThe original tire sizes for front, rear, and spare.dThe proper cold tire pressure for front, rear, and
spare.
Label
Example
Example Tire Size
Tire
Identification
Number (TIN)
Maximum
Tire Load
Maximum
Tire Pressure
Tire Size
■Tire Sizes
1 Tire Sizes
Following is an example of tire size with an
explanation of what each component means.
P205/55 R16 89H
P: Vehicle type (P indi cates passenger vehicle).
205: Tire width in millimeters.
55: Aspect ratio (the tire's section height as a
percentage of its width).
R: Tire construction code (R indicates radial).
16: Rim diameter in inches.
89: Load index (a numerical code associated with the
maximum load the tire can carry).
H: Speed symbol (an alphabe tical code indicating the
maximum speed rating).
23 CIVIC HATCHBACK TYPE R-31T406100_03.book 737 ページ 2022年6月23日 木曜日 午後9時28分