2023 GMC YUKON DENALI ECU
[x] Cancel search: ECUPage 359 of 432

GMC Yukon/Yukon XL/Denali Owner Manual (GMNA-Localizing-U.S./
Canada/Mexico-16417394) - 2023 - CRC - 4/26/22
358 Vehicle Care
Your dealer will know the kind of wheel that
is needed.
Each new wheel should have the same
load-carrying capacity, diameter, width,
offset, and be mounted the same way as
the one it replaces.
Replace wheels, wheel bolts, wheel nuts,
or Tire Pressure Monitor System (TPMS)
sensors with new GM original equipment
parts.
{Warning
Using the wrong replacement wheels,
wheel bolts, or wheel nuts can be
dangerous. It could affect the braking and
handling of the vehicle. Tires can lose air
and cause loss of control, resulting in a
crash. Always use the correct wheel,
wheel bolts, and wheel nuts for
replacement.
{Warning
Replacing a wheel with a used one is
dangerous. How it has been used or how
far it has been driven may be unknown.(Continued)
Warning (Continued)
It could fail suddenly and cause a crash.
When replacing wheels, use a new GM
original equipment wheel.
Caution
The wrong wheel can also cause
problems with bearing life, brake cooling,
speedometer or odometer calibration,
headlamp aim, bumper height, vehicle
ground clearance, and tire or tire chain
clearance to the body and chassis.
Tire Chains
{Warning
If the vehicle has 275/60R20 or 275/50R22
size tires, do not use tire chains. There is
not enough clearance. Tire chains used on
a vehicle without the proper amount of
clearance can cause damage to the
brakes, suspension, or other vehicle parts.
The area damaged by the tire chains
could cause loss of control and a crash.(Continued)
Warning (Continued)
Use another type of traction device only
if its manufacturer recommends it for the
vehicle's tire size combination and road
conditions. Follow that manufacturer's
instructions. To avoid vehicle damage,
drive slow and readjust or remove the
traction device if it is contacting the
vehicle. Do not spin the wheels.
If traction devices are used, install them
on the rear tires.
Caution
If the vehicle is equipped with a tire size
other than 275/60R20 or 275/50R22, use
tire chains only where legal and only
when necessary. Use chains that are the
proper size for the tires. Install them on
the tires of the rear axle. Do not use
chains on the tires of the front axle.
Tighten them as tightly as possible with
the ends securely fastened. Drive slowly
and follow the chain manufacturer's
instructions. If the chains contact the
vehicle, stop and retighten them. If the
(Continued)
Page 361 of 432
GMC Yukon/Yukon XL/Denali Owner Manual (GMNA-Localizing-U.S./
Canada/Mexico-16417394) - 2023 - CRC - 4/26/22
360 Vehicle Care
Warning (Continued)
4. Turn off the engine and do notrestart while the vehicle is raised.
5. Do not allow passengers to remain in the vehicle.
6. Place wheel blocks, if equipped, on both sides of the tire at the opposite
corner of the tire being changed.
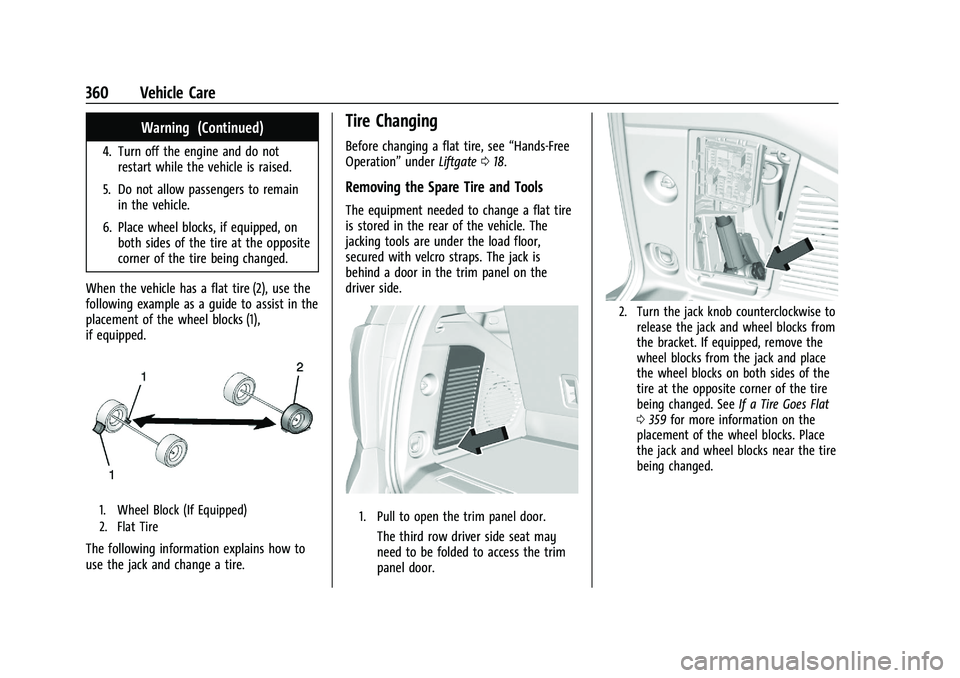
When the vehicle has a flat tire (2), use the
following example as a guide to assist in the
placement of the wheel blocks (1),
if equipped.
1. Wheel Block (If Equipped)
2. Flat Tire
The following information explains how to
use the jack and change a tire.
Tire Changing
Before changing a flat tire, see “Hands-Free
Operation” underLiftgate 018.
Removing the Spare Tire and Tools
The equipment needed to change a flat tire
is stored in the rear of the vehicle. The
jacking tools are under the load floor,
secured with velcro straps. The jack is
behind a door in the trim panel on the
driver side.
1. Pull to open the trim panel door.
The third row driver side seat may
need to be folded to access the trim
panel door.
2. Turn the jack knob counterclockwise to
release the jack and wheel blocks from
the bracket. If equipped, remove the
wheel blocks from the jack and place
the wheel blocks on both sides of the
tire at the opposite corner of the tire
being changed. See If a Tire Goes Flat
0 359 for more information on the
placement of the wheel blocks. Place
the jack and wheel blocks near the tire
being changed.
Page 368 of 432
GMC Yukon/Yukon XL/Denali Owner Manual (GMNA-Localizing-U.S./
Canada/Mexico-16417394) - 2023 - CRC - 4/26/22
Vehicle Care 367
.For bolt-on hub caps, line up the plastic
nut caps with the wheel nuts and tighten
clockwise by hand to get them started.
Then tighten with the wheel wrench
until snug.
Storing a Flat or Spare Tire and Tools
{Warning
Storing a jack, a tire, or other equipment
in the passenger compartment of the
vehicle could cause injury. In a sudden
stop or collision, loose equipment could
strike someone. Store all these in the
proper place.
{Warning
Failure to follow these tire storage
instructions carefully could result in
personal injury or property damage if the
hoist cable fails or if the tire comes loose.
Make sure the tire is stored securely
before driving.
Caution
Always store the spare tire or flat tire
with the valve stem pointed up. Stowing
a tire with the valve stem pointed down
could result in damage to the wheel.
Caution
The tire hoist is designed to be raised
and lowered with tension on the cable.
If the hoist must be raised or lowered
without a tire attached, do so only by
hand, and at a slow pace, to avoid
damaging the mechanism. Do not use
power tools.
{Warning
An improperly stored spare tire could
come loose and cause a crash. To avoid
personal injury or property damage,
always store the spare tire when the
vehicle is parked on a level surface.If the vehicle has 275/60R20 or 275/50R22
size tires, the flat tire must be stored inside
of the vehicle using the flat tire secure strap
inside the glove box. See
“Storing a Flat Tire
Inside of the Vehicle” later in this section.
If the vehicle has 265/65R18 or 275/55R20
size tires, store the flat tire under the rear
of the vehicle in the spare tire carrier. Refer
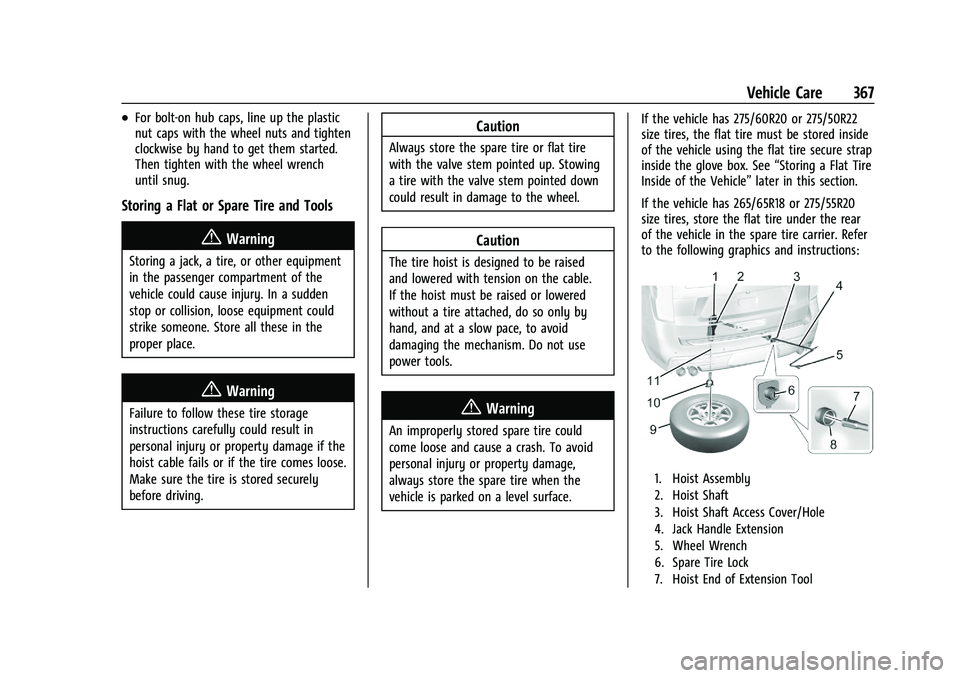
to the following graphics and instructions:
1. Hoist Assembly
2. Hoist Shaft
3. Hoist Shaft Access Cover/Hole
4. Jack Handle Extension
5. Wheel Wrench
6. Spare Tire Lock
7. Hoist End of Extension Tool
Page 369 of 432
GMC Yukon/Yukon XL/Denali Owner Manual (GMNA-Localizing-U.S./
Canada/Mexico-16417394) - 2023 - CRC - 4/26/22
368 Vehicle Care
8. Hoist Shaft Access Hole
9. Spare Tire (Valve Stem Pointed Up)
10. Tire/Wheel Retainer
11. Hoist Cable
1. Put the tire (9) on the ground at the rearof the vehicle with the valve stem
pointed up, and to the rear.
2. Tilt the tire toward the vehicle. Separate the tire/wheel retainer from the guide
pin. Pull the pin through the center of
the wheel. Tilt the retainer down
through the center wheel opening.
Make sure the retainer is fully seated
across the underside of the wheel.
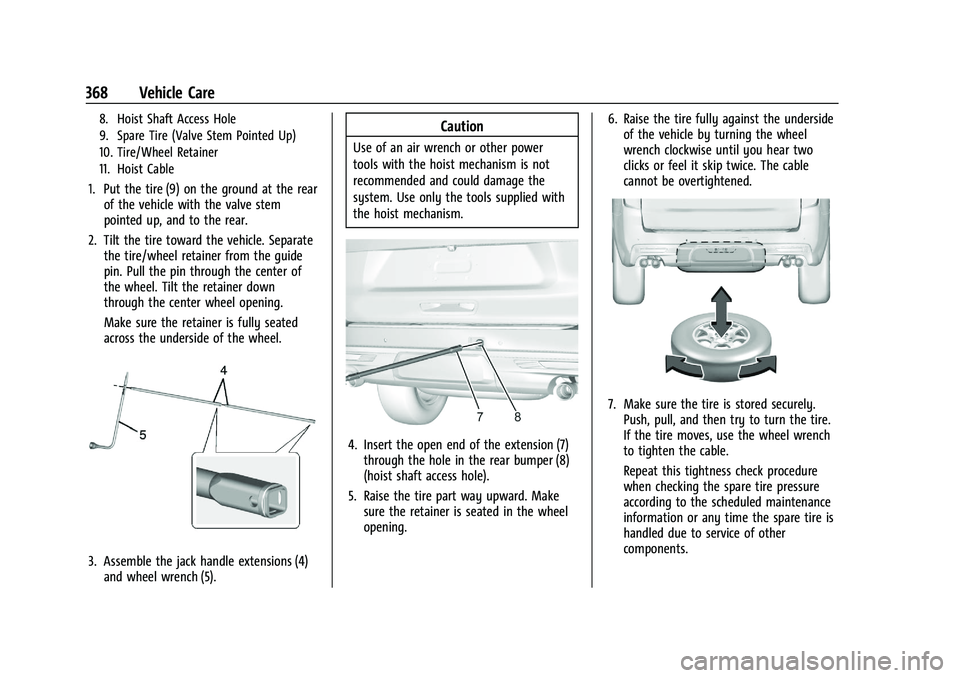
3. Assemble the jack handle extensions (4)and wheel wrench (5).
Caution
Use of an air wrench or other power
tools with the hoist mechanism is not
recommended and could damage the
system. Use only the tools supplied with
the hoist mechanism.
4. Insert the open end of the extension (7)through the hole in the rear bumper (8)
(hoist shaft access hole).
5. Raise the tire part way upward. Make sure the retainer is seated in the wheel
opening. 6. Raise the tire fully against the underside
of the vehicle by turning the wheel
wrench clockwise until you hear two
clicks or feel it skip twice. The cable
cannot be overtightened.
7. Make sure the tire is stored securely.Push, pull, and then try to turn the tire.
If the tire moves, use the wheel wrench
to tighten the cable.
Repeat this tightness check procedure
when checking the spare tire pressure
according to the scheduled maintenance
information or any time the spare tire is
handled due to service of other
components.
Page 370 of 432
GMC Yukon/Yukon XL/Denali Owner Manual (GMNA-Localizing-U.S./
Canada/Mexico-16417394) - 2023 - CRC - 4/26/22
Vehicle Care 369
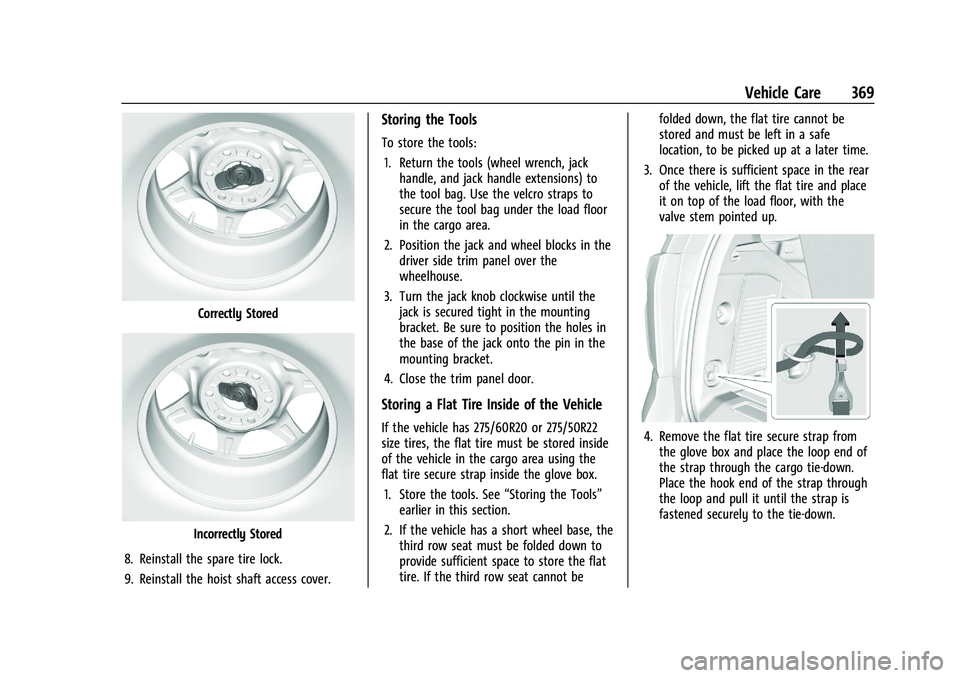
Correctly Stored
Incorrectly Stored
8. Reinstall the spare tire lock.
9. Reinstall the hoist shaft access cover.
Storing the Tools
To store the tools: 1. Return the tools (wheel wrench, jack handle, and jack handle extensions) to
the tool bag. Use the velcro straps to
secure the tool bag under the load floor
in the cargo area.
2. Position the jack and wheel blocks in the driver side trim panel over the
wheelhouse.
3. Turn the jack knob clockwise until the jack is secured tight in the mounting
bracket. Be sure to position the holes in
the base of the jack onto the pin in the
mounting bracket.
4. Close the trim panel door.
Storing a Flat Tire Inside of the Vehicle
If the vehicle has 275/60R20 or 275/50R22
size tires, the flat tire must be stored inside
of the vehicle in the cargo area using the
flat tire secure strap inside the glove box. 1. Store the tools. See “Storing the Tools”
earlier in this section.
2. If the vehicle has a short wheel base, the third row seat must be folded down to
provide sufficient space to store the flat
tire. If the third row seat cannot be folded down, the flat tire cannot be
stored and must be left in a safe
location, to be picked up at a later time.
3. Once there is sufficient space in the rear of the vehicle, lift the flat tire and place
it on top of the load floor, with the
valve stem pointed up.4. Remove the flat tire secure strap from
the glove box and place the loop end of
the strap through the cargo tie-down.
Place the hook end of the strap through
the loop and pull it until the strap is
fastened securely to the tie-down.
Page 374 of 432

GMC Yukon/Yukon XL/Denali Owner Manual (GMNA-Localizing-U.S./
Canada/Mexico-16417394) - 2023 - CRC - 4/26/22
Vehicle Care 373
Warning (Continued)
Battery fluid contains acid that can burn
you. Do not get it on you. If you
accidentally get it in your eyes or on
your skin, flush the place with water and
get medical help immediately.
{Warning
Fans or other moving engine parts can
injure you badly. Keep your hands away
from moving parts once the engine is
running.
6. Check that the jumper cables do not have loose or missing insulation. If they
do, you could get a shock. The vehicles
could be damaged too.
Before you connect the cables, here are
some basic things you should know.
Positive (+) will go to positive (+) or to a
remote positive (+) terminal if the
vehicle has one. Negative (−) will go to a
heavy, unpainted metal engine part or to
a remote negative (−) terminal if the
vehicle has one. Do not connect positive (+) to negative
(−) or you will get a short that would
damage the battery and maybe other
parts too. And do not connect the
negative (−) cable to the negative (−)
terminal on the dead battery because
this can cause sparks.
7. Connect one end of the red positive (+) cable to the discharged battery
positive (+) terminal.
8. Do not let the other end touch metal. Connect it to the good battery
positive (+) terminal. Use a remote
positive (+) terminal if the vehicle
has one.
9. Connect one end of the black negative (−) cable to the good battery negative
(−) terminal. Use a remote negative (−)
terminal if the vehicle has one.
Do not let the other end touch anything
until the next step.
10. Connect the other end of the negative (−) cable to the discharged battery
negative (−) grounding point.
11. Start the vehicle with the good battery and run the engine for a while. 12. Try to start the vehicle that had the
dead battery. If it will not start after a
few tries, it probably needs service.
Jumper Cable Removal
Reverse the sequence exactly when
removing the jumper cables.
After starting the disabled vehicle and
removing the jumper cables, allow it to idle
for several minutes.Towing the Vehicle
Transporting a Disabled Vehicle
Caution
Incorrectly transporting a disabled vehicle
may cause damage to the vehicle. Use
proper tire straps to secure the vehicle to
the flatbed tow truck. Do not strap or
hook to any frame, underbody,
or suspension component not specified
below. Do not move vehicles with drive
axle tires on the ground. Damage is not
covered by the vehicle warranty.
Page 377 of 432

GMC Yukon/Yukon XL/Denali Owner Manual (GMNA-Localizing-U.S./
Canada/Mexico-16417394) - 2023 - CRC - 4/26/22
376 Vehicle Care
Four-Wheel-Drive Vehicles
Only dinghy tow four-wheel-drive vehicles
with a two speed transfer case that has an
N (Neutral) and a 4
nsetting.
{Warning
Shifting a four-wheel-drive vehicle's
transfer case into N (Neutral) can cause
the vehicle to roll even if the
transmission is in P (Park). You or others
could be injured. Set the parking brake
before shifting the transfer case to
N (Neutral).To dinghy tow:
1. Position the vehicle being towed behind the tow vehicle, facing forward and on a
level surface.
2. Securely attach the vehicle being towed to the tow vehicle.
3. Apply the parking brake and start the engine.
4. Shift the transfer case to N (Neutral). See “Shifting into N (Neutral)” under
Four-Wheel Drive 0208 for the proper
procedure. Check that the vehicle is in
N (Neutral) by shifting the transmission
to R (Reverse) and then to D (Drive).
There should be no movement of the
vehicle while shifting.
5. Shift the transmission to P (Park).Caution
Failure to tow the vehicle with the
transmission in P (Park) can cause
damage to the transmission.
6. Turn off the engine.
7. Place the vehicle in accessory mode by pressing the start button without
stepping on the brake pedal. 8. Release the parking brake only when you
are confident it is secured to tow vehicle
and will not roll.
Before going on to the next step, be
sure to take the mechanical key with
you. It will be needed to re-enter the
vehicle after the power is disconnected.
See “Drive Door Key Lock Cylinder
Access” underDoor Locks 015.
9. Disconnect the negative battery cable at the battery and secure the nut and bolt.
Cover the negative battery post with a
non-conductive material to prevent any
contact with the negative battery
terminal.
Caution
Failure to disconnect the negative battery
cable or to have it contact the terminals
can cause damage to the vehicle.
10. Move the steering wheel to make sure the steering column is unlocked.
Caution
If the steering column is locked, vehicle
damage may occur.
Page 387 of 432
GMC Yukon/Yukon XL/Denali Owner Manual (GMNA-Localizing-U.S./
Canada/Mexico-16417394) - 2023 - CRC - 4/26/22
386 Vehicle Care
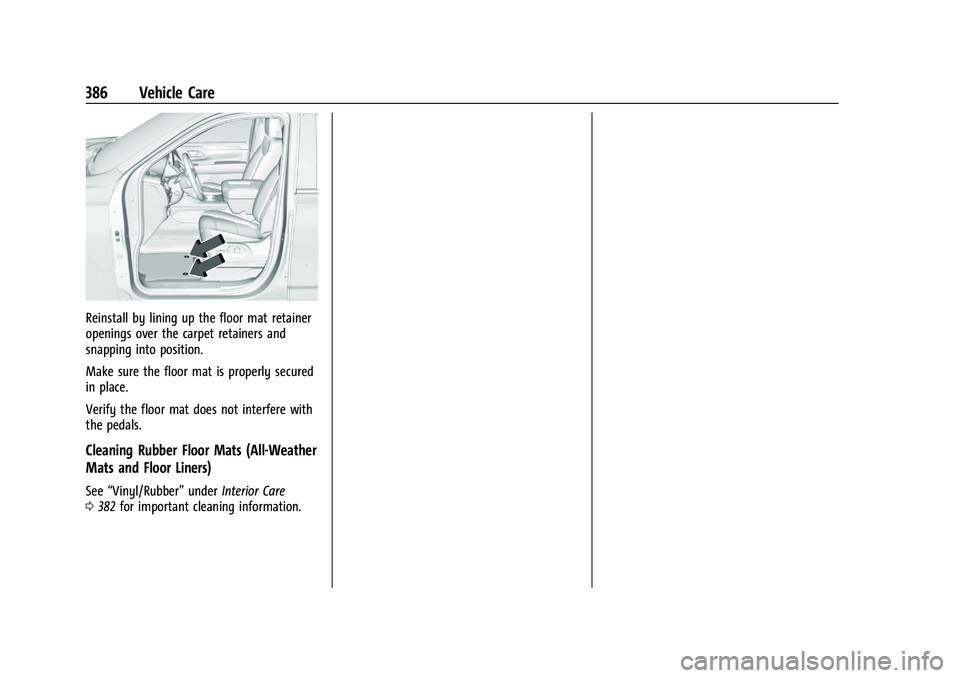
Reinstall by lining up the floor mat retainer
openings over the carpet retainers and
snapping into position.
Make sure the floor mat is properly secured
in place.
Verify the floor mat does not interfere with
the pedals.
Cleaning Rubber Floor Mats (All-Weather
Mats and Floor Liners)
See“Vinyl/Rubber” underInterior Care
0 382 for important cleaning information.