2023 GMC YUKON DENALI change wheel
[x] Cancel search: change wheelPage 127 of 432
GMC Yukon/Yukon XL/Denali Owner Manual (GMNA-Localizing-U.S./
Canada/Mexico-16417394) - 2023 - CRC - 4/26/22
126 Instruments and Controls
If equipped with HUD, some information
about the operation of the vehicle is
projected onto the windshield. The image is
projected through the HUD lens on top of
the instrument panel. The information
appears as an image focused out toward the
front of the vehicle.
Caution
If you try to use the HUD image as a
parking aid, you may misjudge the
distance and damage your vehicle. Do not
use the HUD image as a parking aid.
The HUD information can be displayed in
various languages. The speedometer reading
and other numerical values can be displayed
in either English or metric units.
The language selection is changed through
the radio, and the units of measurement are
changed through the instrument cluster. See
Settings 0167 and “Options” under
Instrument Cluster 0105.
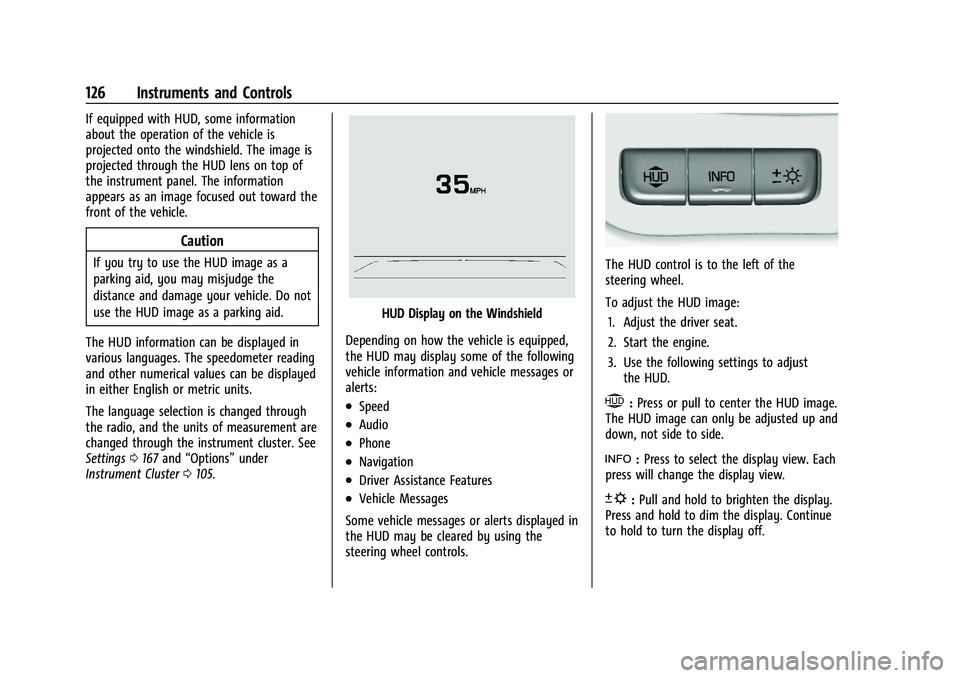
HUD Display on the Windshield
Depending on how the vehicle is equipped,
the HUD may display some of the following
vehicle information and vehicle messages or
alerts:
.Speed
.Audio
.Phone
.Navigation
.Driver Assistance Features
.Vehicle Messages
Some vehicle messages or alerts displayed in
the HUD may be cleared by using the
steering wheel controls.
The HUD control is to the left of the
steering wheel.
To adjust the HUD image: 1. Adjust the driver seat.
2. Start the engine.
3. Use the following settings to adjust the HUD.
$:Press or pull to center the HUD image.
The HUD image can only be adjusted up and
down, not side to side.
!: Press to select the display view. Each
press will change the display view.
D: Pull and hold to brighten the display.
Press and hold to dim the display. Continue
to hold to turn the display off.
Page 128 of 432
GMC Yukon/Yukon XL/Denali Owner Manual (GMNA-Localizing-U.S./
Canada/Mexico-16417394) - 2023 - CRC - 4/26/22
Instruments and Controls 127
The HUD image will automatically dim and
brighten to compensate for outside lighting.
Use
Dto adjust as needed.
The HUD image can temporarily light up
depending on the angle and position of
sunlight on the HUD display. This is normal.
Polarized sunglasses could make the HUD
image harder to see.
Head-Up Display (HUD) Rotation Option
If equipped, this feature under the Options
menu of the instrument cluster allows for
adjusting the angle of the HUD image and
changing or turning off the Speed
Limit Sign.
HUD Rotation: Press the thumbwheel while
Adjust Rotation is highlighted to enter
Adjust Mode. Scroll to adjust the angle of
the HUD display. Press the thumbwheel to
confirm and save the setting. This feature
may only be available in P (Park).
Speed Limit Style Adjustment
If equipped, the speed limit style can be
changed to a speed limit bar or speed limit
sign from the Options menu in the
instrument cluster. Press the thumbwheel
while Speed Limit Style is highlighted to
change the speed sign style or to turn it off. HUD Views
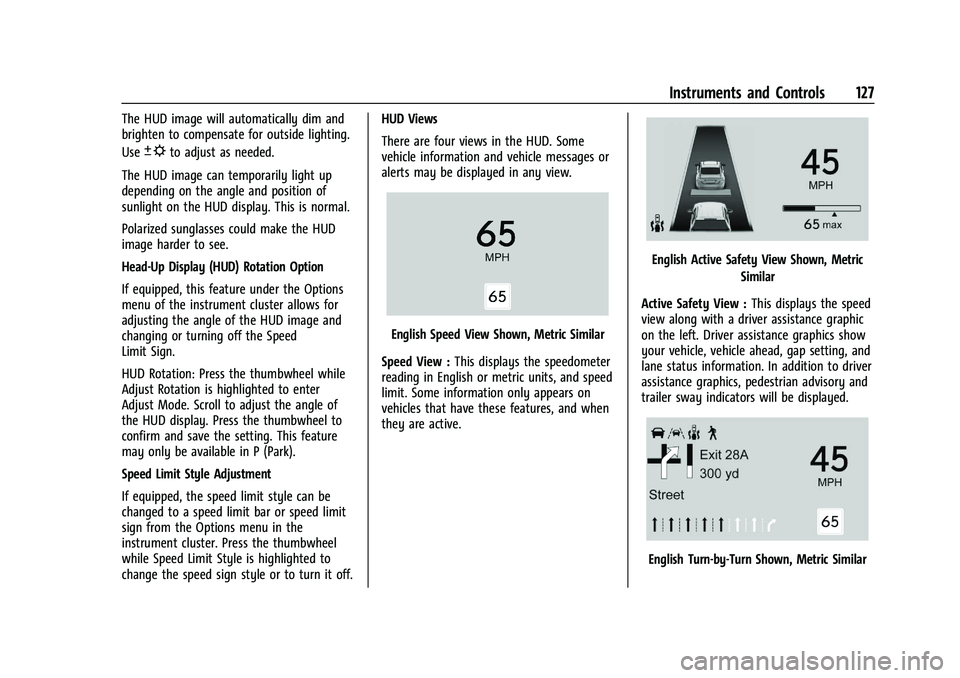
There are four views in the HUD. Some
vehicle information and vehicle messages or
alerts may be displayed in any view.
English Speed View Shown, Metric Similar
Speed View : This displays the speedometer
reading in English or metric units, and speed
limit. Some information only appears on
vehicles that have these features, and when
they are active.
English Active Safety View Shown, Metric
Similar
Active Safety View : This displays the speed
view along with a driver assistance graphic
on the left. Driver assistance graphics show
your vehicle, vehicle ahead, gap setting, and
lane status information. In addition to driver
assistance graphics, pedestrian advisory and
trailer sway indicators will be displayed.
English Turn-by-Turn Shown, Metric Similar
Page 134 of 432
GMC Yukon/Yukon XL/Denali Owner Manual (GMNA-Localizing-U.S./
Canada/Mexico-16417394) - 2023 - CRC - 4/26/22
Lighting 133
Lighting
Exterior Lighting
Exterior Lamp Controls . . . . . . . . . . . . . . . . . 133
Exterior Lamps Off Reminder . . . . . . . . . . 134
Headlamp High/Low-Beam Changer . . . . 135
Flash-to-Pass . . . . . . . . . . . . . . . . . . . . . . . . . . . 135
Daytime Running Lamps (DRL) . . . . . . . . . 135
Automatic Headlamp System . . . . . . . . . . 135
Hazard Warning Flashers . . . . . . . . . . . . . . 136
Turn and Lane-Change Signals . . . . . . . . . 136
Fog Lamps . . . . . . . . . . . . . . . . . . . . . . . . . . . . . 137
Interior Lighting
Instrument Panel IlluminationControl . . . . . . . . . . . . . . . . . . . . . . . . . . . . . . . 137
Dome Lamps . . . . . . . . . . . . . . . . . . . . . . . . . . 138
Reading Lamps . . . . . . . . . . . . . . . . . . . . . . . . 138
Lighting Features
Entry Lighting . . . . . . . . . . . . . . . . . . . . . . . . . 139
Exit Lighting . . . . . . . . . . . . . . . . . . . . . . . . . . . 139
Battery Load Management . . . . . . . . . . . . 139
Battery Power Protection . . . . . . . . . . . . . . 140
Exterior Lighting Battery Saver . . . . . . . . 140
Exterior Lighting
Exterior Lamp Controls
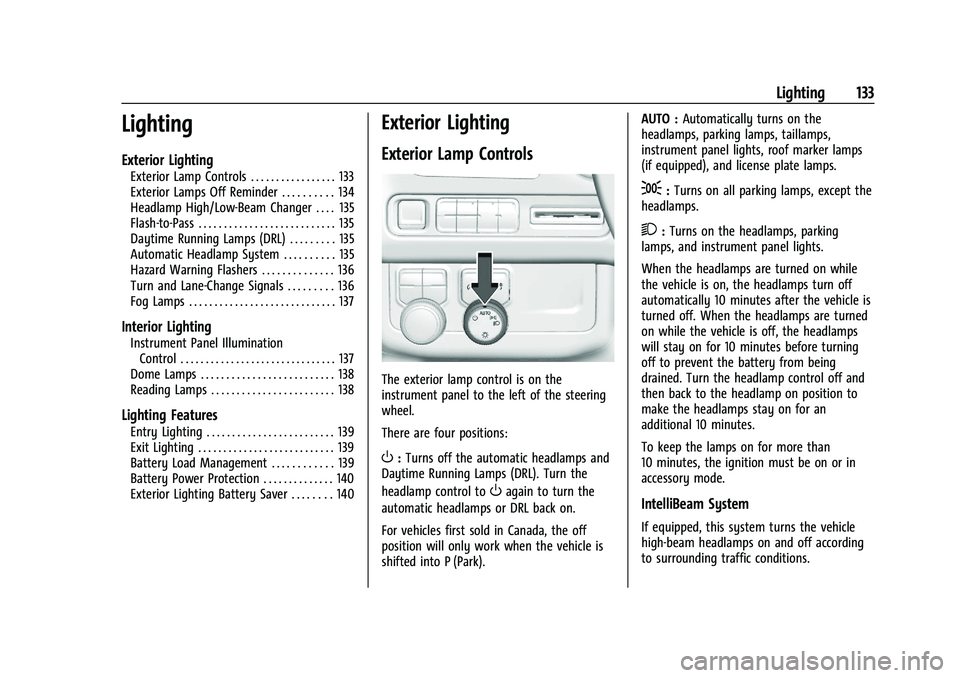
The exterior lamp control is on the
instrument panel to the left of the steering
wheel.
There are four positions:
O: Turns off the automatic headlamps and
Daytime Running Lamps (DRL). Turn the
headlamp control to
Oagain to turn the
automatic headlamps or DRL back on.
For vehicles first sold in Canada, the off
position will only work when the vehicle is
shifted into P (Park). AUTO :
Automatically turns on the
headlamps, parking lamps, taillamps,
instrument panel lights, roof marker lamps
(if equipped), and license plate lamps.
;: Turns on all parking lamps, except the
headlamps.
2: Turns on the headlamps, parking
lamps, and instrument panel lights.
When the headlamps are turned on while
the vehicle is on, the headlamps turn off
automatically 10 minutes after the vehicle is
turned off. When the headlamps are turned
on while the vehicle is off, the headlamps
will stay on for 10 minutes before turning
off to prevent the battery from being
drained. Turn the headlamp control off and
then back to the headlamp on position to
make the headlamps stay on for an
additional 10 minutes.
To keep the lamps on for more than
10 minutes, the ignition must be on or in
accessory mode.
IntelliBeam System
If equipped, this system turns the vehicle
high-beam headlamps on and off according
to surrounding traffic conditions.
Page 144 of 432
GMC Yukon/Yukon XL/Denali Owner Manual (GMNA-Localizing-U.S./
Canada/Mexico-16417394) - 2023 - CRC - 4/26/22
Infotainment System 143
.USB/Bluetooth: Press and hold to
fast reverse the current song if
supported by the device. Release
to return to playing speed. See
USB Port0149 or
Bluetooth Audio 0149.
3.{
.Press to go to the Home Page. See
“Home Page” later in this section.
.Press to exit Android Auto or Apple
CarPlay. To enter back into Android
Auto or Apple CarPlay, press and
hold. SeeApple CarPlay and
Android Auto 0166.
4.6
.Radio: Press and release to go to
the next strong station or channel.
Press and hold to scroll through
the stations or channels. Release to
stop at the next strong station or
channel.
.USB/Bluetooth: Press and hold to
fast forward the current song if
supported by the device. Release
to return to playing speed. See
USB Port 0149 or
Bluetooth Audio 0149.
5.oBACK
.Press to return to the previous
display in a menu.
6.V
.Turn to change tuner sources only
(AM/FM/SXM/DAB where
available), while in the audio app.
Does not support non-tuner
sources. Turn to scroll through
selections in phone
projection apps.
Home Page
The Home Page is where vehicle application
icons are accessed. Some applications are
disabled when the vehicle is moving.
Swipe left or right across the display to
access the pages of icons.
Managing Home Page Icons 1. Touch and hold any of the Home Page icons to enter edit mode.
2. Continue holding the icon and drag it to the desired position.
3. Release your finger to drop the icon in the desired position. Move an Icon to Another Page
1. Drag the icon to the edge of the display toward the desired page.
2. Continue dragging and dropping application icons as desired.
Move an Icon to the Application Tray
For uplevel radio only:
To move an icon to the application tray on
the left side of the screen, drag the icon to
the applications tray.
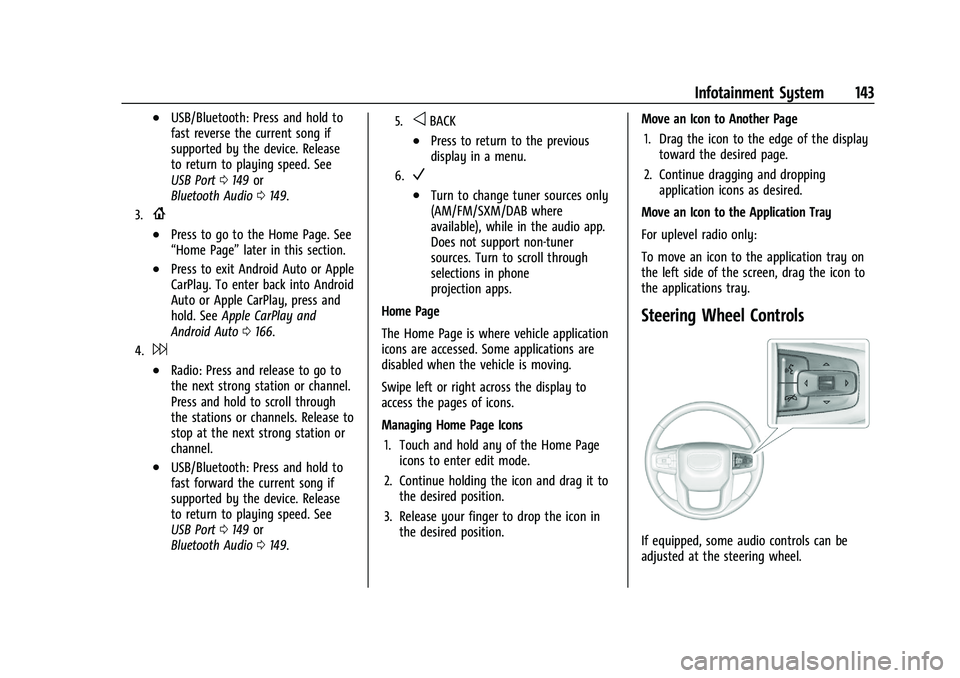
Steering Wheel Controls
If equipped, some audio controls can be
adjusted at the steering wheel.
Page 163 of 432
GMC Yukon/Yukon XL/Denali Owner Manual (GMNA-Localizing-U.S./
Canada/Mexico-16417394) - 2023 - CRC - 4/26/22
162 Infotainment System
system. The system can be used while the
ignition is on or in accessory mode. The
range of the Bluetooth system can be up to
9.1 m (30 ft). Not all mobile devices support
all functions and not all mobile devices work
with the Bluetooth system. SeeOnline
Account 0401 for more information about
compatible mobile devices.
Controls
Use the controls on the infotainment display
and the steering wheel to operate the
Bluetooth system.
Steering Wheel Controls
g: Press and release to answer incoming
calls on your connected Bluetooth mobile
device. Press and hold for mobile device
assistant.
c: Press to end a call, decline a call,
or cancel an operation. Press to mute or
unmute the infotainment system when not
on a call.
Infotainment System Controls
For information about how to navigate the
menu system using the infotainment
controls, see Using the System 0144.
Audio System
When using the Bluetooth mobile device
system, sound comes through the vehicle's
front audio system speakers and overrides
the audio system. The volume level while on
a mobile device call can be adjusted by
pressing the steering wheel controls or the
volume control on the center stack. The
adjusted volume level remains in memory
for later calls. The volume cannot be
lowered beyond a certain level.
Bluetooth (Pairing and Using a
Phone)
Pairing
A Bluetooth-enabled mobile device must be
paired to the Bluetooth system and then
connected to the vehicle before it can be
used. See the mobile device manufacturer's
user guide for Bluetooth functions before
pairing the device.
Pairing Information
.Touch the Phone icon on the home page
of the infotainment display.
.If no mobile device has been paired, a
message on the infotainment display will
show the Manage Phones option. Touch this option and the Phones screen will
display. See
“Pairing a Phone” later in this
section.
.A Bluetooth smartphone with music
capability can be paired to the vehicle as
a smartphone and a music player at the
same time.
.Up to 10 devices can be paired to the
Bluetooth system.
.The pairing process is disabled when the
vehicle is moving.
.Pairing only needs to be completed once,
unless the pairing information on the cell
phone changes or the cell phone is
deleted from the system.
.If multiple paired cell phones are within
range of the system, the system connects
to the paired cell phone that is set to
First to Connect. If there is no cell phone
set to First to Connect, it will link to the
cell phone which was used last. To link to
a different paired cell phone, see “Linking
to a Different Phone” later in this section.
Pairing a Phone 1. Make sure Bluetooth has been enabled on the cell phone before starting the
pairing process.
2. Touch the Phone icon on the Home Page.
Page 166 of 432
GMC Yukon/Yukon XL/Denali Owner Manual (GMNA-Localizing-U.S./
Canada/Mexico-16417394) - 2023 - CRC - 4/26/22
Infotainment System 165
To make a call using the Contacts menu:1. Touch the Phone icon on the Home Page or on the shortcut tray near the left of
the display.
2. Touch Contacts.
3. There are two methods to search for contacts:
.Search bar –Touch the search icon
on the top right of the Phones
window and type the name or
number of the contact on the
keyboard. Search results will be
displayed corresponding to the user
input. Touch the name to call.
.Scroll –Touch the list and scroll,
or use the scrollbar on the left side
of the Phones window. Touch the
name to call.
Making a Call Using the Recents Menu
The Recents menu accesses the recents call
list from your cell phone.
To make a call using the Recents menu:
1. Touch the Phone icon on the Home Page or on the shortcut tray near the left of
the display.
2. Touch Recents.
3. Touch the name or number to call.
Making a Call Using the Keypad
To make a call by dialing the numbers: 1. Touch the Phone icon on the Home Page or on the shortcut tray near the left of
the display.
2. Touch Keypad and enter a phone number.
3. Touch the phone icon on the infotainment display to start dialing the
number.
Searching Contacts Using the Keypad
To search for contacts using the keypad:
1. Touch the Phone icon on the Home Page.
2. Touch Keypad and enter partial phone numbers or contact names using the
digits on the keypad to search.
Results appear on the right side of the
display. Touch one to place a call.
Accepting or Declining a Call
When an incoming call is received, the
infotainment system mutes and a ring tone
is heard in the vehicle.
Accepting a Call
There are two ways to accept a call:
.Pressgon the steering wheel controls.
.Touch Answer on the infotainment
display.
Declining a Call
There are two ways to decline a call:
.Presscon the steering wheel controls.
.Touch Decline on the infotainment
display.
Call Waiting
Call waiting must be supported on the
Bluetooth cell phone and enabled by the
wireless service carrier to work.
Accepting a Call
Press
gto answer, then touch Switch on
the infotainment display.
Declining a Call
Press
cto decline, then touch Decline on
the infotainment display.
Switching Between Calls (Call Waiting
Calls Only)
To switch between calls, touch Phone on the
Home Page to display Call View. While in
Call View, touch the call information of the
call on hold to change calls.
Page 167 of 432
GMC Yukon/Yukon XL/Denali Owner Manual (GMNA-Localizing-U.S./
Canada/Mexico-16417394) - 2023 - CRC - 4/26/22
166 Infotainment System
Ending a Call
.Presscon the steering wheel controls.
.Touch#on the infotainment display,
next to a call, to end only that call.
Dual Tone Multi-Frequency (DTMF) Tones
The in-vehicle Bluetooth system can send
numbers during a call. This is used when
calling a menu-driven phone system. Use the
Keypad to enter the number.
Apple CarPlay and Android Auto
If equipped, Android Auto and/or Apple
CarPlay capability may be available through
a compatible smartphone. If available, the
Android Auto and Apple CarPlay icons will
change from gray to color on the Home
Page of the infotainment display.
To use Android Auto and/or Apple CarPlay:
For Wired Phone Projection
1. Download the Android Auto app to your smartphone from Google Play for phones
running Android 9 and below. There is
no app required for Apple CarPlay or
newer versions of Android. 2. Connect your Android phone or Apple
iPhone by using the factory-provided
phone USB cable and plugging into a
USB data port. For best performance, it is
highly recommended to use the device’s
factory-provided USB cable, which should
be replaced after significant wear to
maintain connection quality. Aftermarket
or third-party cables may not work.
3. When the phone is first connected to activate Apple CarPlay or Android Auto,
accept the terms and conditions on both
the infotainment system and the phone.
4. Follow the instructions on the phone.
The Android Auto and Apple CarPlay icons
on the Home Page will illuminate depending
on the smartphone. Android Auto and/or
Apple CarPlay may automatically launch the
next time the USB is connected. If not,
touch the Android Auto or Apple CarPlay
icon on the Home Page to launch.
Press
{on the center stack to return to the
Home Page.
For Wireless Phone Projection
Verify your phone is wireless compatible by
visiting the Android Auto or Apple CarPlay
support page. 1. Download the Android Auto app to your
smartphone from Google Play for phones
running Android 9 and below. There is
no app required for Apple CarPlay or
newer versions of Android.
2. For first time connection, there are two ways to set up wireless projection:
.Connect your Android phone or Apple
iPhone by using the factory-provided
phone USB cable and plugging into a
USB data port. For best performance,
it is highly recommended to use the
device’s factory-provided USB cable,
which should be replaced after
significant wear to maintain
connection quality. Aftermarket or
third-party cables may not work.
.Connecting the phone over Bluetooth.
See Bluetooth (Pairing and Using a
Phone) 0162 or
Bluetooth (Overview) 0161.
3. Make sure Wi-Fi and Bluetooth is turned on the phone for wireless projection
to work.
4. When the phone is first connected to activate Apple CarPlay or Android Auto,
agree to the terms and conditions on
both the infotainment system and the
phone.
Page 173 of 432
GMC Yukon/Yukon XL/Denali Owner Manual (GMNA-Localizing-U.S./
Canada/Mexico-16417394) - 2023 - CRC - 4/26/22
172 Infotainment System
.Forward Automatic Braking, also called
Automatic Emergency Braking (if
equipped)–the number of times the
vehicle detected that a forward collision
was imminent and applied the brakes.
.Reverse Automatic Braking (if equipped) –
the number of times the vehicle detected
that a rearward collision was imminent
and applied the brakes.
.Traction Control –the number of times
the Traction Control System activated to
reduce wheel spin or loss of traction.
.Stability Control –the number of events
which required the use of electronic
stability control.
.Antilock Braking System Active –The
number of Antilock Brake System
activations.
.Tailgating Alerts (if equipped)– the
number of times the driver was alerted
for following a vehicle ahead too closely.
Report Card Data
Cumulative Data is saved for all trips until
the Report Card is reset or until the
maximum count is exceeded. If the
maximum count is exceeded for a Report
Card line item, that item will no longer be
updated in the Report Card until it is reset. Each item will report a maximum of
1,000 counts. The distance driven will report
a maximum of 64 374 km (40,000 mi).
To delete Report Card data, do one of the
following:
.From the Report Card display, touch
Reset.
.Touch Clear PIN and All Teen Driver Keys
from the Teen Driver menu. This will also
unregister any Teen Driver keys and
delete the PIN.
Forgotten PIN
See your dealer to reset the PIN.
Trademarks and License
Agreements
FCC Information
See Radio Frequency Statement 0407.
"Made for iPhone," means that an electronic
accessory has been designed to connect
specifically to iPhone, and has been certified
by the developer to meet Apple
performance standards. Apple is not
responsible for the operation of this device
or its compliance with safety and regulatory
standards. Please note that the use of this
accessory with iPhone may affect wireless
performance. iPhone are trademarks of
Apple Inc., registered in the U.S. and other
countries.
If you decide to continue service after your
trial, your selected subscription plan will
automatically renew thereafter. You will be
charged at then-current rates. Fees and taxes
apply. Please see the SiriusXM Customer
Agreement at siriusxm.com for complete
terms and how to cancel, which includes
calling SiriusXM at 1-866-635-2349. All fees
and programming are subject to change.