2023 GMC YUKON DENALI ad blue
[x] Cancel search: ad bluePage 151 of 432
GMC Yukon/Yukon XL/Denali Owner Manual (GMNA-Localizing-U.S./
Canada/Mexico-16417394) - 2023 - CRC - 4/26/22
150 Infotainment System
To play music via Bluetooth:1. On the audio now playing page, touch source and select the desired Bluetooth
device.
2. If there is no device connected, follow the screen prompts to pair the device.
Supported media content will appear on
the display.
Manage Bluetooth Devices
Managing Bluetooth devices allows you to
add, delete, or select another paired device.
Only one Bluetooth device can be active at
a time.
Some smartphones support sending
Bluetooth music information to display on
the radio. When the radio receives this
information, it will check to see if any is
available and display it. For more
information about supported Bluetooth
features, visit your brand website. See
Online Account 0401 for details.
See Radio Frequency Statement 0407.Rear Seat Infotainment
Rear Seat Infotainment (RSI)
System
If equipped, the system includes two HDMI
ports, two Bluetooth headphones, and video
touchscreen displays in back of the driver
and passenger seats.
The RSI system may not operate properly
until the temperature is above −20 °C (−4 °F)
and below 55 °C (131 °F).
System Operation
To use:
1. Double-tap anywhere on either screen to power on and view the Home screen.
2. Touch
}on the status bar to turn the
screen off.
The screens can be turned on and off
through each individual touchscreen,
independently from the other, and through
front seat control.
Playback of any media playing through that
specific screen is paused when the screen is
turned off. Screens can be locked via the front seat
control.
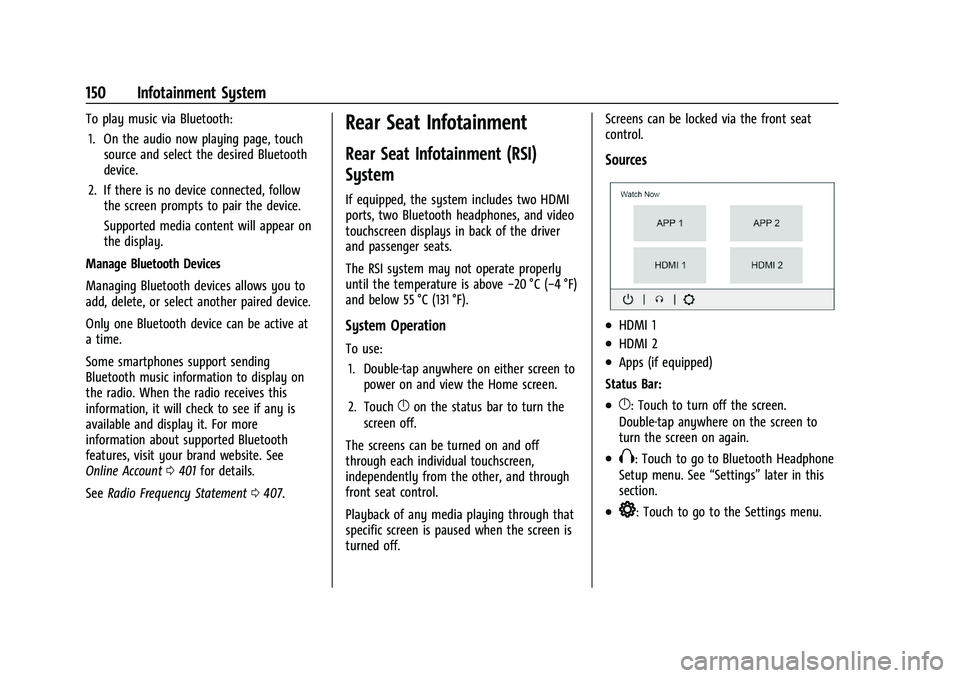
Sources
.HDMI 1
.HDMI 2
.Apps (if equipped)
Status Bar:
.}: Touch to turn off the screen.
Double-tap anywhere on the screen to
turn the screen on again.
.X: Touch to go to Bluetooth Headphone
Setup menu. See “Settings”later in this
section.
.*: Touch to go to the Settings menu.
Page 152 of 432
GMC Yukon/Yukon XL/Denali Owner Manual (GMNA-Localizing-U.S./
Canada/Mexico-16417394) - 2023 - CRC - 4/26/22
Infotainment System 151
HDMI Input
An HDMI cable is required to connect an
HDMI device to the RSI hub. The RSI HDMI
inputs allow connection to video games, disc
players, cameras, smartphones, tablets,
streaming devices, and A/V dongles that
have HDMI (version 1.4a) outputs.
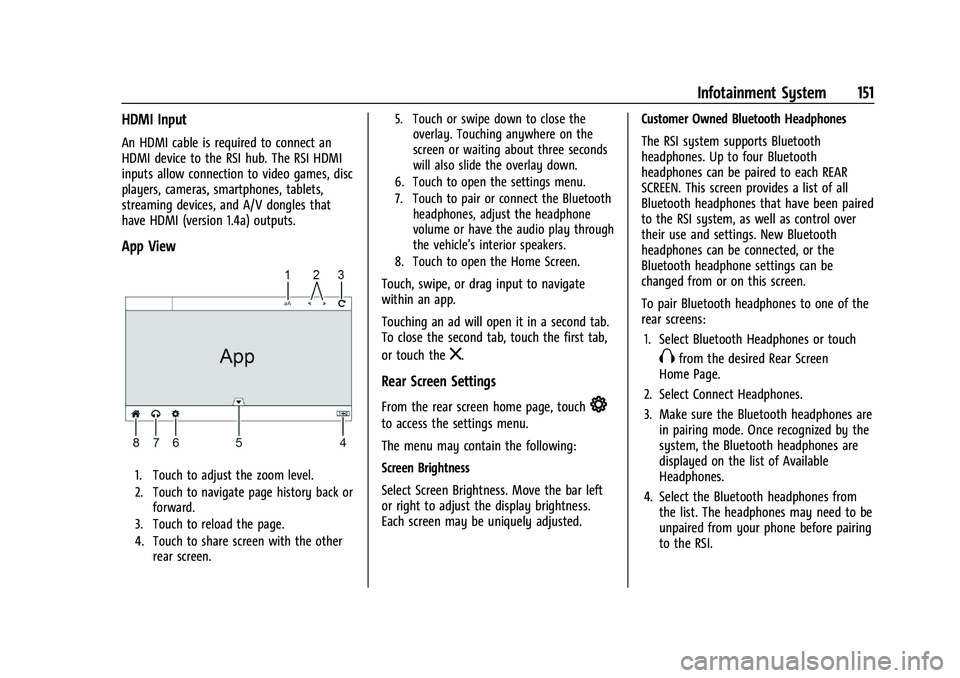
App View
1. Touch to adjust the zoom level.
2. Touch to navigate page history back orforward.
3. Touch to reload the page.
4. Touch to share screen with the other rear screen. 5. Touch or swipe down to close the
overlay. Touching anywhere on the
screen or waiting about three seconds
will also slide the overlay down.
6. Touch to open the settings menu.
7. Touch to pair or connect the Bluetooth headphones, adjust the headphone
volume or have the audio play through
the vehicle’s interior speakers.
8. Touch to open the Home Screen.
Touch, swipe, or drag input to navigate
within an app.
Touching an ad will open it in a second tab.
To close the second tab, touch the first tab,
or touch the
z.
Rear Screen Settings
From the rear screen home page, touch*
to access the settings menu.
The menu may contain the following:
Screen Brightness
Select Screen Brightness. Move the bar left
or right to adjust the display brightness.
Each screen may be uniquely adjusted. Customer Owned Bluetooth Headphones
The RSI system supports Bluetooth
headphones. Up to four Bluetooth
headphones can be paired to each REAR
SCREEN. This screen provides a list of all
Bluetooth headphones that have been paired
to the RSI system, as well as control over
their use and settings. New Bluetooth
headphones can be connected, or the
Bluetooth headphone settings can be
changed from or on this screen.
To pair Bluetooth headphones to one of the
rear screens:
1. Select Bluetooth Headphones or touch
Xfrom the desired Rear Screen
Home Page.
2. Select Connect Headphones.
3. Make sure the Bluetooth headphones are in pairing mode. Once recognized by the
system, the Bluetooth headphones are
displayed on the list of Available
Headphones.
4. Select the Bluetooth headphones from the list. The headphones may need to be
unpaired from your phone before pairing
to the RSI.
Page 153 of 432
GMC Yukon/Yukon XL/Denali Owner Manual (GMNA-Localizing-U.S./
Canada/Mexico-16417394) - 2023 - CRC - 4/26/22
152 Infotainment System
5. Once a headphone is paired, touchoptions for that headphone to access the
menu where the headphone can be
renamed, connected, disconnected, or to
forget.
Provided Bluetooth Headphones
{Warning
The headphones have a built-in
rechargeable lithium ion battery pack
that presents a serious fire hazard if
damaged, defective, or improperly used.
To avoid battery leakage and/or a
potential fire:
.Do not attempt to burn, crush, or cut
the battery
.Do not expose the battery to
environments with extremely low air
pressures or temperatures above 60 °C
(140 °F)
.Do not charge the battery at
temperatures above 45 °C (113 °F)
.Do not charge the battery if the
headphones are defective or damaged
Caution
Do not store the headphones in heat or
direct sunlight. This could damage the
headphones and repairs would not be
covered by the vehicle warranty. Storage
in extreme cold can weaken the batteries.
Keep the headphones stored in a cool,
dry place.
Batteries in this product should not be
disposed of with household waste. Batteries
should be recycled at an appropriate facility.
Contact local authorities for details on
recycling.
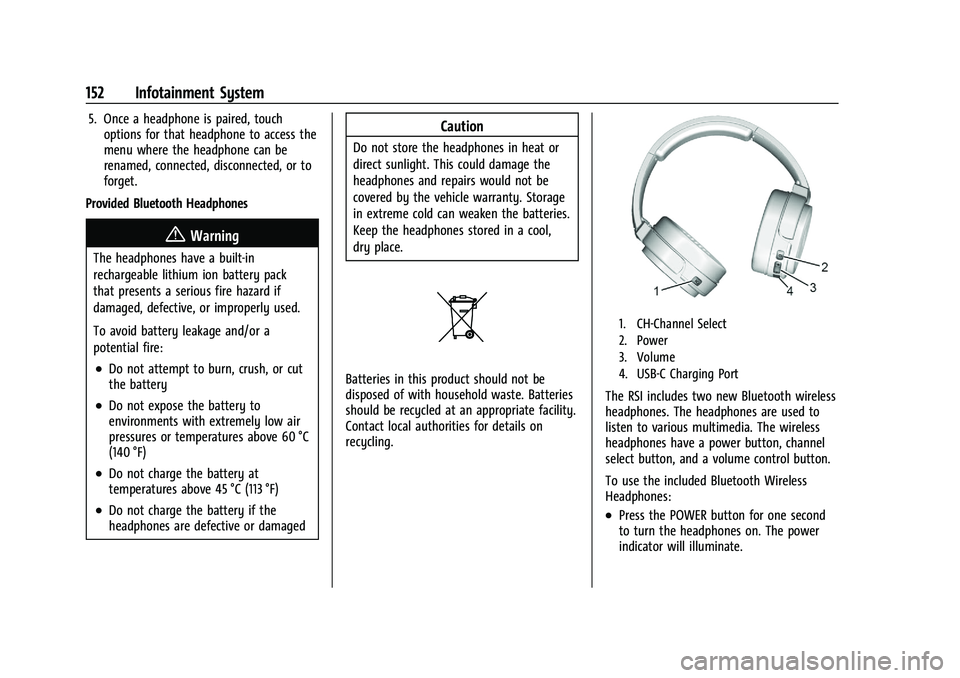
1. CH-Channel Select
2. Power
3. Volume
4. USB-C Charging Port
The RSI includes two new Bluetooth wireless
headphones. The headphones are used to
listen to various multimedia. The wireless
headphones have a power button, channel
select button, and a volume control button.
To use the included Bluetooth Wireless
Headphones:
.Press the POWER button for one second
to turn the headphones on. The power
indicator will illuminate.
Page 154 of 432
GMC Yukon/Yukon XL/Denali Owner Manual (GMNA-Localizing-U.S./
Canada/Mexico-16417394) - 2023 - CRC - 4/26/22
Infotainment System 153
.While the headphones are powered off,
press and hold the power button for
two seconds to enter pairing mode. The
headphone name will display as“GM RSI
BT HP.” See“Pairing to RSI Screen” below
for pairing instructions with RSI screen.
.To power off, press and hold the power
button for two seconds while the power
is on.
.Press the CH-CHANNEL SELECT button (1)
to change between the audio associated
with Screen 1 or Screen 2. This function
only works after pairing to both RSI
Screens.
Paring to RSI Screen
Only two headphones can be active per RSI
Screen.
To pair a Bluetooth headphone to one of
the rear screens: 1. Touch the Headphone icon from the desired Rear Screen Home Page.
2. Select Add New Headphones.
3. Make sure the Bluetooth headphone is in pairing mode.
4. Once recognized by the system, the Bluetooth headphone is displayed on the
list of Available Headphones. 5. Select the Bluetooth headphone from the
list. Once connected, touch OK at the
Pairing Successful pop-up.
6. Touch OK.
To un-pair the Headphones from the screens,
touch the Headphone icon from the desired
Rear Screen Home page. Then touch the
options button under the Headphone that
you want to un-pair. Select Forget
Headphones. This step must be done
separately for each screen.
Voice Over
If equipped, the RSI system has a Voice Over
feature to benefit the visually and hearing
impaired.
When activated, Voice Over provides audible
feedback to the user about which area on
the screen they are touching, identifying
active buttons, as well as providing
information feedback of screen identification,
current status, list content, metadata, and
pop-up information. It allows for the user to
activate features through a double tap
anywhere on the screen which relates to the
last single touched and audibly announced
actionable button. To turn Voice Over on or off, touch
*,
touch the toggle, and then press OK to
confirm. Voice Over turns off every time the
vehicle is turned off.
Reset Rear Media
Select to reset the Apps and log out users.
Open Source License
Select to show the license information.
Rear Consumer Ports (RCP)
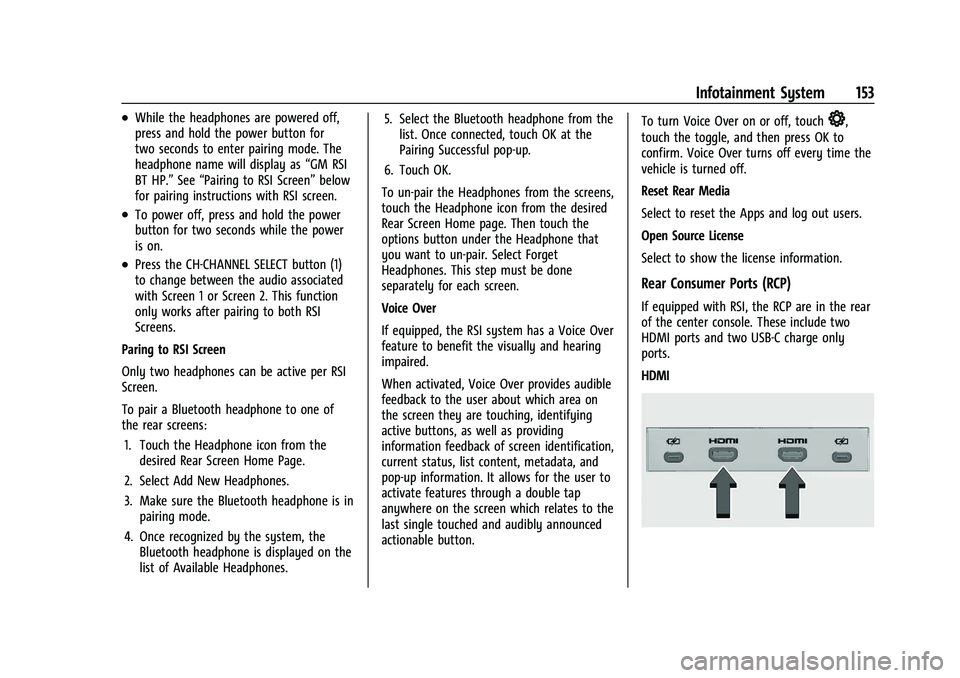
If equipped with RSI, the RCP are in the rear
of the center console. These include two
HDMI ports and two USB-C charge only
ports.
HDMI
Page 155 of 432
GMC Yukon/Yukon XL/Denali Owner Manual (GMNA-Localizing-U.S./
Canada/Mexico-16417394) - 2023 - CRC - 4/26/22
154 Infotainment System
The HDMI input allows an HDMI A/V cable
to be connected from an auxiliary device
such as a camcorder, video game system,
or Apple device. A cable from Apple is
required for Apple devices.
Touch the HDMI port that the external
device was connected to on the home
screen.
For certain HDMI devices that support USB
charging, the USB ports can be used as a
power source.
Content from these HDMI ports are NOT
accessible through the infotainment display.
To use the HDMI input of the RSI system:1. Connect the auxiliary device with an HDMI cable.
2. Power on both the auxiliary device and the RSI video screen.
3. Touch
{(Home) on the desired display
and select HDMI as the source.
HDMI
HDMI Connection
The RCP provides two HDMI ports to mirror
video devices.
Connect the external device to watch the
device content through the RSI screen. Touch the HDMI port that was connected to
the external device on the home screen.
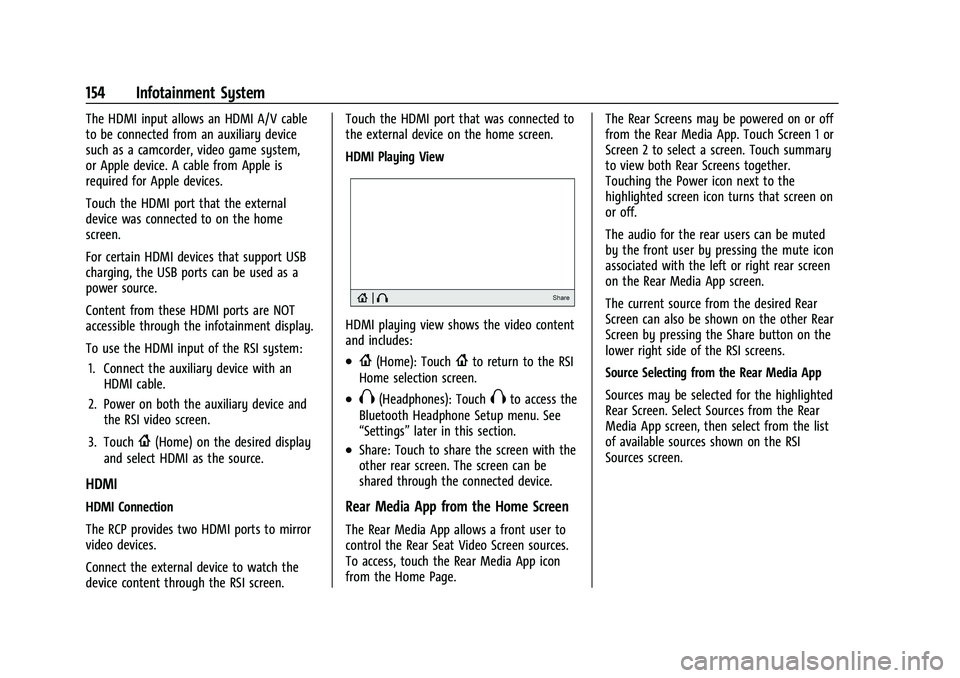
HDMI Playing View
HDMI playing view shows the video content
and includes:
.{(Home): Touch{to return to the RSI
Home selection screen.
.X(Headphones): TouchXto access the
Bluetooth Headphone Setup menu. See
“Settings” later in this section.
.Share: Touch to share the screen with the
other rear screen. The screen can be
shared through the connected device.
Rear Media App from the Home Screen
The Rear Media App allows a front user to
control the Rear Seat Video Screen sources.
To access, touch the Rear Media App icon
from the Home Page. The Rear Screens may be powered on or off
from the Rear Media App. Touch Screen 1 or
Screen 2 to select a screen. Touch summary
to view both Rear Screens together.
Touching the Power icon next to the
highlighted screen icon turns that screen on
or off.
The audio for the rear users can be muted
by the front user by pressing the mute icon
associated with the left or right rear screen
on the Rear Media App screen.
The current source from the desired Rear
Screen can also be shown on the other Rear
Screen by pressing the Share button on the
lower right side of the RSI screens.
Source Selecting from the Rear Media App
Sources may be selected for the highlighted
Rear Screen. Select Sources from the Rear
Media App screen, then select from the list
of available sources shown on the RSI
Sources screen.
Page 157 of 432

GMC Yukon/Yukon XL/Denali Owner Manual (GMNA-Localizing-U.S./
Canada/Mexico-16417394) - 2023 - CRC - 4/26/22
156 Infotainment System
Rear Media Settings
From the Rear Media page, touch Settings to
access the settings menu.
The menu may contain the following:
Remember Screen Power Status
Select to have rear screens automatically
power on when the vehicle is started.
Rear Screen Voice-Over
Select to have Video Voice Over for the
individual rear screens.
Allowed Applications
Select to choose which applications are
visible.
Account
Select to show the vehicle data plan.
Reset Rear Media
Select to reset the applications.
Rear Media Terms of Use
Select to view the terms of use.
Privacy Statement
Select to view the Privacy statement.RSI Troubleshooting
No power :
The ignition might not be on or
in accessory mode.
There is no sound from the headphones
with the indicator light on : Make sure the
headphones have sufficient charge. Plug the
headphones to a USB-C port to charge.
Check to see if headphones are paired to the
screens. Make sure that you are listening in
to the correct screen by pressing the
channel select button.
If the steps above do not work, then unpair
the headphones from the RSI screens, turn
the headphones off, turn them back on and
attempt to pair them. See pairing
procedures for the Bluetooth headphone
previously in this section.
Video Distortion
Video distortion can occur when operating
cellular phones, scanners, CB radios, Global
Positioning Systems (GPS), two-way radios,
mobile faxes, or walkie talkies.
It might be necessary to turn off the video
player when operating one of these devices
in or near the vehicle.
Navigation
Using the Navigation System
The Navigation software is provided by
Google Maps. The information provided in
this section is a general overview and is
subject to change. For the latest functional
information, see g.co/mapsincar.
Accept the Terms and Conditions to use.
Internet Connectivity
Google Maps relies on a subscription data
plan for full functionality, including
availability of offline maps. With an
applicable connected services plan, Google
Maps can be used offline when driving
through connectivity dead zones by
auto-downloading offline maps prior to
going offline.
Profiles
Sign in to a Google Account for personalized
service. Information available in the Google
Account will be shown.
To log into a profile, see Accounts under
Settings 0167.
Page 162 of 432

GMC Yukon/Yukon XL/Denali Owner Manual (GMNA-Localizing-U.S./
Canada/Mexico-16417394) - 2023 - CRC - 4/26/22
Infotainment System 161
“Play
Page 163 of 432
GMC Yukon/Yukon XL/Denali Owner Manual (GMNA-Localizing-U.S./
Canada/Mexico-16417394) - 2023 - CRC - 4/26/22
162 Infotainment System
system. The system can be used while the
ignition is on or in accessory mode. The
range of the Bluetooth system can be up to
9.1 m (30 ft). Not all mobile devices support
all functions and not all mobile devices work
with the Bluetooth system. SeeOnline
Account 0401 for more information about
compatible mobile devices.
Controls
Use the controls on the infotainment display
and the steering wheel to operate the
Bluetooth system.
Steering Wheel Controls
g: Press and release to answer incoming
calls on your connected Bluetooth mobile
device. Press and hold for mobile device
assistant.
c: Press to end a call, decline a call,
or cancel an operation. Press to mute or
unmute the infotainment system when not
on a call.
Infotainment System Controls
For information about how to navigate the
menu system using the infotainment
controls, see Using the System 0144.
Audio System
When using the Bluetooth mobile device
system, sound comes through the vehicle's
front audio system speakers and overrides
the audio system. The volume level while on
a mobile device call can be adjusted by
pressing the steering wheel controls or the
volume control on the center stack. The
adjusted volume level remains in memory
for later calls. The volume cannot be
lowered beyond a certain level.
Bluetooth (Pairing and Using a
Phone)
Pairing
A Bluetooth-enabled mobile device must be
paired to the Bluetooth system and then
connected to the vehicle before it can be
used. See the mobile device manufacturer's
user guide for Bluetooth functions before
pairing the device.
Pairing Information
.Touch the Phone icon on the home page
of the infotainment display.
.If no mobile device has been paired, a
message on the infotainment display will
show the Manage Phones option. Touch this option and the Phones screen will
display. See
“Pairing a Phone” later in this
section.
.A Bluetooth smartphone with music
capability can be paired to the vehicle as
a smartphone and a music player at the
same time.
.Up to 10 devices can be paired to the
Bluetooth system.
.The pairing process is disabled when the
vehicle is moving.
.Pairing only needs to be completed once,
unless the pairing information on the cell
phone changes or the cell phone is
deleted from the system.
.If multiple paired cell phones are within
range of the system, the system connects
to the paired cell phone that is set to
First to Connect. If there is no cell phone
set to First to Connect, it will link to the
cell phone which was used last. To link to
a different paired cell phone, see “Linking
to a Different Phone” later in this section.
Pairing a Phone 1. Make sure Bluetooth has been enabled on the cell phone before starting the
pairing process.
2. Touch the Phone icon on the Home Page.