2023 GMC YUKON DENALI wheel
[x] Cancel search: wheelPage 369 of 432
GMC Yukon/Yukon XL/Denali Owner Manual (GMNA-Localizing-U.S./
Canada/Mexico-16417394) - 2023 - CRC - 4/26/22
368 Vehicle Care
8. Hoist Shaft Access Hole
9. Spare Tire (Valve Stem Pointed Up)
10. Tire/Wheel Retainer
11. Hoist Cable
1. Put the tire (9) on the ground at the rearof the vehicle with the valve stem
pointed up, and to the rear.
2. Tilt the tire toward the vehicle. Separate the tire/wheel retainer from the guide
pin. Pull the pin through the center of
the wheel. Tilt the retainer down
through the center wheel opening.
Make sure the retainer is fully seated
across the underside of the wheel.
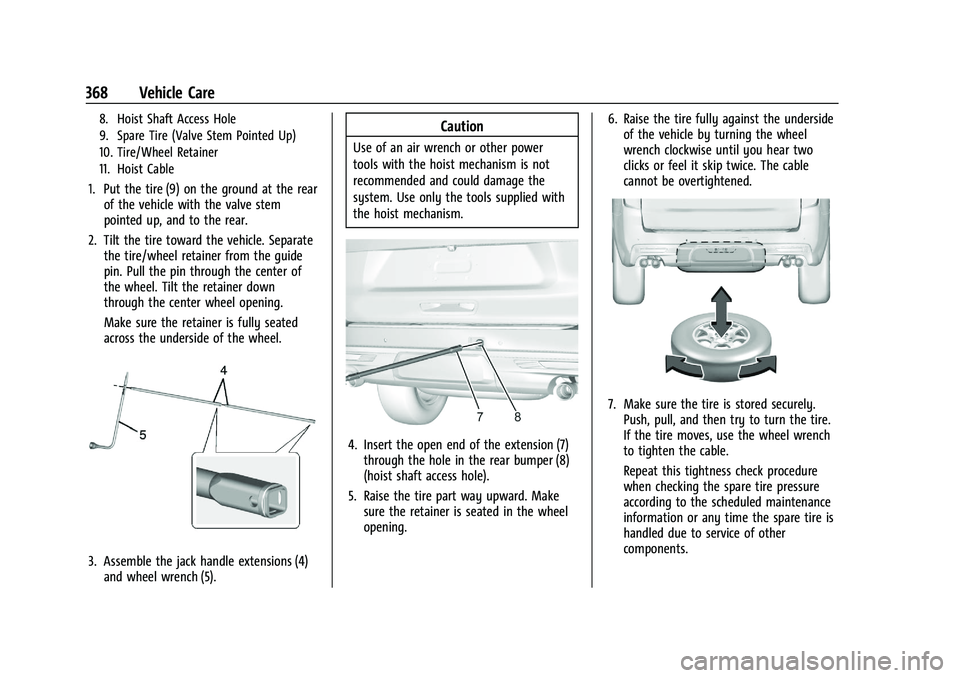
3. Assemble the jack handle extensions (4)and wheel wrench (5).
Caution
Use of an air wrench or other power
tools with the hoist mechanism is not
recommended and could damage the
system. Use only the tools supplied with
the hoist mechanism.
4. Insert the open end of the extension (7)through the hole in the rear bumper (8)
(hoist shaft access hole).
5. Raise the tire part way upward. Make sure the retainer is seated in the wheel
opening. 6. Raise the tire fully against the underside
of the vehicle by turning the wheel
wrench clockwise until you hear two
clicks or feel it skip twice. The cable
cannot be overtightened.
7. Make sure the tire is stored securely.Push, pull, and then try to turn the tire.
If the tire moves, use the wheel wrench
to tighten the cable.
Repeat this tightness check procedure
when checking the spare tire pressure
according to the scheduled maintenance
information or any time the spare tire is
handled due to service of other
components.
Page 370 of 432
GMC Yukon/Yukon XL/Denali Owner Manual (GMNA-Localizing-U.S./
Canada/Mexico-16417394) - 2023 - CRC - 4/26/22
Vehicle Care 369
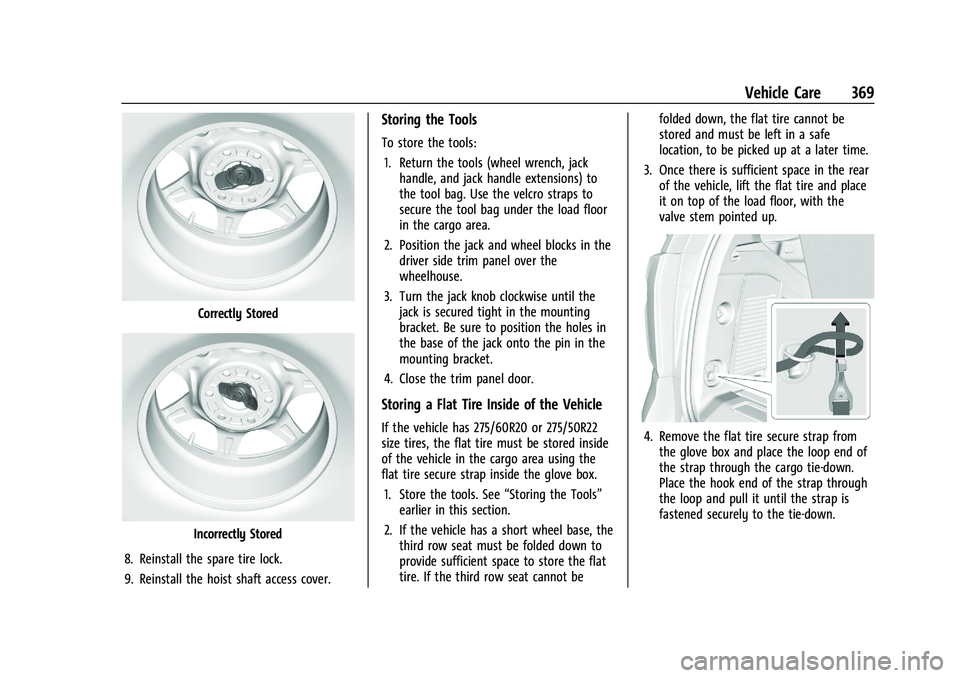
Correctly Stored
Incorrectly Stored
8. Reinstall the spare tire lock.
9. Reinstall the hoist shaft access cover.
Storing the Tools
To store the tools: 1. Return the tools (wheel wrench, jack handle, and jack handle extensions) to
the tool bag. Use the velcro straps to
secure the tool bag under the load floor
in the cargo area.
2. Position the jack and wheel blocks in the driver side trim panel over the
wheelhouse.
3. Turn the jack knob clockwise until the jack is secured tight in the mounting
bracket. Be sure to position the holes in
the base of the jack onto the pin in the
mounting bracket.
4. Close the trim panel door.
Storing a Flat Tire Inside of the Vehicle
If the vehicle has 275/60R20 or 275/50R22
size tires, the flat tire must be stored inside
of the vehicle in the cargo area using the
flat tire secure strap inside the glove box. 1. Store the tools. See “Storing the Tools”
earlier in this section.
2. If the vehicle has a short wheel base, the third row seat must be folded down to
provide sufficient space to store the flat
tire. If the third row seat cannot be folded down, the flat tire cannot be
stored and must be left in a safe
location, to be picked up at a later time.
3. Once there is sufficient space in the rear of the vehicle, lift the flat tire and place
it on top of the load floor, with the
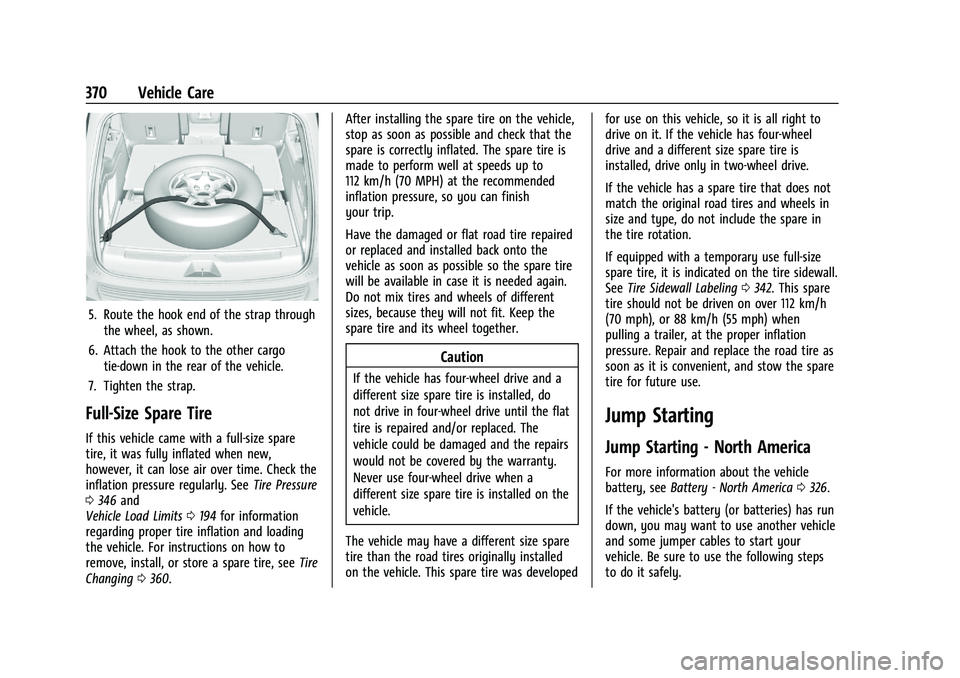
valve stem pointed up.4. Remove the flat tire secure strap from
the glove box and place the loop end of
the strap through the cargo tie-down.
Place the hook end of the strap through
the loop and pull it until the strap is
fastened securely to the tie-down.
Page 371 of 432
GMC Yukon/Yukon XL/Denali Owner Manual (GMNA-Localizing-U.S./
Canada/Mexico-16417394) - 2023 - CRC - 4/26/22
370 Vehicle Care
5. Route the hook end of the strap throughthe wheel, as shown.
6. Attach the hook to the other cargo tie-down in the rear of the vehicle.
7. Tighten the strap.
Full-Size Spare Tire
If this vehicle came with a full-size spare
tire, it was fully inflated when new,
however, it can lose air over time. Check the
inflation pressure regularly. See Tire Pressure
0 346 and
Vehicle Load Limits 0194 for information
regarding proper tire inflation and loading
the vehicle. For instructions on how to
remove, install, or store a spare tire, see Tire
Changing 0360. After installing the spare tire on the vehicle,
stop as soon as possible and check that the
spare is correctly inflated. The spare tire is
made to perform well at speeds up to
112 km/h (70 MPH) at the recommended
inflation pressure, so you can finish
your trip.
Have the damaged or flat road tire repaired
or replaced and installed back onto the
vehicle as soon as possible so the spare tire
will be available in case it is needed again.
Do not mix tires and wheels of different
sizes, because they will not fit. Keep the
spare tire and its wheel together.
Caution
If the vehicle has four-wheel drive and a
different size spare tire is installed, do
not drive in four-wheel drive until the flat
tire is repaired and/or replaced. The
vehicle could be damaged and the repairs
would not be covered by the warranty.
Never use four-wheel drive when a
different size spare tire is installed on the
vehicle.
The vehicle may have a different size spare
tire than the road tires originally installed
on the vehicle. This spare tire was developed for use on this vehicle, so it is all right to
drive on it. If the vehicle has four-wheel
drive and a different size spare tire is
installed, drive only in two-wheel drive.
If the vehicle has a spare tire that does not
match the original road tires and wheels in
size and type, do not include the spare in
the tire rotation.
If equipped with a temporary use full-size
spare tire, it is indicated on the tire sidewall.
See
Tire Sidewall Labeling 0342. This spare
tire should not be driven on over 112 km/h
(70 mph), or 88 km/h (55 mph) when
pulling a trailer, at the proper inflation
pressure. Repair and replace the road tire as
soon as it is convenient, and stow the spare
tire for future use.
Jump Starting
Jump Starting - North America
For more information about the vehicle
battery, see Battery - North America 0326.
If the vehicle's battery (or batteries) has run
down, you may want to use another vehicle
and some jumper cables to start your
vehicle. Be sure to use the following steps
to do it safely.
Page 373 of 432

GMC Yukon/Yukon XL/Denali Owner Manual (GMNA-Localizing-U.S./
Canada/Mexico-16417394) - 2023 - CRC - 4/26/22
372 Vehicle Care
The discharged battery positive (+) terminal
and the discharged battery negative (–)
grounding point are on the passenger side
of the vehicle.
The discharged battery positive (+) terminal
is under a cover. Open the cover to expose
the terminal.1. Check the other vehicle. It must have a 12-volt battery with a negative ground
system.
Caution
If the other vehicle does not have a
12-volt system with a negative ground,
both vehicles can be damaged. Only use
a vehicle that has a 12-volt system with a
negative ground for jump starting.
2. If you have a vehicle with a diesel engine with two batteries, you should
know before you begin that, especially in
cold weather, you may not be able to
get enough power from a single battery
in another vehicle to start your diesel
engine. If your vehicle has more than
one battery, using the battery that is
closer to the starter will reduce electrical resistance. This is located on the
passenger side, in the rear of the engine
compartment.
3. Get the vehicles close enough so the jumper cables can reach, but be sure the
vehicles are not touching each other.
If they are, it could cause an unwanted
ground connection. You would not be
able to start your vehicle, and the bad
grounding could damage the electrical
systems.
To avoid the possibility of the vehicles
rolling, set the parking brake firmly on
both vehicles involved in the jump start
procedure. Put an automatic transmission
in P (Park) or a manual transmission in
Neutral before setting the parking brake.
If you have a four-wheel-drive vehicle, be
sure the transfer case is in a drive gear,
not in N (Neutral).
Caution
If any accessories are left on or plugged
in during the jump starting procedure,
they could be damaged. The repairs
would not be covered by the vehicle
warranty. Whenever possible, turn off or
unplug all accessories on either vehicle
when jump starting. 4. Turn the ignition off on both vehicles.
Unplug unnecessary accessories plugged
into the accessory power outlets. Turn
off the radio and all the lamps that are
not needed. This will avoid sparks and
help save both batteries. And it could
save the radio!
5. Open the hood on the other vehicle and locate the positive (+) and negative (−)
terminal locations on that vehicle.
{Warning
An electric fan can start up even when
the engine is not running and can injure
you. Keep hands, clothing, and tools
away from any underhood electric fan.
{Warning
Using a match near a battery can cause
battery gas to explode. People have been
hurt doing this, and some have been
blinded. Use a flashlight if you need
more light.
(Continued)
Page 376 of 432
GMC Yukon/Yukon XL/Denali Owner Manual (GMNA-Localizing-U.S./
Canada/Mexico-16417394) - 2023 - CRC - 4/26/22
Vehicle Care 375
Recreational Vehicle Towing
Recreational vehicle towing means towing
the vehicle behind another vehicle, such as a
motor home. The two most common types
of recreational vehicle towing are dinghy
and dolly towing. Dinghy towing is towing
the vehicle with all four wheels on the
ground. Dolly towing is towing the vehicle
with two wheels on the ground and two
wheels on a dolly.
Follow the tow vehicle manufacturer’s
instructions. See your dealer or trailering
professional for additional advice and
equipment recommendations.
Here are some important things to consider
before recreational vehicle towing:
.Before towing the vehicle, become
familiar with the local laws that apply to
recreational vehicle towing. These laws
may vary by region.
.What is the towing capacity of the
towing vehicle? Be sure to read the tow
vehicle manufacturer's recommendations.
.What is the distance that will be
traveled? Some vehicles have restrictions
on how far and how long they can tow.
.Is the proper towing equipment going to
be used? See your dealer or trailering
professional for additional advice and
equipment recommendations.
.Is the vehicle ready to be towed? Just as
preparing the vehicle for a long trip,
make sure the vehicle is prepared to be
towed.
Caution
Use of a shield mounted in front of the
vehicle grille could restrict airflow and
cause damage to the transmission. The
repairs would not be covered by the
vehicle warranty. If using a shield, only
use one that attaches to the towing
vehicle.
Dinghy Towing
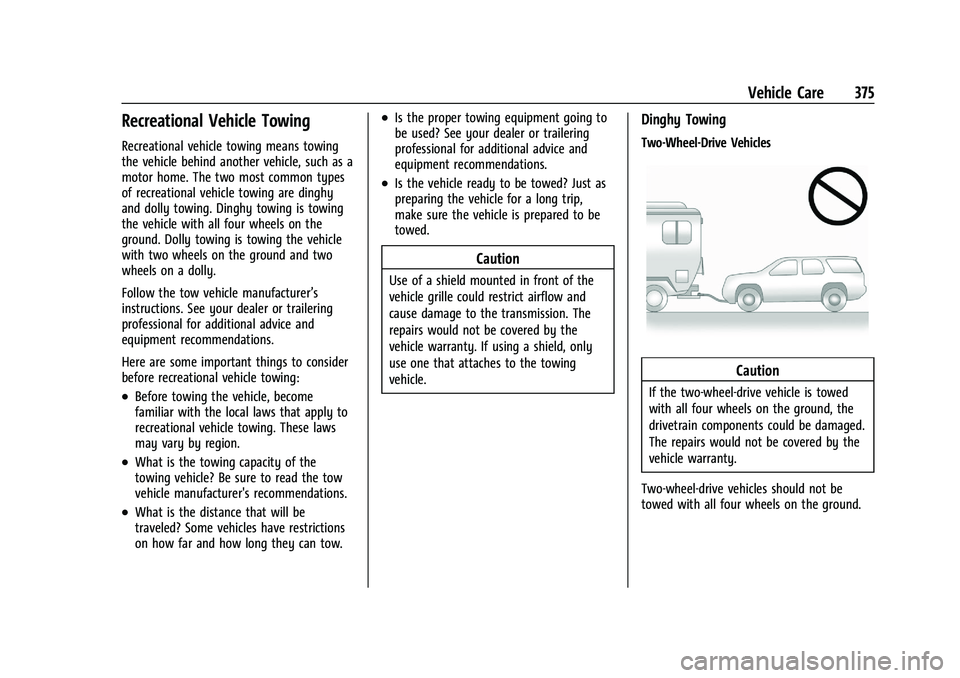
Two-Wheel-Drive Vehicles
Caution
If the two-wheel-drive vehicle is towed
with all four wheels on the ground, the
drivetrain components could be damaged.
The repairs would not be covered by the
vehicle warranty.
Two-wheel-drive vehicles should not be
towed with all four wheels on the ground.
Page 377 of 432

GMC Yukon/Yukon XL/Denali Owner Manual (GMNA-Localizing-U.S./
Canada/Mexico-16417394) - 2023 - CRC - 4/26/22
376 Vehicle Care
Four-Wheel-Drive Vehicles
Only dinghy tow four-wheel-drive vehicles
with a two speed transfer case that has an
N (Neutral) and a 4
nsetting.
{Warning
Shifting a four-wheel-drive vehicle's
transfer case into N (Neutral) can cause
the vehicle to roll even if the
transmission is in P (Park). You or others
could be injured. Set the parking brake
before shifting the transfer case to
N (Neutral).To dinghy tow:
1. Position the vehicle being towed behind the tow vehicle, facing forward and on a
level surface.
2. Securely attach the vehicle being towed to the tow vehicle.
3. Apply the parking brake and start the engine.
4. Shift the transfer case to N (Neutral). See “Shifting into N (Neutral)” under
Four-Wheel Drive 0208 for the proper
procedure. Check that the vehicle is in
N (Neutral) by shifting the transmission
to R (Reverse) and then to D (Drive).
There should be no movement of the
vehicle while shifting.
5. Shift the transmission to P (Park).Caution
Failure to tow the vehicle with the
transmission in P (Park) can cause
damage to the transmission.
6. Turn off the engine.
7. Place the vehicle in accessory mode by pressing the start button without
stepping on the brake pedal. 8. Release the parking brake only when you
are confident it is secured to tow vehicle
and will not roll.
Before going on to the next step, be
sure to take the mechanical key with
you. It will be needed to re-enter the
vehicle after the power is disconnected.
See “Drive Door Key Lock Cylinder
Access” underDoor Locks 015.
9. Disconnect the negative battery cable at the battery and secure the nut and bolt.
Cover the negative battery post with a
non-conductive material to prevent any
contact with the negative battery
terminal.
Caution
Failure to disconnect the negative battery
cable or to have it contact the terminals
can cause damage to the vehicle.
10. Move the steering wheel to make sure the steering column is unlocked.
Caution
If the steering column is locked, vehicle
damage may occur.
Page 378 of 432

GMC Yukon/Yukon XL/Denali Owner Manual (GMNA-Localizing-U.S./
Canada/Mexico-16417394) - 2023 - CRC - 4/26/22
Vehicle Care 377
11. Rock the vehicle to make sure theparking brake is not set and transfer case
is in N (Neutral).
Caution
Towing the vehicle with the parking
brake set can damage it. Always release
the parking brake prior to towing the
vehicle.
Disconnecting the Towed Vehicle
Before disconnecting the towed vehicle: 1. Park on a level surface.
2. Connect the battery.
3. Apply the brake pedal.
{Warning
The vehicle can roll when the brake pedal
is released. Always apply and hold the
brake pedal when setting the parking
brake. Make sure the parking brake is
fully engaged before releasing the brake
pedal.
4. Start the engine and shift the transfer case out of N (Neutral) to 2
m. See
“Shifting out of N (Neutral)” under
Four-Wheel Drive 0208. See your dealer
if the transfer case cannot be shifted out
of N (Neutral).
5. Check that the vehicle is in 2
mby
shifting the transmission to R (Reverse)
and then to D (Drive). There should be
movement of the vehicle while shifting.
6. Shift the transmission to P (Park) and turn off the vehicle.
7. Set the parking brake.
8. Release the parking brake.
9. Disconnect the vehicle from the tow vehicle.
10. Reset any lost presets. The outside temperature display will
default to 0 °C (32 °F) but will reset with
normal usage.
Dolly Towing
Page 379 of 432
GMC Yukon/Yukon XL/Denali Owner Manual (GMNA-Localizing-U.S./
Canada/Mexico-16417394) - 2023 - CRC - 4/26/22
378 Vehicle Care
Caution
Do not tow this vehicle with two wheels
on the ground, or vehicle damage could
occur. This damage would not be covered
by the vehicle warranty.
Dolly towing this vehicle is not allowed with
either the front or the rear tires on the
ground for two-wheel drive or four-wheel
drive, regardless of transfer case.
Appearance Care
Exterior Care
Locks
Locks are lubricated at the factory. Use a
de-icing agent only when absolutely
necessary, and have the locks greased after
using. See Recommended Fluids and
Lubricants 0392.
Washing the Vehicle
To preserve the vehicle finish, wash it often
and out of direct sunlight.
Caution
Do not use petroleum-based, acidic,
or abrasive cleaning agents as they can
damage the vehicle's paint, metal,
or plastic parts. If damage occurs, it
would not be covered by the vehicle
warranty. Approved cleaning products can
be obtained from your dealer. Follow all
manufacturer directions regarding correct
product usage, necessary safety
precautions, and appropriate disposal of
any vehicle care product.
Caution
Avoid using high-pressure washes closer
than 30 cm (12 in) to the surface of the
vehicle. Use of power washers exceeding
8 274 kPa (1,200 psi) can result in
damage or removal of paint and decals.
If using an automatic car wash, follow the
car wash instructions. The windshield wiper
and rear window wiper, if equipped, must
be off. Remove any accessories that may be
damaged or interfere with the car wash
equipment. Rinse the vehicle well, before washing and
after, to remove all cleaning agents
completely. Dried on cleaning agents may
stain the finish.
Dry the finish with a soft, clean chamois or
an all-cotton towel to avoid surface
scratches and water spotting.
Cleaning Underhood Components
Caution
Do not power wash any component
under the hood that has this
e
symbol.
This could cause damage that would not
be covered by the vehicle warranty.
Solvents or aggressive cleaners may harm
underhood components. The use of these
chemicals should be avoided.
Recommend water only.
If a pressure washer is used, use with care.
The following criteria must be followed:
.Water pressure must be kept below
14,000 KPa (2,000 PSI).
.Water temperature must be below 80 °C
(180 °F).