2023 GMC SIERRA seats
[x] Cancel search: seatsPage 23 of 430

GMC Sierra/Sierra Denali 2500 HD/3500 HD Owner Manual (GMNA-
Localizing-U.S./Canada-16504257) - 2023 - CRC - 5/9/22
22 Keys, Doors, and Windows
2. Insert a flat, thin object in the center ofthe transmitter to separate and remove
the back cover.
3. Lift the battery with a flat object.
4. Remove the battery.
5. Insert the new battery, positive sidetoward the back cover. Replace with a
CR2032 or equivalent battery.
6. Ensure that the silicone mat is correctly positioned with no gaps or wrinkles.
7. Set transmitter button side down on a hard surface and press the other half
straight down to force the halves
together.
8. Insert the key back into the RKE transmitter.
Remote Vehicle Start
If equipped with the remote start feature,
the climate control system will come on
when the vehicle is started remotely,
depending on the outside temperature.
The rear defog and heated and ventilated
seats, if equipped, may also come on. See
Heated and Ventilated Front Seats 056. To
view available settings for this feature,
touch the Settings icon on the infotainment
home page. Select “Vehicle”to display the
list of available options and select “Comfort
and Convenience”.
If equipped, the automatic heated steering
wheel may also come on. See Heated
Steering Wheel 0105.
Laws in some communities may restrict the
use of remote starters. Check local
regulations for any requirements on remote
starting of vehicles.
Do not use remote start if the vehicle is low
on fuel. The vehicle may run out of fuel.
The vehicle cannot be remote started if:
.The RKE transmitter is inside the vehicle
or if the key is in the ignition.
.The hood is not closed.
.There is an emission control system
malfunction and the lamp is on.
.The ignition is in any mode other
than off.
.The hazard warning flashers are on.
.Two remote starts or a remote start with
an extension have been used.
.The vehicle is not in P (Park).
The engine will turn off during a remote
vehicle start if:
.The coolant temperature gets too high.
.The oil pressure gets low.
The RKE transmitter range may be reduced
while the vehicle is running.
Other conditions can affect the performance
of the transmitter. See Remote Keyless Entry
(RKE) System 012.
Starting the Engine Using Remote Start
1. Press and release
Q.
2. Immediately press and hold
/until the
turn signal lamps flash or for at least
four seconds.
When the vehicle starts, the parking
lamps will turn on. The doors will be
locked and the climate control system
may come on.
Page 39 of 430
GMC Sierra/Sierra Denali 2500 HD/3500 HD Owner Manual (GMNA-
Localizing-U.S./Canada-16504257) - 2023 - CRC - 5/9/22
38 Keys, Doors, and Windows
If a popping noise from the mirror is heard,
this sound is normal as the manual detents
are aligning after a manual extend/retract
operation has occurred.
Auxiliary Cargo Mirror Lamps
If equipped, cargo mirror lamps face
rearward to provide more light on the sides
of the vehicle, if needed. SeeExterior Cargo
Lamps 0144.
Advanced Trailering Vision System Side
Cameras
If equipped, the Advanced Trailering Vision
System side cameras are on the bottom of
the outside mirrors. See “Surround Vision
(360 Degrees)” underAssistance Systems for
Parking or Backing 0248.Power Mirrors
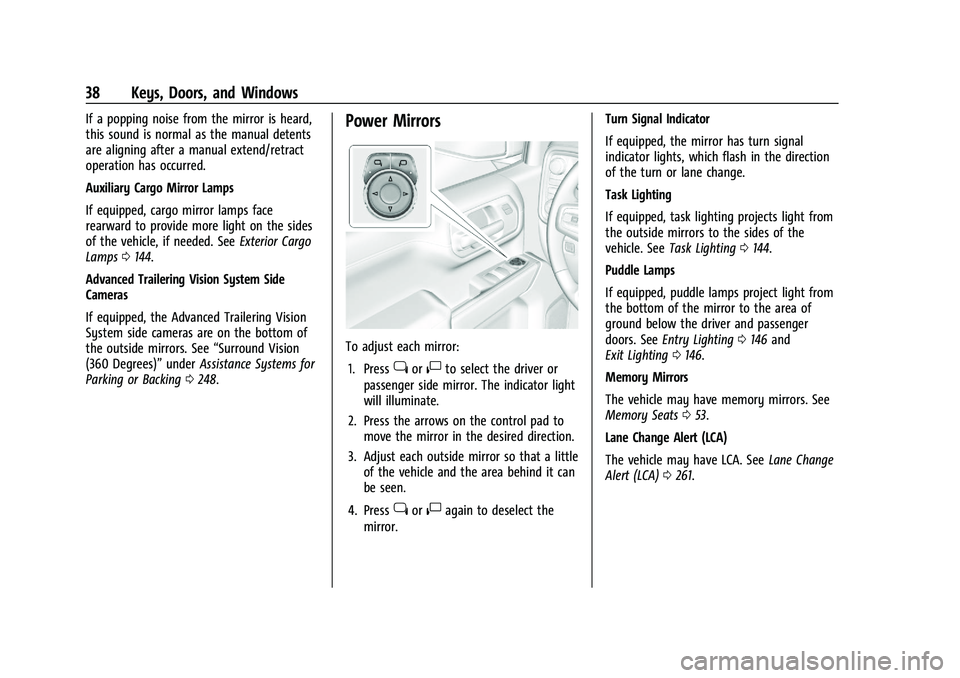
To adjust each mirror:
1. Press
jor|to select the driver or
passenger side mirror. The indicator light
will illuminate.
2. Press the arrows on the control pad to move the mirror in the desired direction.
3. Adjust each outside mirror so that a little of the vehicle and the area behind it can
be seen.
4. Press
jor|again to deselect the
mirror. Turn Signal Indicator
If equipped, the mirror has turn signal
indicator lights, which flash in the direction
of the turn or lane change.
Task Lighting
If equipped, task lighting projects light from
the outside mirrors to the sides of the
vehicle. See
Task Lighting 0144.
Puddle Lamps
If equipped, puddle lamps project light from
the bottom of the mirror to the area of
ground below the driver and passenger
doors. See Entry Lighting 0146 and
Exit Lighting 0146.
Memory Mirrors
The vehicle may have memory mirrors. See
Memory Seats 053.
Lane Change Alert (LCA)
The vehicle may have LCA. See Lane Change
Alert (LCA) 0261.
Page 41 of 430
GMC Sierra/Sierra Denali 2500 HD/3500 HD Owner Manual (GMNA-
Localizing-U.S./Canada-16504257) - 2023 - CRC - 5/9/22
40 Keys, Doors, and Windows
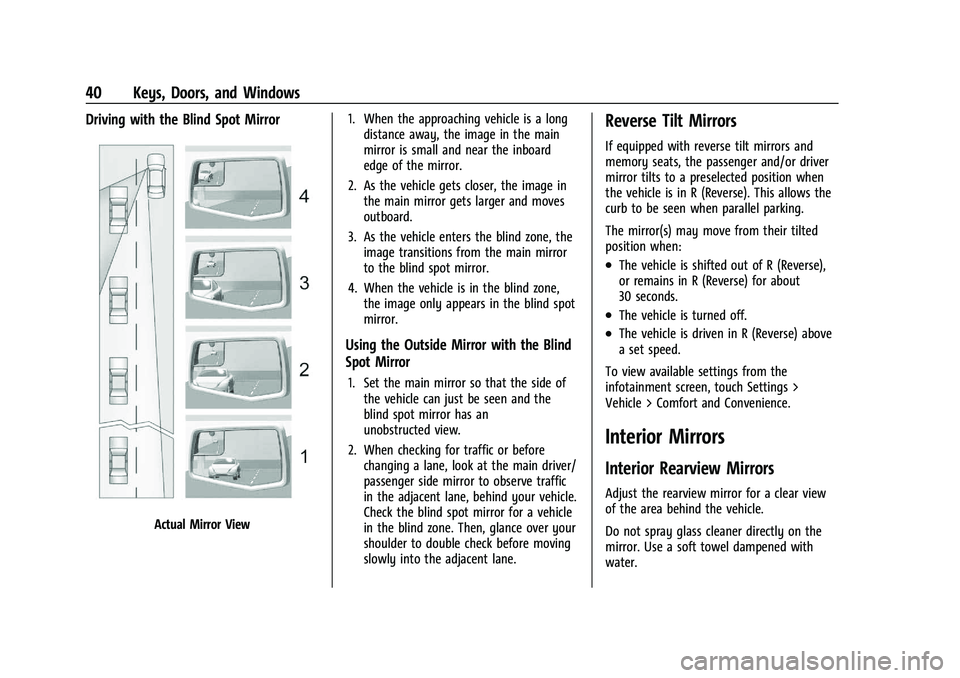
Driving with the Blind Spot Mirror
Actual Mirror View1. When the approaching vehicle is a long
distance away, the image in the main
mirror is small and near the inboard
edge of the mirror.
2. As the vehicle gets closer, the image in the main mirror gets larger and moves
outboard.
3. As the vehicle enters the blind zone, the image transitions from the main mirror
to the blind spot mirror.
4. When the vehicle is in the blind zone, the image only appears in the blind spot
mirror.
Using the Outside Mirror with the Blind
Spot Mirror
1. Set the main mirror so that the side ofthe vehicle can just be seen and the
blind spot mirror has an
unobstructed view.
2. When checking for traffic or before changing a lane, look at the main driver/
passenger side mirror to observe traffic
in the adjacent lane, behind your vehicle.
Check the blind spot mirror for a vehicle
in the blind zone. Then, glance over your
shoulder to double check before moving
slowly into the adjacent lane.
Reverse Tilt Mirrors
If equipped with reverse tilt mirrors and
memory seats, the passenger and/or driver
mirror tilts to a preselected position when
the vehicle is in R (Reverse). This allows the
curb to be seen when parallel parking.
The mirror(s) may move from their tilted
position when:
.The vehicle is shifted out of R (Reverse),
or remains in R (Reverse) for about
30 seconds.
.The vehicle is turned off.
.The vehicle is driven in R (Reverse) above
a set speed.
To view available settings from the
infotainment screen, touch Settings >
Vehicle > Comfort and Convenience.
Interior Mirrors
Interior Rearview Mirrors
Adjust the rearview mirror for a clear view
of the area behind the vehicle.
Do not spray glass cleaner directly on the
mirror. Use a soft towel dampened with
water.
Page 50 of 430
GMC Sierra/Sierra Denali 2500 HD/3500 HD Owner Manual (GMNA-
Localizing-U.S./Canada-16504257) - 2023 - CRC - 5/9/22
Seats and Restraints 49
Seats and Restraints
Head Restraints
Head Restraints . . . . . . . . . . . . . . . . . . . . . . . . 49
Front Seats
Seat Adjustment . . . . . . . . . . . . . . . . . . . . . . . 50
Center Seat . . . . . . . . . . . . . . . . . . . . . . . . . . . . . 51
Power Seat Adjustment . . . . . . . . . . . . . . . . . 51
Reclining Seatbacks . . . . . . . . . . . . . . . . . . . . . 52
Lumbar Adjustment . . . . . . . . . . . . . . . . . . . . . 53
Memory Seats . . . . . . . . . . . . . . . . . . . . . . . . . . 53
Heated and Ventilated Front Seats . . . . . 56
Rear Seats
Rear Seats . . . . . . . . . . . . . . . . . . . . . . . . . . . . . . 57
Heated Rear Seats . . . . . . . . . . . . . . . . . . . . . . 58
Seat Belts
Seat Belts . . . . . . . . . . . . . . . . . . . . . . . . . . . . . . 58
How to Wear Seat Belts Properly . . . . . . 59
Lap-Shoulder Belt . . . . . . . . . . . . . . . . . . . . . . . 61
Seat Belt Use During Pregnancy . . . . . . . . 64
Seat Belt Extender . . . . . . . . . . . . . . . . . . . . . 64
Safety System Check . . . . . . . . . . . . . . . . . . . 64
Seat Belt Care . . . . . . . . . . . . . . . . . . . . . . . . . . 64
Replacing Seat Belt System Parts after aCrash . . . . . . . . . . . . . . . . . . . . . . . . . . . . . . . . . 65
Airbag System
Airbag System . . . . . . . . . . . . . . . . . . . . . . . . . . 65 Where Are the Airbags? . . . . . . . . . . . . . . . . 67
When Should an Airbag Inflate? . . . . . . . . 68
What Makes an Airbag Inflate? . . . . . . . . 68
How Does an Airbag Restrain? . . . . . . . . . 69
What Will You See after an Airbag
Inflates? . . . . . . . . . . . . . . . . . . . . . . . . . . . . . . 69
Passenger Sensing System . . . . . . . . . . . . . 70
Servicing the Airbag-Equipped Vehicle . . . . . . . . . . . . . . . . . . . . . . . . . . . . . . . . 73
Adding Equipment to the Airbag-Equipped Vehicle . . . . . . . . . . . . . . 74
Airbag System Check . . . . . . . . . . . . . . . . . . . 75
Replacing Airbag System Parts after a Crash . . . . . . . . . . . . . . . . . . . . . . . . . . . . . . . . . 75
Child Restraints
Older Children . . . . . . . . . . . . . . . . . . . . . . . . . . 75
Infants and Young Children . . . . . . . . . . . . . 77
Child Restraint Systems . . . . . . . . . . . . . . . . 79
Where to Put the Restraint . . . . . . . . . . . . 80
Lower Anchors and Tethers for Children(LATCH System) . . . . . . . . . . . . . . . . . . . . . . . 82
Replacing LATCH System Parts After a Crash . . . . . . . . . . . . . . . . . . . . . . . . . . . . . . . . . 92
Securing Child Restraints (With the Seat Belt in the Rear Seat) . . . . . . . . . . . . . . . . . 92
Securing Child Restraints (With the Seat Belt in the Front Passenger Seat) . . . . . 96
Securing Child Restraints (With the Seat Belt in the Center Front Seat) . . . . . . . . 99
Head Restraints
{
Warning
With head restraints that are not
installed and adjusted properly, there is a
greater chance that occupants will suffer
a neck/spinal injury in a crash. Do not
drive until the head restraints for all
occupants are installed and adjusted
properly.
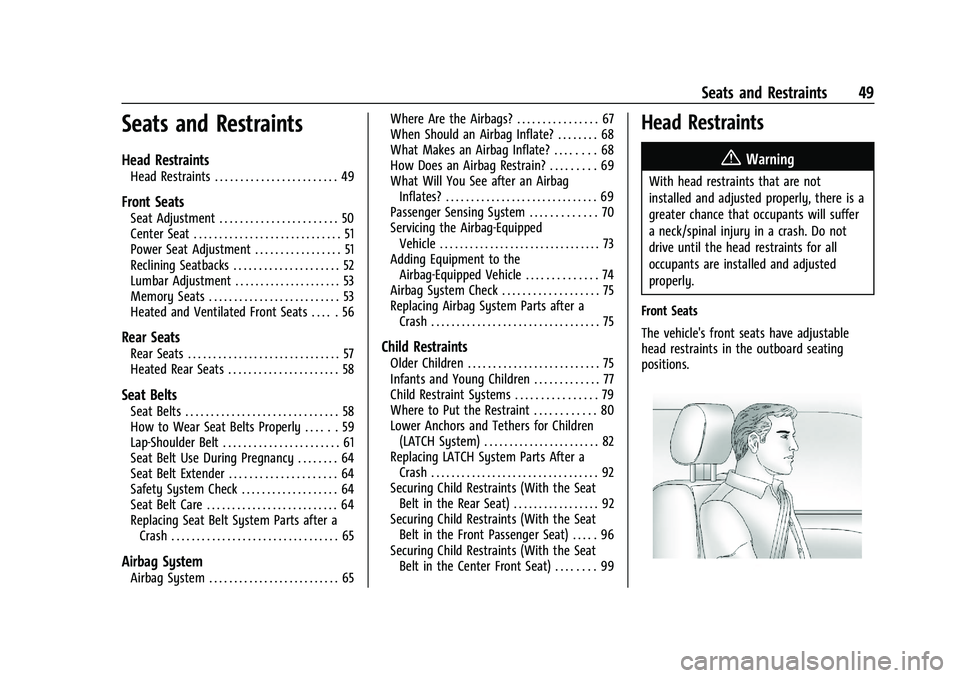
Front Seats
The vehicle's front seats have adjustable
head restraints in the outboard seating
positions.
Page 51 of 430

GMC Sierra/Sierra Denali 2500 HD/3500 HD Owner Manual (GMNA-
Localizing-U.S./Canada-16504257) - 2023 - CRC - 5/9/22
50 Seats and Restraints
Adjust the head restraint so that the top of
the restraint is at the same height as the
top of the occupant's head. This position
reduces the chance of a neck injury in a
crash.
To raise or lower the head restraint, press
the button on the side of the head restraint
and pull up or push the head restraint down
and release the button.
Pull and push on the head restraint after the
button is released to make sure that it is
locked in place.
The front seat outboard head restraints are
not removable.
Rear Head Restraints
The vehicle’s rear seat has head restraints in
the outboard seating positions that cannot
be adjusted.
The head restraint can be folded forward to
allow for better visibility when the rear seat
is unoccupied. To fold the head restraint,
press the button on the side of the head
restraint.
When an occupant is in the seat, always
return the head restraint to the upright
position until it locks into place. Push and
pull on the head restraint to make sure that
it is locked.If you are installing a child restraint in the
rear seat, see
Lower Anchors and Tethers for
Children (LATCH System) 082.
Center Headrest
The vehicle’s rear seat may be equipped
with a headrest in the center seating
position that cannot be adjusted.
If you are installing a child restraint in the
rear seat, see Lower Anchors and Tethers for
Children (LATCH System) 082.
Front Seats
Seat Adjustment
{Warning
You can lose control of the vehicle if you
try to adjust a driver seat while the
vehicle is moving. Adjust the driver seat
only when the vehicle is not moving.
Page 52 of 430
GMC Sierra/Sierra Denali 2500 HD/3500 HD Owner Manual (GMNA-
Localizing-U.S./Canada-16504257) - 2023 - CRC - 5/9/22
Seats and Restraints 51
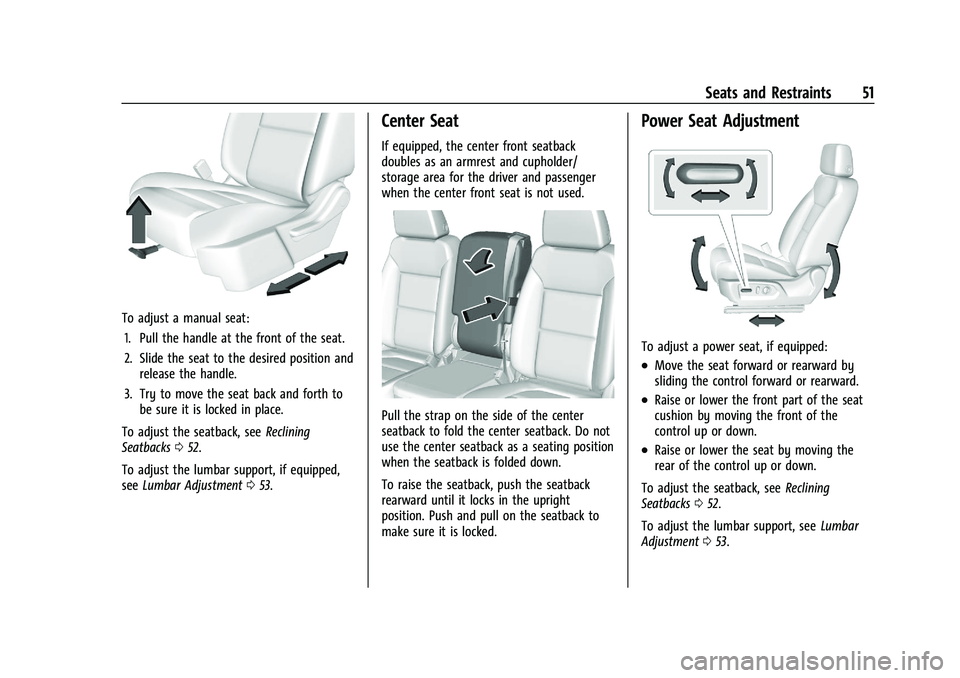
To adjust a manual seat:1. Pull the handle at the front of the seat.
2. Slide the seat to the desired position and release the handle.
3. Try to move the seat back and forth to be sure it is locked in place.
To adjust the seatback, see Reclining
Seatbacks 052.
To adjust the lumbar support, if equipped,
see Lumbar Adjustment 053.
Center Seat
If equipped, the center front seatback
doubles as an armrest and cupholder/
storage area for the driver and passenger
when the center front seat is not used.
Pull the strap on the side of the center
seatback to fold the center seatback. Do not
use the center seatback as a seating position
when the seatback is folded down.
To raise the seatback, push the seatback
rearward until it locks in the upright
position. Push and pull on the seatback to
make sure it is locked.
Power Seat Adjustment
To adjust a power seat, if equipped:
.Move the seat forward or rearward by
sliding the control forward or rearward.
.Raise or lower the front part of the seat
cushion by moving the front of the
control up or down.
.Raise or lower the seat by moving the
rear of the control up or down.
To adjust the seatback, see Reclining
Seatbacks 052.
To adjust the lumbar support, see Lumbar
Adjustment 053.
Page 53 of 430
GMC Sierra/Sierra Denali 2500 HD/3500 HD Owner Manual (GMNA-
Localizing-U.S./Canada-16504257) - 2023 - CRC - 5/9/22
52 Seats and Restraints
Some vehicles are equipped with a feature
that activates a vibrating pulse alert in the
driver seat to help the driver avoid crashes.
SeeDriver Assistance Systems 0246.
Reclining Seatbacks
{Warning
Sitting in a reclined position when the
vehicle is in motion can be dangerous.
Even when buckled up, the seat belts
cannot do their job.
The shoulder belt will not be against
your body. Instead, it will be in front of
you. In a crash, you could go into it,
receiving neck or other injuries.
The lap belt could go up over your
abdomen. The belt forces would be there,
not at your pelvic bones. This could cause
serious internal injuries.
For proper protection when the vehicle is
in motion, have the seatback upright.
Then sit well back in the seat and wear
the seat belt properly.
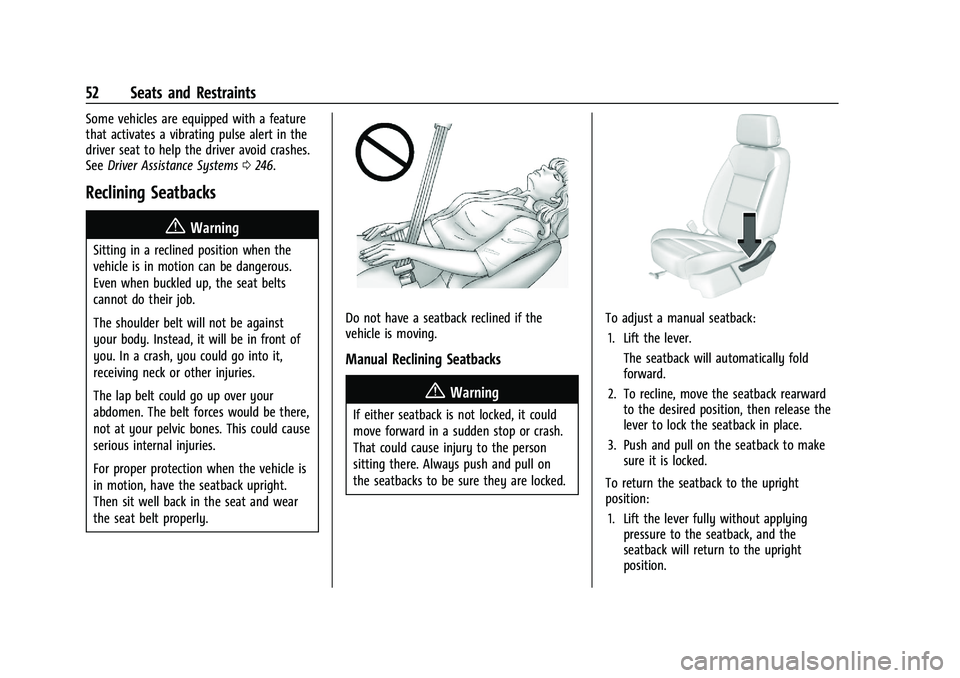
Do not have a seatback reclined if the
vehicle is moving.
Manual Reclining Seatbacks
{Warning
If either seatback is not locked, it could
move forward in a sudden stop or crash.
That could cause injury to the person
sitting there. Always push and pull on
the seatbacks to be sure they are locked.
To adjust a manual seatback:
1. Lift the lever. The seatback will automatically fold
forward.
2. To recline, move the seatback rearward to the desired position, then release the
lever to lock the seatback in place.
3. Push and pull on the seatback to make sure it is locked.
To return the seatback to the upright
position: 1. Lift the lever fully without applying pressure to the seatback, and the
seatback will return to the upright
position.
Page 54 of 430

GMC Sierra/Sierra Denali 2500 HD/3500 HD Owner Manual (GMNA-
Localizing-U.S./Canada-16504257) - 2023 - CRC - 5/9/22
Seats and Restraints 53
2. Push and pull on the seatback to makesure it is locked.
Power Reclining Seatbacks
To recline a power seatback, if equipped:
.Tilt the top of the control rearward to
recline.
.Tilt the top of the control forward to
raise.
Lumbar Adjustment
Power Lumbar
To adjust the lumbar support, if equipped:
.Press and hold the control forward to
increase or rearward to decrease upper
and lower lumbar support at the
same time.
Memory Seats
Overview
If equipped, the memory seat feature allows
drivers to save their unique driving positions
and a shared exit position. See “Saving
Seating Positions” later in this section. The
saved positions can be recalled manually by
all drivers, see “Manually Recalling Seating
Positions” later in this section, and drivers
with remote key 1 and 2 can also recall
them automatically. See “Auto Seat Entry
Memory Recall” or“Auto Seat Exit Memory
Recall” later in this section. To enable
automatic recalls, turn on Seat Entry
Memory and/or Seat Exit Memory. See
“Enabling Automatic Recalls” later in this