2023 FORD MAVERICK flat tire
[x] Cancel search: flat tirePage 359 of 556
WARNING: Make sure that thewheels are pointing straight ahead.
WARNING: Make sure that yourvehicle is on firm and level ground withthe front wheels pointing straight aheadand set up a warning triangle if available.
WARNING: Only use replacementtires and wheels that are the same size,load index, speed rating, and type asthose originally provided for your vehicle.The recommended tire and wheel sizescan be found on the Tire Label on thedriver side door frame or the edge of thedriver door. If this information is notfound in those locations, or for additionaloptions, contact your authorized dealer.Use of any tire or wheel notrecommended, could affect the safetyand performance of your vehicle, whichcould result in an increased risk of lossof vehicle control, vehicle rollover,personal injury and death.
WARNING: Do not fit run flat tireson vehicles that were not originally fittedwith them. See an authorized dealer formore details about compatibility.
WARNING: Make sure there is nogrease or oil on the threads or thesurface between the wheel studs andthe wheel nuts. This can cause the wheelnuts to loosen while driving.
WARNING: Have the wheel nutschecked for tightness and the tirepressure checked as soon as possible.
WARNING: Do not install alloywheels using wheel nuts designed foruse with steel wheels.
Dissimilar Spare Wheel and TireAssembly Information
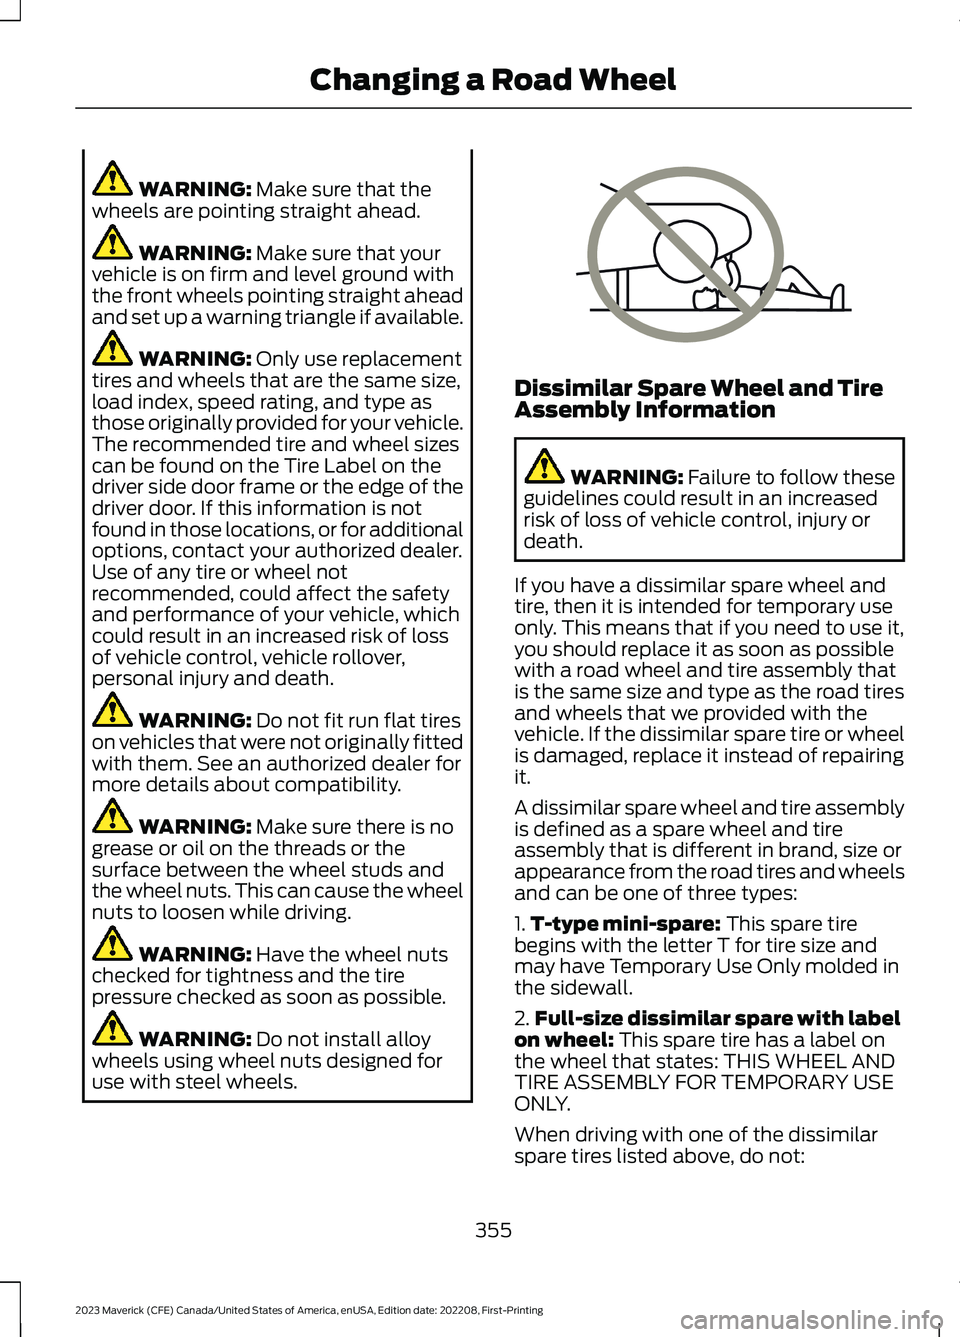
WARNING: Failure to follow theseguidelines could result in an increasedrisk of loss of vehicle control, injury ordeath.
If you have a dissimilar spare wheel andtire, then it is intended for temporary useonly. This means that if you need to use it,you should replace it as soon as possiblewith a road wheel and tire assembly thatis the same size and type as the road tiresand wheels that we provided with thevehicle. If the dissimilar spare tire or wheelis damaged, replace it instead of repairingit.
A dissimilar spare wheel and tire assemblyis defined as a spare wheel and tireassembly that is different in brand, size orappearance from the road tires and wheelsand can be one of three types:
1.T-type mini-spare: This spare tirebegins with the letter T for tire size andmay have Temporary Use Only molded inthe sidewall.
2.Full-size dissimilar spare with labelon wheel: This spare tire has a label onthe wheel that states: THIS WHEEL ANDTIRE ASSEMBLY FOR TEMPORARY USEONLY.
When driving with one of the dissimilarspare tires listed above, do not:
355
2023 Maverick (CFE) Canada/United States of America, enUSA, Edition date: 202208, First-PrintingChanging a Road WheelE166722
Page 362 of 556
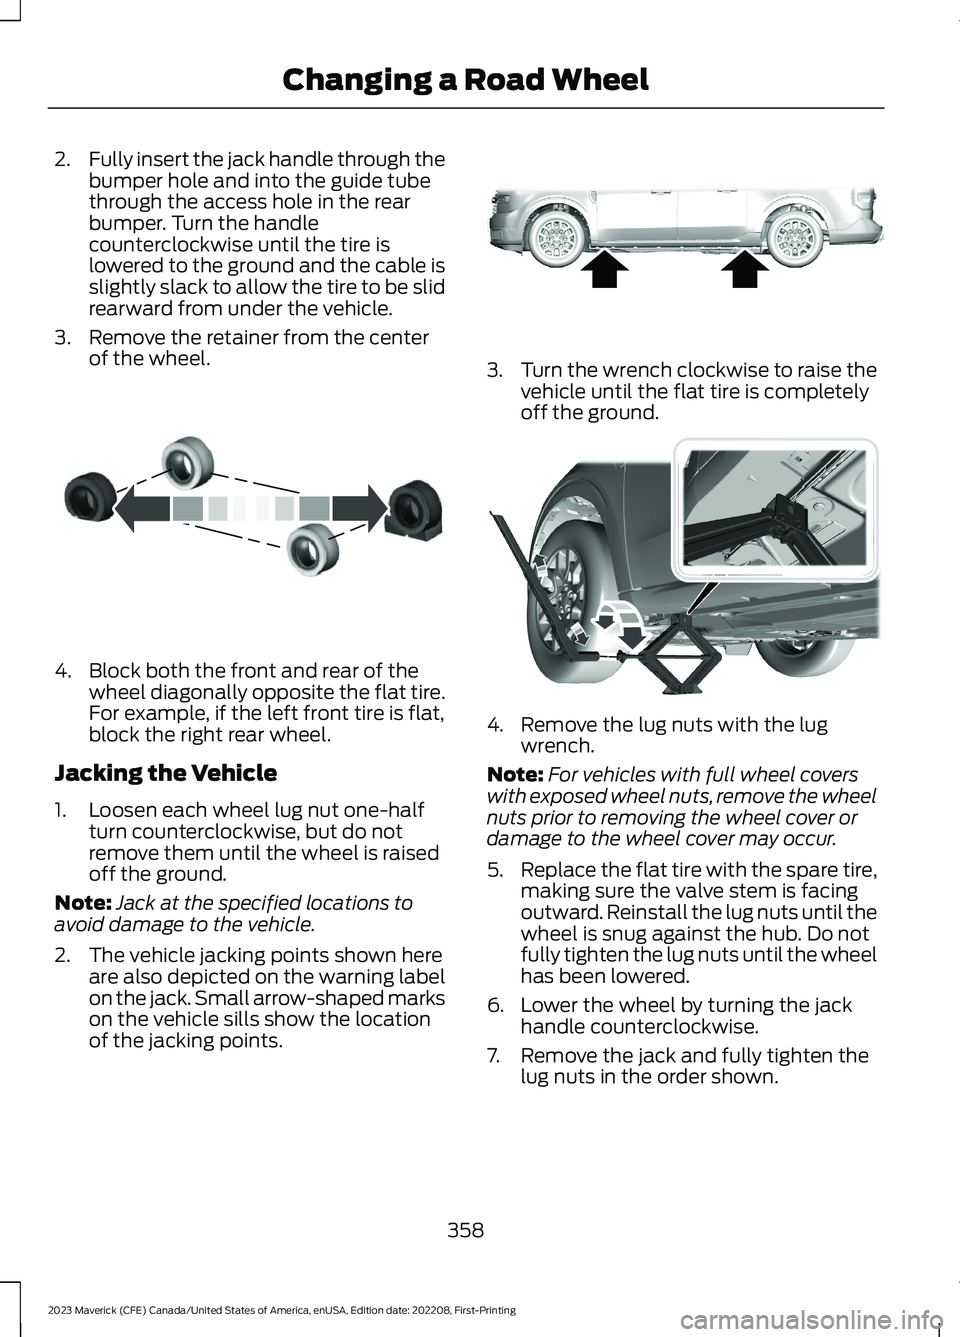
2.Fully insert the jack handle through thebumper hole and into the guide tubethrough the access hole in the rearbumper. Turn the handlecounterclockwise until the tire islowered to the ground and the cable isslightly slack to allow the tire to be slidrearward from under the vehicle.
3.Remove the retainer from the centerof the wheel.
4.Block both the front and rear of thewheel diagonally opposite the flat tire.For example, if the left front tire is flat,block the right rear wheel.
Jacking the Vehicle
1.Loosen each wheel lug nut one-halfturn counterclockwise, but do notremove them until the wheel is raisedoff the ground.
Note:Jack at the specified locations toavoid damage to the vehicle.
2.The vehicle jacking points shown hereare also depicted on the warning labelon the jack. Small arrow-shaped markson the vehicle sills show the locationof the jacking points.
3.Turn the wrench clockwise to raise thevehicle until the flat tire is completelyoff the ground.
4.Remove the lug nuts with the lugwrench.
Note:For vehicles with full wheel coverswith exposed wheel nuts, remove the wheelnuts prior to removing the wheel cover ordamage to the wheel cover may occur.
5.Replace the flat tire with the spare tire,making sure the valve stem is facingoutward. Reinstall the lug nuts until thewheel is snug against the hub. Do notfully tighten the lug nuts until the wheelhas been lowered.
6.Lower the wheel by turning the jackhandle counterclockwise.
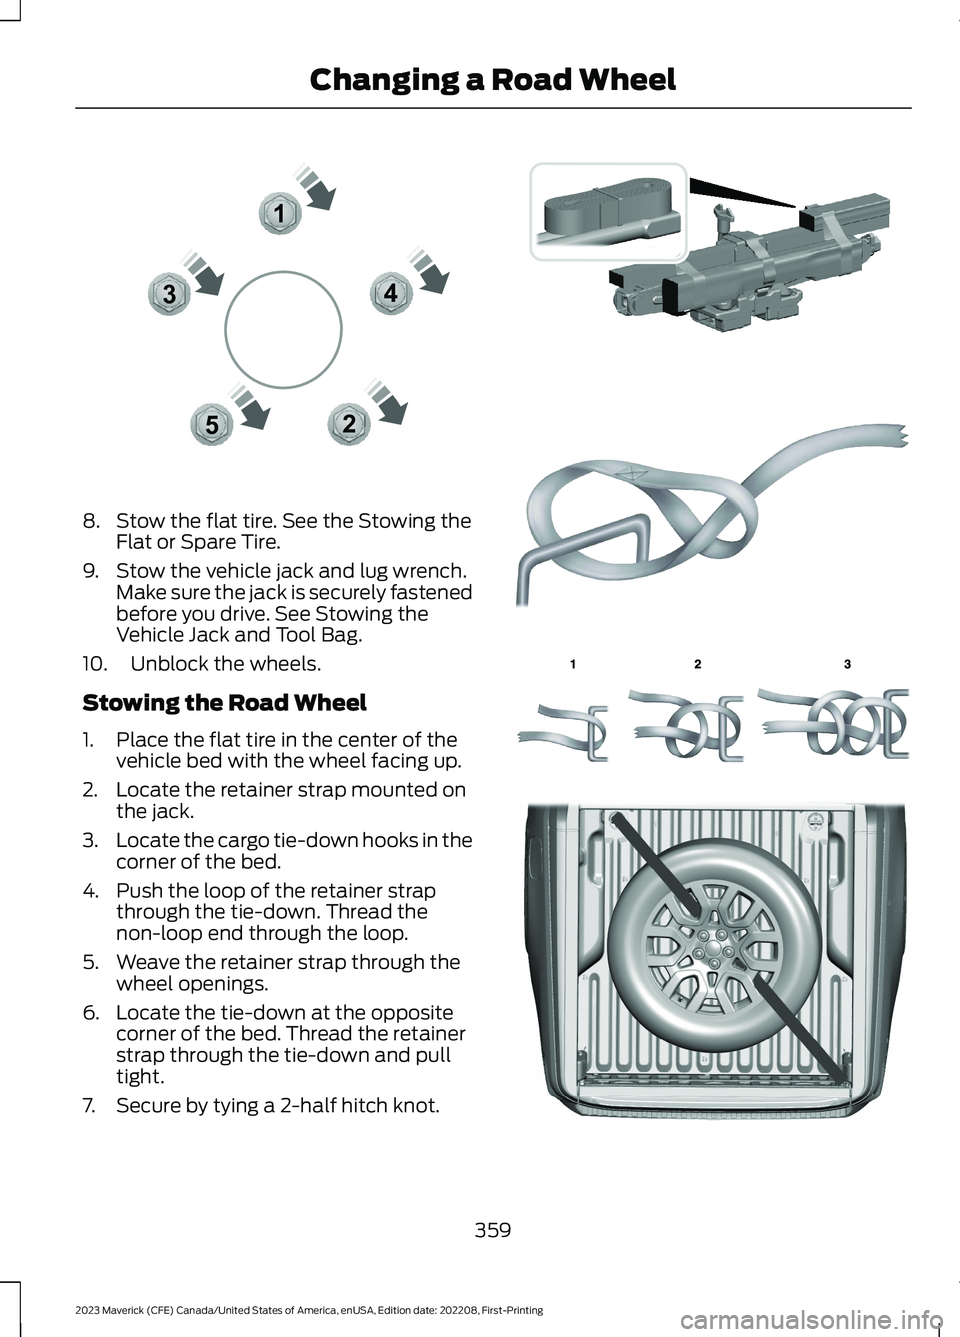
7.Remove the jack and fully tighten thelug nuts in the order shown.
358
2023 Maverick (CFE) Canada/United States of America, enUSA, Edition date: 202208, First-PrintingChanging a Road WheelE175447 E352156 E352182
Page 363 of 556
8.Stow the flat tire. See the Stowing theFlat or Spare Tire.
9.Stow the vehicle jack and lug wrench.Make sure the jack is securely fastenedbefore you drive. See Stowing theVehicle Jack and Tool Bag.
10.Unblock the wheels.
Stowing the Road Wheel
1.Place the flat tire in the center of thevehicle bed with the wheel facing up.
2.Locate the retainer strap mounted onthe jack.
3.Locate the cargo tie-down hooks in thecorner of the bed.
4.Push the loop of the retainer strapthrough the tie-down. Thread thenon-loop end through the loop.
5.Weave the retainer strap through thewheel openings.
6.Locate the tie-down at the oppositecorner of the bed. Thread the retainerstrap through the tie-down and pulltight.
7.Secure by tying a 2-half hitch knot.
359
2023 Maverick (CFE) Canada/United States of America, enUSA, Edition date: 202208, First-PrintingChanging a Road Wheel12345E306781 E355266 E142906 E143746 E355267
Page 364 of 556
Stowing the Spare Tire
Note:Failure to follow the spare tirestowage instructions could result in failureof the cable or loss of the spare tire.
1.Lay the tire on the ground with thevalve stem facing down.
2.Slide the wheel partially under thevehicle and install the retainer throughthe wheel center. Pull on the cable toalign the components at the end of thecable.
3.Turn the jack handle clockwise untilthe tire is raised to its stowed positionunderneath the vehicle. The effort toturn the jack handle increasessignificantly and the spare tire carrierratchets or slips when the tire is raisedto the maximum tightness. Tighten tothe point where the ratchet or slipoccurs, a minimum of three times asindicated by an audible click each time.The spare tire carrier does not allowyou to overtighten. If the spare tirecarrier ratchets or slips with little effort,contact your authorized dealer.
4.Check that the tire lies flat against theframe and is properly tightened. Try topush or pull, then turn the tire to besure it does not move. Loosen andretighten, if necessary. Failure toproperly stow the spare tire couldresult in failure of the winch cable andloss of the tire.
5.Repeat this tightness check procedurewhen servicing the spare tire pressure,every six months, as per your scheduledmaintenance information, or at anytime that the spare tire is disturbedthrough service of other components.
Stowing the Vehicle Jack and ToolBag
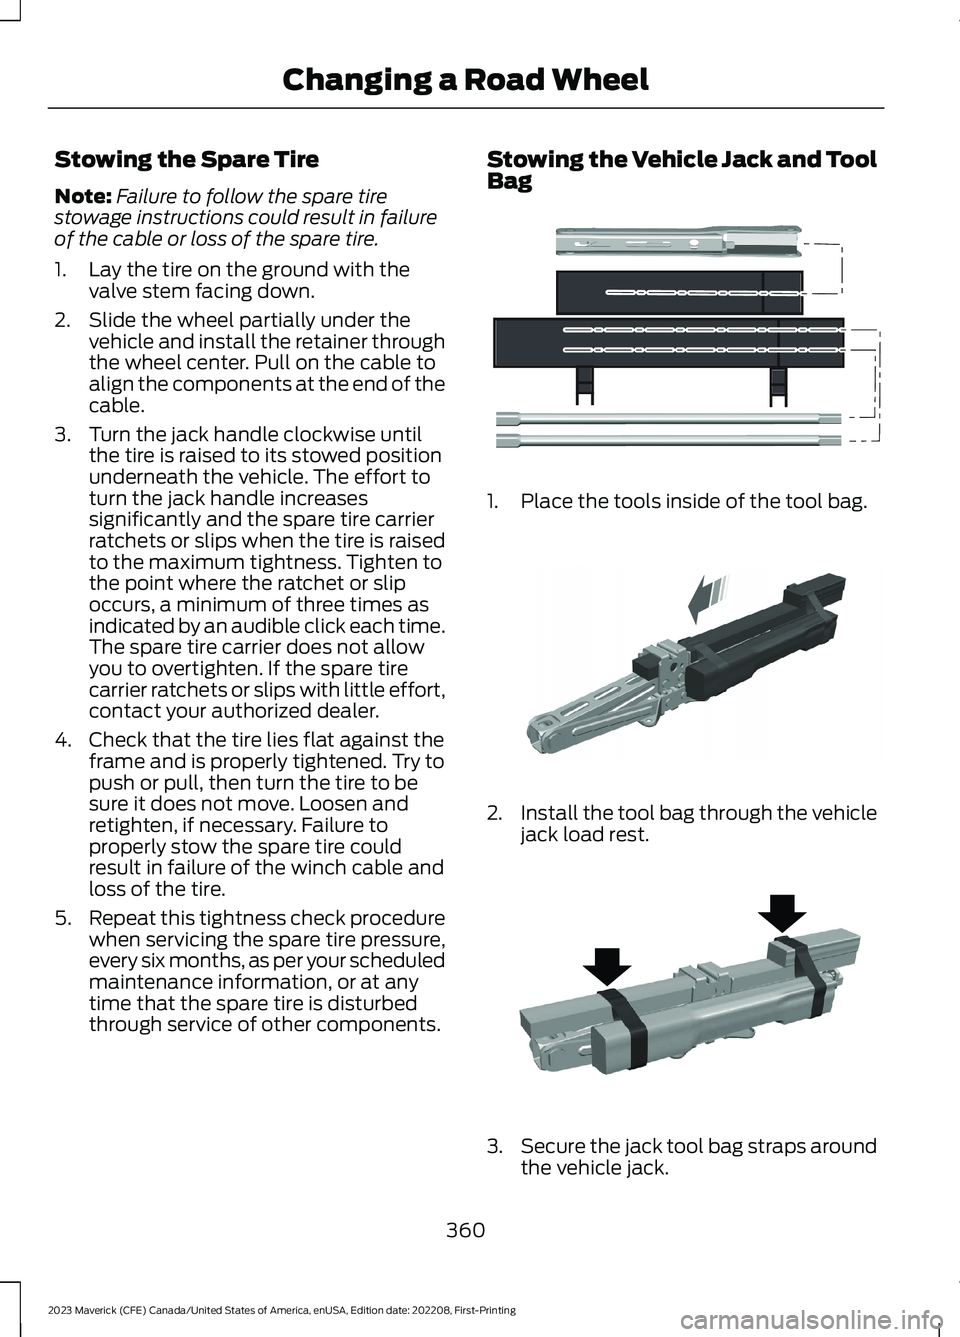
1.Place the tools inside of the tool bag.
2.Install the tool bag through the vehiclejack load rest.
3.Secure the jack tool bag straps aroundthe vehicle jack.
360
2023 Maverick (CFE) Canada/United States of America, enUSA, Edition date: 202208, First-PrintingChanging a Road WheelE352149 E352034 E352022
Page 365 of 556
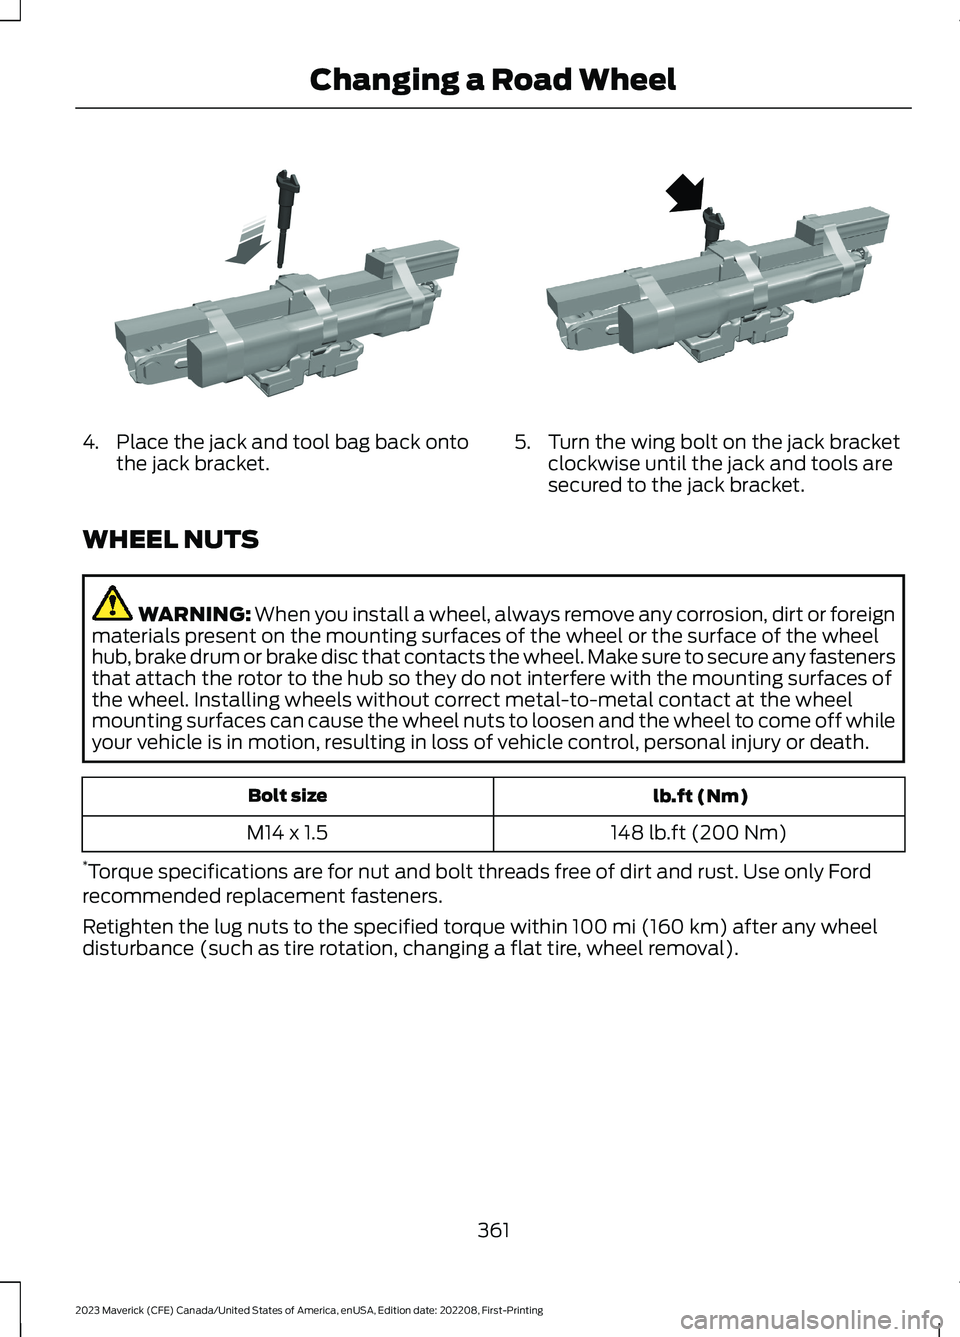
4.Place the jack and tool bag back ontothe jack bracket.5.Turn the wing bolt on the jack bracketclockwise until the jack and tools aresecured to the jack bracket.
WHEEL NUTS
WARNING: When you install a wheel, always remove any corrosion, dirt or foreignmaterials present on the mounting surfaces of the wheel or the surface of the wheelhub, brake drum or brake disc that contacts the wheel. Make sure to secure any fastenersthat attach the rotor to the hub so they do not interfere with the mounting surfaces ofthe wheel. Installing wheels without correct metal-to-metal contact at the wheelmounting surfaces can cause the wheel nuts to loosen and the wheel to come off whileyour vehicle is in motion, resulting in loss of vehicle control, personal injury or death.
lb.ft (Nm)Bolt size
148 lb.ft (200 Nm)M14 x 1.5
*Torque specifications are for nut and bolt threads free of dirt and rust. Use only Fordrecommended replacement fasteners.
Retighten the lug nuts to the specified torque within 100 mi (160 km) after any wheeldisturbance (such as tire rotation, changing a flat tire, wheel removal).
361
2023 Maverick (CFE) Canada/United States of America, enUSA, Edition date: 202208, First-PrintingChanging a Road WheelE352027 E352026
Page 452 of 556
WHAT IS FORD PROTECT
Protect yourself from the rising cost ofvehicle repairs with a Ford Protectextended service plan.
Ford Protect Extended ServicePlans - United States Only
Ford Protect extended service plans meanpeace of mind. Extended service plans arebacked by Ford Motor Company, andprovide more protection beyond the NewVehicle Limited Warranty coverage. Whenyou visit your Ford Dealer, insist on the FordProtect extended service plan.
Ford Protect Can Quickly Pay for Itself
One trip to the service center could easilyexceed the price of your Ford Protectextended service plan. With the FordProtect extended service plan, youminimize your risk for unexpected repairbills and rising repair costs.
Up to 1,000+ Covered VehicleComponents
There are four mechanical Ford Protectextended service plans with different levelsof coverage. Ask your authorized dealer fordetails.
1.PremiumCARE - Our mostcomprehensive coverage. With over1,000 covered components, this planis so complete it is probably easier tolist what is not covered.
2.ExtraCARE - Covers 113 components,and includes many high-tech items.
3.BaseCARE - Covers 84 components.
4.PowertrainCARE - Covers 29 criticalcomponents.
Ford Protect extended service plans arehonored by all authorized Ford dealers inthe United States, Canada and Mexico.
That means you get:
•Reliable, quality service at any Ford orLincoln dealership.
•Repairs performed by factory trainedtechnicians, using genuine parts.
Rental Car Reimbursement
First Day Rental Benefit
If you bring your car into your dealer forservice, we will give you a rental vehicle touse for the day.
Extended Rental Benefits
If your vehicle is kept overnight for coveredrepairs, you are eligible for rental carcoverage, warranty repairs, and fieldservice actions.
Roadside Assistance
Exclusive 24/7 roadside assistance,including:
•Towing, flat-tire change and batteryjump starts.
•Out of fuel and lock-out assistance.
•Travel expense reimbursement forlodging, meals and rental car.
•Assistance for taxi, shuttle, rental carcoverage or other transportation.
Transferable Coverage
If you sell your vehicle before your FordProtect extended service plan coverageexpires, you can transfer any remainingcoverage to the new owner. This shouldgive you and your potential buyer peace ofmind.
448
2023 Maverick (CFE) Canada/United States of America, enUSA, Edition date: 202208, First-PrintingFord Protect
Page 458 of 556
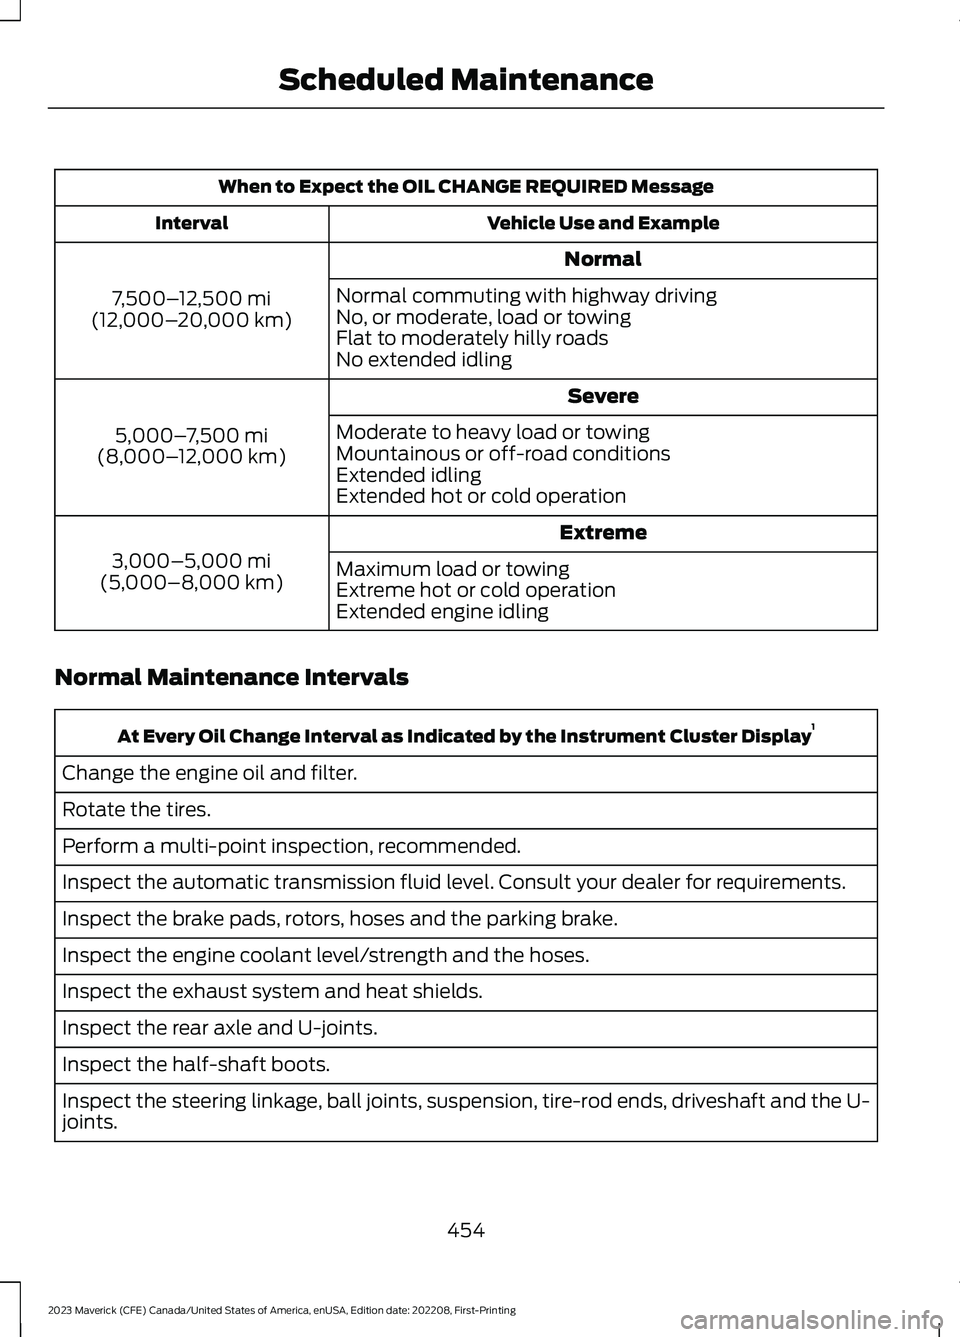
When to Expect the OIL CHANGE REQUIRED Message
Vehicle Use and ExampleInterval
Normal
7,500–12,500 mi(12,000–20,000 km)
Normal commuting with highway drivingNo, or moderate, load or towingFlat to moderately hilly roadsNo extended idling
Severe
5,000–7,500 mi(8,000–12,000 km)
Moderate to heavy load or towingMountainous or off-road conditionsExtended idlingExtended hot or cold operation
Extreme
3,000–5,000 mi(5,000–8,000 km)Maximum load or towingExtreme hot or cold operationExtended engine idling
Normal Maintenance Intervals
At Every Oil Change Interval as Indicated by the Instrument Cluster Display1
Change the engine oil and filter.
Rotate the tires.
Perform a multi-point inspection, recommended.
Inspect the automatic transmission fluid level. Consult your dealer for requirements.
Inspect the brake pads, rotors, hoses and the parking brake.
Inspect the engine coolant level/strength and the hoses.
Inspect the exhaust system and heat shields.
Inspect the rear axle and U-joints.
Inspect the half-shaft boots.
Inspect the steering linkage, ball joints, suspension, tire-rod ends, driveshaft and the U-joints.
454
2023 Maverick (CFE) Canada/United States of America, enUSA, Edition date: 202208, First-PrintingScheduled Maintenance
Page 542 of 556

Calculating the Load Limit.......................259Canceling the Set Speed..........................204Capacities and Specifications................363Catalytic Converter......................................180Catalytic Converter –Troubleshooting............................................180Catalytic Converter Precautions............180Catalytic Converter –Troubleshooting........................................180Catalytic Converter – WarningLamps................................................................180Center Console..............................................153Opening the Center Console..........................153Changing a Flat Tire....................................354Changing a Road Wheel...........................354Changing the 12V Battery..........................315Changing the 12V Battery - HybridElectric Vehicle (HEV).............................318Changing the Engine Air Filter - 2.0LEcoBoost™..................................................313Changing the Engine Air Filter - 2.5L,Hybrid Electric Vehicle (HEV)...............314Changing the Fuel Filter.............................315Changing the Remote Control Battery -Vehicles With: Push Button Start.........64Changing the Remote Control Battery -Vehicles Without: Push ButtonStart.................................................................63Changing the Vehicle Wi-Fi HotspotName or Password...................................381Charging a Device.........................................147Charging a Wireless Device.......................152Checking MyKey System Status..............69Checking the Brake Fluid...........................192Checking the Coolant................................309Checking the Seatbelts...............................48Checking the Tire Pressures....................346Checking the Wiper Blades........................89Children and Airbags.....................................53Child Restraint Anchor Points....................32Locating the Child Restraint Lower AnchorPoints...................................................................32Locating the Child Restraint Top TetherAnchor Points...................................................33What Are the Child Restraint AnchorPoints...................................................................32Child Restraints...............................................33Child Restraint Position Information.............33
Child Restraints Recommendation...............34Child Safety.......................................................31Child Restraint Anchor Points..........................32Child Restraints.....................................................33Installing Child Restraints.................................34Child Safety Locks..........................................41Child Safety Precautions..............................31Cleaning Products........................................327Cleaning the Exterior..................................328Cleaning Camera Lenses andSensors.............................................................329Cleaning Chrome, Aluminium or StainlessSteel...................................................................328Cleaning Headlamps and RearLamps...............................................................328Cleaning Stripes or Graphics.........................329Cleaning the Engine Compartment............329Cleaning the Exterior Precautions...............328Cleaning the Underbody.................................329Cleaning Wheels................................................328Cleaning Windows and WiperBlades...............................................................328Cleaning the Interior...................................329Cleaning Carpets and Floor Mats.................331Cleaning Displays and Screens....................330Cleaning Fabric...................................................330Cleaning Leather................................................330Cleaning Moonroof Tracks..............................331Cleaning Plastic.................................................330Cleaning Seatbelts.............................................331Cleaning Storage Compartments................331Cleaning the Instrument Panel....................329Cleaning Vinyl.......................................................331Clearing All MyKeys.......................................69Climate Control.............................................125Auto Mode.............................................................126Climate Control Hints.................................128Cold Weather Precautions.......................278Configuring the Trip Computer - VehiclesWith: 4.2 Inch Screen...............................120Connected Vehicle.......................................377Connecting the Vehicle to a MobileNetwork.............................................................377Connected Vehicle Data..............................24Connected Vehicle Limitations...............377Connected Vehicle Requirements.........377Connected Vehicle – Troubleshooting -Vehicles With: Modem............................378
538
2023 Maverick (CFE) Canada/United States of America, enUSA, Edition date: 202208, First-PrintingIndex