2023 FORD EXPLORER ignition
[x] Cancel search: ignitionPage 334 of 573

WARNING: Battery posts,terminals and related accessoriescontain lead and lead compounds,chemicals known to the State ofCalifornia to cause cancer andreproductive harm.Wash your handsafter handling.
WARNING: This vehicle may havemore than one battery. Removing thebattery cables from only one batterydoes not disconnect your vehicleelectrical system. Make sure youdisconnect the battery cables from allbatteries when disconnecting power.Failure to do so may cause seriouspersonal injury or property damage.
WARNING: For vehicles withAuto-Start-Stop the battery requirementis different. You must replace the batterywith one of exactly the samespecification.
The battery is in the engine compartment.See Under Hood Overview (page 317).
Your vehicle has a maintenance-freebattery. It does not require additionalwater during service.
If the vehicle battery has a cover and venthose, make sure you correctly install it aftercleaning or replacing the battery.
For longer, trouble-free operation, keep thetop of the battery clean and dry and thebattery cables tightly fastened to thebattery terminals. If any corrosion ispresent on the battery or terminals, removethe cables from the terminals and cleanwith a wire brush. You can neutralize theacid with a solution of baking soda andwater.
We recommend that you disconnect thenegative battery cable terminal from thebattery if you plan to store your vehicle foran extended period.
Note:If you only disconnect the negativebattery cable terminal, make sure it isisolated or placed away from the batteryterminal to avoid unintended connection orarcing.
If you replace the battery make sure itmatches the electrical requirements ofyour vehicle.
If you disconnect or replace the batteryand your vehicle has an automatictransmission, it must relearn its adaptivestrategy. Because of this, the transmissionmay shift firmly when first driven. This isnormal operation while the transmissionfully updates its operation to optimumshift feel.
Battery Sensor Reset
When you install a new battery, reset thebattery sensor by doing the following:
1.Switch the ignition on, and leave theengine off.
Note:Complete Steps 2 and 3 within 10seconds.
2.Flash the high beam headlamps fivetimes, ending with the high beams off.
3.Press and release the brake pedal threetimes.
The battery warning lamp flashes threetimes to confirm that the reset issuccessful.
Battery Management System (If
Equipped)
The system monitors battery conditionsand takes actions to extend battery life. Ifexcessive battery drain is detected, thesystem temporarily disables someelectrical systems to protect the battery.
Systems included are:
•Heated rear window.
•Heated seats.
330
2023 Explorer (CTW) Canada/United States of America, enUSA, Edition date: 202209, First-PrintingMaintenance
Page 335 of 573

•Climate control.
•Heated steering wheel.
•Audio unit.
•Navigation system.
A message may appear in the informationdisplay to alert you that battery protectionactions are active. This message is only fornotification that an action is taking place,and not intended to indicate an electricalproblem or that the battery requiresreplacement.
After battery replacement, or in somecases after charging the battery with anexternal charger, the battery managementsystem requires eight hours of vehicle sleeptime to relearn the battery state of charge.During this time, your vehicle must remainfully locked with the ignition switched off.
Note:Prior to relearning the battery stateof charge, the battery management systemmay temporarily disable some electricalsystems.
Electrical Accessory Installation
To make sure the battery managementsystem works correctly, do not connect anelectrical device ground connectiondirectly to the battery negative post. Thiscan cause inaccurate measurements ofthe battery condition and potentialincorrect system operation.
Note:If you add electrical accessories orcomponents to the vehicle, it may adverselyaffect battery performance and durability.This may also affect the performance ofother electrical systems in the vehicle.
Remove and Reinstall the Battery
Install a battery approved for use by ourspecifications. See Capacities andSpecifications (page 378).
To disconnect or remove the battery, dothe following:
1.Apply the parking brake and switch theignition off.
2.Switch all electrical equipment off, forexample lights and radio.
3.Wait a minimum of two minutes beforedisconnecting the battery.
Note:The engine management system hasa power hold function and remains poweredfor a period of time after you switch theignition off. This is to allow the system tostore diagnostic and adaptive tables.Disconnecting the battery without waitingcan cause damage not covered by thevehicle warranty.
4.Disconnect the negative battery cableterminal.
5.Disconnect the positive battery cableterminal.
6.Remove the battery securing clamp.
7.Remove the battery.
8.To install, reverse the removalprocedure.
Note:Before reconnecting the battery,make sure the ignition remains switched off.
Note:Make sure to fully tighten the batterycables.
If you disconnect or replace the vehiclebattery, you must reset the followingfeatures:
•Window bounce-back. See PowerWindows (page 94).
•Clock Settings.
•Pre-set radio stations.
Battery Disposal
Make sure that you dispose ofold batteries in anenvironmentally friendly way.Seek advice from your local authorityabout recycling old batteries.
331
2023 Explorer (CTW) Canada/United States of America, enUSA, Edition date: 202209, First-PrintingMaintenanceE107998
Page 337 of 573

Your vehicle has a maintenance-freebattery. It does not require additionalwater during service.
If the vehicle battery has a cover and venthose, make sure you correctly install it aftercleaning or replacing the battery.
For longer, trouble-free operation, keep thetop of the battery clean and dry and thebattery cables tightly fastened to thebattery terminals. If any corrosion ispresent on the battery or terminals, removethe cables from the terminals and cleanwith a wire brush. You can neutralize theacid with a solution of baking soda andwater.
We recommend that you disconnect thenegative battery cable terminal from thebattery if you plan to store your vehicle foran extended period.
Note:If you only disconnect the negativebattery cable terminal, make sure it isisolated or placed away from the batteryterminal to avoid unintended connection orarcing.
If you replace the battery make sure itmatches the electrical requirements ofyour vehicle.
If you disconnect or replace the batteryand your vehicle has an automatictransmission, it must relearn its adaptivestrategy. Because of this, the transmissionmay shift firmly when first driven. This isnormal operation while the transmissionfully updates its operation to optimumshift feel.
Battery Sensor Reset
When you install a new battery, reset thebattery sensor by doing the following:
1.Switch the ignition on, and leave theengine off.
Note:Complete Steps 2 and 3 within 10seconds.
2.Flash the high beam headlamps fivetimes, ending with the high beams off.
3.Press and release the brake pedal threetimes.
The battery warning lamp flashes threetimes to confirm that the reset issuccessful.
Battery Management System (If
Equipped)
The system monitors battery conditionsand takes actions to extend battery life. Ifexcessive battery drain is detected, thesystem temporarily disables someelectrical systems to protect the battery.
Systems included are:
•Heated rear window.
•Heated seats.
333
2023 Explorer (CTW) Canada/United States of America, enUSA, Edition date: 202209, First-PrintingMaintenance E371794
Page 338 of 573

•Climate control.
•Heated steering wheel.
•Audio unit.
•Navigation system.
A message may appear in the informationdisplay to alert you that battery protectionactions are active. This message is only fornotification that an action is taking place,and not intended to indicate an electricalproblem or that the battery requiresreplacement.
After battery replacement, or in somecases after charging the battery with anexternal charger, the battery managementsystem requires eight hours of vehicle sleeptime to relearn the battery state of charge.During this time, your vehicle must remainfully locked with the ignition switched off.
Note:Prior to relearning the battery stateof charge, the battery management systemmay temporarily disable some electricalsystems.
Electrical Accessory Installation
To make sure the battery managementsystem works correctly, do not connect anelectrical device ground connectiondirectly to the battery negative post. Thiscan cause inaccurate measurements ofthe battery condition and potentialincorrect system operation.
Note:If you add electrical accessories orcomponents to the vehicle, it may adverselyaffect battery performance and durability.This may also affect the performance ofother electrical systems in the vehicle.
Remove and Reinstall the Battery
Install a battery approved for use by ourspecifications. See Capacities andSpecifications (page 378).
To disconnect or remove the battery, dothe following:
1.Apply the parking brake and switch theignition off.
2.Switch all electrical equipment off, forexample lights and radio.
3.Wait a minimum of two minutes beforedisconnecting the battery.
Note:The engine management system hasa power hold function and remains poweredfor a period of time after you switch theignition off. This is to allow the system tostore diagnostic and adaptive tables.Disconnecting the battery without waitingcan cause damage not covered by thevehicle warranty.
4.Disconnect the negative battery cableterminal.
5.Disconnect the positive battery cableterminal.
6.Remove the battery securing clamp.
7.Remove the battery.
8.To install, reverse the removalprocedure.
Note:Before reconnecting the battery,make sure the ignition remains switched off.
Note:Make sure to fully tighten the batterycables.
If you disconnect or replace the vehiclebattery, you must reset the followingfeatures:
•Window bounce-back. See PowerWindows (page 94).
•Clock Settings.
•Pre-set radio stations.
Battery Disposal
Make sure that you dispose ofold batteries in anenvironmentally friendly way.Seek advice from your local authorityabout recycling old batteries.
334
2023 Explorer (CTW) Canada/United States of America, enUSA, Edition date: 202209, First-PrintingMaintenanceE107998
Page 341 of 573

Note:Make sure that the wiper arm doesnot spring back against the glass when thewiper blade is not attached.
2.Slightly rotate the wiper blade.
3.Remove the wiper blade.
4.To install, reverse the removalprocedure.
Note:Make sure that the wiper blade locksinto place.
CHANGING THE REAR WIPER
BLADES
You can improve poor wiper quality bycleaning the wiper blades and thewindshield.
Replace the wiper blades at least annuallyfor optimum performance.
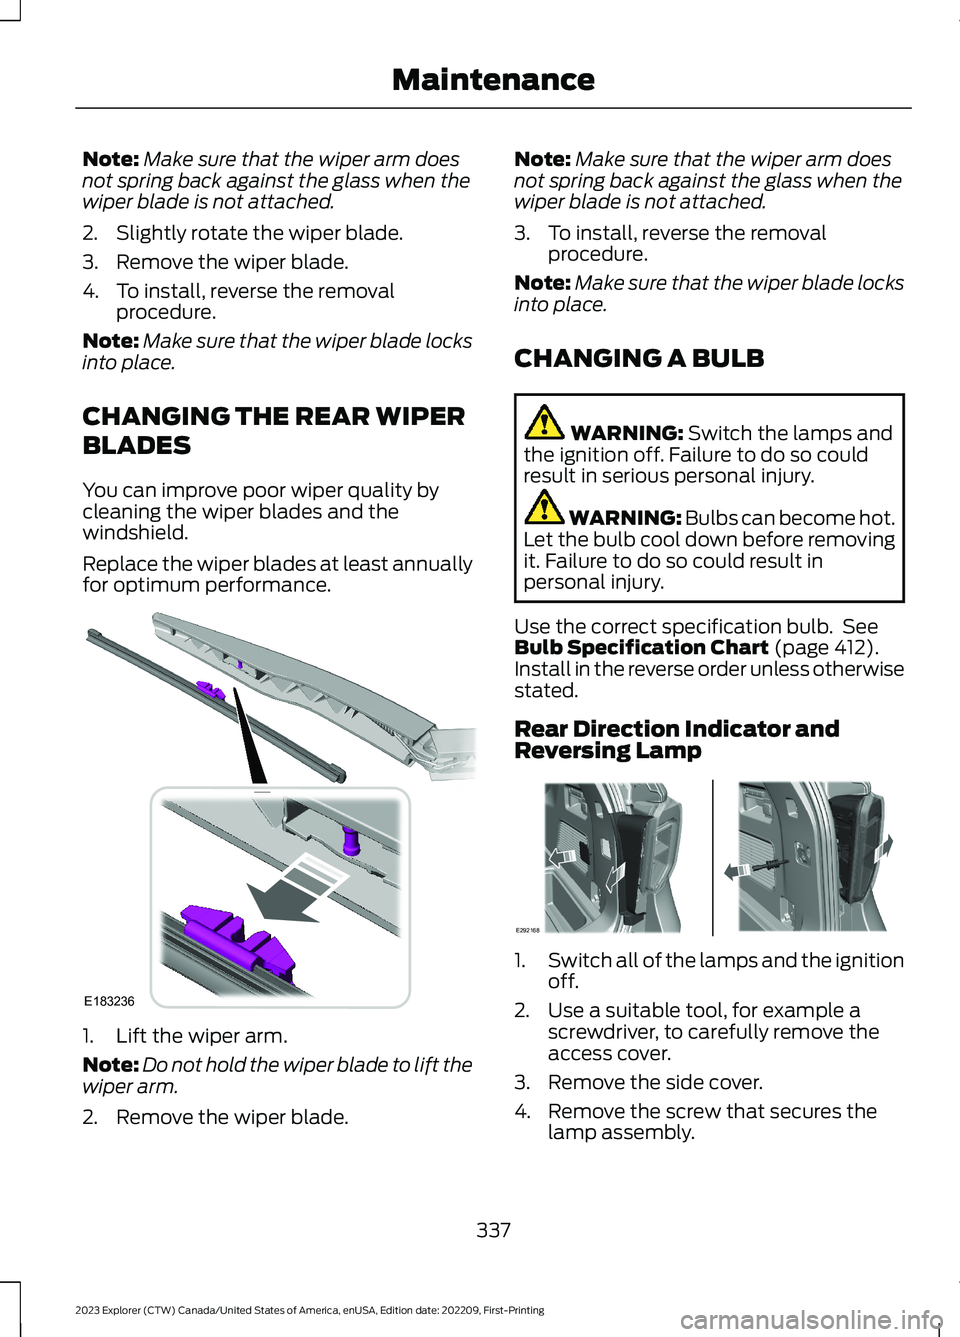
1.Lift the wiper arm.
Note:Do not hold the wiper blade to lift thewiper arm.
2.Remove the wiper blade.
Note:Make sure that the wiper arm doesnot spring back against the glass when thewiper blade is not attached.
3.To install, reverse the removalprocedure.
Note:Make sure that the wiper blade locksinto place.
CHANGING A BULB
WARNING: Switch the lamps andthe ignition off. Failure to do so couldresult in serious personal injury.
WARNING: Bulbs can become hot.Let the bulb cool down before removingit. Failure to do so could result inpersonal injury.
Use the correct specification bulb. SeeBulb Specification Chart (page 412).Install in the reverse order unless otherwisestated.
Rear Direction Indicator andReversing Lamp
1.Switch all of the lamps and the ignitionoff.
2.Use a suitable tool, for example ascrewdriver, to carefully remove theaccess cover.
3.Remove the side cover.
4.Remove the screw that secures thelamp assembly.
337
2023 Explorer (CTW) Canada/United States of America, enUSA, Edition date: 202209, First-PrintingMaintenanceE183236 E292168
Page 346 of 573

•Never wash or rinse the engine while itis hot or running; water in the runningengine may cause internal damage.
•Never wash or rinse any ignition coil,spark plug wire or spark plug well, orthe area in and around these locations.
•Cover the battery, power distributionbox, and air filter assembly to preventwater damage when cleaning theengine.
CLEANING THE WINDOWS AND
WIPER BLADES
Car wash chemicals and environmentalfallout can result in windshield and wiperblade contamination. Dirty windshield andwipers will result in poor windshield wiperoperation. Keep the windshield and wiperblades clean to maintain windshield wiperperformance.
To clean the windshield and wiper blades:
•Clean the windshield with anon-abrasive glass cleaner. Whencleaning the interior of the windshield,avoid getting any glass cleaner on theinstrument panel or door panels. Wipeany glass cleaner off these surfacesimmediately.
•For windshields contaminated withtree sap, chemicals, wax or bugs, cleanthe entire windshield using steel wool(no greater than 0000 grade) in acircular motion and rinse with water.
•Clean the wiper blades with isopropylrubbing alcohol or windshield washerconcentrate.
Note: Do not use razor blades or othersharp objects to clean or remove decalsfrom the inside of the heated rear window.The vehicle warranty does not coverdamage caused to the heated rear windowgrid lines.
CLEANING THE INTERIOR
WARNING: Do not use cleaningsolvents, bleach or dye on the vehicle'sseatbelts, as these actions may weakenthe belt webbing.
WARNING: On vehicles equippedwith seat-mounted airbags, do not usechemical solvents or strong detergents.Such products could contaminate theside airbag system and affectperformance of the side airbag in a crash.
For fabric, carpets, cloth seats and seatsequipped with side airbags:
•Remove dust and loose dirt with avacuum cleaner.
•Remove light stains and soil withMotorcraft Professional StrengthCarpet & Upholstery Cleaner.
•If grease or tar is present on thematerial, spot-clean the area first withMotorcraft Spot and Stain Remover. InCanada, use Motorcraft Multi-PurposeCleaner.
•If a ring forms on the fabric after spotcleaning, clean the entire areaimmediately (but do not oversaturate)or the ring will set.
•Do not use household cleaningproducts or glass cleaners, which canstain and discolor the fabric and affectthe flame retardant abilities of the seatmaterials.
Mirrors
Do not clean the housing or glass of anymirror with harsh abrasives, fuel or otherpetroleum or ammonia-based cleaningproducts.
342
2023 Explorer (CTW) Canada/United States of America, enUSA, Edition date: 202209, First-PrintingVehicle Care
Page 373 of 573

•To reduce the chances of interferencefrom another vehicle, perform thesystem reset procedure at least 3 ft(1 m) away from another Ford MotorCompany vehicle undergoing thesystem reset procedure at the sametime.
•Do not wait more than two minutesbetween resetting each tire sensor orthe system can time-out and you haveto repeat the entire procedure on allfour wheels.
•A double horn sounds indicating theneed to repeat the procedure.
Performing the System Reset Procedure
Read the entire procedure beforeattempting.
1.Drive the vehicle above 20 mph(32 km/h) for at least two minutes,then park in a safe location where youcan easily get to all four tires and haveaccess to an air pump.
2.Place the ignition in the off position andkeep the key in the ignition.
3.Cycle the ignition to the on positionwith the engine off.
4.Turn the hazard flashers on then offthree times. You must accomplish thiswithin 10 seconds. If you successfullyenter the reset mode, the horn soundsonce, the system indicator flashes anda message shows in the informationdisplay. If this does not occur, pleasetry again starting at step 2. If afterrepeated attempts to enter the resetmode, the horn does not sound, thesystem indicator does not flash and nomessage shows in the informationdisplay, seek service from yourauthorized dealer.
5.Train the tire pressure monitoringsystem sensors in the tires using thefollowing system reset sequencestarting with the left front tire in thefollowing clockwise order: Left front -driver side front tire, Right front -passenger side front tire, Right rear -passenger side rear tire, Left rear -driver side rear tire.
6.Remove the valve cap from the valvestem on the left front tire. Decrease theair pressure until the horn sounds.
Note:The single horn tone confirms thatthe sensor identification code has beenlearned by the module for this position. If adouble horn is heard, the reset procedurewas unsuccessful, and you must repeat it.
7.Remove the valve cap from the valvestem on the right front tire. Decreasethe air pressure until the horn sounds.
8.Remove the valve cap from the valvestem on the right rear tire. Decrease theair pressure until the horn sounds.
9.Remove the valve cap from the valvestem on the left rear tire. Decrease theair pressure until the horn sounds.Training is complete after the hornsounds for the last tire trained, driverside rear tire, the system indicatorstops flashing, and a message showsin the information display.
10.Turn the ignition off. If two short hornbeeps are heard, the reset procedurewas unsuccessful and you mustrepeat it. If after repeating theprocedure and two short beeps areheard when the ignition is turned tooff, seek assistance from yourauthorized dealer.
369
2023 Explorer (CTW) Canada/United States of America, enUSA, Edition date: 202209, First-PrintingWheels and Tires
Page 382 of 573

ENGINE SPECIFICATIONS - 2.3L ECOBOOST™
2.3L EcoBoostEngine
10:1Compression ratio.
138 in³ (2,261 cm³)Displacement.
1-3-4-2Firing order.
Coil on plugIgnition system.
0.028–0.031 in (0.7–0.8 mm)Spark plug gap.
Drivebelt Routing
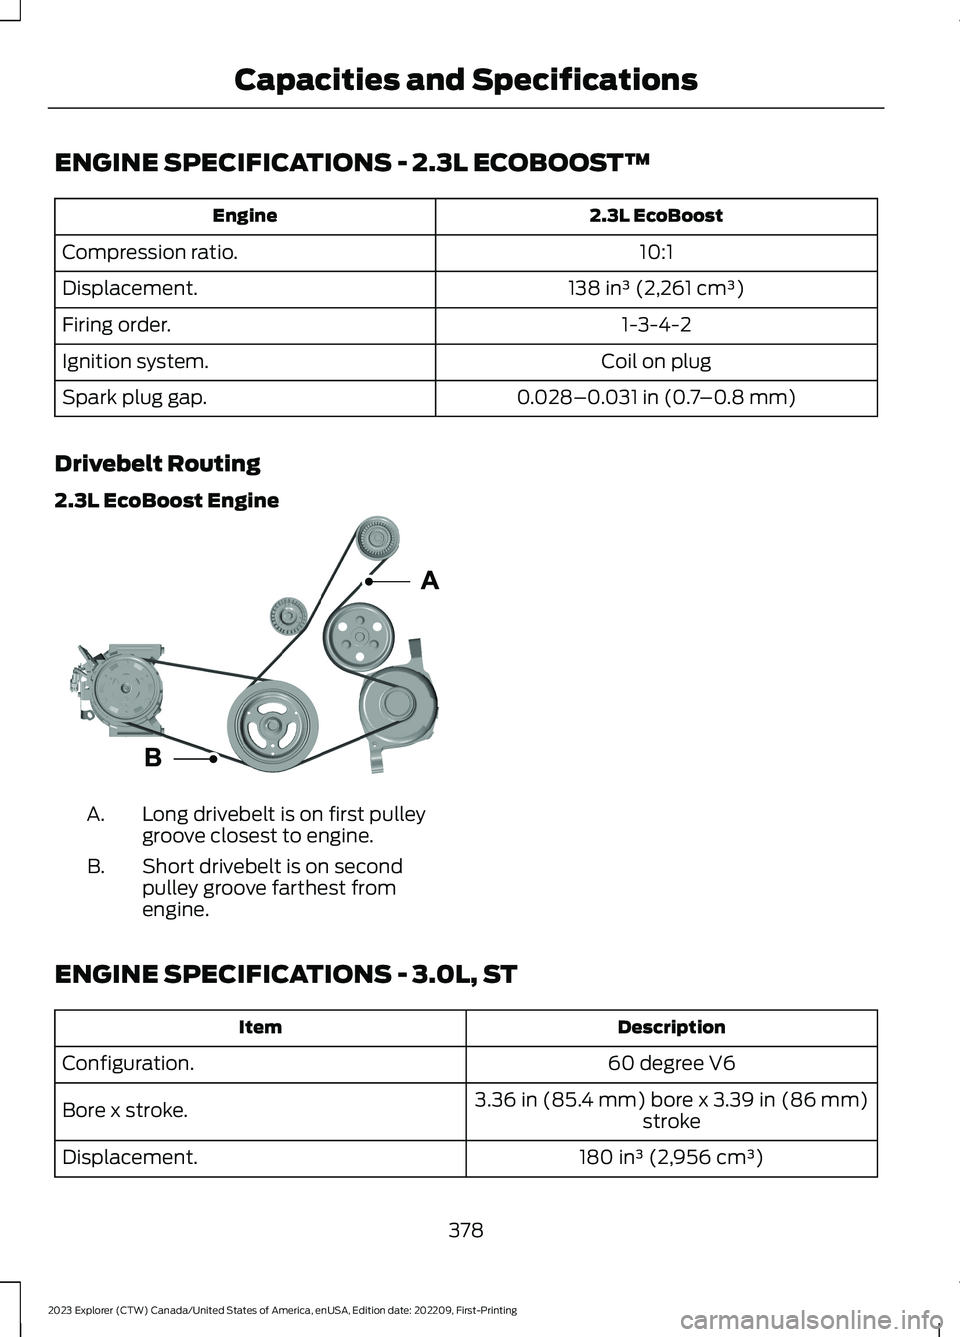
2.3L EcoBoost Engine
Long drivebelt is on first pulleygroove closest to engine.A.
Short drivebelt is on secondpulley groove farthest fromengine.
B.
ENGINE SPECIFICATIONS - 3.0L, ST
DescriptionItem
60 degree V6Configuration.
3.36 in (85.4 mm) bore x 3.39 in (86 mm)strokeBore x stroke.
180 in³ (2,956 cm³)Displacement.
378
2023 Explorer (CTW) Canada/United States of America, enUSA, Edition date: 202209, First-PrintingCapacities and SpecificationsE293908