2023 DODGE CHARGER service
[x] Cancel search: servicePage 99 of 292
STARTING AND OPERATING97
The ParkSense switch LED will be on when ParkSense is
disabled or requires service. The ParkSense switch LED
will be off when the system is enabled. If the ParkSense
switch is pushed and the system requires service, the
ParkSense switch LED will blink momentarily and then the
LED will be on.
SERVICE THE PARKSENSE PARK ASSIST
S
YSTEM
During vehicle start up, when the ParkSense Rear Park
Assist System has detected a faulted condition, the
instrument cluster display will actuate a single chime,
once per ignition cycle, and it will display the “PARKSENSE
UNAVAILABLE WIPE REAR SENSORS” or the “PARKSENSE
UNAVAILABLE SERVICE REQUIRED” message. When the
gear selector is moved to REVERSE and the system has
detected a faulted condition, the instrument cluster
display will show the "PARKSENSE UNAVAILABLE WIPE
REAR SENSORS" or "PARKSENSE UNAVAILABLE SERVICE
REQUIRED" message for as long as the vehicle is in
REVERSE. Under this condition, ParkSense will not
operate.
If “PARKSENSE UNAVAILABLE WIPE REAR SENSORS”
appears in the instrument cluster display, make sure the
outer surface and the underside of the rear fascia/
bumper is clean and clear of snow, ice, mud, dirt or other
obstruction and then cycle the ignition. If the message
continues to appear, see an authorized dealer.
If “PARKSENSE UNAVAILABLE SERVICE REQUIRED”
appears in the instrument cluster display, see an
authorized dealer.
CLEANING THE PARKSENSE SYSTEM
Clean the ParkSense sensors with water, car wash soap
and a soft cloth. Do not use rough or hard cloths. Do not
scratch or poke the sensors. Otherwise, you could damage
the sensors.
PARKSENSE SYSTEM USAGE
P
RECAUTIONS
NOTE:
Ensure that the rear fascia/bumper is free of snow, ice,
mud, dirt and debris to keep the ParkSense system
operating properly.
Jackhammers, large trucks, and other vibrations could
affect the performance of ParkSense.
When you turn ParkSense off in DRIVE, the instrument
cluster will display "PARKSENSE OFF" for five seconds.
Furthermore, once you turn ParkSense off, it remains
off until you turn it on again, even if you cycle the igni -
tion.
When you move the gear selector to the REVERSE posi -
tion and ParkSense is turned off, the instrument
cluster display will show the “PARKSENSE OFF”
message for as long as the vehicle is in REVERSE.
ParkSense will reduce the volume of the radio when it
is sounding an audio tone.
Clean the ParkSense sensors regularly, taking care not
to scratch or damage them. The sensors must not be
covered with ice, snow, slush, mud, dirt or debris.
Failure to do so can result in the system not working
properly. The ParkSense system might not detect an
obstacle behind the fascia/bumper, or it could provide
a false indication that an obstacle is behind the fascia/
bumper.
Use the ParkSense switch to turn the ParkSense
system off if objects such as bicycle carriers, trailer
hitches, etc. are placed within 12 inches (30 cm) from
the rear fascia/bumper. Failure to do so can result in
the system misinterpreting a close object as a sensor
problem, causing the “PARKSENSE UNAVAILABLE
WIPE REAR SENSORS” message to be displayed in the
instrument cluster.
WARNING!
Drivers must be careful when backing up even when
using ParkSense. Always check carefully behind your
vehicle, look behind you, and be sure to check for
pedestrians, animals, other vehicles, obstructions, and
blind spots before backing up. You are responsible for
safety and must continue to pay attention to your
surroundings. Failure to do so can result in serious
injury or death.
4
23_LD_OM_EN_USC_t.book Page 97
Page 105 of 292
STARTING AND OPERATING103
OVERLOADING
The load carrying components (axle, springs, tires, wheels,
etc.) of your vehicle will provide satisfactory service as
long as you do not exceed the GVWR and the front and
rear GAWR.
The best way to figure out the total weight of your vehicle
is to weigh it when it is fully loaded and ready for
operation. Weigh it on a commercial scale to ensure that
it is not over the GVWR.
Figure out the weight on the front and rear of the vehicle
separately. It is important that you distribute the load
evenly over the front and rear axles.
Overloading can cause potential safety hazards and
shorten useful service life. Heavier axles or suspension
components do not necessarily increase the vehicle's
GVWR.
LOADING
To load your vehicle properly, first figure out its empty
weight, axle-by-axle and side-by-side. Store heavier items
down low and be sure you distribute their weight as evenly
as possible. Stow all loose items securely before driving. If
weighing the loaded vehicle shows that you have
exceeded either GAWR, but the total load is within the
specified GVWR, you must redistribute the weight.
Improper weight distribution can have an adverse effect
on the way your vehicle steers and handles and the way
the brakes operate.
NOTE:
Refer to the Vehicle Certification Label affixed to the
rear of the driver's door for your vehicle's GVWR and
GAWR.
Refer to the Tire And Loading Information Placard for
your vehicle's proper tire pressure
Úpage 252.
TRAILER TOWING
In this section you will find safety tips and information on
limits to the type of towing you can reasonably do with your
vehicle. Before towing a trailer, carefully review this
information to tow your load as efficiently and safely as
possible.
To maintain the New Vehicle Limited Warranty coverage,
follow the requirements and recommendations in this
manual concerning vehicles used for trailer towing.
COMMON TOWING DEFINITIONS
The following trailer towing related definitions will assist
you in understanding the following information:
Gross Vehicle Weight Rating (GVWR)
The GVWR is the total allowable weight of your vehicle.
This includes driver, passengers, cargo and tongue
weight. The total load must be limited so that you do not
exceed the GVWR
Úpage 102.
Gross Trailer Weight (GTW)
The GTW is the weight of the trailer plus the weight of all
cargo, consumables, and equipment (permanent or
temporary) loaded in or on the trailer in its "loaded and
ready for operation" condition.
The recommended way to measure GTW is to put your fully
loaded trailer on a vehicle scale. The entire weight of the
trailer must be supported by the scale.
Gross Combination Weight Rating (GCWR)
The GCWR is the total allowable weight of your vehicle and
trailer when weighed in combination.
Gross Axle Weight Rating (GAWR)
The GAWR is the maximum capacity of the front and rear
axles. Distribute the load over the front and rear axles
evenly. Make sure that you do not exceed either front or
rear GAWR
Úpage 102.
WARNING!
It is important that you do not exceed the maximum
front or rear GAWR. A dangerous driving condition can
result if either rating is exceeded. You could lose control
of the vehicle and have a collision.
4
23_LD_OM_EN_USC_t.book Page 103
Page 130 of 292
128MULTIMEDIA
DRAG & DROP MENU BAR
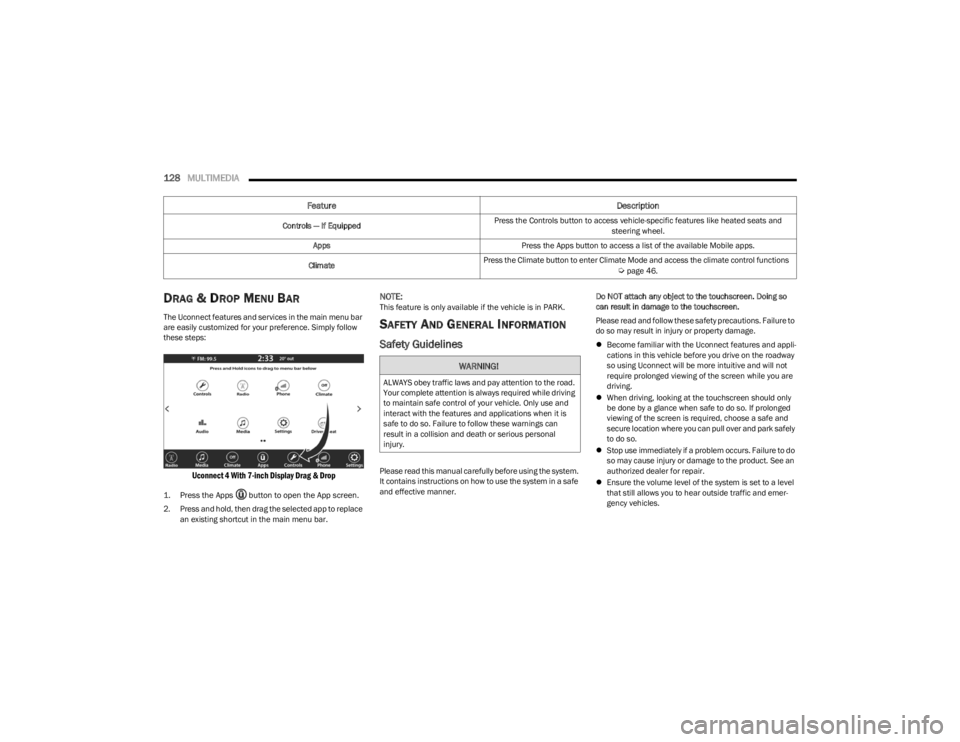
The Uconnect features and services in the main menu bar
are easily customized for your preference. Simply follow
these steps:
Uconnect 4 With 7-inch Display Drag & Drop
1. Press the Apps button to open the App screen.
2. Press and hold, then drag the selected app to replace
an existing shortcut in the main menu bar.
NOTE:This feature is only available if the vehicle is in PARK.
SAFETY AND GENERAL INFORMATION
Safety Guidelines
Please read this manual carefully before using the system.
It contains instructions on how to use the system in a safe
and effective manner. Do NOT attach any object to the touchscreen. Doing so
can result in damage to the touchscreen.
Please read and follow these safety precautions. Failure to
do so may result in injury or property damage.
Become familiar with the Uconnect features and appli -
cations in this vehicle before you drive on the roadway
so using Uconnect will be more intuitive and will not
require prolonged viewing of the screen while you are
driving.
When driving, looking at the touchscreen should only
be done by a glance when safe to do so. If prolonged
viewing of the screen is required, choose a safe and
secure location where you can pull over and park safely
to do so.
Stop use immediately if a problem occurs. Failure to do
so may cause injury or damage to the product. See an
authorized dealer for repair.
Ensure the volume level of the system is set to a level
that still allows you to hear outside traffic and emer -
gency vehicles.
Feature Description
Controls — If EquippedPress the Controls button to access vehicle-specific features like heated seats and
steering wheel.
Apps Press the Apps button to access a list of the available Mobile apps.
Climate Press the Climate button to enter Climate Mode and access the climate control functions
Úpage 46.
WARNING!
ALWAYS obey traffic laws and pay attention to the road.
Your complete attention is always required while driving
to maintain safe control of your vehicle. Only use and
interact with the features and applications when it is
safe to do so. Failure to follow these warnings can
result in a collision and death or serious personal
injury.
23_LD_OM_EN_USC_t.book Page 128
Page 133 of 292
MULTIMEDIA131
Press the available number button on the touchscreen to
begin selecting a desired station. Once a number has
been entered, any numbers that are no longer possible
(stations that cannot be reached) will become
deactivated/grayed out.
Undo
You can backspace an entry by pressing the
Back button on the touchscreen.
GO
Once the last digit of a station has been entered, press
“Ok”. The Direct Tune screen will close, and the system will
automatically tune to that station.
RADIO VOICE COMMANDS
Use your voice to quickly get to the AM, FM, or SiriusXM®
Satellite Radio stations you would like to hear.
(Subscription or included SiriusXM® Satellite Radio trial
required.)
Push the VR button on the steering wheel and wait for
the beep to say a command. See an example:
“Tune to ninety-five-point-five FM”
“Tune to Satellite Channel Hits 1”
Did You Know: At any time, if you are not sure of what to
say or want to learn a Voice Command, push the VR button
and say “ Help”. The system provides you with a list of
commands.
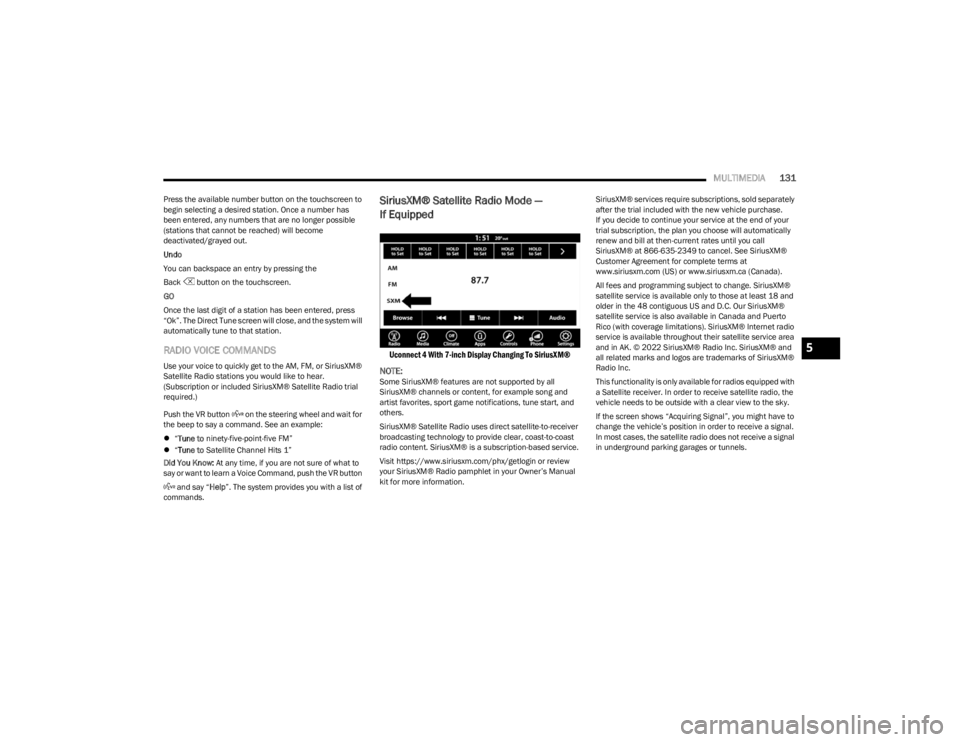
SiriusXM® Satellite Radio Mode —
If Equipped
Uconnect 4 With 7-inch Display Changing To SiriusXM®
NOTE:
Some SiriusXM® features are not supported by all
SiriusXM® channels or content, for example song and
artist favorites, sport game notifications, tune start, and
others.
SiriusXM® Satellite Radio uses direct satellite-to-receiver
broadcasting technology to provide clear, coast-to-coast
radio content. SiriusXM® is a subscription-based service.
Visit https://www.siriusxm.com/phx/getlogin or review
your SiriusXM® Radio pamphlet in your Owner’s Manual
kit for more information. SiriusXM® services require subscriptions, sold separately
after the trial included with the new vehicle purchase.
If you decide to continue your service at the end of your
trial subscription, the plan you choose will automatically
renew and bill at then-current rates until you call
SiriusXM® at 866-635-2349 to cancel. See SiriusXM®
Customer Agreement for complete terms at
www.siriusxm.com (US) or www.siriusxm.ca (Canada).
All fees and programming subject to change. SiriusXM®
satellite service is available only to those at least 18 and
older in the 48 contiguous US and D.C. Our SiriusXM®
satellite service is also available in Canada and Puerto
Rico (with coverage limitations). SiriusXM® Internet radio
service is available throughout their satellite service area
and in AK. © 2022 SiriusXM® Radio Inc. SiriusXM® and
all related marks and logos are trademarks of SiriusXM®
Radio Inc.
This functionality is only available for radios equipped with
a Satellite receiver. In order to receive satellite radio, the
vehicle needs to be outside with a clear view to the sky.
If the screen shows “Acquiring Signal”, you might have to
change the vehicle’s position in order to receive a signal.
In most cases, the satellite radio does not receive a signal
in underground parking garages or tunnels.
5
23_LD_OM_EN_USC_t.book Page 131
Page 134 of 292

132MULTIMEDIA
No Subscription
Radios equipped with a Satellite receiver require a
subscription to the SiriusXM® Service. When the radio
does not have the necessary subscription, the radio is
able to receive the Preview channel only.
Acquiring SiriusXM® Subscription
To activate the SiriusXM® Satellite Radio subscription, US
residents visit https://www.siriusxm.com/phx/getlogin or
call: 1-800-643-2112
Canadian residents visit https://www.siriusxm.ca/ or call:
1-888-539-7474.
NOTE:You will need to provide the SiriusXM® ID (RID) located at
the bottom of the Channel 0 screen.
The Satellite Mode is activated by a press of the SXM
button on the touchscreen. When in Satellite Mode:
The SXM button on the touchscreen is highlighted.
The SiriusXM® Presets are displayed at the top of the
screen.
The SiriusXM® Channel Number is displayed in the
center.
The Program Information is displayed at the bottom of
the Channel Number.
The SiriusXM® function buttons are displayed below
the Program Information.
Tuning is done by operating the Tune Knob or by Direct
Tune, similar to other Radio Bands.
In addition to the tuning operation functions common
to all radio modes, the Replay, Traffic/Weather button,
and Favorite button functions are available in
SiriusXM® Mode.
Uconnect 4 With 7-inch Display SiriusXM® Satellite Radio
1 — Browse
2 — Replay
3 — Seek Down Button
4 — Direct Tune Button
5 — Seek Up Button
6 — Audio Settings Button
23_LD_OM_EN_USC_t.book Page 132
Page 147 of 292
MULTIMEDIA145
MANAGING YOUR FAVORITES — IF EQUIPPED
There are two ways you can add an entry to your favorites:
1. After loading the mobile phonebook, press the
Favorites button on the touchscreen, and then press
one of the +Add Favorite Contact buttons that
appears on the list.
2. After loading the mobile phonebook, select “Contacts” from the Phone main screen, and then
select the appropriate number. Press the Down Arrow
button or the Settings Gear button next to the
selected number to display the option’s pop-up. In the
pop-up, select “Add to Favorites”.
NOTE:If the Favorites list is full, you will be asked to remove an
existing favorite.
TO REMOVE A FAVORITE — IF EQUIPPED
1. To remove a Favorite, select “Favorites” from the Phone main screen.
2. Next, select the Down Arrow icon or the Settings Gear icon next to the contact you want to remove from your
favorites. This will bring up the options for that
Favorite contact.
3. Deselect the Star icon to delete the Favorite.
Phone Call Features
The following features can be accessed through the
Uconnect Phone if the feature(s) are available and
supported by Bluetooth® on your mobile service plan. For
example, if your mobile service plan provides three-way
calling, this feature can be accessed through the
Uconnect Phone. Check with your mobile service provider
for the features that you have.
Here are the phone options with Uconnect:
Redial
Dial by pressing in the number
Voice Commands (Dial by Saying a Name, Call by
Saying a Phonebook Name, Redial or Call Back)
Favorites
Mobile Phonebook
Recent Call Log
SMS Message Viewer
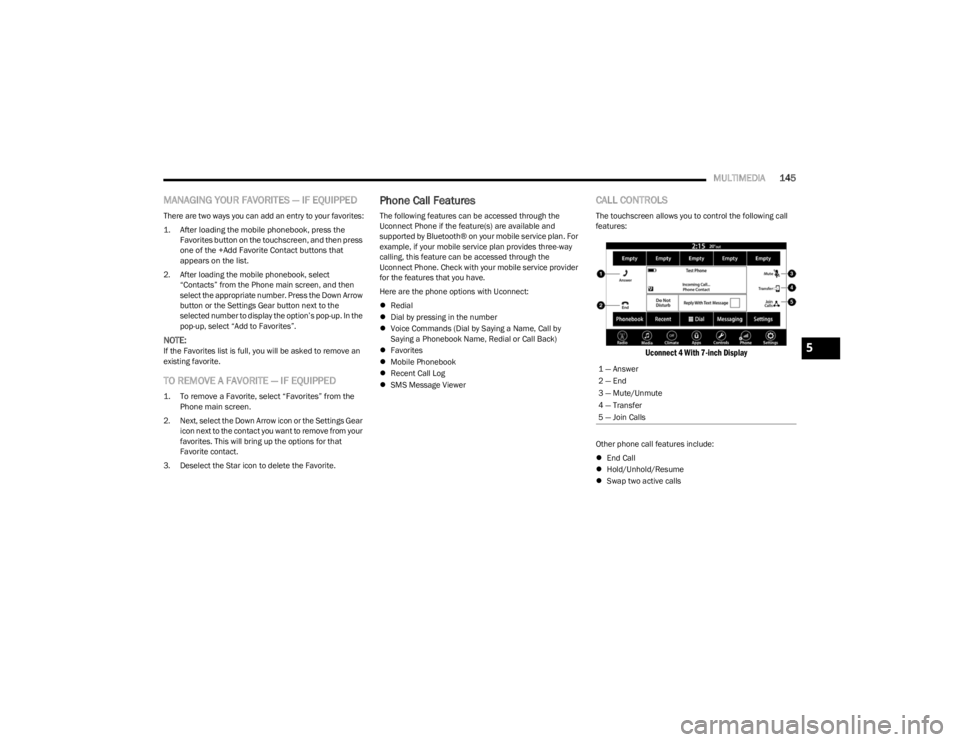
CALL CONTROLS
The touchscreen allows you to control the following call
features:
Uconnect 4 With 7-inch Display
Other phone call features include:
End Call
Hold/Unhold/Resume
Swap two active calls
1 — Answer
2 — End
3 — Mute/Unmute
4 — Transfer
5 — Join Calls
5
23_LD_OM_EN_USC_t.book Page 145
Page 166 of 292

164
(Continued)
SAFETY
SAFETY FEATURES
ANTI-LOCK BRAKE SYSTEM (ABS)
The ABS provides increased vehicle stability and brake
performance under most braking conditions. The system
automatically prevents wheel lock and enhances vehicle
control during braking.
The ABS performs a self-check cycle to ensure that the
ABS is working properly each time the vehicle is started
and driven. During this self-check, you may hear a slight
clicking sound as well as some related motor noises.
The ABS is activated during braking when the system
detects one or more wheels are beginning to lock. Road
conditions such as ice, snow, gravel, bumps, railroad
tracks, loose debris, or panic stops may increase the
likelihood of ABS activation(s).
You also may experience the following normal
characteristics when the ABS activates:
ABS motor noise or clicking sounds (you may continue
to hear for a short time after the stop)
Brake pedal pulsations
A slight drop of the brake pedal at the end of the stop The ABS is designed to function with the Original
Equipment Manufacturer (OEM) tires. Modification may
result in degraded ABS performance.
Anti-Lock Brake System (ABS) Warning
Light
The yellow ABS Warning Light will turn on when the ignition
is placed in the ON/RUN mode and may stay on for as long
as four seconds.
If the ABS Warning Light remains on or comes on while
driving, it indicates that the anti-lock portion of the brake
system is not functioning and that service is required.
However, the conventional brake system will continue to
operate normally if the ABS Warning Light is on.
If the ABS Warning Light is on, the brake system should be
serviced as soon as possible to restore the benefits of
anti-lock brakes. If the ABS Warning Light does not come
on when the ignition is placed in the ON/RUN mode, have
the light repaired as soon as possible.
WARNING!
The ABS contains sophisticated electronic equip -
ment that may be susceptible to interference caused
by improperly installed or high output radio transmit -
ting equipment. This interference can cause possible
loss of anti-lock braking capability. Installation of
such equipment should be performed by qualified
professionals.
Pumping of the Anti-Lock Brakes will diminish their
effectiveness and may lead to a collision. Pumping
makes the stopping distance longer. Just press firmly
on your brake pedal when you need to slow down or
stop.
The ABS cannot prevent the natural laws of physics
from acting on the vehicle, nor can it increase
braking or steering efficiency beyond that afforded
by the condition of the vehicle brakes and tires or the
traction afforded.
The ABS cannot prevent collisions, including those
resulting from excessive speed in turns, following
another vehicle too closely, or hydroplaning.
The capabilities of an ABS equipped vehicle must
never be exploited in a reckless or dangerous
manner that could jeopardize the user’s safety or the
safety of others.
WARNING!
23_LD_OM_EN_USC_t.book Page 164
Page 167 of 292
SAFETY165
ELECTRONIC BRAKE CONTROL (EBC)
S
YSTEM
Your vehicle is equipped with an advanced Electronic
Brake Control (EBC) system. This system includes
Electronic Brake Force Distribution (EBD), Anti-Lock Brake
System (ABS), Brake Assist System (BAS), Hill Start Assist
(HSA), Traction Control System (TCS), Electronic Stability
Control (ESC), and Electronic Roll Mitigation (ERM). These
systems work together to enhance both vehicle stability
and control in various driving conditions.
Your vehicle may also be equipped with Ready Alert
Braking (RAB) and Rain Brake Support (RBS).
Brake System Warning Light
The red Brake System Warning Light will turn on when the
ignition is placed in the ON/RUN mode and may stay on for
as long as four seconds.
If the Brake System Warning Light remains on or comes on
while driving, it indicates that the brake system is not
functioning properly and that immediate service is
required. If the Brake System Warning Light does not
come on when the ignition is placed in the ON/RUN mode,
have the light repaired as soon as possible.
Brake Assist System (BAS)
The BAS is designed to optimize the vehicle’s braking
capability during emergency braking maneuvers. The
system detects an emergency braking situation by sensing
the rate and amount of brake application and then applies
optimum pressure to the brakes. This can help reduce
braking distances. The BAS complements the Anti-Lock
Brake System (ABS). Applying the brakes very quickly
results in the best BAS assistance. To receive the benefit of the system, you must apply
continuous braking pressure during the stopping
sequence (do not “pump” the brakes). Do not reduce
brake pedal pressure unless braking is no longer desired.
Once the brake pedal is released, the BAS is deactivated.
Electronic Brake Force Distribution (EBD)
EBD manages the distribution of the braking torque
between the front and rear axles by limiting braking
pressure to the rear axle. This is done to prevent overslip
of the rear wheels to avoid vehicle instability, and to
prevent the rear axle from entering ABS before the front
axle.
Electronic Roll Mitigation (ERM)
ERM anticipates the potential for wheel lift by monitoring
the driver’s steering wheel input and the speed of the
vehicle. When ERM determines that the rate of change of
the steering wheel angle and vehicle’s speed are
sufficient to potentially cause wheel lift, it then applies the
appropriate brake and may also reduce engine power to
lessen the chance that wheel lift will occur. ERM can only
reduce the chance of wheel lift occurring during severe or
evasive driving maneuvers; it cannot prevent wheel lift
due to other factors, such as road conditions, leaving the
roadway, striking objects or other vehicles.
NOTE:ERM is disabled any time the ESC is in “Full Off” mode
(if equipped). See Úpage 166 for a complete explanation
of the available ESC modes.
WARNING!
The Brake Assist System (BAS) cannot prevent the
natural laws of physics from acting on the vehicle, nor
can it increase the traction afforded by prevailing road
conditions. BAS cannot prevent collisions, including
those resulting from excessive speed in turns, driving
on very slippery surfaces, or hydroplaning. The
capabilities of a BAS-equipped vehicle must never be
exploited in a reckless or dangerous manner, which
could jeopardize the user's safety or the safety of
others.
WARNING!
Many factors, such as vehicle loading, road conditions
and driving conditions, influence the chance that wheel
lift or rollover may occur. ERM cannot prevent all wheel
lift or rollovers, especially those that involve leaving the
roadway or striking objects or other vehicles. The
capabilities of an ERM-equipped vehicle must never be
exploited in a reckless or dangerous manner which
could jeopardize the user's safety or the safety of
others.
6
23_LD_OM_EN_USC_t.book Page 165