2023 DODGE CHARGER lights
[x] Cancel search: lightsPage 109 of 292
STARTING AND OPERATING107
Towing Requirements — Tires
Do not attempt to tow a trailer while using a compact
spare tire.
Do not drive more than 50 mph (80 km/h) when towing
while using a full size spare tire.
Proper tire inflation pressures are essential to the safe
and satisfactory operation of your vehicle.
Check the trailer tires for proper tire inflation pressures
before trailer usage.
Check for signs of tire wear or visible tire damage
before towing a trailer. For the proper inspection proce -
dure.
Replacing tires with a higher load carrying capacity will
not increase the vehicle's GVWR and GAWR limits.
For further information
Úpage 248.
Towing Requirements — Trailer Brakes
Do not interconnect the hydraulic brake system or
vacuum system of your vehicle with that of the trailer.
This could cause inadequate braking and possible
personal injury.
An electronically actuated trailer brake controller is
required when towing a trailer with electronically actu -
ated brakes. When towing a trailer equipped with a
hydraulic surge actuated brake system, an electronic
brake controller is not required.
Trailer brakes are recommended for trailers over
1,000 lb (453 kg) and required for trailers in excess of
2,000 lb (907 kg).
Towing Requirements — Trailer Lights And
Wiring
Whenever you pull a trailer, regardless of the trailer size,
stoplights and turn signals on the trailer are required for
motoring safety.
The Trailer Tow Package may include a four- and seven-pin
wiring harness. Use a factory approved trailer harness and
connector.
NOTE:Do not cut or splice wiring into the vehicle’s wiring
harness.
CAUTION!
Do not tow a trailer at all during the first 500 miles
(805 km) the new vehicle is driven. The engine, axle
or other parts could be damaged.
Then, during the first 500 miles (805 km) that a
trailer is towed, do not drive over 50 mph (80 km/h)
and do not make starts at full throttle. This helps the
engine and other parts of the vehicle wear in at the
heavier loads.
WARNING!
Do not connect trailer brakes to your vehicle's
hydraulic brake lines. It can overload your brake
system and cause it to fail. You might not have
brakes when you need them and could have an acci -
dent.
Towing any trailer will increase your stopping
distance. When towing, you should allow for addi -
tional space between your vehicle and the vehicle in
front of you. Failure to do so could result in an acci -
dent.
CAUTION!
If the trailer weighs more than 1,000 lb (453 kg)
loaded, it should have its own brakes and they should
be of adequate capacity. Failure to do this could lead to
accelerated brake lining wear, higher brake pedal
effort, and longer stopping distances.
4
23_LD_OM_EN_USC_t.book Page 107
Page 115 of 292
MULTIMEDIA113
Language
Display
When the Language button is pressed on the touchscreen, the system displays the different language options. Once an option is selected, the system will display in the chosen
language.
NOTE:Depending on the vehicle’s options, feature settings may vary.
Setting Name Description
LanguageThis setting will change the language of the Uconnect system and Instrument Cluster
Display. The available languages are English, Français, and Español.
When the Display button is pressed on the touchscreen, the system will display the options related to the theme (if equipped), brightness, and color of the touchscreen. The available
settings are:
NOTE:Depending on the vehicle’s options, feature settings may vary.
Setting Name Description
Display ModeThis setting will allow you to set the brightness manually or have the system
set it automatically. The “Auto” setting has the system automatically adjust the
display brightness. The “Manual” setting will allow the user to adjust the brightness of the display.
Display Brightness With Headlights ON This setting will allow you to set the brightness when the headlights are on. To access this
setting, Display Mode must be set to “Manual”. The “+” setting will increase the brightness; the “-” will decrease the brightness.
Display Brightness With Headlights OFF This setting will allow you to set the brightness when the headlights are off. To access this
setting, Display Mode must be set to “Manual”. The “+” setting will increase the brightness; the “-” will decrease the brightness.
5
23_LD_OM_EN_USC_t.book Page 113
Page 119 of 292
MULTIMEDIA117
Safety/Assistance
When the Safety/Assistance button is selected on the touchscreen, the system displays the options related to the vehicle’s safety settings. These options will differ depending on the
features equipped on the vehicle. The settings may display in list form or within subfolders on the screen. To access a subfolder, select the desired folder; the available options
related to that feature will then display on the screen.
NOTE:Depending on the vehicle’s options, feature settings may vary.
Setting Name Description
Forward Collision Warning SensitivityThis setting will change the distance at which the Forward Collision Warning (FCW) alert
sounds. The “Medium” setting will have the FCW system signal when an object is in view, and the possibility of a collision is detected. The “Near” setting will have the FCW system
signal when the object is closer to the vehicle. The “Far” setting will have the FCW system signal when an object is at a far distance from the vehicle.
Forward Collision Warning This setting will turn the Forward Collision Warning system on or off. The “Off” setting will
deactivate the FCW system. The “Warning Only” setting will provide only an audible chime when a collision is detected. The “Warning + Active Braking” setting will provide an audible chime and apply brake pressure when a collision is detected.
Forward Collision Warning Active Braking This setting will activate Forward Collision Warning Active Braking. The available options
are “On” and “Off”.
ParkSense This setting will change the type of ParkSense alert when a close object is detected and
can provide both an audible chime and a visual display.
Rear ParkSense Volume This setting adjusts the volume of the Rear ParkSense system. The available settings are
“Low”, “Medium”, and “High”.
Blind Spot Alert This setting will change the type of alert provided when an object is detected in a
vehicle’s blind spot. The “Off” setting will turn off Blind Spot Alert. The “Lights” setting will activate the Blind Spot Alert lights on the outside mirrors. The “Lights & Chime” setting will activate both the lights on the outside mirrors and an audible chime.
5
23_LD_OM_EN_USC_t.book Page 117
Page 121 of 292
MULTIMEDIA119
Mirrors & Wipers
When the Mirrors & Wipers button is pressed on the touchscreen, the system displays the options related to the vehicle’s mirrors and wipers.
NOTE:Depending on the vehicle’s options, feature settings may vary.
Setting Name Description
Tilt Side Mirrors in ReverseThis setting will tilt the outside side-view mirrors when the ignition is in the ON/RUN
position and the transmission gear selector is in the REVERSE position. The mirrors will move back to their previous position when the transmission is shifted out of REVERSE. The available settings are “On” and “Off”.
Rain Sensing Auto Wipers This setting will turn the Rain Sensing Auto Wipers on or off.
Headlights with Wipers This setting will turn the headlights on when the wipers are activated. Setting options are
“On” and “Off”.
5
23_LD_OM_EN_USC_t.book Page 119
Page 122 of 292
120MULTIMEDIA
Lights
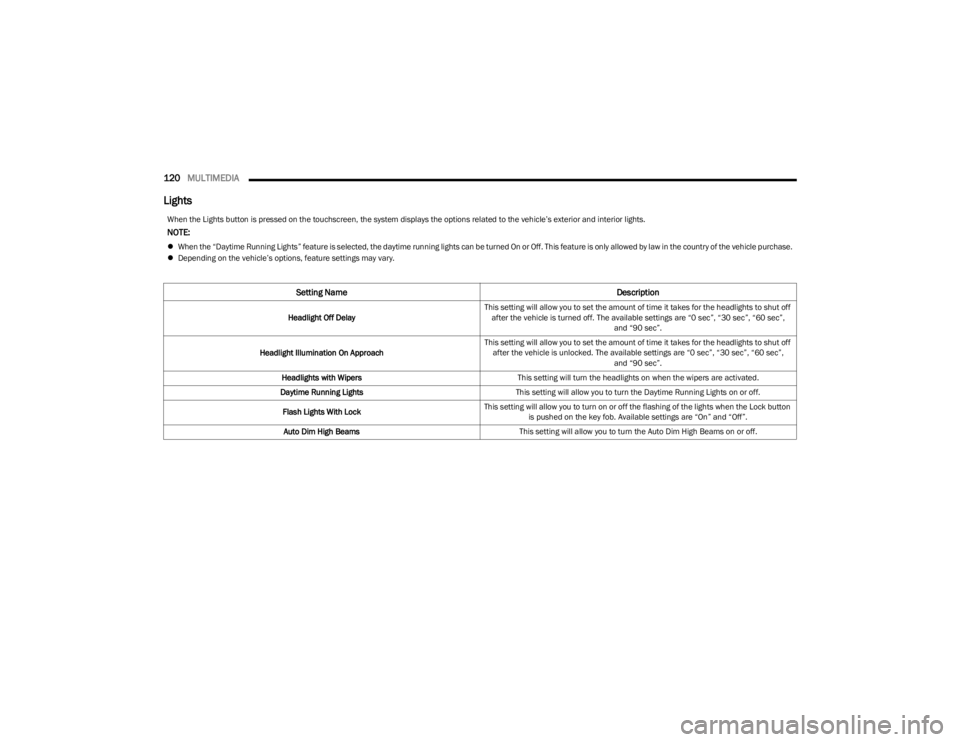
When the Lights button is pressed on the touchscreen, the system displays the options related to the vehicle’s exterior and interior lights.
NOTE:
When the “Daytime Running Lights” feature is selected, the daytime running lights can be turned On or Off. This feature is only allowed by law in the country of the vehicle purchase.
Depending on the vehicle’s options, feature settings may vary.
Setting Name Description
Headlight Off DelayThis setting will allow you to set the amount of time it takes for the headlights to shut off
after the vehicle is turned off. The available settings are “0 sec”, “30 sec”, “60 sec”, and “90 sec”.
Headlight Illumination On Approach This setting will allow you to set the amount of time it takes for the headlights to shut off
after the vehicle is unlocked. The available settings are “0 sec”, “30 sec”, “60 sec”, and “90 sec”.
Headlights with Wipers This setting will turn the headlights on when the wipers are activated.
Daytime Running Lights This setting will allow you to turn the Daytime Running Lights on or off.
Flash Lights With Lock This setting will allow you to turn on or off the flashing of the lights when the Lock button
is pushed on the key fob. Available settings are “On” and “Off”.
Auto Dim High Beams This setting will allow you to turn the Auto Dim High Beams on or off.
23_LD_OM_EN_USC_t.book Page 120
Page 123 of 292
MULTIMEDIA121
Doors & Locks
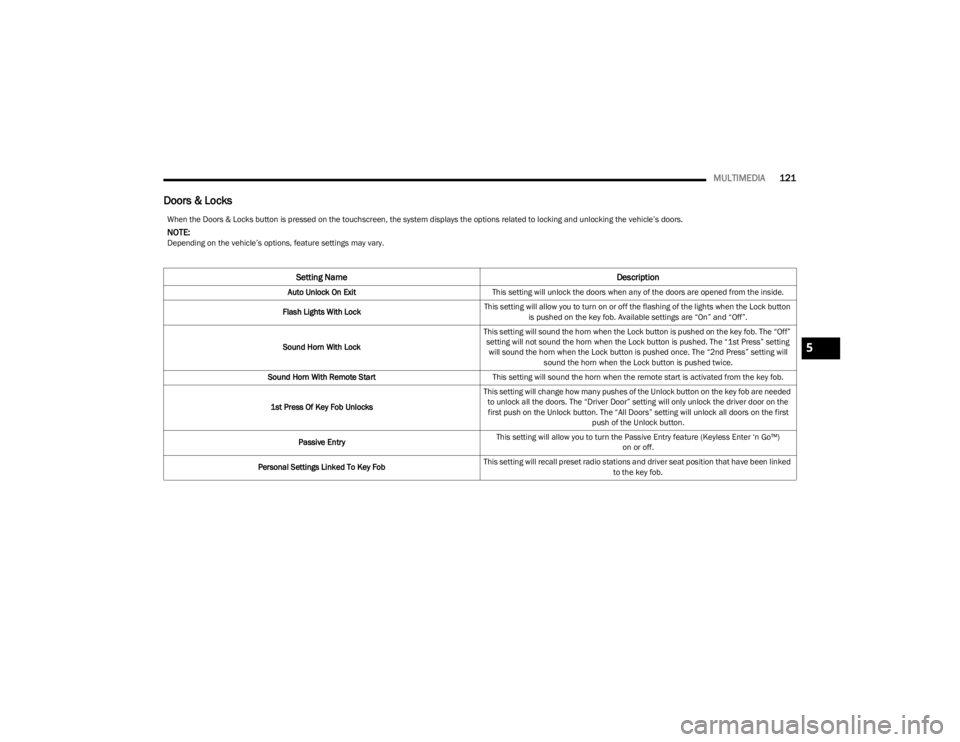
When the Doors & Locks button is pressed on the touchscreen, the system displays the options related to locking and unlocking the vehicle’s doors.
NOTE:Depending on the vehicle’s options, feature settings may vary.
Setting Name Description
Auto Unlock On ExitThis setting will unlock the doors when any of the doors are opened from the inside.
Flash Lights With Lock This setting will allow you to turn on or off the flashing of the lights when the Lock button
is pushed on the key fob. Available settings are “On” and “Off”.
Sound Horn With Lock This setting will sound the horn when the Lock button is pushed on the key fob. The “Off”
setting will not sound the horn when the Lock button is pushed. The “1st Press” setting will sound the horn when the Lock button is pushed once. The “2nd Press” setting will sound the horn when the Lock button is pushed twice.
Sound Horn With Remote Start This setting will sound the horn when the remote start is activated from the key fob.
1st Press Of Key Fob Unlocks This setting will change how many pushes of the Unlock button on the key fob are needed
to unlock all the doors. The “Driver Door” setting will only unlock the driver door on the first push on the Unlock button. The “All Doors” setting will unlock all doors on the first push of the Unlock button.
Passive Entry This setting will allow you to turn the Passive Entry feature (Keyless Enter ‘n Go™)
on or off.
Personal Settings Linked To Key Fob This setting will recall preset radio stations and driver seat position that have been linked
to the key fob.
5
23_LD_OM_EN_USC_t.book Page 121
Page 124 of 292
122MULTIMEDIA
Seats & Comfort
Key Off Options
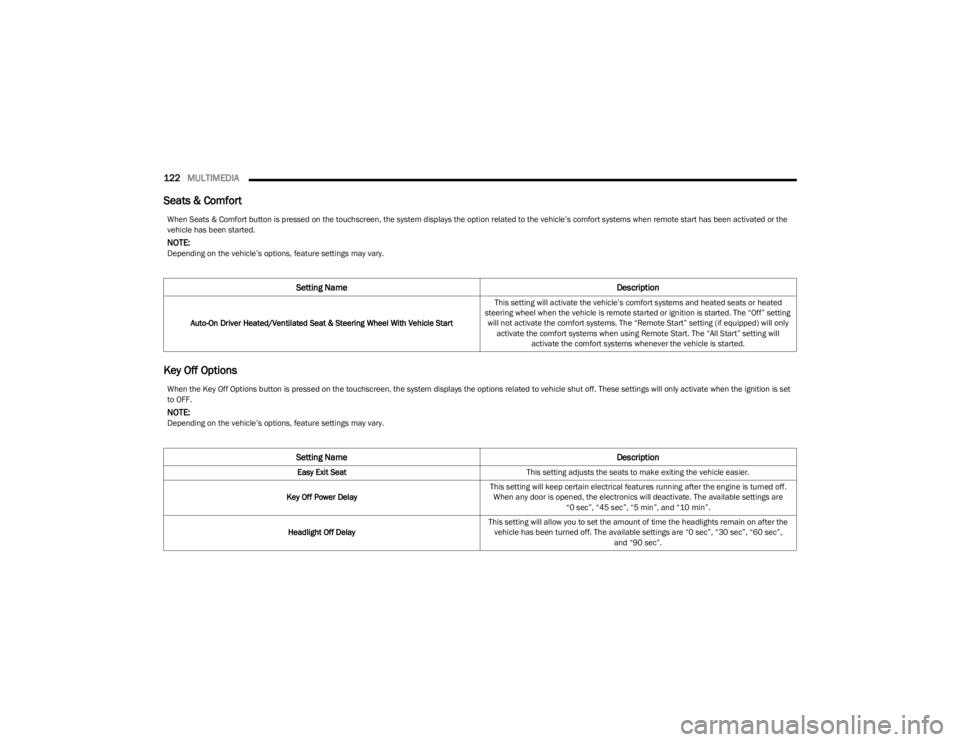
When Seats & Comfort button is pressed on the touchscreen, the system displays the option related to the vehicle’s comfort systems when remote start has been activated or the
vehicle has been started.
NOTE:Depending on the vehicle’s options, feature settings may vary.
Setting Name Description
Auto-On Driver Heated/Ventilated Seat & Steering Wheel With Vehicle Start This setting will activate the vehicle’s comfort systems and heated seats or heated
steering wheel when the vehicle is remote started or ignition is started. The “Off” setting will not activate the comfort systems. The “Remote Start” setting (if equipped) will only activate the comfort systems when using Remote Start. The “All Start” setting will activate the comfort systems whenever the vehicle is started.
When the Key Off Options button is pressed on the touchscreen, the system displays the options related to vehicle shut off. These settings will only activate when the ignition is set
to OFF.
NOTE:Depending on the vehicle’s options, feature settings may vary.
Setting Name Description
Easy Exit SeatThis setting adjusts the seats to make exiting the vehicle easier.
Key Off Power Delay This setting will keep certain electrical features running after the engine is turned off.
When any door is opened, the electronics will deactivate. The available settings are “0 sec”, “45 sec”, “5 min”, and “10 min”.
Headlight Off Delay This setting will allow you to set the amount of time the headlights remain on after the
vehicle has been turned off. The available settings are “0 sec”, “30 sec”, “60 sec”, and “90 sec”.
23_LD_OM_EN_USC_t.book Page 122
Page 172 of 292
170SAFETY
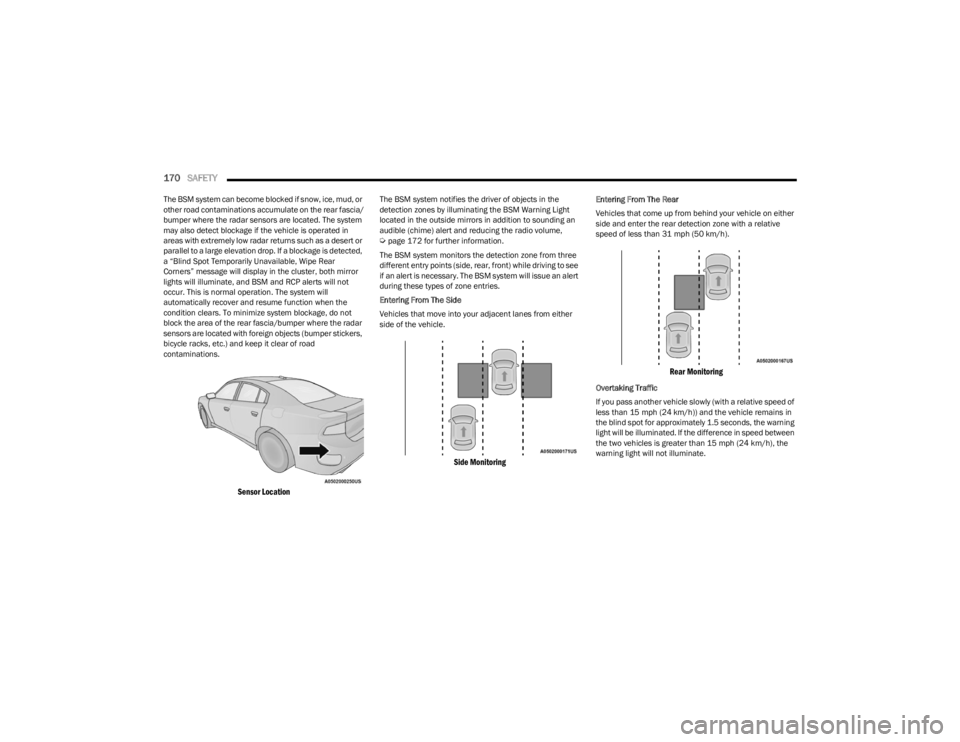
The BSM system can become blocked if snow, ice, mud, or
other road contaminations accumulate on the rear fascia/
bumper where the radar sensors are located. The system
may also detect blockage if the vehicle is operated in
areas with extremely low radar returns such as a desert or
parallel to a large elevation drop. If a blockage is detected,
a “Blind Spot Temporarily Unavailable, Wipe Rear
Corners” message will display in the cluster, both mirror
lights will illuminate, and BSM and RCP alerts will not
occur. This is normal operation. The system will
automatically recover and resume function when the
condition clears. To minimize system blockage, do not
block the area of the rear fascia/bumper where the radar
sensors are located with foreign objects (bumper stickers,
bicycle racks, etc.) and keep it clear of road
contaminations.
Sensor Location
The BSM system notifies the driver of objects in the
detection zones by illuminating the BSM Warning Light
located in the outside mirrors in addition to sounding an
audible (chime) alert and reducing the radio volume,
Úpage 172 for further information.
The BSM system monitors the detection zone from three
different entry points (side, rear, front) while driving to see
if an alert is necessary. The BSM system will issue an alert
during these types of zone entries.
Entering From The Side
Vehicles that move into your adjacent lanes from either
side of the vehicle.
Side Monitoring
Entering From The Rear
Vehicles that come up from behind your vehicle on either
side and enter the rear detection zone with a relative
speed of less than 31 mph (50 km/h).
Rear Monitoring
Overtaking Traffic
If you pass another vehicle slowly (with a relative speed of
less than 15 mph (24 km/h)) and the vehicle remains in the blind spot for approximately 1.5 seconds, the warning
light will be illuminated. If the difference in speed between
the two vehicles is greater than 15 mph (24 km/h), the
warning light will not illuminate.
23_LD_OM_EN_USC_t.book Page 170