2023 DODGE CHARGER sport mode
[x] Cancel search: sport modePage 169 of 292

SAFETY167
(Continued)
NOTE:
For vehicles with multiple partial ESC modes, the push
and release of the button will toggle the ESC modes.
Multiple attempts may be required to return to
"ESC On" mode.
Trailer Sway Control (TSC) is disabled when the
ESC system is in the “Partial Off” mode.
If Equipped — "ESC Sport" and "ESC Track" are
ESC “Partial Off” mode(s).
“Full Off” – If Equipped
This mode is intended for off-highway or off-road use only
and should not be used on any public roadways. In this
mode, TCS and ESC features are turned off. To enter the
“Full Off” mode, push and hold the ESC OFF button for five
seconds while the vehicle is stopped with the engine
running. After five seconds, a chime will sound, the ESC
OFF Indicator Light will illuminate, and the ESC OFF
message will display in the instrument cluster. To turn ESC
on again, momentarily push the ESC OFF button.
ESC Activation/Malfunction Indicator Light
And ESC OFF Indicator Light
The ESC Activation/Malfunction Indicator Light
in the instrument cluster will come on when the
ignition is placed in the ON/RUN mode. It
should go out with the engine running. If the
ESC Activation/Malfunction Indicator Light comes on
continuously with the engine running, a malfunction has
been detected in the ESC system. If this light remains on
after several ignition cycles, and the vehicle has been
driven several miles (kilometers) at speeds greater than
30 mph (48 km/h), see an authorized dealer as soon as possible to have the problem diagnosed and corrected.
The ESC Activation/Malfunction Indicator Light (located in
the instrument cluster) starts to flash as soon as the tires
lose traction and the ESC system becomes active. The ESC
Activation/Malfunction Indicator Light also flashes when
TCS is active. If the ESC Activation/Malfunction Indicator Light begins to
flash during acceleration, ease up on the accelerator and
apply as little throttle as possible. Be sure to adapt your
speed and driving to the prevailing road conditions.
The ESC OFF Indicator Light indicates the
customer has elected to have the Electronic
Stability Control (ESC) in a reduced mode.
NOTE:
The ESC Activation/Malfunction Indicator Light and the
ESC OFF Indicator Light come on momentarily each
time the ignition is placed in the ON mode.
Each time the ignition is placed in the ON mode, the
ESC system will be on even if it was turned off previ -
ously.
The ESC system will make buzzing or clicking sounds
when it is active. This is normal; the sounds will stop
when ESC becomes inactive following the maneuver
that caused the ESC activation.
Hill Start Assist (HSA)
HSA is designed to mitigate roll back from a complete stop
while on an incline. If the driver releases the brake while
stopped on an incline, HSA will continue to hold the brake
pressure for a short period. If the driver does not apply the
throttle before this time expires, the system will release
brake pressure and the vehicle will roll down the hill as
normal.WARNING!
In the ESC “Full Off” mode, the engine torque reduc -
tion and stability features are disabled. Therefore,
enhanced vehicle stability offered by the ESC system
is unavailable. In an emergency evasive maneuver,
the ESC system will not engage to assist in main -
taining stability. ESC “Full Off” mode is intended for
off-highway or off-road use only.
The Electronic Stability Control (ESC) cannot prevent
the natural laws of physics from acting on the
vehicle, nor can it increase the traction afforded by
prevailing road conditions. ESC cannot prevent all
accidents, including those resulting from excessive
speed in turns, driving on very slippery surfaces, or
hydroplaning. ESC also cannot prevent collisions.
WARNING!
6
23_LD_OM_EN_USC_t.book Page 167
Page 179 of 292

SAFETY177
Beginning with the next ignition cycle, the TPMS will no
longer chime or display the “Service Tire Pressure System”
message in the instrument cluster but dashes (--) will
remain in place of the pressure values.
To reactivate the TPMS, replace all four wheel and tire
assemblies (road tires) with tires equipped with TPMS
sensors. Then, drive the vehicle for up to 20 minutes
above 15 mph (24 km/h). The TPMS will chime, the TPMS
Warning Light will flash on and off for 75 seconds and then
turn off. The instrument cluster will display the “Service
Tire Pressure System” message and then display pressure
values in place of the dashes. On the next ignition cycle
the "Service Tire Pressure System" message will no longer
be displayed as long as no system fault exists.
OCCUPANT RESTRAINT SYSTEMS
Some of the most important safety features in your vehicle
are the restraint systems:
OCCUPANT RESTRAINT SYSTEMS
F
EATURES
Seat Belt Systems
Supplemental Restraint Systems (SRS) Air Bags
Child Restraints
Some of the safety features described in this section may
be standard equipment on some models, or may be
optional equipment on others. If you are not sure, ask an
authorized dealer.
IMPORTANT SAFETY PRECAUTIONS
Please pay close attention to the information in this
section. It tells you how to use your restraint system
properly, to keep you and your passengers as safe as
possible.
Here are some simple steps you can take to minimize the
risk of harm from a deploying air bag:
1. Children 12 years old and under should always ride buckled up in the rear seat of a vehicle with a rear
seat.
2. A child who is not big enough to wear the vehicle seat belt properly must be secured in the appropriate child
restraint or belt-positioning booster seat in a rear
seating position
Úpage 190.
3. If a child from 2 to 12 years old (not in a rear-facing child restraint) must ride in the front passenger seat,
move the seat as far back as possible and use the
proper child restraint
Úpage 190.
4. Never allow children to slide the shoulder belt behind them or under their arm.
5. You should read the instructions provided with your child restraint to make sure that you are using it
properly. 6. All occupants should always wear their lap and
shoulder belts properly.
7. The driver and front passenger seats should be moved back as far as practical to allow the front air
bags room to inflate.
8. Do not lean against the door or window. If your vehicle has side air bags, and deployment occurs, the side air
bags will inflate forcefully into the space between
occupants and the door and occupants could be
injured.
9. If the air bag system in this vehicle needs to be modified to accommodate a disabled person, see
Úpage 273 for customer service contact
information.
WARNING!
Never place a rear-facing child restraint in front of an
air bag. A deploying passenger front air bag can
cause death or serious injury to a child 12 years or
younger, including a child in a rear-facing child
restraint.
Never install a rear-facing child restraint in the front
seat of a vehicle. Only use a rear-facing child
restraint in the rear seat. If the vehicle does not have
a rear seat, do not transport a rear-facing child
restraint in that vehicle.6
23_LD_OM_EN_USC_t.book Page 177
Page 185 of 292

SAFETY183
How To Engage The Automatic Locking Mode
1. Buckle the combination lap and shoulder belt.
2. Grab the shoulder portion and pull downward until
the entire seat belt is extracted.
3. Allow the seat belt to retract. As the seat belt retracts, you will hear a clicking sound. This indicates the seat
belt is now in the Automatic Locking Mode.
How To Disengage The Automatic Locking Mode
Unbuckle the combination lap/shoulder belt and allow it
to retract completely to disengage the Automatic Locking
Mode and activate the vehicle sensitive (emergency)
locking mode.
SUPPLEMENTAL RESTRAINT SYSTEMS
(SRS)
Some of the safety features described in this section may
be standard equipment on some models, or may be
optional equipment on others. If you are not sure, ask an
authorized dealer.
The air bag system must be ready to protect you in a
collision. The Occupant Restraint Controller (ORC)
monitors the internal circuits and interconnecting wiring
associated with the electrical Air Bag System Components. Your vehicle may be equipped with the
following Air Bag System Components:
Air Bag System Components
Occupant Restraint Controller (ORC)
Air Bag Warning Light
Steering Wheel and Column
Instrument Panel
Knee Impact Bolsters
Driver and Front Passenger Air Bags
Seat Belt Buckle Switch
Supplemental Side Air Bags
Supplemental Knee Air Bags
Front and Side Impact Sensors
Seat Belt Pretensioners
Seat Track Position Sensors
Air Bag Warning Light
The Occupant Restraint Controller (ORC)
monitors the readiness of the electronic parts
of the air bag system whenever the ignition
switch is in the START or ON/RUN position.
If the ignition switch is in the OFF position or in the ACC
position, the air bag system is not on and the air bags will
not inflate.
The ORC contains a backup power supply system that may
deploy the air bag system even if the battery loses power
or it becomes disconnected prior to deployment.
WARNING!
Never place a rear-facing child restraint in front of an
air bag. A deploying passenger front air bag can
cause death or serious injury to a child 12 years or
younger, including a child in a rear-facing child
restraint.
Never install a rear-facing child restraint in the front
seat of a vehicle. Only use a rear-facing child
restraint in the rear seat. If the vehicle does not have
a rear seat, do not transport a rear-facing child
restraint in that vehicle.
WARNING!
The seat belt assembly must be replaced if the
switchable Automatic Locking Retractor (ALR)
feature or any other seat belt function is not working
properly when checked according to the procedures
in the Service Manual.
Failure to replace the seat belt assembly could
increase the risk of injury in collisions.
Do not use the Automatic Locking Mode to restrain
occupants who are wearing the seat belt or children
who are using booster seats. The locked mode is only
used to install rear-facing or forward-facing child
restraints that have a harness for restraining the
child.
6
23_LD_OM_EN_USC_t.book Page 183
Page 212 of 292

210IN CASE OF EMERGENCY
(Continued)
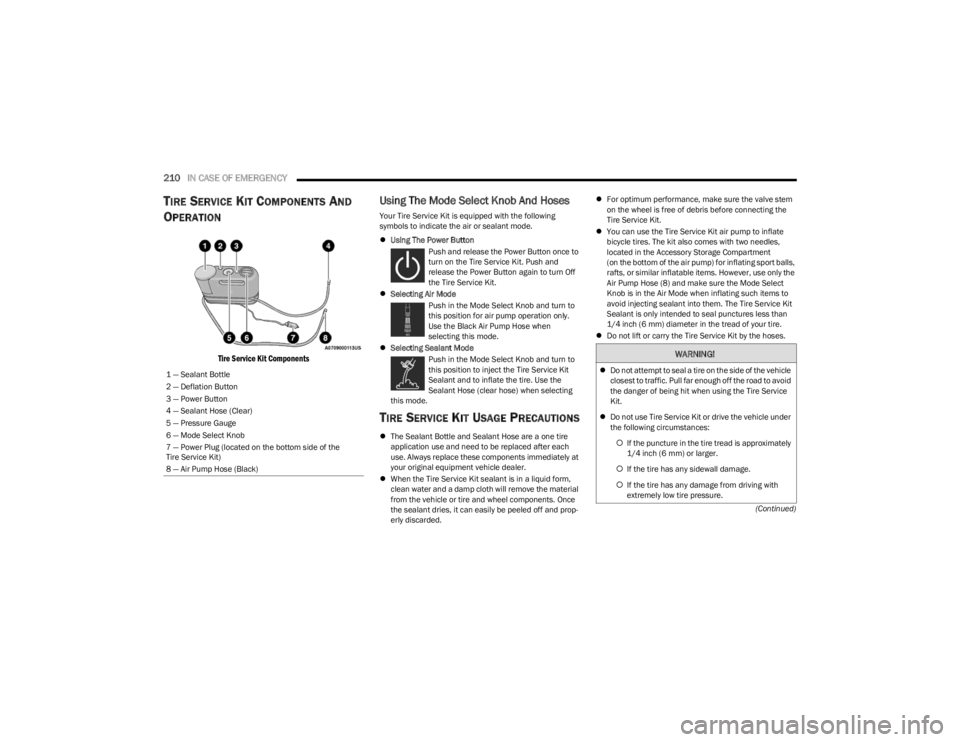
TIRE SERVICE KIT COMPONENTS AND
O
PERATION
Tire Service Kit Components
Using The Mode Select Knob And Hoses
Your Tire Service Kit is equipped with the following
symbols to indicate the air or sealant mode.
Using The Power Button
Push and release the Power Button once to
turn on the Tire Service Kit. Push and
release the Power Button again to turn Off
the Tire Service Kit.
Selecting Air Mode
Push in the Mode Select Knob and turn to
this position for air pump operation only.
Use the Black Air Pump Hose when
selecting this mode.
Selecting Sealant Mode
Push in the Mode Select Knob and turn to
this position to inject the Tire Service Kit
Sealant and to inflate the tire. Use the
Sealant Hose (clear hose) when selecting
this mode.
TIRE SERVICE KIT USAGE PRECAUTIONS
The Sealant Bottle and Sealant Hose are a one tire
application use and need to be replaced after each
use. Always replace these components immediately at
your original equipment vehicle dealer.
When the Tire Service Kit sealant is in a liquid form,
clean water and a damp cloth will remove the material
from the vehicle or tire and wheel components. Once
the sealant dries, it can easily be peeled off and prop -
erly discarded.
For optimum performance, make sure the valve stem
on the wheel is free of debris before connecting the
Tire Service Kit.
You can use the Tire Service Kit air pump to inflate
bicycle tires. The kit also comes with two needles,
located in the Accessory Storage Compartment
(on the bottom of the air pump) for inflating sport balls,
rafts, or similar inflatable items. However, use only the
Air Pump Hose (8) and make sure the Mode Select
Knob is in the Air Mode when inflating such items to
avoid injecting sealant into them. The Tire Service Kit
Sealant is only intended to seal punctures less than
1/4 inch (6 mm) diameter in the tread of your tire.
Do not lift or carry the Tire Service Kit by the hoses.
1 — Sealant Bottle
2 — Deflation Button
3 — Power Button
4 — Sealant Hose (Clear)
5 — Pressure Gauge
6 — Mode Select Knob
7 — Power Plug (located on the bottom side of the
Tire Service Kit)
8 — Air Pump Hose (Black)
WARNING!
Do not attempt to seal a tire on the side of the vehicle
closest to traffic. Pull far enough off the road to avoid
the danger of being hit when using the Tire Service
Kit.
Do not use Tire Service Kit or drive the vehicle under
the following circumstances:
If the puncture in the tire tread is approximately
1/4 inch (6 mm) or larger.
If the tire has any sidewall damage.
If the tire has any damage from driving with
extremely low tire pressure.
23_LD_OM_EN_USC_t.book Page 210
Page 286 of 292

284
Safety, Exhaust Gas ..................................................... 201
Satellite Radio .............................................................. 131
Saved Radio Stations .................................................. 135
Schedule, Maintenance...................................... 221
, 222
Seat Belt Reminder.........................................................70 Seat Belts ............................................................ 178
, 199
Adjustable Shoulder Belt........................................ 181
Adjustable Upper Shoulder Anchorage ................. 181
Adjustable Upper Shoulder Belt Anchorage.......... 181
Automatic Locking Retractor (ALR)........................ 182
Child Restraints ...................................................... 190
Energy Management Feature ................................ 182
Extender .................................................................. 181
Front Seat....................................................... 178
, 180
Inspection................................................................ 199 Lap/Shoulder Belt Operation................................. 180
Lap/Shoulder Belt Untwisting ................................ 180
Lap/Shoulder Belts ................................................ 178
Operating Instructions ............................................ 180
Pregnant Women .................................................... 182
Pretensioners.......................................................... 182
Rear Seat ................................................................ 178Reminder................................................................. 178
Seat Belt Extender .................................................. 181Seat Belt Pretensioner ........................................... 182Untwisting Procedure ............................................. 180
Seat Belts Maintenance .............................................. 266
Seats .................................................................. 28
, 30, 31
Adjustment ..........................................................28, 30
Easy Entry ...................................................................31
Head Restraints .........................................................33
Heated ........................................................................31 Height Adjustment..................................................... 30
Power ......................................................................... 30
Rear Folding........................................................ 28
, 29
Seatback Release .............................................. 28, 29
Tilting ................................................................... 28, 30
Vented ........................................................................ 32
Ventilated ................................................................... 32
Security Alarm ................................................... 18
, 19, 70
Arm The System......................................................... 19
Selection Of Coolant (Antifreeze)................................. 271
Sentry Key (Immobilizer) ................................................ 15
Service Assistance........................................................ 273
Service Contract ...........................................................275
Service Manuals ...........................................................276
Settings, Audio .............................................................. 136
Shifting ............................................................................ 80 Automatic Transmission .................................... 80
, 81
Shoulder Belts .............................................................. 178
Side View Mirror Adjustment ......................................... 35
Signals, Turn ................................................... 43
, 74, 201
Sirius Satellite Radio ....................................................131 Favorites .................................................................. 134
Replay ...................................................................... 133
SiriusXM Satellite Radio Browse in SXM......................................................... 134
Favorites .................................................................. 134
Replay ...................................................................... 133
Snow Chains (Tire Chains) ...........................................262
Snow Tires .....................................................................259
Spare Tires ................................................. 206
, 259, 260
Specifications Fuel (Gasoline)......................................................... 271
Oil .............................................................................271 Speed Control
Accel/Decel ............................................................... 86
Accel/Decel (ACC Only) ............................................. 90
Cancel ........................................................................ 86
Resume...................................................................... 86
Set .............................................................................. 86
Speed Control (Cruise Control) ........................ 85
, 86, 87
Sport Mode ..................................................................... 84 Starting............................................................................ 76 Automatic Transmission ........................................... 76
Button ........................................................................ 15
Cold Weather............................................................. 78
Engine Fails To Start ................................................. 78
Remote ...................................................................... 16
Starting And Operating................................................... 76
Starting Procedures ....................................................... 76 Steering ........................................................................... 24 Column Lock.............................................................. 24
Power ......................................................................... 85
Tilt Column.......................................................... 24
, 25
Wheel, Heated ........................................................... 25
Wheel, Tilt ........................................................... 24
, 25
Steering Wheel Audio Controls .................................... 129
Steering Wheel Mounted Sound System .................... 129
Storage ................................................................... 52
, 264
Storage, Vehicle..................................................... 52, 264
Store Radio Presets ..................................................... 135
Storing Your Vehicle ..................................................... 264
Stuck, Freeing............................................................... 218
Sun Roof .................................................................. 57
, 58
Sunglasses Storage ....................................................... 53 Supplemental Restraint System – Air Bag ................. 184
Symbol Glossary ................................................................8
Synthetic Engine Oil ..................................................... 229
System, Remote Starting ............................................... 16
23_LD_OM_EN_USC_t.book Page 284