2023 DODGE CHALLENGER brake
[x] Cancel search: brakePage 230 of 300

228SERVICING AND MAINTENANCE
ENGINE COMPARTMENT
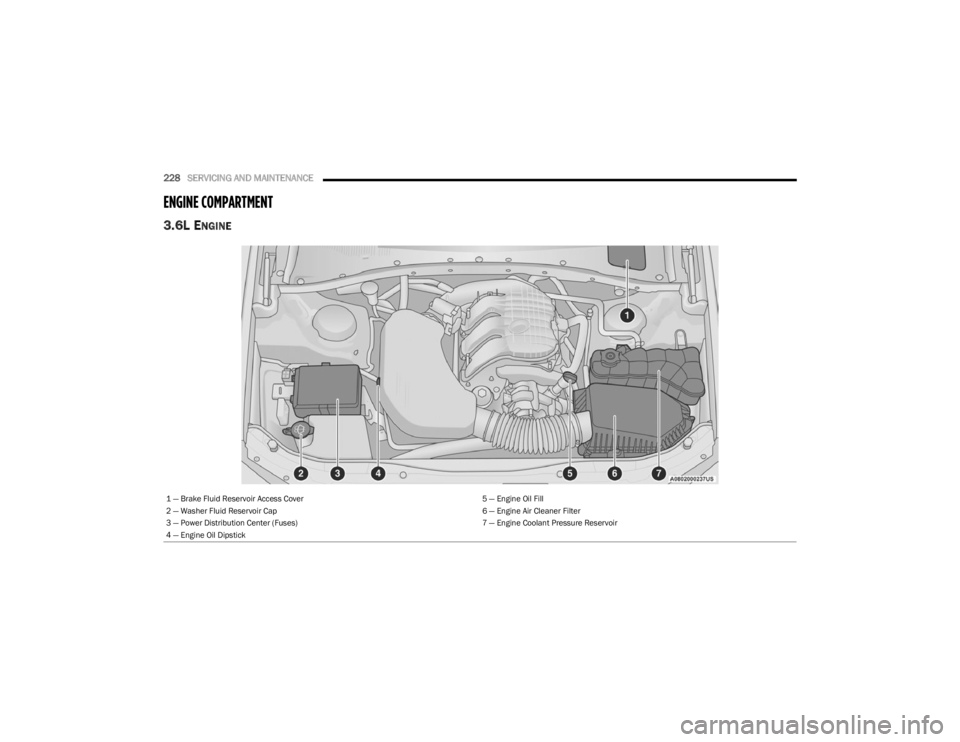
3.6L ENGINE
1 — Brake Fluid Reservoir Access Cover 5 — Engine Oil Fill
2 — Washer Fluid Reservoir Cap 6 — Engine Air Cleaner Filter
3 — Power Distribution Center (Fuses) 7 — Engine Coolant Pressure Reservoir
4 — Engine Oil Dipstick
23_LA_OM_EN_USC_t.book Page 228
Page 231 of 300

SERVICING AND MAINTENANCE229
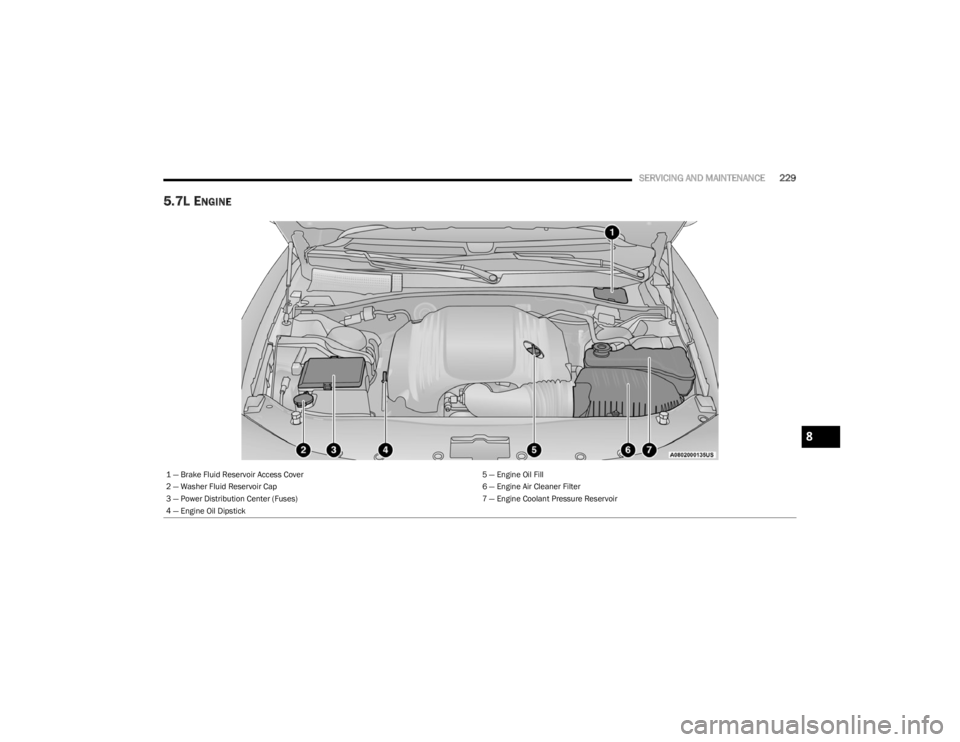
5.7L ENGINE
1 — Brake Fluid Reservoir Access Cover 5 — Engine Oil Fill
2 — Washer Fluid Reservoir Cap 6 — Engine Air Cleaner Filter
3 — Power Distribution Center (Fuses) 7 — Engine Coolant Pressure Reservoir
4 — Engine Oil Dipstick
8
23_LA_OM_EN_USC_t.book Page 229
Page 242 of 300

240SERVICING AND MAINTENANCE
BRAKE SYSTEM
In order to ensure brake system performance, all brake
system components should be inspected periodically
Úpage 224.
Fluid Level Check — Brake Master Cylinder
Check the fluid level in the master cylinder immediately if
the Brake System Warning Light indicates system failure.
Check the fluid level in the master cylinder when
performing underhood services.
Clean the top of the master cylinder area before removing
the cap. Add fluid to bring the level up to the top of the
“FULL” mark on the side of the master cylinder reservoir.
Overfilling of fluid is not recommended because it may
cause leaking in the system.
Add enough fluid to bring the level up to the requirements
described on the brake fluid reservoir. With disc brakes,
fluid level can be expected to fall as the brake pads wear.
However, low fluid level may be caused by a leak and a
checkup may be needed. Use only brake fluid that has been recommended by the
manufacturer, and has been kept in a tightly closed
container to avoid contamination from foreign matter or
moisture
Úpage 278.
CLUTCH HYDRAULIC SYSTEM — MANUAL
T
RANSMISSION (IF EQUIPPED)
The clutch hydraulic system is fed by a segregated volume
of fluid within the brake system master cylinder reservoir.
In the event of leakage or wear, use only the
manufacturer's recommended brake fluid
Úpage 278.
MANUAL TRANSMISSION — IF EQUIPPED
Fluid Level Check
Check the fluid level by removing the fill plug on the left
side of the transmission. The fluid level should be
1/4 inch (6.4mm) below the bottom of the fill hole.
Add fluid, if necessary, to maintain the proper level
Úpage 278.
Change Transmission Fluid
If contaminated with water, change the fluid immediately.
See an authorized dealer for service.
For the proper maintenance intervals
Úpage 224.
WARNING!
Riding the brakes can lead to brake failure and possibly
a collision. Driving with your foot resting or riding on the
brake pedal can result in abnormally high brake
temperatures, excessive lining wear, and possible brake
damage. You would not have your full braking capacity
in an emergency.
WARNING!
Use only manufacturer's recommended brake fluid Úpage 278. Using the wrong type of brake fluid can
severely damage your brake system and/or impair its
performance. The proper type of brake fluid for your
vehicle is also identified on the original factory
installed hydraulic master cylinder reservoir.
To avoid contamination from foreign matter or mois -
ture, use only new brake fluid or fluid that has been
in a tightly closed container. Keep the master
cylinder reservoir cap secured at all times. Brake
fluid in a open container absorbs moisture from the
air resulting in a lower boiling point. This may cause
it to boil unexpectedly during hard or prolonged
braking, resulting in sudden brake failure. This could
result in a collision.
Overfilling the brake fluid reservoir can result in
spilling brake fluid on hot engine parts, causing the
brake fluid to catch fire. Brake fluid can also damage
painted and vinyl surfaces, care should be taken to
avoid its contact with these surfaces.
Do not allow petroleum based fluid to contaminate
the brake fluid. Brake seal components could be
damaged, causing partial or complete brake failure.
This could result in a collision.
CAUTION!
Using a transmission fluid other than the
manufacturer's recommended fluid may cause
deterioration in transmission shift quality and/or
damage to the transmission
Úpage 278.
23_LA_OM_EN_USC_t.book Page 240
Page 246 of 300

244SERVICING AND MAINTENANCE
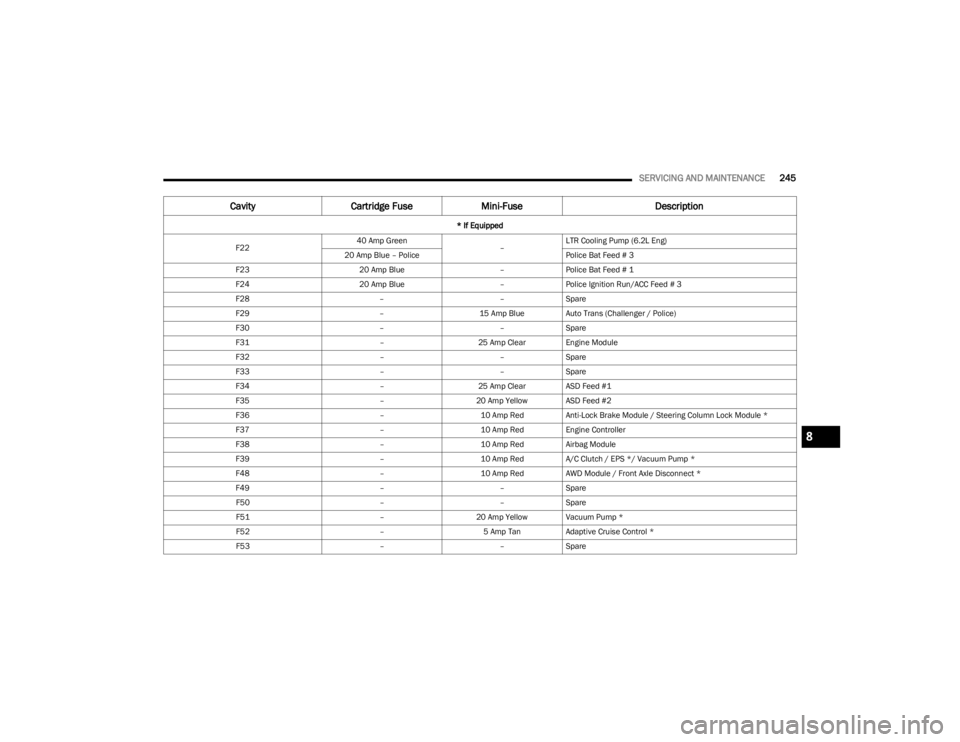
CavityCartridge Fuse Mini-Fuse Description
* If Equipped
F01 ––Spare
F02 40 Amp Green
–Radiator Fan #1 – (Non 6.2L & Non – Police)
50 Amp Red Radiator Fan (6.2L & Police)
F03 50 Amp Red –Electric Power Steering #1 *
F04 30 Amp Pink –Starter
F05 40 Amp Green –Anti-Lock Brake
F06 30 Amp Pink –Anti-Lock Brake
F07 20 Amp Blue –Police Ignition Run / ACC #1
F08 20 Amp Blue –Police Ignition Run / ACC # 2
F09 –20 Amp Yellow All-Wheel Drive Module *
F10 –10 Amp RedIntrusion MOD (300) * / Under Hood Lamp – Police
F11 –20 Amp Yellow Horns
F12 –10 Amp RedAir Conditioning Clutch
F13 ––Spare
F14 ––Spare
F15 –20 Amp Yellow Left HID Headlamp *
F16 –20 Amp Yellow Right HID Headlamp *
F18 50 Amp Red –Radiator Fan #2
F19 50 Amp Red –Electric Power Steering #2 *
F20 30 Amp Pink –Wiper Motor
F21 30 Amp Pink
–Headlamp Washers *
20 Amp Blue – Police Police Bat Feed #2
23_LA_OM_EN_USC_t.book Page 244
Page 247 of 300

SERVICING AND MAINTENANCE245
F2240 Amp Green
–LTR Cooling Pump (6.2L Eng)
20 Amp Blue – Police Police Bat Feed # 3
F23 20 Amp Blue –Police Bat Feed # 1
F24 20 Amp Blue –Police Ignition Run/ACC Feed # 3
F28 ––Spare
F29 –15 Amp Blue Auto Trans (Challenger / Police)
F30 ––Spare
F31 –25 Amp Clear Engine Module
F32 ––Spare
F33 ––Spare
F34 –25 Amp Clear ASD Feed #1
F35 –20 Amp Yellow ASD Feed #2
F36 –10 Amp RedAnti-Lock Brake Module / Steering Column Lock Module *
F37 –10 Amp RedEngine Controller
F38 –10 Amp RedAirbag Module
F39 –10 Amp RedA/C Clutch / EPS */ Vacuum Pump *
F48 –10 Amp RedAWD Module / Front Axle Disconnect *
F49 ––Spare
F50 ––Spare
F51 –20 Amp Yellow Vacuum Pump *
F52 –5 Amp TanAdaptive Cruise Control *
F53 ––Spare
Cavity Cartridge Fuse Mini-Fuse Description
* If Equipped
8
23_LA_OM_EN_USC_t.book Page 245
Page 268 of 300

266SERVICING AND MAINTENANCE
Limited Use Spare — If Equipped
The limited use spare tire is for temporary emergency use
only. This tire is identified by a label located on the limited
use spare wheel. This label contains the driving limitations
for this spare. This tire may look like the original equipped
tire on the front or rear axle of your vehicle, but it is not.
Installation of this limited use spare tire affects vehicle
handling. Since it is not the same as your original
equipment tire, replace (or repair) the original equipment
tire and reinstall on the vehicle at the first opportunity.
WHEEL AND WHEEL TRIM CARE
All wheels and wheel trim, especially aluminum and
chrome plated wheels, should be cleaned regularly using
mild (neutral Ph) soap and water to maintain their luster
and to prevent corrosion. Wash wheels with the same
soap solution recommended for the body of the vehicle
and remember to always wash when the surfaces are not
hot to the touch.
Your wheels are susceptible to deterioration caused by
salt, sodium chloride, magnesium chloride, calcium
chloride, etc., and other road chemicals used to melt ice
or control dust on dirt roads. Use a soft cloth or sponge
and mild soap to wipe away promptly. Do not use harsh
chemicals or a stiff brush. They can damage the wheel’s
protective coating that helps keep them from corroding
and tarnishing.
When cleaning extremely dirty wheels including excessive
brake dust, care must be taken in the selection of tire and
wheel cleaning chemicals and equipment to prevent
damage to the wheels. Mopar® Wheel Treatment or Mopar® Chrome Cleaner or
their equivalent is recommended or select a non-abrasive,
non-acidic cleaner for aluminum or chrome wheels.
NOTE:If you intend parking or storing your vehicle for an
extended period after cleaning the wheels with wheel
cleaner, drive your vehicle and apply the brakes to remove
the water droplets from the brake components. This
activity will remove the red rust on the brake rotors and
prevent vehicle vibration when braking.
Dark Vapor Chrome, Black Satin Chrome, or Low Gloss
Clear Coat Wheels
WARNING!
Limited use spares are for emergency use only.
Installation of this limited use spare tire affects vehicle
handling. With this tire, do not drive more than the
speed listed on the limited use spare wheel. Keep
inflated to the cold tire inflation pressures listed on your
Tire And Loading Information Placard located on the
driver’s side B-pillar or the rear edge of the driver’s side
door. Replace (or repair) the original equipment tire at
the first opportunity and reinstall it on your vehicle.
Failure to do so could result in loss of vehicle control.
CAUTION!
Avoid products or automatic car washes that use acidic
solutions or strong alkaline additives or harsh brushes.
Many aftermarket wheel cleaners and automatic car
washes may damage the wheel's protective finish. Such
damage is not covered by the New Vehicle Limited
Warranty. Only car wash soap, Mopar® Wheel Cleaner
or equivalent is recommended.
CAUTION!
Do not use scouring pads, steel wool, a bristle brush,
metal polishes or oven cleaner. These products may
damage the wheel's protective finish. Such damage is
not covered by the New Vehicle Limited Warranty. Only
car wash soap, Mopar® Wheel Cleaner or equivalent is
recommended.
CAUTION!
If your vehicle is equipped with these specialty wheels,
DO NOT USE wheel cleaners, abrasives, or polishing
compounds. They will permanently damage this finish
and such damage is not covered by the New Vehicle
Limited Warranty. HAND WASH ONLY USING MILD SOAP
AND WATER WITH A SOFT CLOTH. Used on a regular
basis; this is all that is required to maintain this finish.
23_LA_OM_EN_USC_t.book Page 266
Page 275 of 300

273
TECHNICAL SPECIFICATIONS
VEHICLE IDENTIFICATION NUMBER (VIN)
The VIN is on the left front corner of the instrument panel.
The VIN is visible from outside of the vehicle through the
windshield.
Windshield VIN Location
NOTE:It is illegal to remove or alter the VIN.
BRAKE SYSTEM
Your vehicle is equipped with dual hydraulic brake
systems. If either of the two hydraulic systems lose normal
capability, the remaining system will still function. There
will be some loss of overall braking effectiveness.This may be evident by increased pedal travel during
application, greater pedal force required to slow or stop,
and potential activation of the Brake Warning Light.
In the event power assist is lost for any reason (for
example, repeated brake applications with the engine off),
the brakes will still function. The effort required to brake
the vehicle will be much greater than that required with
the power system operating.
WHEEL AND TIRE TORQUE SPECIFICATIONS
Proper lug nut/bolt torque is very important to ensure that
the wheel is properly mounted to the vehicle. Any time a
wheel has been removed and reinstalled on the vehicle,
the lug nuts/bolts should be torqued using a properly
calibrated torque wrench using a six-sided (hex) deep wall
socket.
TORQUE SPECIFICATIONS
**Use only authorized dealer recommended lug nuts/
bolts and clean or remove any dirt or oil before tightening.
Inspect the wheel mounting surface prior to mounting the
tire and remove any corrosion or loose particles.
Wheel Mounting Surface
Tighten the lug nuts/bolts in a star pattern until each
nut/bolt has been tightened twice. Ensure that the socket
is fully engaged on the lug nut/bolt (do not insert it
halfway).
NOTE:If in doubt about the correct tightness, have them checked
with a torque wrench by an authorized dealer or service
station.
Lug Nut/Bolt
Torque **Lug Nut/Bolt
Size Lug Nut/Bolt
Socket Size
130 ft-lb
(176 N·m) M14 x 1.50 22 mm
9
23_LA_OM_EN_USC_t.book Page 273
Page 281 of 300

TECHNICAL SPECIFICATIONS279
CHASSIS FLUIDS AND LUBRICANTS
CAUTION!
Mixing of engine coolant (antifreeze) other than specified Organic Additive Technology (OAT) engine coolant (antifreeze), may result in engine damage and may decrease corrosion
protection. Organic Additive Technology (OAT) engine coolant is different and should not be mixed with Hybrid Organic Additive Technology (HOAT) engine coolant (antifreeze) or
any “globally compatible” coolant (antifreeze). If a non-OAT engine coolant (antifreeze) is introduced into the cooling system in an emergency, the cooling system will need to be
drained, flushed, and refilled with fresh OAT coolant (conforming to MS.90032), by an authorized dealer as soon as possible.
Do not use water alone or alcohol-based engine coolant (antifreeze) products. Do not use additional rust inhibitors or antirust products, as they may not be compatible with the
radiator engine coolant and may plug the radiator.
This vehicle has not been designed for use with propylene glycol-based engine coolant (antifreeze). Use of propylene glycol-based engine coolant (antifreeze) is not recommended.
Component Fluid, Lubricant, or Genuine Part
Automatic Transmission – If Equipped
Use only Mopar® ZF 8 & 9 Speed ATF Automatic Transmission Fluid, or equivalent. Failure to use the correct fluid may
affect the function or performance of your transmission.
Manual Transmission – If Equipped We recommend using Mopar® ATF+4 Automatic Transmission Fluid.
Brake Master Cylinder We recommend using Mopar® DOT 3, SAE J1703.
Front Axle – AWD (If Equipped) We recommend using Mopar® Synthetic Gear Lubricant SAE 75W90 (API GL-5).
Rear Axle – 3.6L/5.7L Engine With
Automatic Transmission We recommend using Mopar® OD Synthetic Gear Lubricant SAE 75W85 (API GL-5).
Rear Axle – 5.7L Engine With Manual Transmission We recommend using Mopar® LSD Synthetic Gear Lubricant SAE 75W85 (API GL-5).
Transfer Case – AWD (If Equipped) We recommend using Mopar® Transfer Case Lubricant for Borg Warner 44–40.
9
23_LA_OM_EN_USC_t.book Page 279